24 WEEKEND PROJECTS FOR PETS
Doghouses, Cat Trees, Rabbit Hutches & More
 {alt=”Various pets including a dog, cat, rabbit, and birds, illustrating the types of projects in the book.”}
Contents
| Introduction 5 | Cat Sill Perch 92 |
|---|---|
| Tools & Materials7 | Pet Door98 |
| Cat Tree 16 | Cedar Scratching Post102 |
| Green Doghouse22 | Cat Steps 106 |
| Small Animal Cage32 | Oak Dog Bed112 |
| Rabbit Hutch38 | Snake Cage118 |
| Kennel Pergola44 | Aquarium Stand124 |
| Cat Climber 50 | Cat TV130 |
| Utility Doghouse54 | Birdhouse138 |
| Indoor Aviary 62 | Bird Feeder142 |
| Bird Perch70 | Bird Feeder Stand 148 |
| Ranch Doghouse 74 | Resources 154 |
| Dog Ramp 80 | Metric Conversions 155 |
| Litter Box Conceal 86 | Index |
 {alt=”Decorative image of a dog looking out from a doghouse and a cat on a cat tree.”}
Introduction
In recent years pet stores have changed from small mom-and-pop operations to big box superstores that peddle everything from guppies to automatic litter boxes to dog ramps to parrot perches. The advent of the pet store megamart has turned the special relationship between people and their companion animals into a multibillion-dollar industry. But unlike other retail markets that have undergone large-scale consolidation to a few big stores, the overall prices have not gone down as a result of economies of scale (if you’ve ever been charged $100 for a piece of thin foam wrapped in light fabric and called a dog bed, you’ll agree).
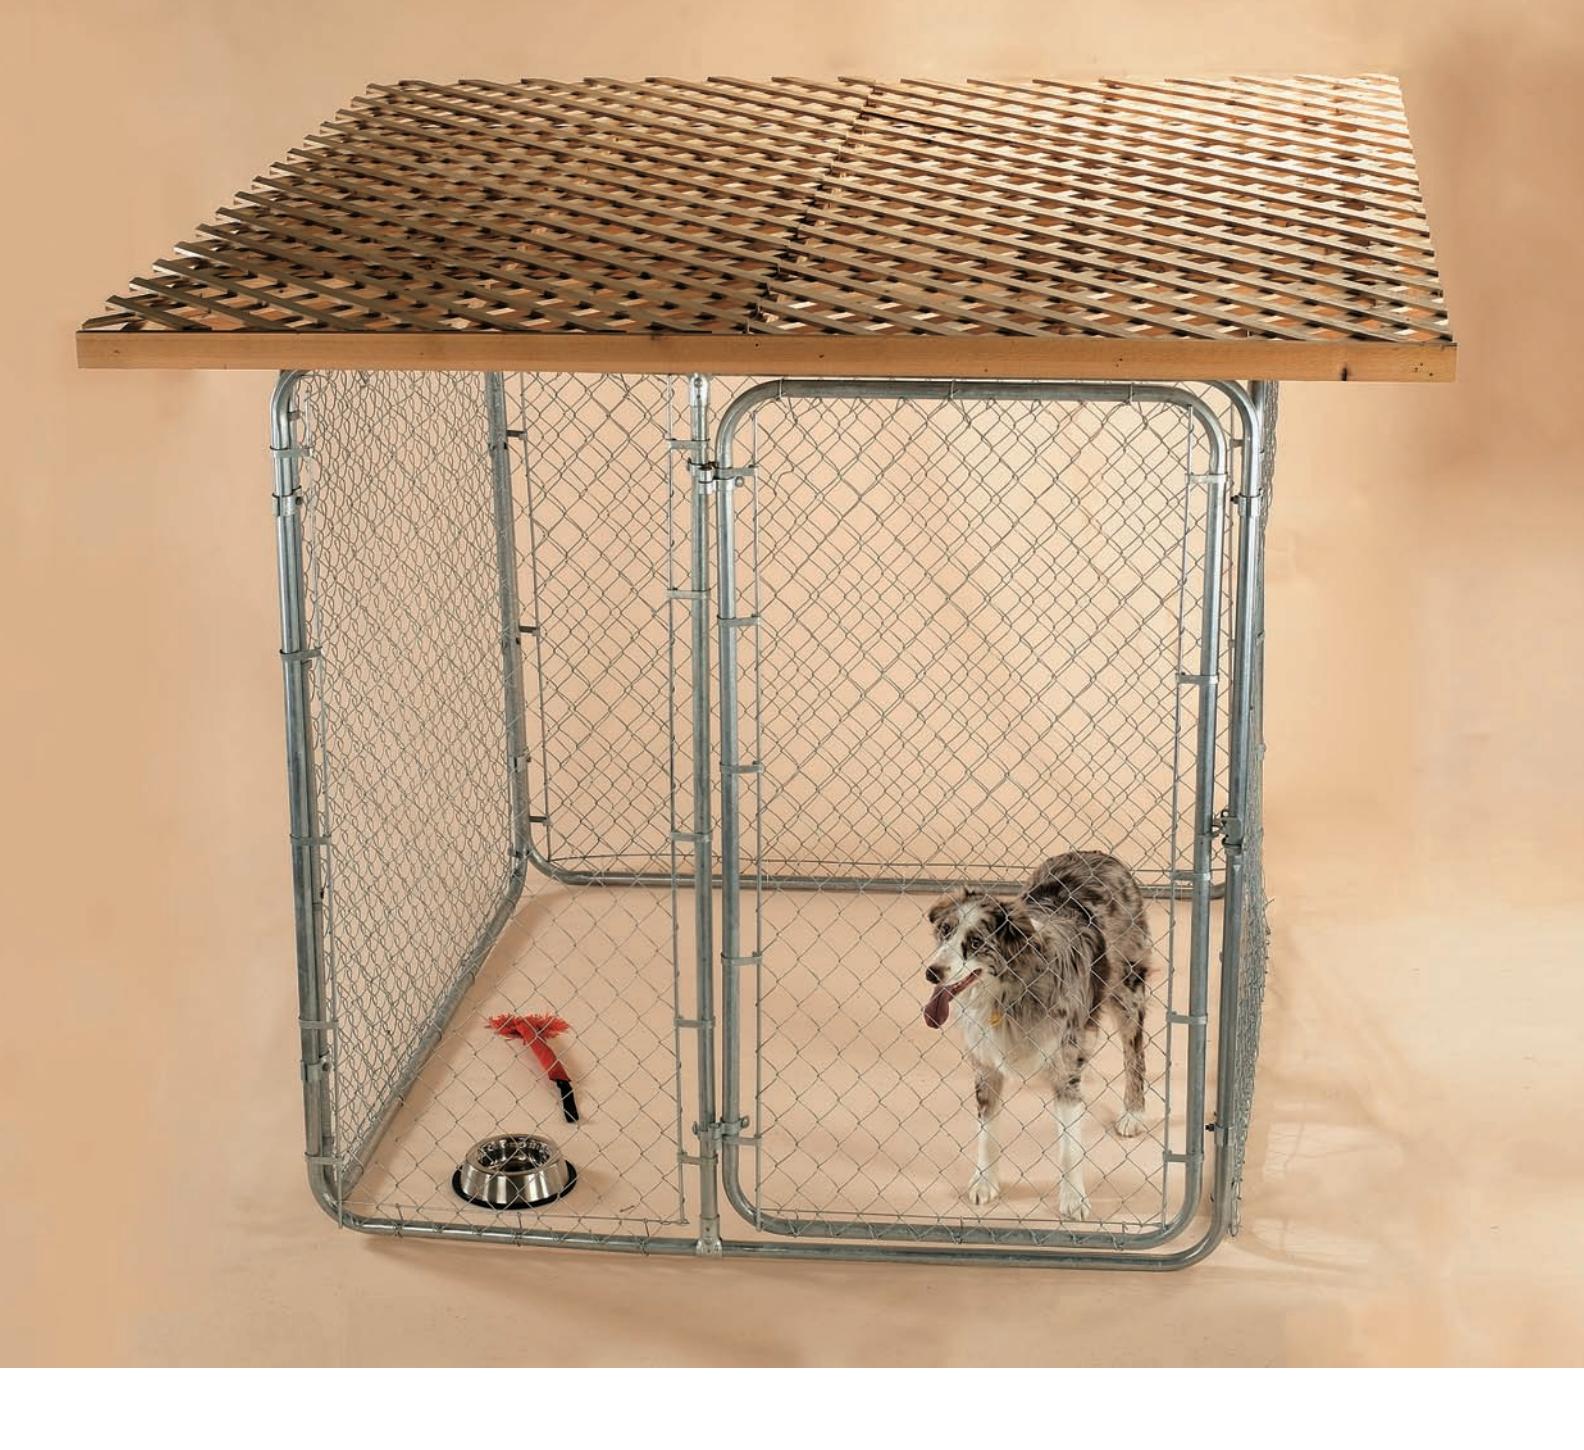
Furthermore, anybody who’s looked below the surface of pet store merchandise knows it’s not Chippendale furniture. A typical cat condo, for example, is made of strand board, 2x4s and carpet remnants. Expensive reptile enclosures are fiberboard and Plexiglas. Dog kennels are little more than chain link panels tied together with pipe clamps.
This book is the culmination of research into pet structures that anybody with a few basic tools can make. We’ve intentionally kept the plans simple, but not so plain that they look completely homemade. Most projects require only basic hand tools, a circular saw and a drill/driver. The beauty of pet accoutrements is they don’t have to be fancy. They just need to work well, be safe, look good, and make pets and their people happy.
Wherever possible, we’ve selected inexpensive commodity building materials—plywood, framing lumber, melamine-coated particleboard, hardware cloth—stuff that is common enough to keep the cost down. Yet we have specified oak, upholstery fabric and other “nice” materials for selected purposes where they’ll make a difference. While we’ve tried to keep costs and difficulty low, we haven’t settled for projects that are ugly or flimsy. To the contrary, we explain how to make sturdy, reliable products that in many cases outclass commercially available alternatives.
In short, we’ve done with these designs what you would have done if you had the time. We put careful thought and ample research into sizing, material safety, and functionality so you don’t have to. That doesn’t mean you can’t innovate. Need an aviary that fits under the stairs? Modify our plan. Want to upholster a windowsill cat perch to match your couch? You can. One of the beauties of making it yourself is you can build it to suit your needs, your house and (most importantly) your pet’s needs.
Perhaps the greatest pleasure of building pet structures is the creative outlet of the process. Cat climbers, thank goodness, aren’t toasters; the only limits to their final appearance are the boundaries of your imagination (and a few assorted laws of physics). We hope you’ll take the structural fundamentals of our plans and make the finished products your own and your pet’s. Building a doghouse may have practical and economic advantages, but it’s also an opportunity to let your inner artist shine.
Finally, let’s not forget whom this book is all about: your pet! Making something he or she can use, for many, is an act of love. It’s a way of giving something back to our furry, scaly, or feathery friends. We’ve taken these animals into our care and they’ve enriched our lives. Let us, with our hands, make their time with us enriching too.
 {alt=”Decorative image of a small dog sitting in a woven pet bed.”}
 {alt=”Decorative image of a hand holding a drill, next to a piece of wood, signifying DIY projects.”}
Tools & Materials for Pet Projects
Building homes and accessories for your pets can be accomplished with many of the same tools and building materials we use in our houses and landscapes. However, in some cases the fact that our pets are more inclined than our children to eat their house does impact the selection process. As with people-scale projects, you’ll select materials for your pet projects based on safety, ease of use, appearance, durability, and cost. And most of the projects in this book can be constructed with simple hand and power tools that you probably own already. On the following pages we review some common materials with these considerations in mind. After that, you’ll find a very brief refresher course on a few basic woodworking skills you’ll need for even the most simple pet projects. Then, we jump feet-first into the pool of pet projects.
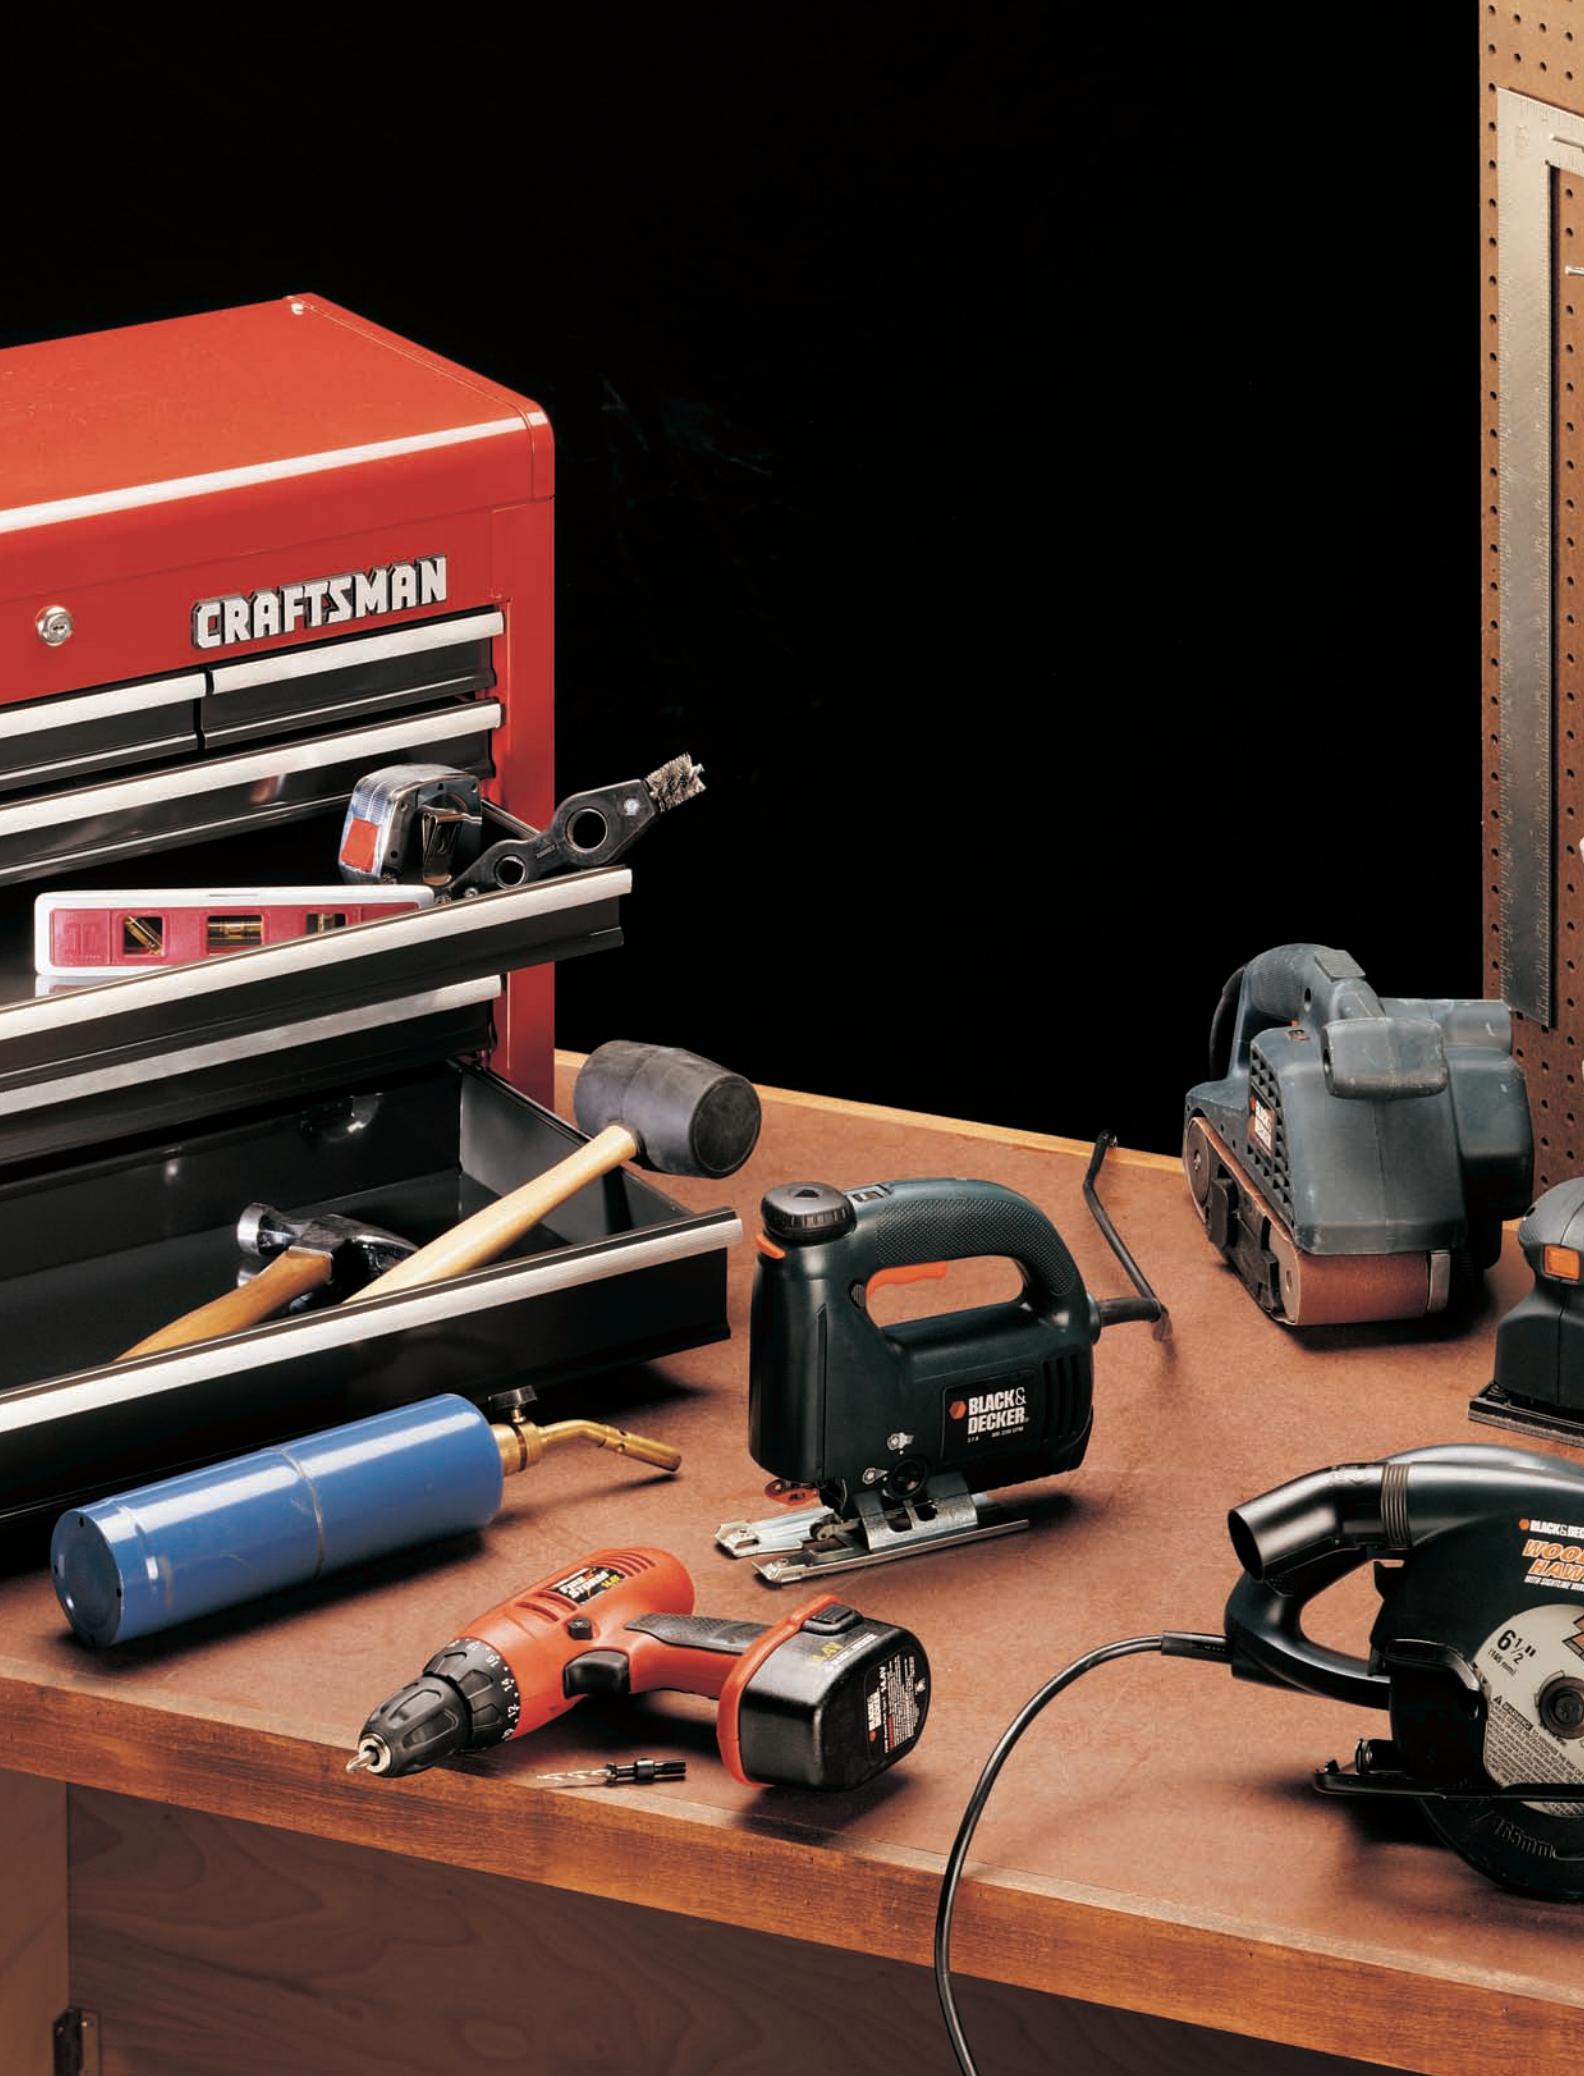
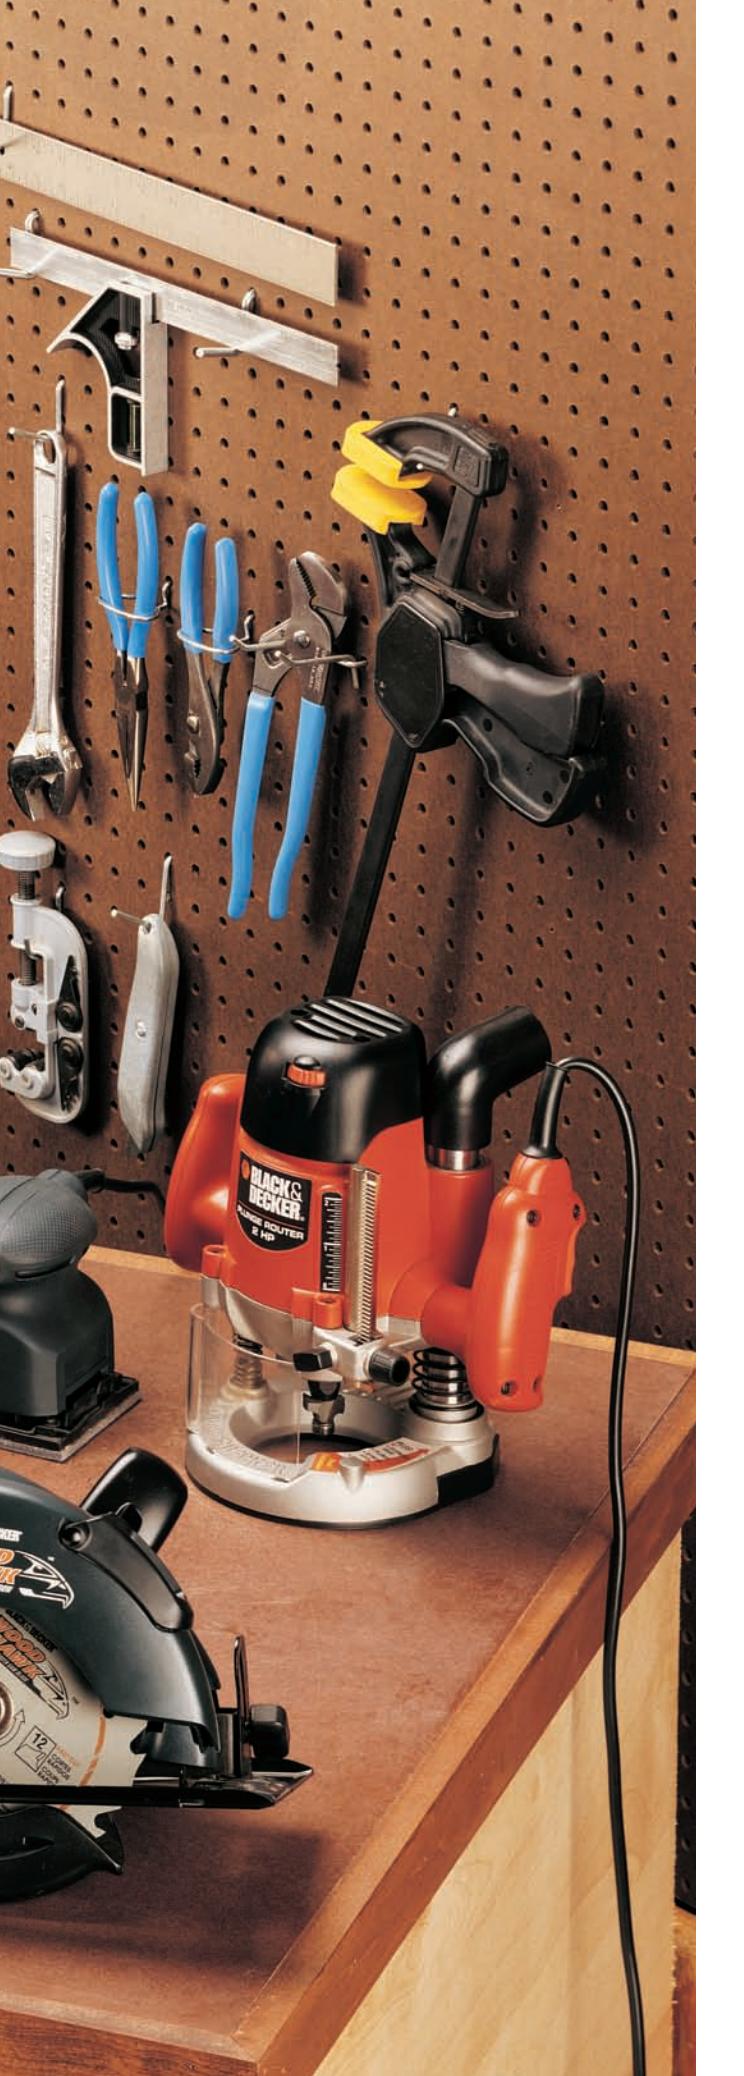
Every project in this book can be built with just a few ordinary hand and power tools you probably own already.
Building Materials for Your Pet Projects
SHEET GOODS
Sheet goods such as plywood and medium-density fiberboard (MDF) can be shaped easily with a router and some, especially MDF and medium-density overlay (MDO) feature a smooth surface that takes paint and contact paper well on both faces and edges. Machining most sheet goods produces hazardous dust that needs to be collected. To limit off-gassing of formaldehyde, use contact paper or apply sealing primer to sheet goods used for pet enclosures.
Interior plywood Frequently sold with a smooth, finish-grade hardwood veneer surface, plywood may be painted or sealed and stained. Plywood cuts easily and is the easiest sheet good to fasten. Hardwood plywoods are expensive and should be sealed to slow off-gassing of formaldehyde.
Exterior plywood and oriented-strand board (OSB) (sheathing, sub-floor decking) Panels are inexpensive and easy to fasten and cut. OSB and exterior plywood do not contain formaldehyde, making them preferable to hardwood plywood for unsealed carpeted cat structures and other interior structures where appearance is not an issue. Surfaces and edges are rough, and the plywood may not lie flat without framing.
Melamine Mostly available in white, melamine features a particleboard core and hard, water-resistant plastic faces that require no other paint or finish. Melamine is sometimes used as flooring for pet enclosures and cleanout trays. In this application, sides made from other materials are screwed and glued to the particleboard edges.
Sanded plywood, sheathing plywood and oriented-strand board (OSB) are economical project materials that can be painted, carpeted or used for other structural purposes.
Common sheet goods that may be used for pets include hardboard (also available as perforated pegboard), MDF (medium-density fiberboard), and MDO (medium-density overlay).
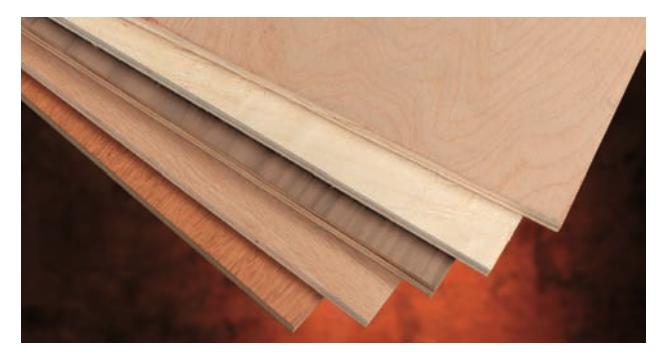 {alt=”Various types of sheet goods including sanded plywood, sheathing plywood, and oriented-strand board (OSB).”}
Interior plywoods often feature hardwood veneer and are generally higher quality than products made for exterior use. When used for pet projects (such as the aquarium stand on pages 124 to 129) make sure to seal them well with varnish or polyurethane, since they are created with adhesives and binders that will off-gas potentially dangerous fumes.
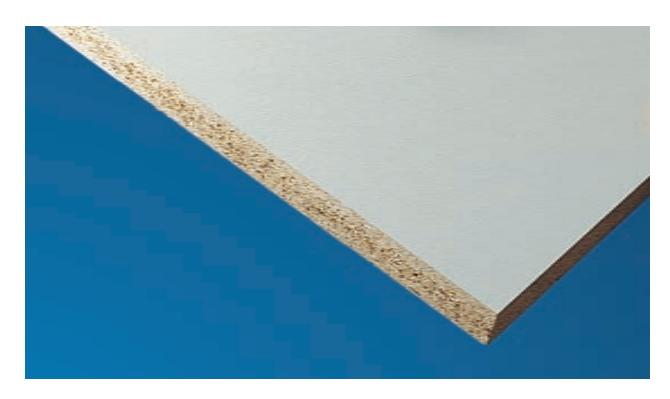 {alt=”Close-up of melamine-coated particleboard.”}
Melamine-coated particleboard has a tough, water-resistant (but also very slippery) surface coating that’s applied at the factory.
WOOD
Softwood construction lumber. Stud grade 2x4s, 2×2 furring strips, lath, and construction grade 1x3s are a few examples of construction lumber that is safe, natural, easy to work with and extremely inexpensive. With a little care, you can turn these rough-and-tumble materials into pet projects that belie their blue-collar pedigree.
Cedar and redwood are naturally rot resistant and hold paint well. Use for outdoor pet structures. Find them in the fencing and decking sections of home improvement stores. Do not use cedar shavings as bedding for birds, reptiles, rabbits and pets that are averse to strong smells.
Hardwood is useful for any building project, either for making the entire project or to trim out a larger project made with sheet goods or softwood.
Pressure-treated wood. Pressure-treated wood no longer contains arsenic, as it once did. Use on outdoor structures where proximity to soil may cause rot. Avoid on parts of structures that may be chewed by your pet.
Manzanita wood. Natural manzanita branches make durable, attractive, and safe perches for snakes, lizards, and birds.
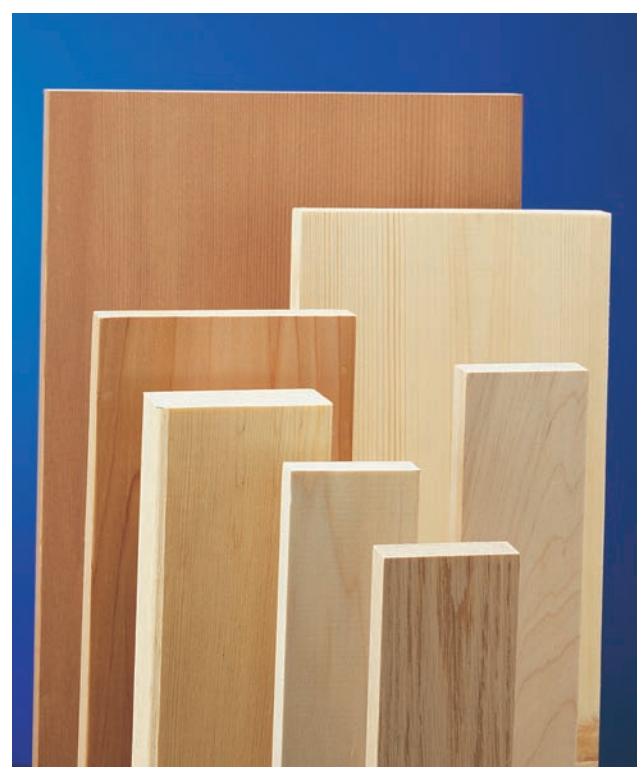 {alt=”Clockwise from top: Samples of redwood, pine, maple, oak, poplar, dimensional framing lumber (spruce, pine or fir), and cedar.”}
Species of lumber that are suitable for pet projects include (clockwise from top): Redwood, pine, maple, oak, poplar, dimensional framing lumber (spruce, pine or fir), and cedar.
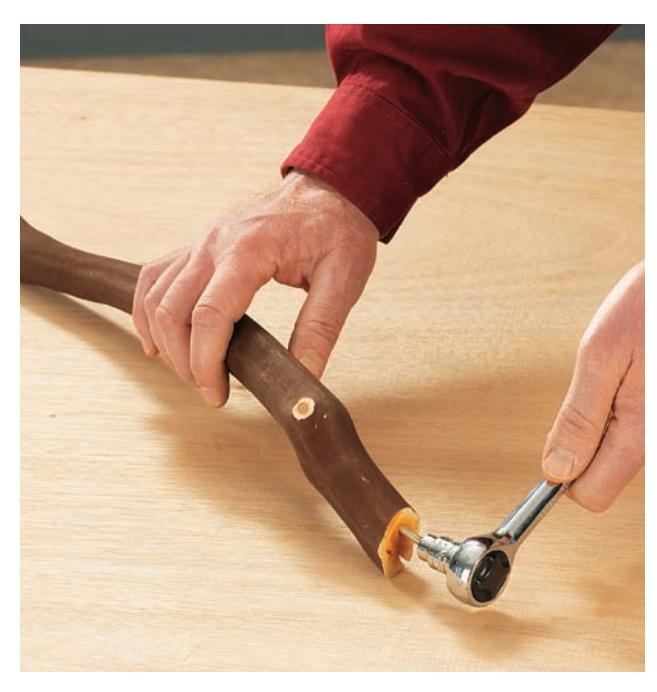 {alt=”Branches of manzanita wood, ideal for pet perches.”}
Manzanita is a specialty wood sold at pet shops for its premium perch-making qualities.
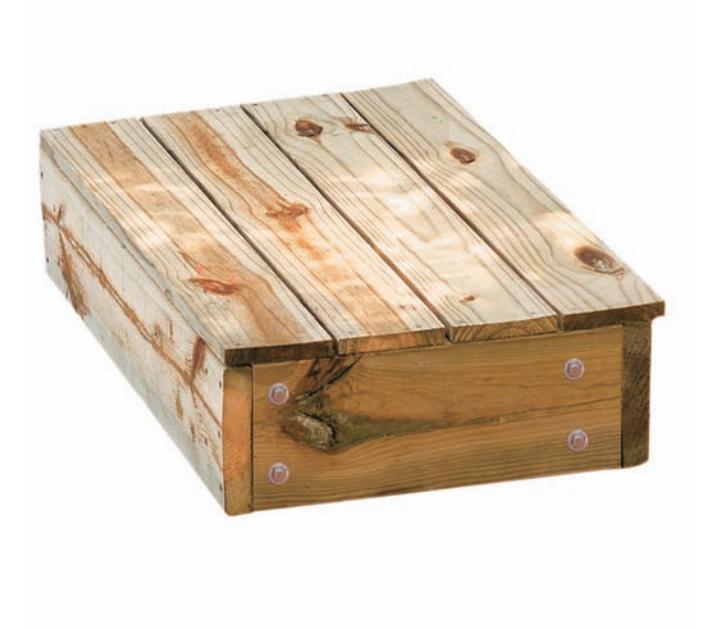 {alt=”Stack of pressure-treated lumber planks.”}
Pressure-treated lumber is usually a variety of pine and has chemically enhanced resistance to rot and infestation.
METAL FABRICS
Galvanized hardware cloth. Galvanized hardware cloth is available in a range of mesh sizes and offers a strong, inexpensive cage material. The zinc in the coating can be toxic to birds, however. Scrub the surface zinc off in a 10% vinegar solution before using for birdcages. For cage-chewing birds, choose a different material.
Coated wire. Powder coated steel wire features a durable baked-on finish and is the next step up from galvanized mesh. Order it from wire mesh and animal enclosure suppliers with a suitable bar spacing to prevent entrapment of feet and heads. Note that determined chewers can break though a powder coat, sometimes exposing a dangerous zinc undercoat.
Stainless steel. Stainless steel is the gold standard of cage materials for birds and other pets, since there is no coating to be chewed off. It is also the most expensive. Special ordering is usually necessary.
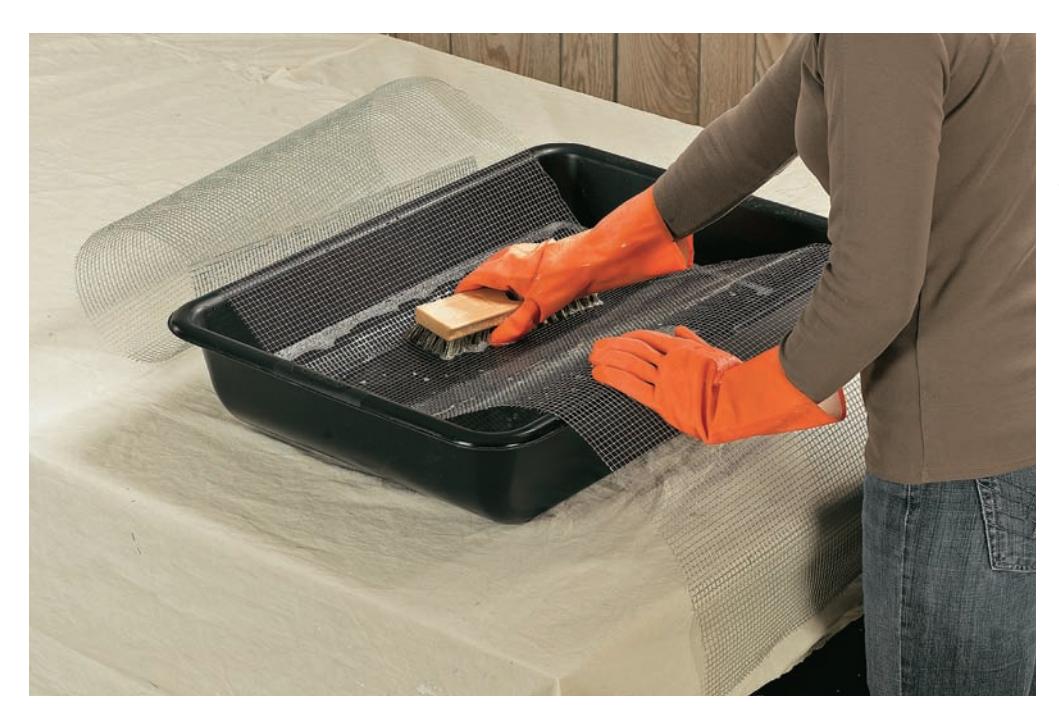 {alt=”Rolls of galvanized hardware cloth with different mesh sizes.”}
Galvanized hardware cloth comes in a variety of grid sizes. Like any galvanized metal, it should be thoroughly washed with a 10% vinegar solution before using in an animal habitat.
MISCELLANEOUS MATERIALS
Plexiglas lends a professional, polished look to aviaries and reptile cages, while being easier to work with than glass. Use 1/4” or thicker for snakes and large reptiles. Care must be taken to provide adequate ventilation, especially to birds.
Plastic tubing. Rodents such as gerbils and rats love tubes. A wide range of tubing is available from hardware stores and home centers. Larger-diameter PVC tubing can also be used as a structural element in cat condos and other accessories (see pages 106 to 110).
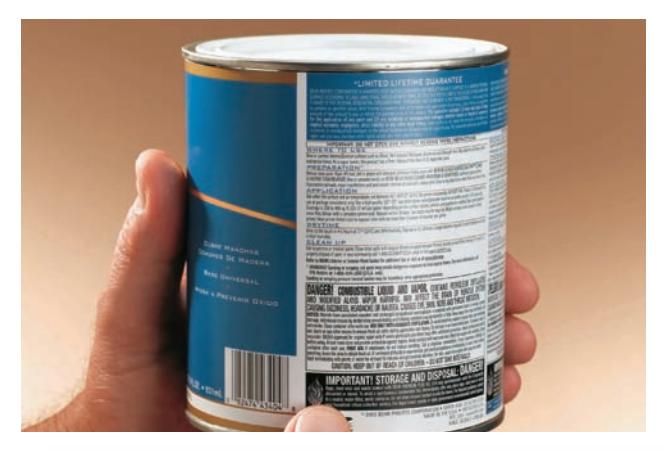
Paints, finishes, chemicals. Use water based, low volatile organic compound (V.O.C.) paints and finishes on pet projects then let cure until odor free. Birds are particularly sensitive to airborne chemicals emitted from paints, finishes, and cleaners.
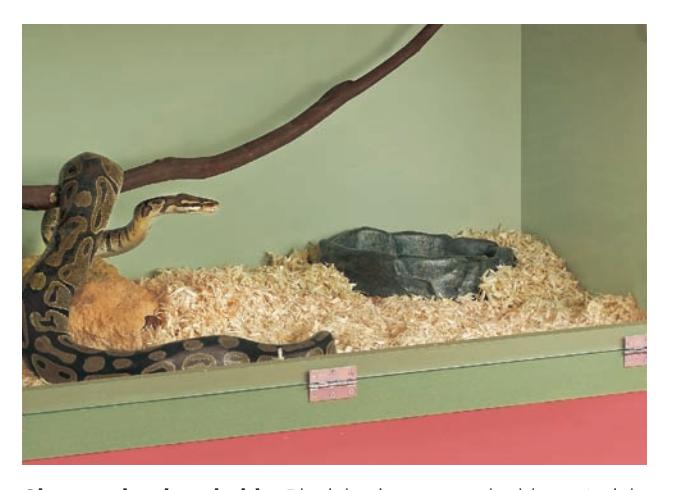 .”)
.”)
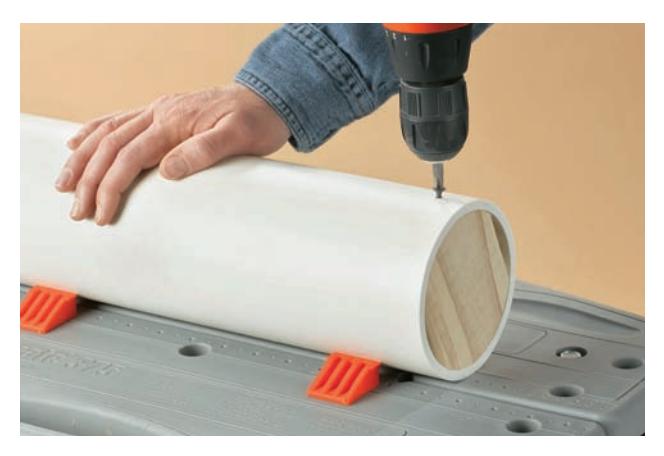
Carpeting. Use dense, plush carpets without loops for cat projects. Fold and fasten the carpeting so cats and dogs can’t chew the edges loose. Use carpet tacks or glue where cats might catch claws on staples. The CRI (Carpet and Rug Institute) Green Label is a plus if chemical odors are a concern.
Upholstery fabric. Any cat perch or dog bed can be given that sofa feel if you cover it with upholstery fabric and batting. Buy upholstery fabric and supplies at fabric stores. Rectangles and squares are easiest to upholster, since the fabric can be made smooth, folded under, and carpet-tacked or stapled to the bottom of the piece.
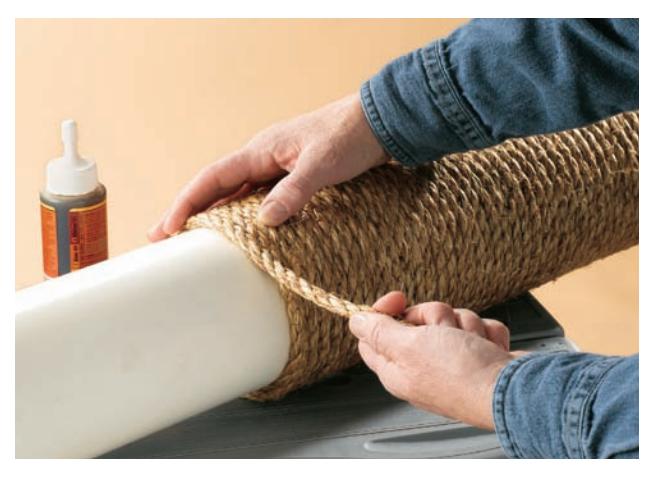
Sisal. Sisal rope and fabric are made from a tough, safe plant fiber. Use for cat scratchers, bird perches, and other pet project components likely to be shredded by your pet.
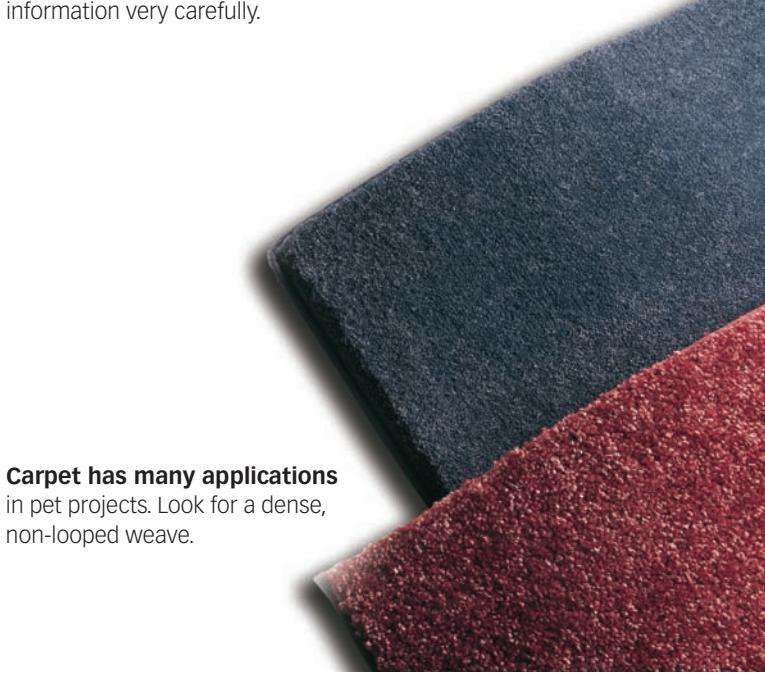

Upholstery fabric is very sturdy and anyone who owns both furniture and a cat can attest to how much cats enjoy scratching it.
Woodworking Techniques
CUTTING
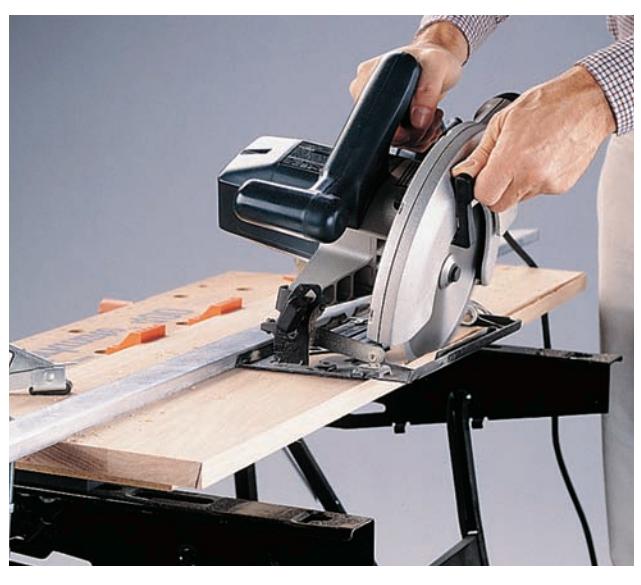
Circular saws and jig saws cut wood as the blade passes up through the material, which can cause splintering or chipping on the top face of the wood. For this reason, always cut with your workpiece facedown.
To ensure a straight cut with a circular saw, clamp a straightedge to your workpiece to guide the foot of the saw as you cut.
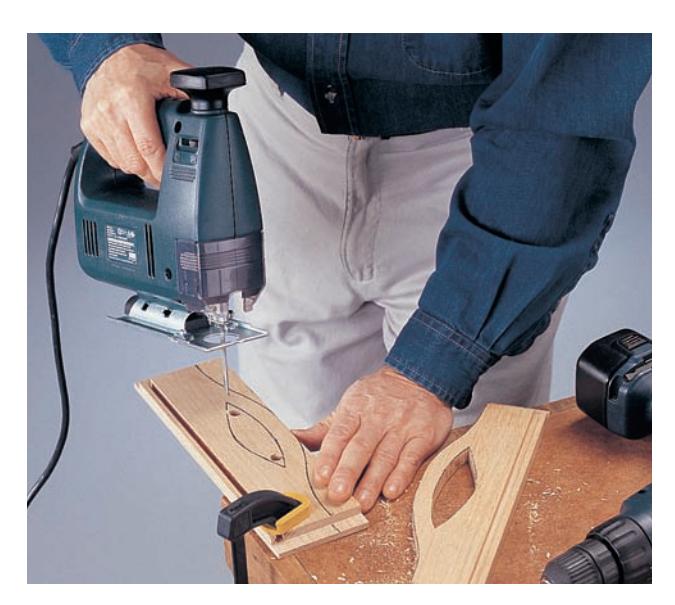
To make an internal cutout in your workpiece, drill starter holes near cutting lines, and use a jig saw to complete the cut.
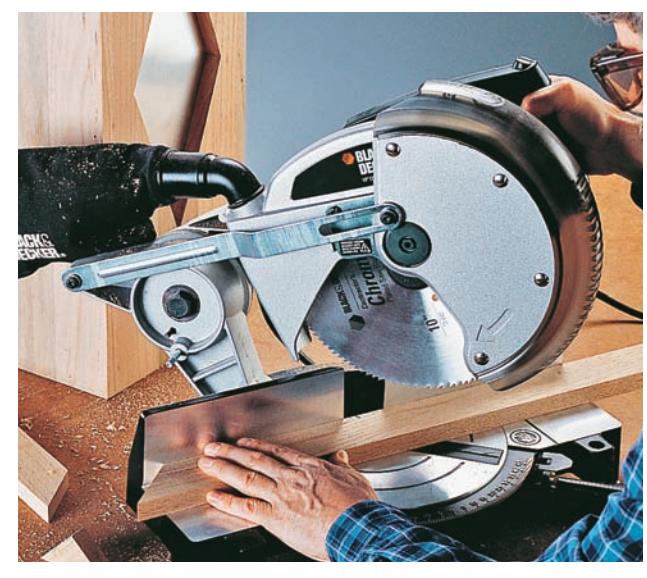
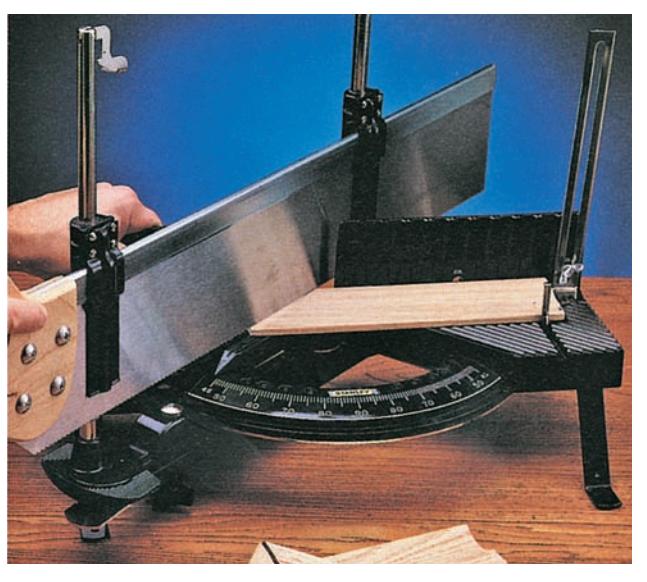
A power miter saw is the best tool for making straight or angled cuts on narrow boards and trim pieces. This saw is especially helpful for cutting hardwood. An alternative is to use an inexpensive hand miter box fitted with a backsaw.
SHAPING
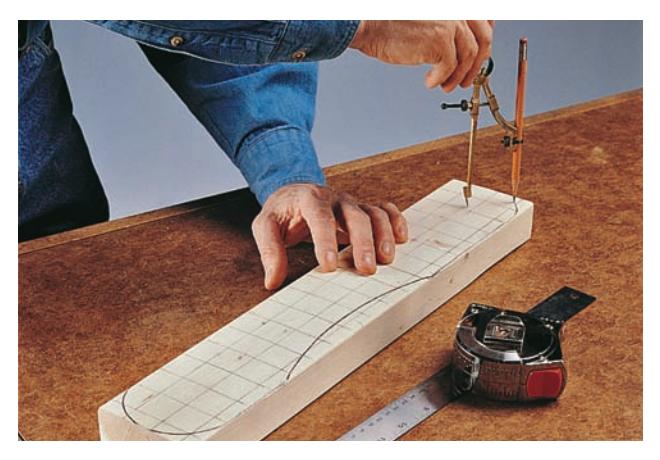
Create detailed shapes by drawing a grid pattern on your workpiece. Use the grid to mark accurate centers and endpoints for the shapes you will cut. Make smooth roundovers and curves using a standard compass.
You can also create shapes by enlarging a drawing detail, using a photocopier and transferring the pattern to the workpiece.
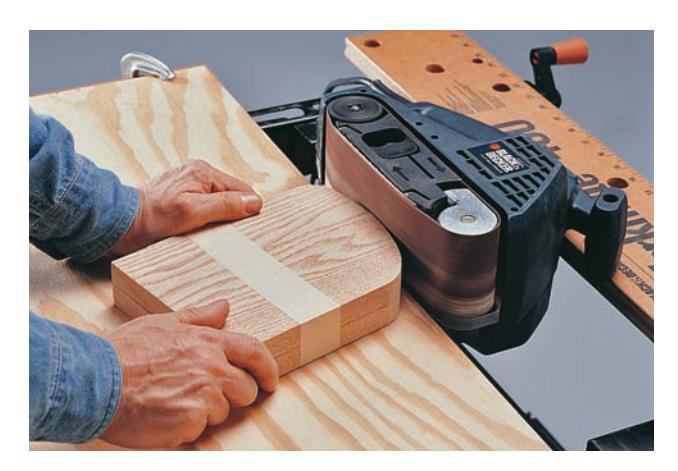
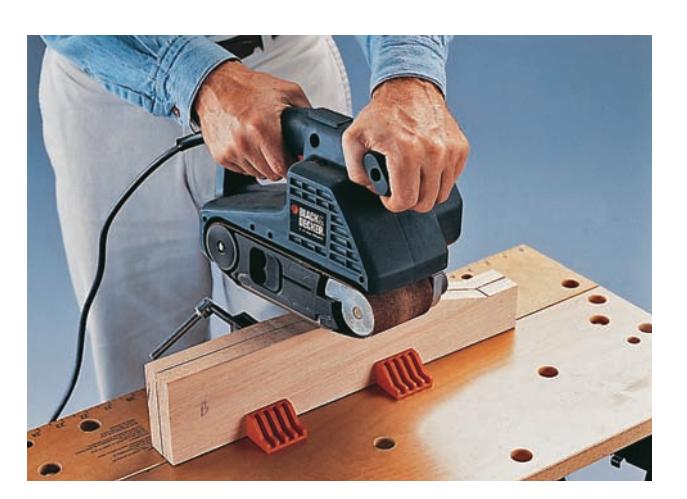
A belt sander makes short work of sanding tasks and is also a powerful shaping tool. Mounting a belt sander to your workbench allows you to move and shape the workpiece freely—using both hands. Secure the sander by clamping the tool casing in a bench-top vise or with large handscrew or C-clamps. Clamp a scrap board to your bench to use as a platform, keeping the workpiece square and level with the sanding belt.
To ensure that matching pieces have an identical shape, clamp them together before shaping. This technique is known as gang-sanding.
SQUARING A FRAME
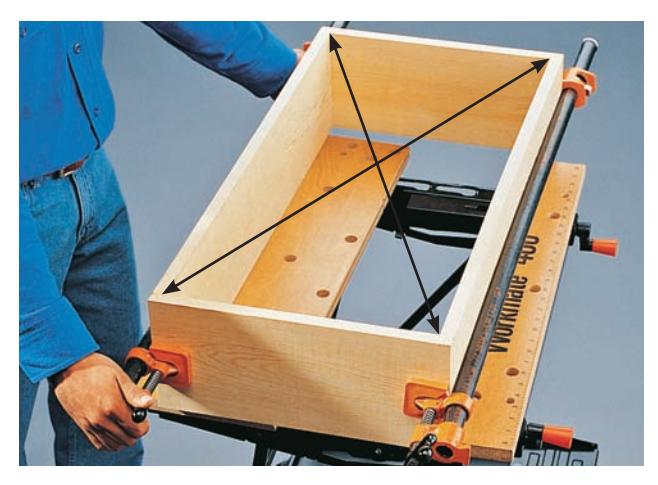
Squaring is an important technique in furniture construction. A frame or assembly that is not square will result in a piece that teeters on two legs or won’t stand up straight. Always check an assembly for square before fastening the parts together.
To square a frame, measure diagonally from corner to corner. When the measurements are equal, the frame is square. Adjust the frame by applying inward pressure to diagonally opposite corners. A framing square or a combination square can also be used to see if two pieces form a right angle.
PILOTING AND DRILLING
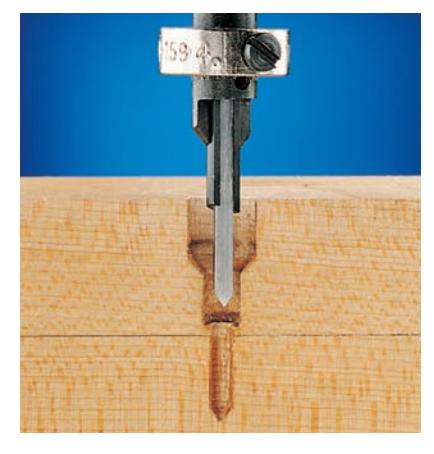
Pilot holes make it easier to drive screws or nails into a workpiece since they remove some material, and keep the fastener from splitting the wood. If you find that your screws are still difficult to drive or that the wood splits, switch to a larger piloting bit. If the screws are not holding well or are stripping the pilot holes, use a smaller bit to pilot subsequent holes. When drilling pilot holes for finish nails, use a standard straight bit.
A combination pilot bit drills pilot holes for the threaded and unthreaded sections of the screw shank, as well as a counterbore recess that allows the screw to seat below the surface of the workpiece. The counterbore portion of the bit drills a 3/8”-dia. hole to accept a standard wood plug. A bit stop with a setscrew allows you to adjust the drilling depth.
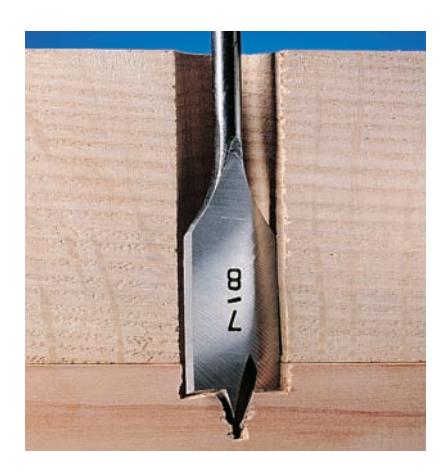
When drilling a hole through a workpiece, clamp a scrap board to the piece on the side where the drill bit will exit. This “backer board” will prevent the bit from splintering the wood and is especially important when drilling large holes with a spade bit.
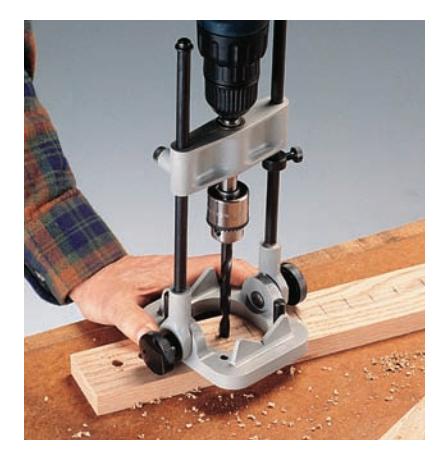
To make perfectly straight or uniform holes, mount your drill to a portable drill stand. The stand can be adjusted for drilling to a specific depth and angle.
GLUING
A gluing surface should be smooth and free of dust but not sanded. Glue and fasten boards soon after they are cut—machined surfaces, which dry out over time, bond best when they are freshly cut.
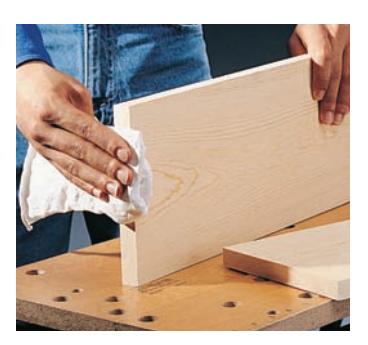
Before gluing, test-fit the pieces to ensure a proper fit. Then, clean the mating edges with a clean, dry cloth to remove dust.
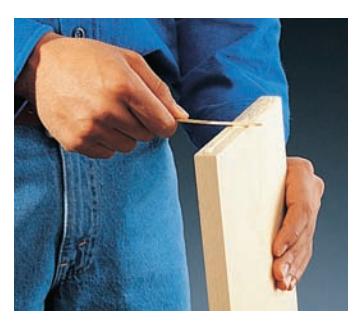
Apply glue to both surfaces and spread it evenly, using a stick or your finger. Use enough glue to cover the area, with a small amount of excess.
Promptly assemble and clamp the pieces with enough clamps to apply even pressure to the joint. Watch the glue oozing from the joint to gauge the distribution of pressure. Excessive “squeeze-out” indicates that the clamps are too tight or that there is too much glue. Wipe away excess glue with a damp not wet—cloth.
PREPPING WOOD FOR FINISHING TOUCHES
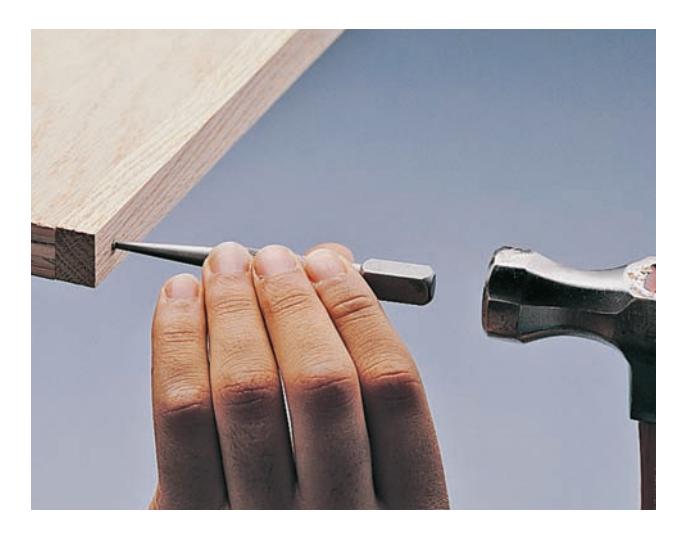
Most projects require that nail heads be set below the surface of the wood, using a nail set. Choose a nail set with a point slightly smaller than the nail head.
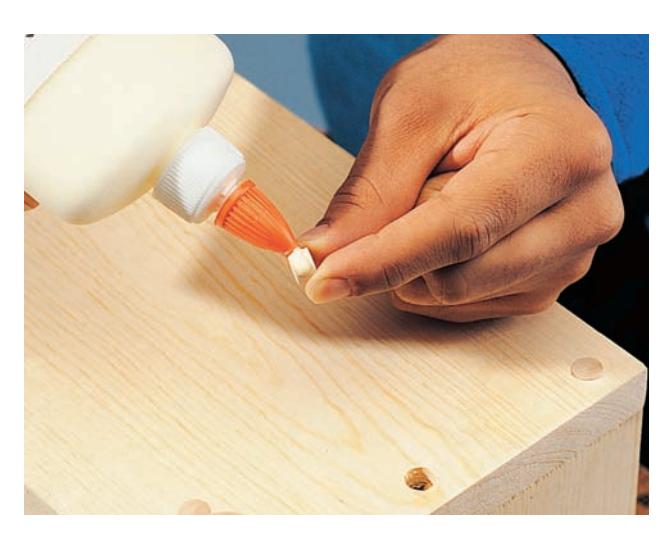
Screws that have been driven well below the surface (about 1/4”) can be hidden by filling the counterbores with glued wood plugs. Tap the plug into place with a wood mallet or a hammer and scrap block, leaving the plug just above the surface. Then, sand the plug smooth with the surrounding surface.
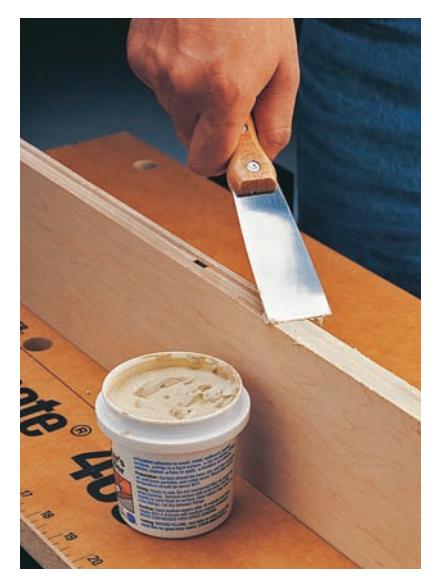
Fill nail holes and small defects with wood putty. When applying a stain or clear finish to a project, use a tinted putty to match the wood and avoid smearing it outside the nail holes. Use putty to fill screw holes on painted projects.
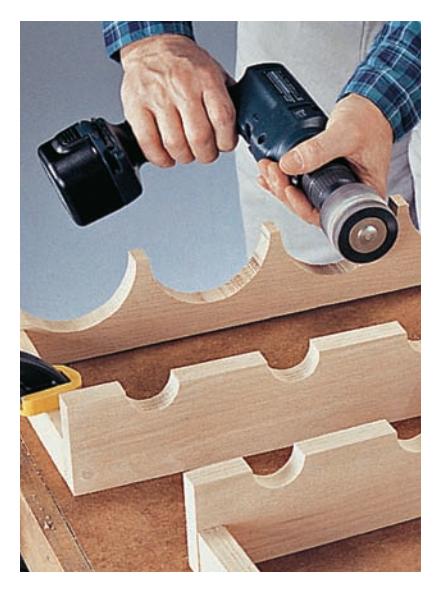
A power drill with a sanding drum attachment helps you sand contoured surfaces until smooth.
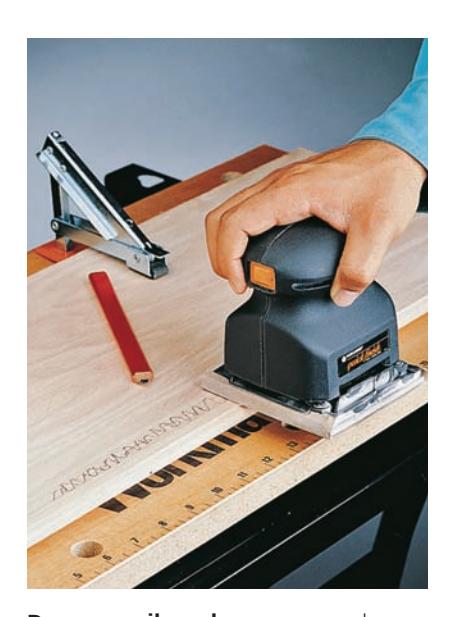
Use a palm sander to finish-sand flat surfaces. To avoid sanding through thin veneers, draw light pencil marks on the surface and sand just until the marks disappear.
To finish-sand your projects, start with medium sandpaper (100- or 120-grit) and switch to increasingly finer papers (150- to 220-grit).
Cat Tree
A cat tree lets your cat scratch, climb and perch safely and harmlessly, which helps to preserve your furniture (and sanity) while keeping kitty healthy and happy.
Cover your new cat tree with upholstery batting and a tough upholstery fabric or dense non-looped carpet remnants, as we did here. We also stapled carpeting to cover the platforms. If fasteners need to be used on a gripping surface, use carpet tacks and glue. These won’t snag your cat’s claws as staples may. Apply catnip and hang toys from your tree to increase its attractiveness to kitty.
This cat tree is simple to build from framing lumber and a single sheet of 3/4”-thick plywood. Rectangular components make this easy to carpet or upholster. The triple-ply base gives good heavy ballast to the structure (many cat trees you’ll find suffer from tippiness). A ramp wrapped with sisal rope is perfect for climbing and scratching. This design includes offset platforms to allow jumping between levels. For carpet you may use practically any old scraps you have lying around the house. Generally, the denser the weave, the longer it will last. Avoid carpet with loops that can snag your cat’s claws.
Tools
- Stapler
- Circular saw
- Drill/driver
- 1/8” drill bit
- 3/16” drill bit
- Driver bit
- Hammer
- Carpenter’s square
- Straightedge
- Utility knife
Materials
- 5 to 6 yards of carpet remnants (allows for waste)
- 2 hinges with screws
- 2 hinges with screws
- One box 3 1/2” deck or coarse-thread drywall screws
- Wood glue
- Carpet tacks
- %16” staples
- 50 ft. roll of 3/8” sisal rope
- Package of four 1 1/2” threaded glides (feet)
- (1) 3/4” x 4 x 8’ construction grade (BC) plywood
- (2) 2 x 4 x 8’
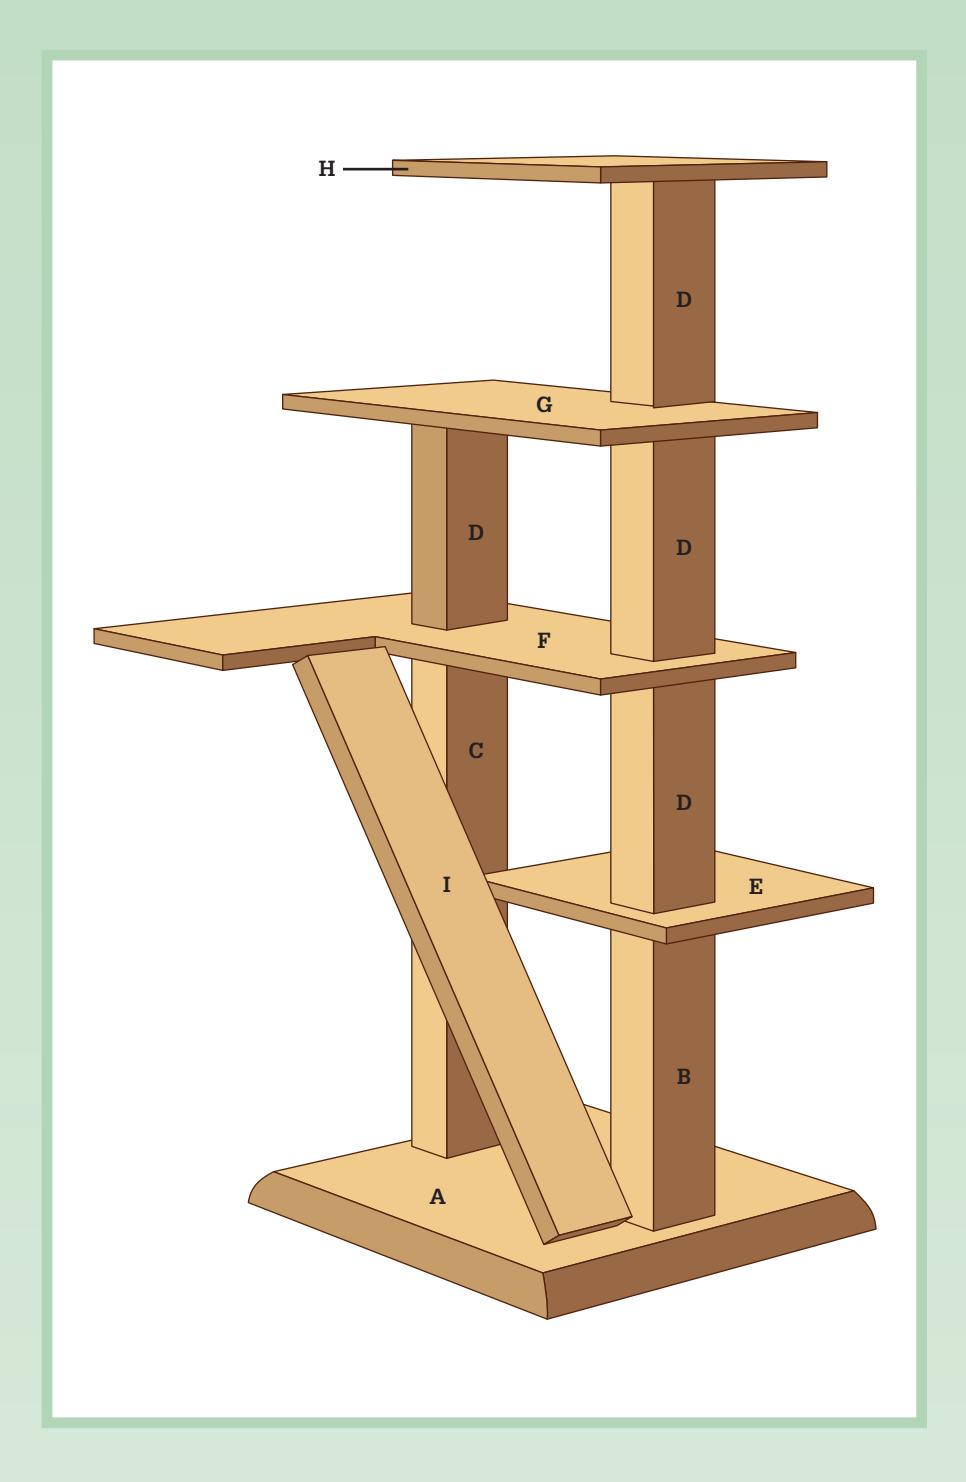
Cutting List
How to Make a Cat Tree
| Key | Part | Dimension | Pcs. | Material |
|---|---|---|---|---|
| A | Base | $^{3}/_{4} times 22 times 26”$ | 3 | Plywood |
| B | Base post | $3 times 3frac{1}{2} times 16”$ | 1 | Doubled $2 times 4$ |
| C | Tall base post | $3 times 3frac{1}{2} times 28frac{3}{4}”$ | 1 | Doubled $2 times 4$ |
| D | Post | $3 times 3frac{1}{2} times 12”$ | 4 | Doubled 2 times 4 |
| E | Level one | $^{3}/_{4} times 14 times 14”$ | 1 | Plywood |
| F | Level two | (L shaped) | 1 | Plywood |
| G | Level three | $3/4 times 14 times 26”$ | 1 | Plywood |
| H | Level four | $3/4 times 14 times 16”$ | 1 | Plywood |
| I | Ramp | $3/4 times 5 times 36”$ | 2 | Plywood |
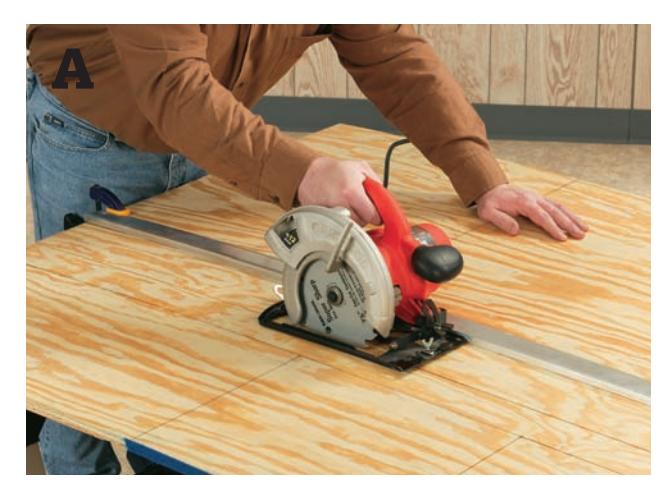
Draw and label the panel components and cutting order onto the plywood sheet to avoid costly errors.
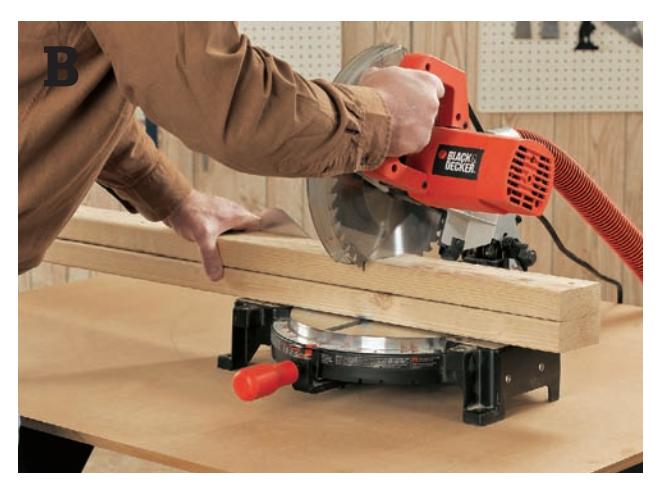
After sandwiching two $2 times 4s$ together face to face, cut the stock into post lengths.
Bevel the edge of the base at 221/2 degrees.
MAKE THE PERCHES, POSTS AND BASE
Lay out the parts on your plywood sheet and cut with a circular saw (photo A). Cut the base and the platforms for the upper levels and the ramp. Glue, clamp and screw the two $2 times 4s$ together, face to face, to make a single $3 times 3frac{1}{2} times 8$ ft. post. Use masonry blocks or five-gallon buckets filled with water to press the panels tightly together until the glue sets. Then, cut this post into the base post, tall base post, and intermediate posts (photo B). The tall base post is equal to 28” plus the thickness of your plywood. Remove any screws in the blade path before cutting. Glue the three base sections together.
ATTACH THE FIRST POSTS AND CARPETING
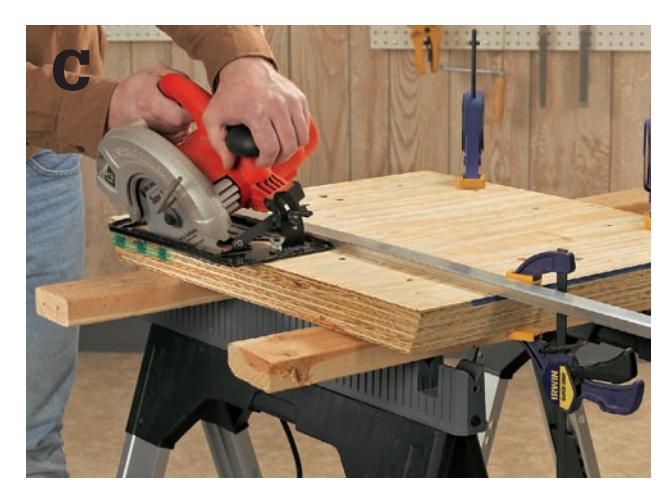
Face-glue the three-ply base and reinforce with wallboard screws. Then, cut a 22½° bevel on the base edge. The wide side of the base faces down (photo C). Position the short base post 91/4” in from a long side and 2” in from the front and position the tall base post 91/4” in from the same long side and 2” in from the back of the base. Outline them on the plywood base. Remove the posts and drill four 1/8” pilot holes, then tip the base over and drill counterbore holes at pilot hole locations, drilling through the bottom-most plywood panel.
Apply wood glue within the post outlines on the base and on the post bottoms. Have a helper hold the posts precisely in position. Attach from below with 31/2” screws. Drive screw heads about one-third of the way into the base until they are firmly seated in the middle plywood layer (photo D). Cut a carpet piece large enough to overhang the base by 5” on each side. With a marker, transfer a map of the base top, including exact post locations, onto the back of the carpet. Make diagonal corner cuts 2” from the base corners. Cut along the lines, using a straightedge and a sharp utility knife on safe surface (photo E). Push the carpet down over the base so the posts penetrate the holes. Fold the carpet edges under the base and staple them from below. Hammer in any staples that aren’t fully seated.
Buyer’s Tip ▶
Buy carpet remnants cheaply from carpet stores or building centers.
ATTACH LEVEL ONE
Trace the position of the posts onto the top and bottom of Level One and drill pilot holes. Attach the platform to the lower post through pilot holes, using glue and four 3½” screws. Then, drill angled pilot holes in the middle of all four sides of the upper post so you can attach it to the Level One platform toenail style (photo F). Cut and attach carpeting to the Level One platform.
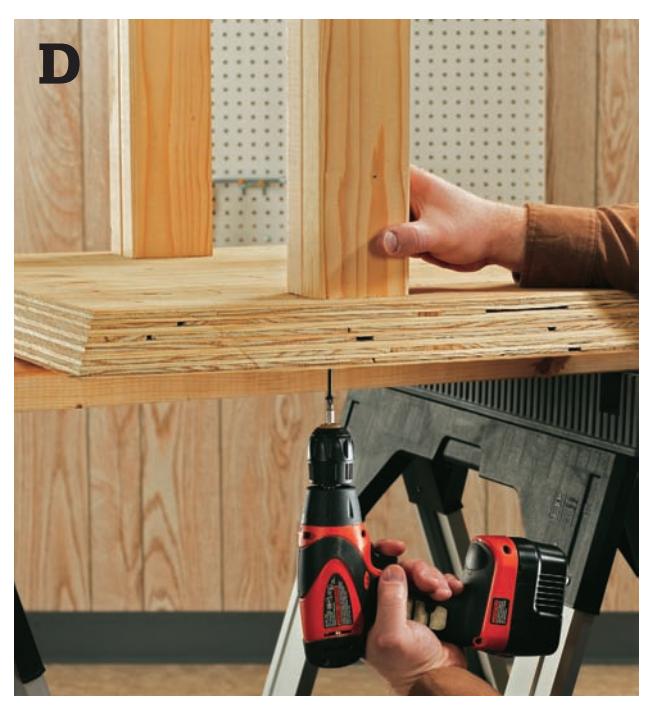
Countersink screws deeply into the base for better screw penetration of posts.
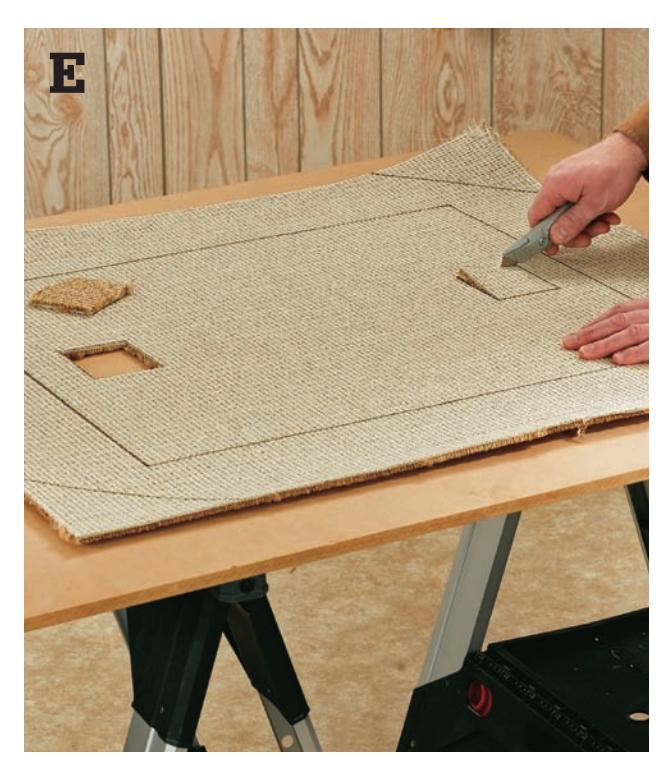
Cut scraps of carpet to fit the base. Outline and cut out holes for the posts.
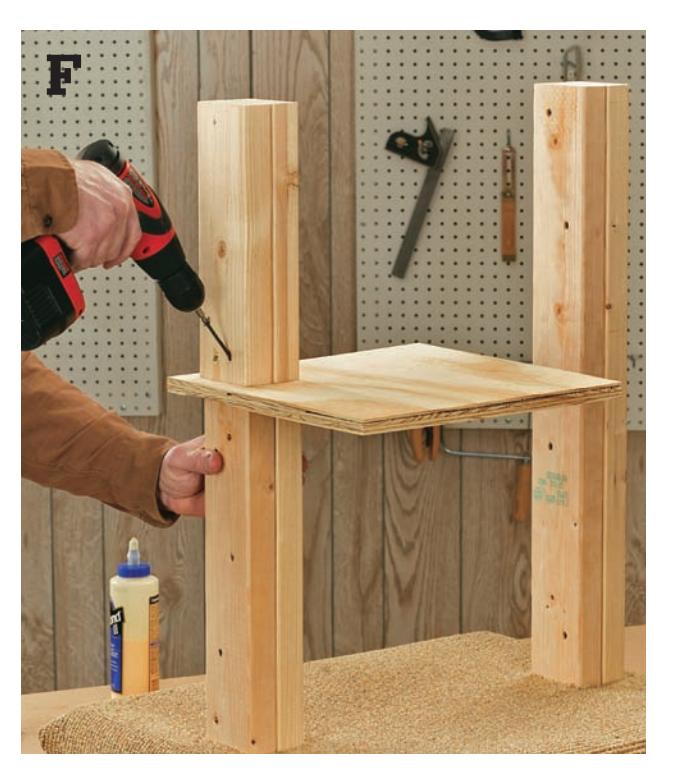
Drill pilot holes near the base of the post and then attach the posts with glue and screws driven toenail style through the pilot holes.
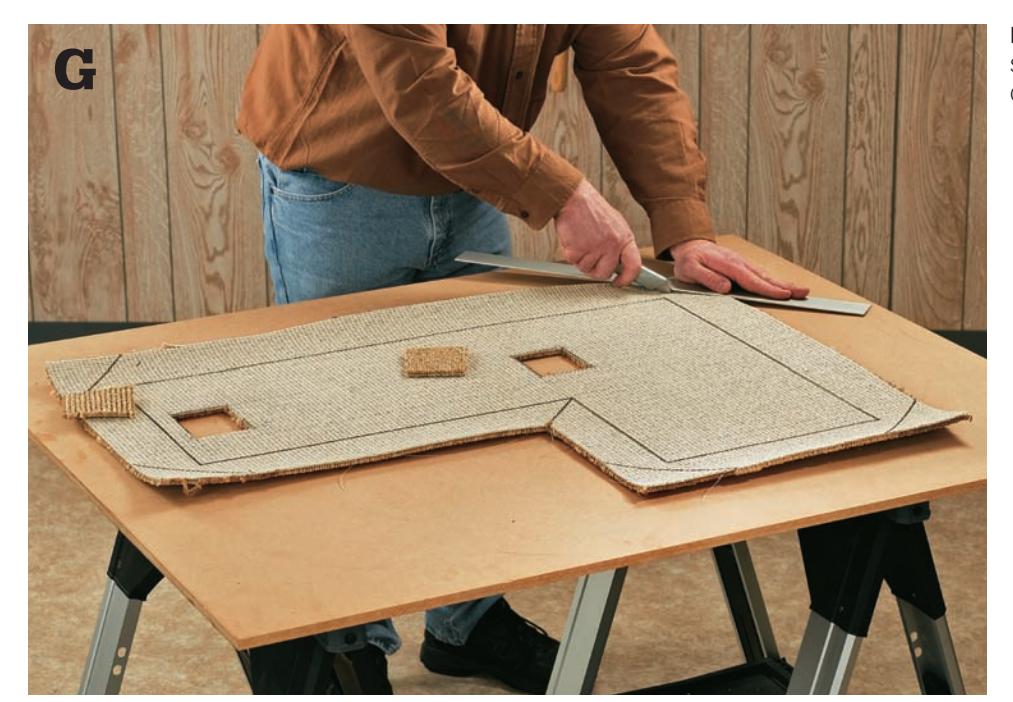
Make relief cuts at corners so you can wrap the carpeting onto the platform.
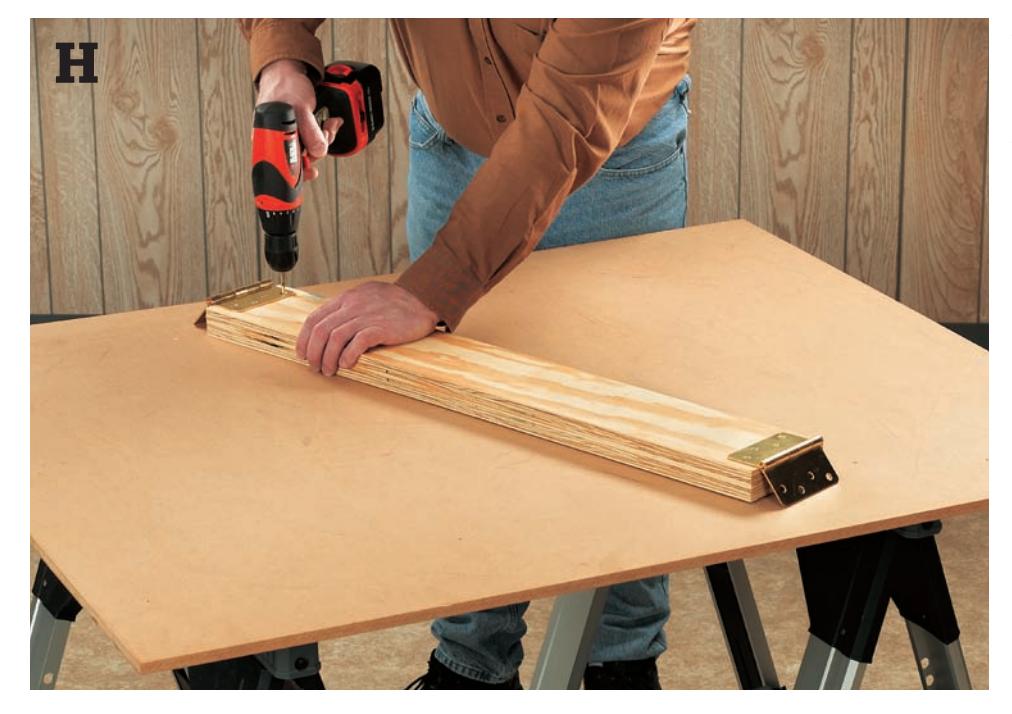
Attach 4” butt hinges to the ends of the ramp. The hinges should be centered on the edge and on the same face of the ramp.
Preventing Unraveling >
Singe synthetic carpet edges over a flame before applying to “tie up” loose threads.
ATTACH LEVEL TWO
Trace the post positions onto the top and bottom of the Level Two platform and drill pilot holes. Place the Level Two platform top-face down on an upside-down carpet scrap and trace. Measure in from the edge lines to draw the post cutouts. Add an overlap and relief cut lines and then cut the carpeting (photo G). Attach posts and carpeting.
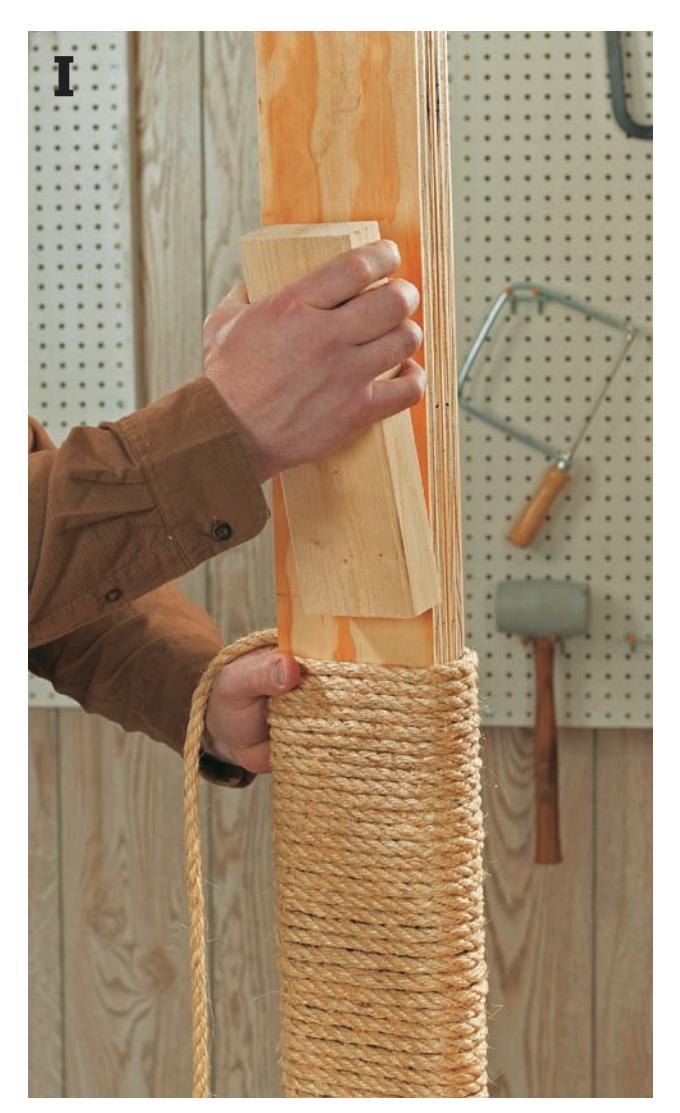
Tightly wound sisal rope coils that are slightly compressed create a durable scratching and climbing surface on the ramp. Use a $2 times 4$ scrap to compress the rope as you bond it to the post.
Warning >
Some cats will eat carpet and suffer internal injuries. Make sure all carpet edges remain secured to structure.
BUILD THE RAMP
Glue and weigh down two ramp-stock pieces, face to face. When the glue dries, cut the ramp to $34frac{1}{2}$ ” long. Pre-drill and screw hinges to the underside of the top and bottom of the ramp (photo H).
Nail one end of the 3/8”-dia. sisal rope to the ramp, using carpet tacks driven along the width of the ramp. Wrap the ramp tightly with the rope (photo I). Compact the rope against itself with a block of wood as you go. After trimming, secure the last pull of rope to the ramp with carpet tacks. Holding the ramp vertically, screw the bottom set of hinge flaps to the base in a position that will allow the hinges at the top of the ramp to barely clear Level Two when they are folded down. Fold down the ramp to its final position and screw the top set of hinges to the bottom of the Level Two platform.
ATTACH THE REMAINING PLATFORMS
Attach and carpet the remaining levels. Cut panels of carpet 13” wide and as long as each post to carpet the posts. Center a carpet rectangle on the wide face of a post, glue, and nail it on with carpet tacks (photo J). Wrap carpet around the post and glue and tack it at the edges. Drill 11/32” (typically) holes in the corners of the base. Insert and adjust threaded glides (feet) so the structure doesn’t wobble.
Green Doghouse
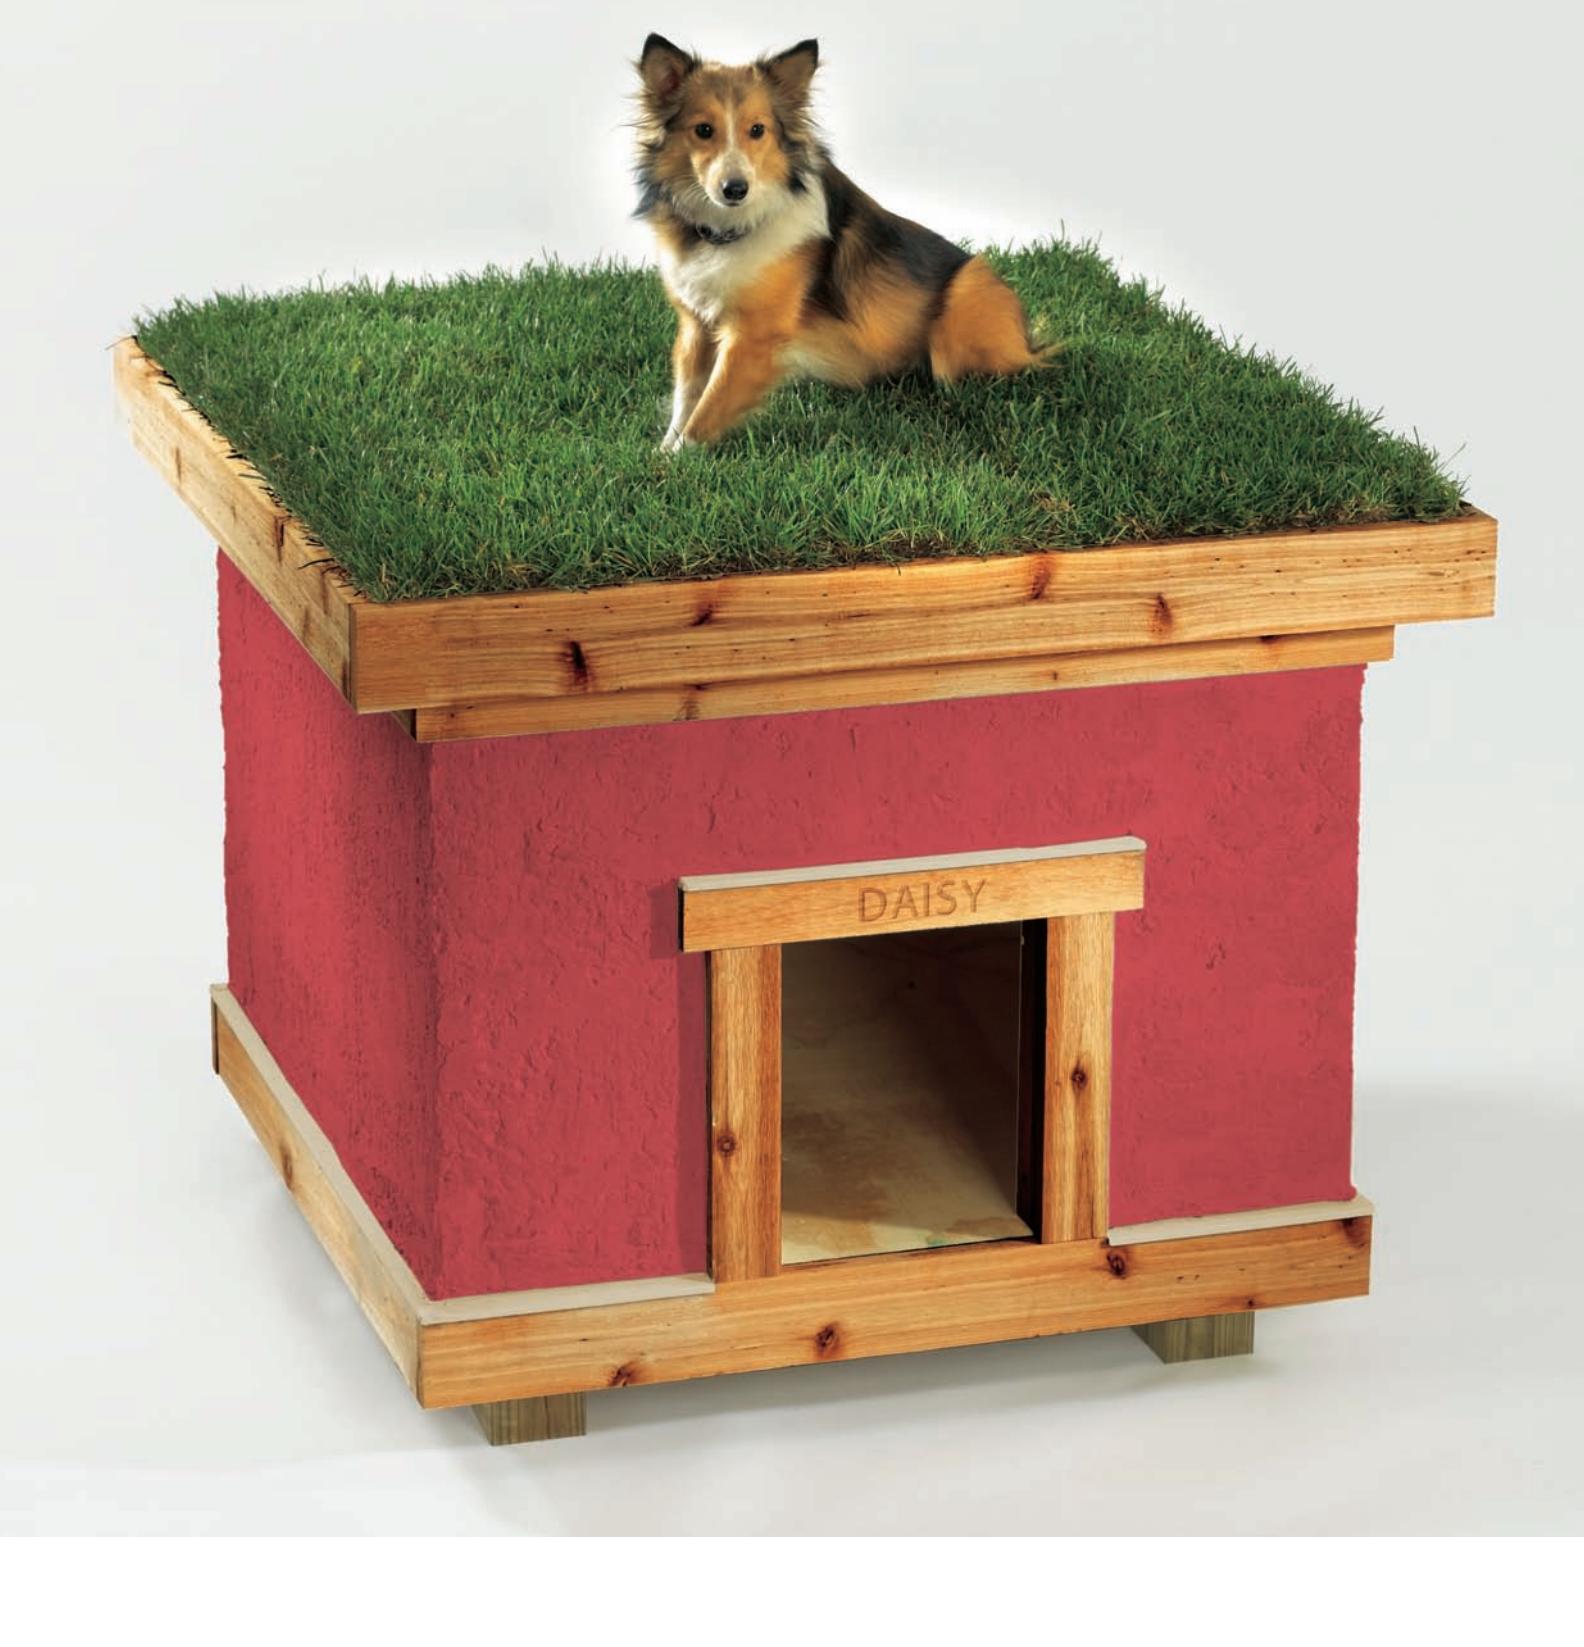
This “green” doghouse, with its sod roof and stucco siding, stays cooler in the summer and warmer in the winter. A sod roof, like the one featured, may become a favorite lookout perch for your pooch. Though this house is stucco, it could be sided to match your own house.
Tools
- Measuring tape
- Utility knife
- Jig saw
- Marker
- Hammer
- Clamps
- Square
- Caulk gun
- Straightedge
- Circular saw
- Stapler
- Trowel
- Hand saw
- Paintbrush
- 2” hole saw
- Drill/driver
Materials
- (2) 8’ pressure treated $2 times 4s$
- (1) 4’ pressure treated $4 times 4$
- 2 sheets $4 times 8’ frac{3}{4}$ ” CDX plywood
- 1 half sheet $(4 times 4’)$ $^{3}/_{4}$” p.t. plywood
- (3) 8’ 2 × 3s (pine)
- (6) 8’ $2 times 2s$ (pine)
- $(1) 6’ 1 times 3 (cedar)$
- (4) $10’ 1 times 4 (cedar)$
- 2” deck screws
- 31/2” deck screws
- 2” galvanized casing nails
- Staples
- 3/4” roofing nails
- 36” long 27/16” drip edge
- Two 2” circular louver vents
- Roll 15 lb. building paper
- 1/2 sheet 5/8” cement board (optional)
- Planting medium
- Sod
- 12 ft. aluminum drip edge
- $3 times 12$ ft. stucco lath
- 10 ft. stucco lath corner
- Fencing staples
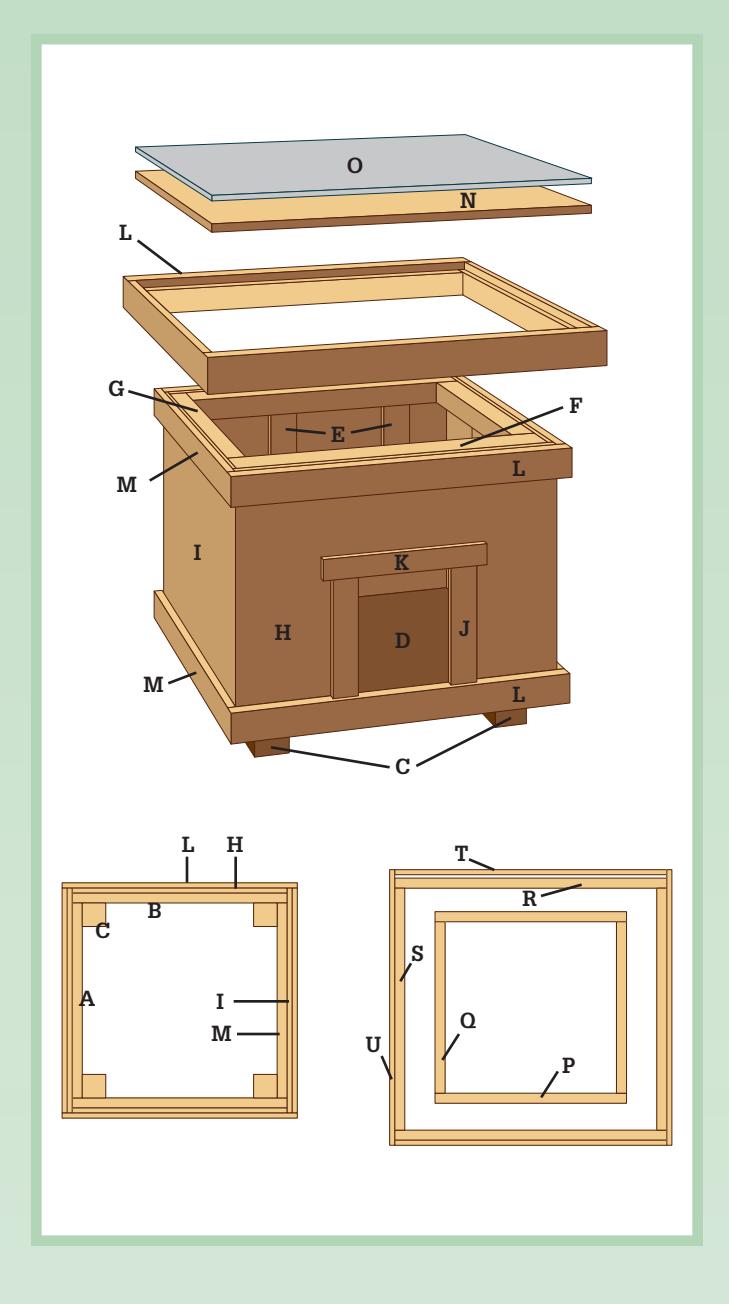
Cutting List
| Key | Part | Dimensions | Pcs. | Material |
|---|---|---|---|---|
| A | Floor joist | $1frac{1}{2} times 3frac{1}{2} times 29”$ | 3 | PT 2 × 4 |
| B | Joist header | $1frac{1}{2} times 3frac{1}{2} times 32”$ | 2 | PT 2 × 4 |
| C | Feet | $3frac{1}{2} times 3frac{1}{2} times 6”$ | 4 | PT 4 × 4 |
| D | Floor deck | $frac{3}{4} times 32 times 32frac{3}{4}”$ | 1 | CDX plywood |
| E | Wall studs | $1frac{1}{2} times 2frac{1}{2} times 22frac{1}{2}”$ | 9 | $2 times 3$ Pine |
| F | Front & back top plate | $1frac{1}{2} times 1frac{1}{2} times 32”$ | 2 | $2 times 2$ Pine |
| G | Side top plates | $1frac{1}{2} times 1frac{1}{2} times 29”$ | 2 | $2 times 2$ Pine |
| H | Front/back wall sheathing | $frac{3}{4} times 32 times 27frac{3}{4}”$ | 2 | CDX plywood |
| I | Side wall sheathing | $frac{3}{4} times 33frac{1}{2} times 27frac{3}{4}”$ | 2 | CDX plywood |
| J | Door trim – side | $frac{3}{4} times 2frac{1}{2} times 12frac{1}{4}”$ | 2 | Cedar |
| K | Door trim – top | $frac{3}{4} times 2frac{1}{2} times 16frac{3}{4}”$ | 1 | Cedar |
| L | Front/back frieze/base | 3/4 × 31/2 × 351/4” | 4 | Cedar |
| M | Side frieze/base | 3/4 × 31/2 × 331/2” | 4 | Cedar |
| N | Roof deck | 3/4 × 39 × 40” | 1 | CDX plywood |
| O | Sod underlayment | 5/8 × 39 × 40” | 1 | Cement board |
| P | Frame stops f/b | 11/2 × 11/2 × 281/2” | 2 | 2 × 2 Pine |
| Q | Frame stops side | 11/2 × 11/2 × 251/2” | 2 | 2 × 2 Pine |
| R | Deck frame f/b | 11/2 × 11/2 × 39” | 2 | 2 × 2 Pine |
| S | Deck frame side | 11/2 × 11/2 × 361/2” | 2 | 2 × 2 Pine |
| T | Roof fascia f/b | 3/4 × 31/2 × 401/2” | 2 | Cedar |
| U | Roof fascia side | 3/4 × 31/2 × 401/2” | 2 | Cedar |
How to Build a “Green” Doghouse
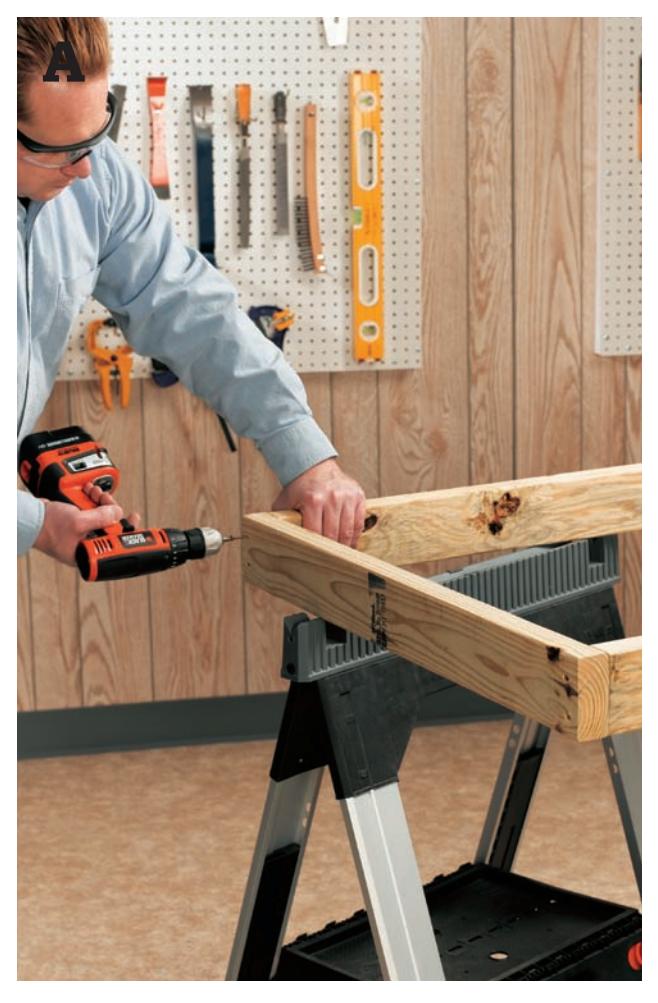
Drive deck screws through the second header and into the end of the outside joist, completing the 2 × 4 frame for the floor.
Finish the threshold tongue cutout, using a jig saw.
BUILD THE FLOOR AND STUD WALLS
Cut the floor joists and headers to length from pressure-treated $2 times 4$ lumber. Drive a pair of $3frac{1}{2}$” deck screws through pilot holes in the ends of each header and into the outside joists to make a square frame (photo A). Use a carpenter’s square to check for square. Press the corner into square if necessary, and then add the center joist between the headers.
Cut the floor deck to size from exterior grade (CDX) plywood. Start by cutting your plywood stock so it is $32 times 33^{1/2}$” in size. Then, draw a reference line $frac{3}{4}$” back from and parallel to one long end. Measure in 11” from each end of the reference line and draw a cutting line that extends from the edge of the plywood to the reference line. Cut out the $frac{3}{4}$” by 11” waste section from each end, creating a $frac{3}{4}$” × 10” tongue that will serve as the threshold of the doghouse (photo B).
Cut the wall studs to length. If your local lumberyard does not stock $2 times 3s$, use full-width $2 times 4s$, or rip-cut a $2 times 6$ down the middle to create pairs of $2 times 3s$ (approximately). Position the studs on the top surface of the deck and trace around them for reference. Then, flip the deck on its edge and drive two or three $3frac{1}{2}$” deck screws up through the underside of the deck and into the bottom end of each stud (photo C). After all of the wall studs are attached to the deck floor, position the deck over the floor frame so all of the outside edges align. Drive 2” deck screws down through the plywood deck and into the tops of the floor frame members. Drive screws every 8” (photo D).
Cut the top plates for the front, back and side to length and then attach them to the tops of the wall studs with $3frac{1}{2}$” deck screws (photo E). Drill pilot holes first so you don’t split the $2 times 2$ plates. Test the stud walls with a framing square and adjust as necessary.
Flip the structure so the top plates are resting on a flat surface, then cut the feet to length. Attach the feet by driving a pair of $3frac{1}{2}$” screws through each $2 times 4$ in the frame corner. The tops of the feet should be resting on the underside of the floor deck. It isn’t necessary to drive screws down through the deck.
INSTALL THE SHEATHING AND TRIM
Cut the wall sheathing from $frac{3}{4}$” CDX plywood. Use a circular saw and straightedge cutting guide or a table saw to make square cuts (photo F).
Outline the door opening in the front wall sheathing piece (see drawing, p. 23). Drill a starter hole in one corner of the cutout and then make the cutout with a jig saw, squaring off the corners as you go (photo G). If the cutout is uneven, smooth it with a belt sander or random orbit sander.
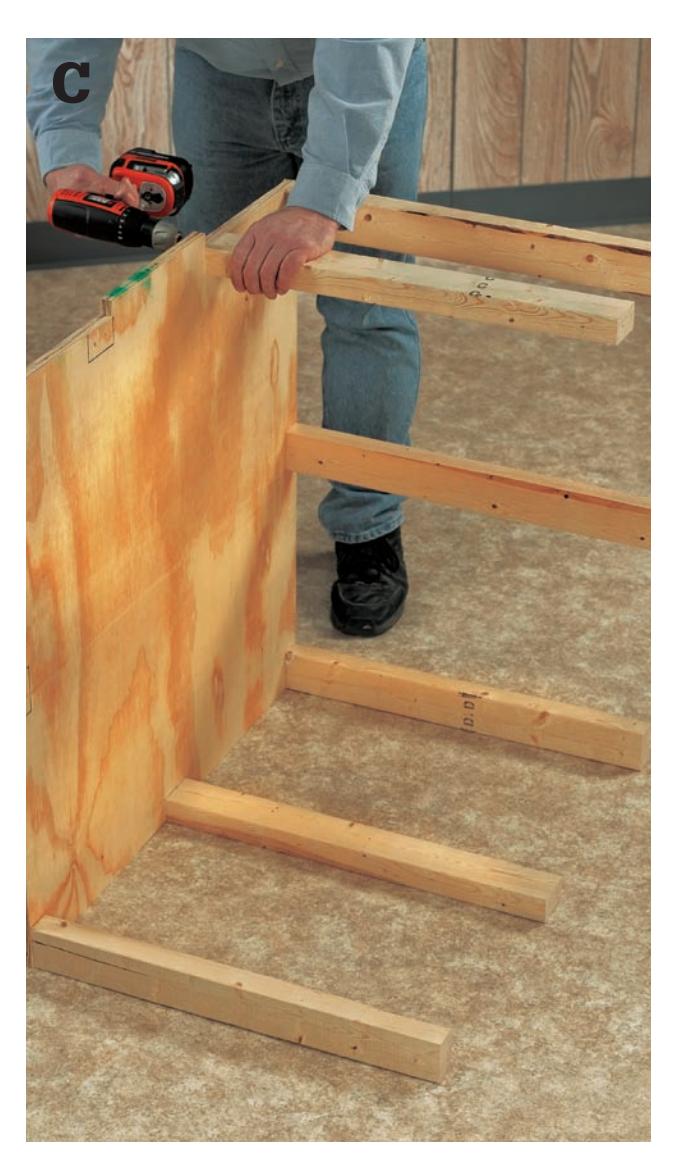
Drive a 3½” deck screw through the bottom of the floor deck and into a wall stud. Have a helper hold the stud, if possible.
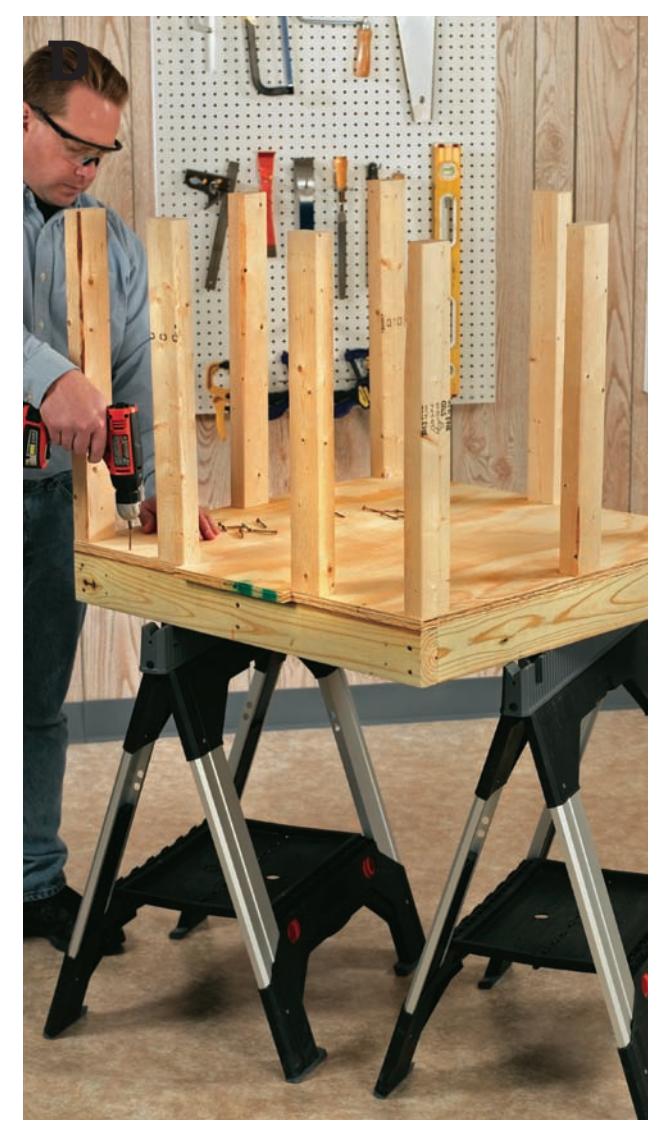
Attach the deck (with the studs attached to the deck but loose on top) to the floor frame with deck screws.
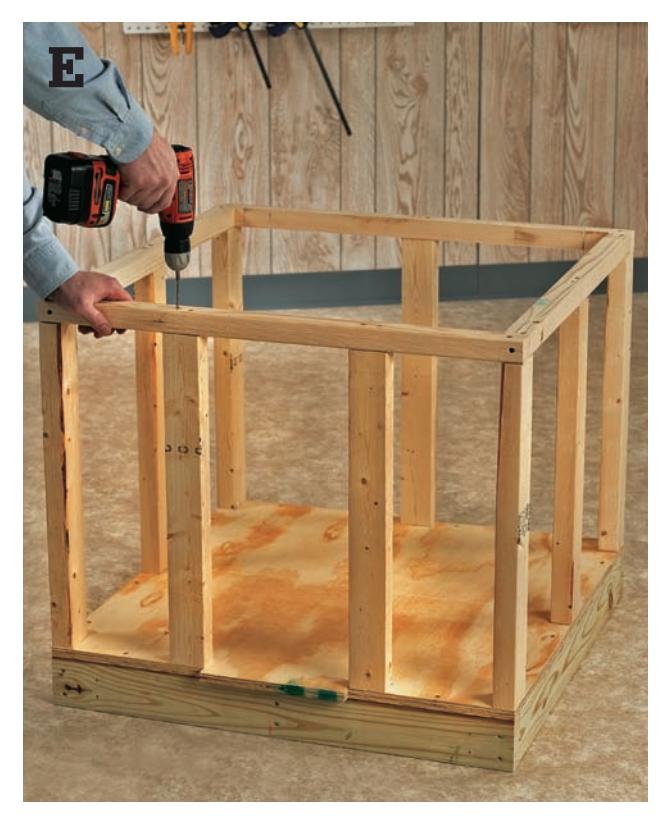
Drive a deck screw down into the last top plate to complete the stud walls.
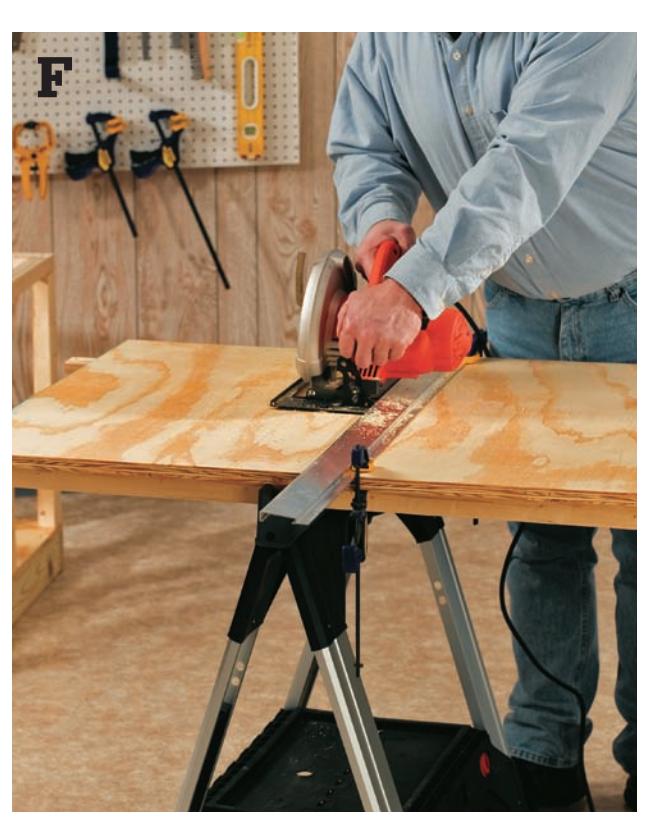
Cut out the wall sheathing panels from CDX plywood, using a circular saw and straightedge guide.
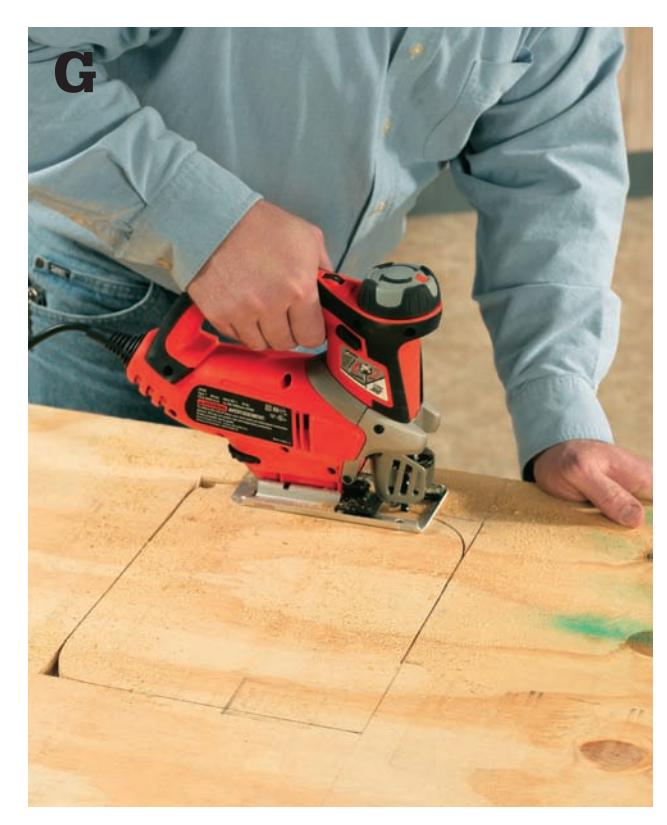
Drill starter holes and then make the door cutout in the front wall sheathing.
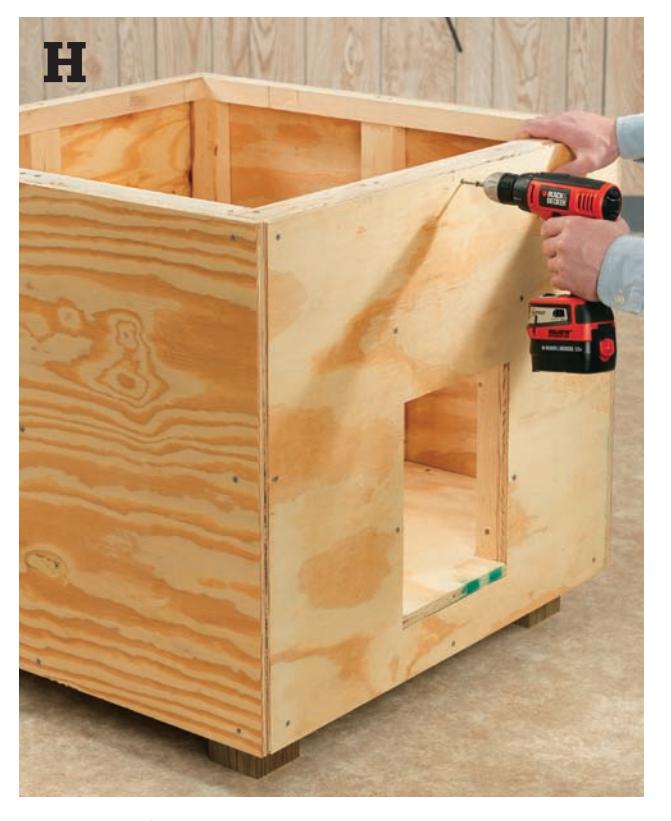
Attach the front piece of wall sheathing to the framing last.
Staple one long piece of building paper all around the doghouse, then trim the top. Cut out the door opening with a utility knife (cut from the inside, following the door opening edges).
Use galvanized finish nails to nail the front base trim piece in place.
Attach wall sheathing to the wall and floor framing with $1^{5}/_{8}$” deck screws. Apply the front and back panels first. The threshold tongue should fit through the door opening (photo H).
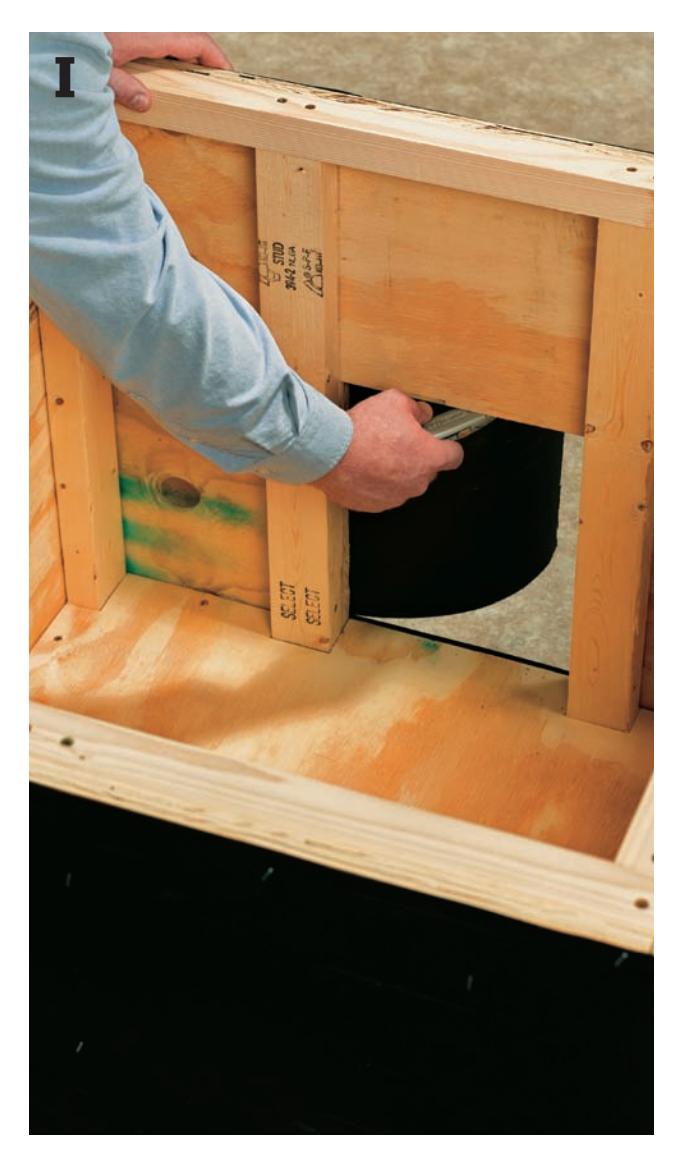
Staple 15-pound building paper (use two layers for stucco) to the doghouse walls. Wrap the entire house with one course of building paper so the bottom edge of the paper is flush with the bottom edge of the sheathing. Staple the building paper every eight square inches or so, then trim off the excess at the top and cut out the door opening (photo I).
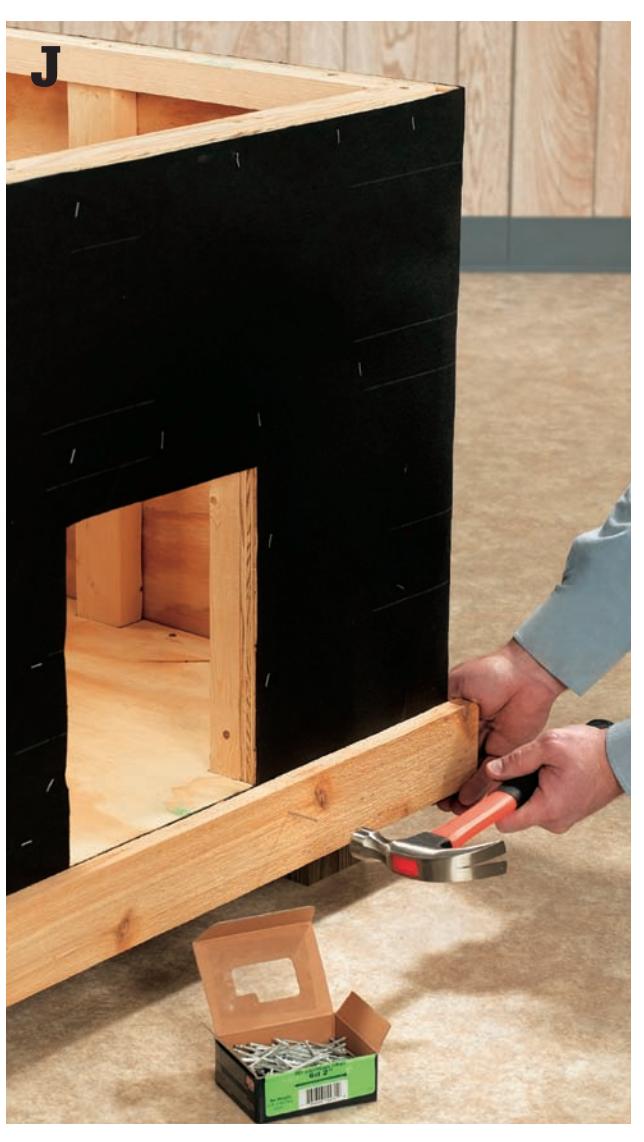
Cut the base trim boards to size. Using 2” galvanized finish nails, attach the front trim piece so the top edge is flush with the top of the floor deck. The ends should overhang the sheathing by $frac{3}{4}$” on each side (photo J).
Attach the side and back trim boards with finish nails, making sure the top edges of the trim boards are level with the top of the front base trim board.
Attach the top trim/frieze boards so the top edges are all even with the top edges of the sheathing and the stud wall caps. If the sheathing panels are not quite level with one another, install the trim so the tops are level with the lowest point on the wall sheathing and each board is parallel with the base trim beneath it.
Attach the head casing so the overhang on the side casing is equal.
Nail aluminum drip-edge flashing so it fits over the top edges of the base trim pieces.
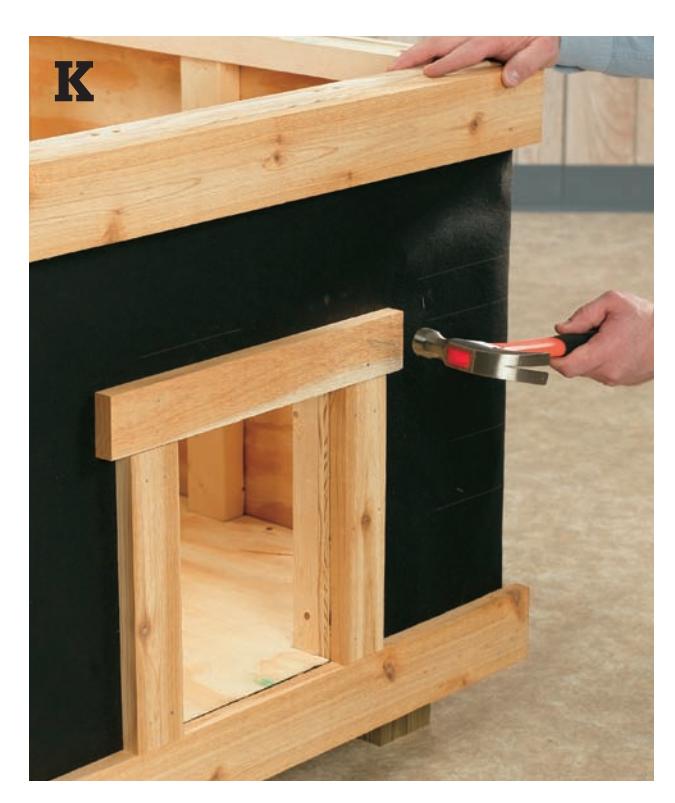
Attach the two door casing trim pieces so they rest flush on the top edge of the base trim and are flush with the edges of the door opening. Cap the side trim pieces with the cap trim, centering the cap piece so the overhang is equal on both edges (it should be 1” per side) (photo K).
Mount a 2”-dia. hole saw in your power drill and drill two 2” holes into the back wall, centered side to side and about 2” down from the top. Insert 2” dia. circular louvers into the hole so the flange is about $frac{3}{8}$” away from the wall on the outside of the doghouse. You’ll need to work around the louvers as you install the stucco, but it is easier than trying to cut through the stucco after it is applied.
APPLY THE STUCCO FINISH
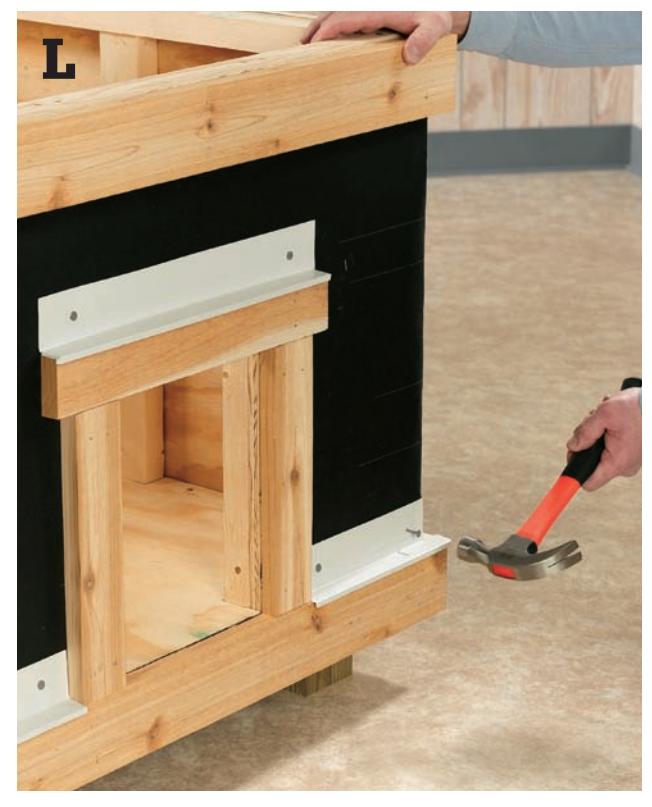
Using $frac{1}{2}$” roofing nails, nail drip-edge flashing to the doghouse walls so the drip-edge covers and overhangs slightly the base trim. Make a relief cut and miter the corners of the flashing. The drip edge will direct moisture away from the trim pieces (photo L). Drill 2”-dia. vent holes near the top of the back panel and insert round, louvered vent covers (photo M).
Attach stucco lath (self-furring expanded metal lath) to the walls of the doghouse using galvanized fencing staples (photo N). At the corners, attach stucco edging using $1frac{1}{2}$” roofing nails. Also attach edging (or drip screed) at the bottom edges of the walls. Cut the lath with aviator snips so it fits around the circular louvers on the back wall.
A traditional three-coat stucco finish is always best, but if you wish to take a shortcut here, trowel preformulated stucco mix over the lath, following the manufacturer’s directions on the container (photo O). You can find this product at most home building centers or at your local concrete supplies dealer. Paint the stucco, if desired, after it has dried.
Tip ▶
To keep your grass roof groomed, don’t use your lawnmower. Use a string trimmer, or give your rabbit a break from his hutch (page 38) and let him munch on the grass a few times each week.
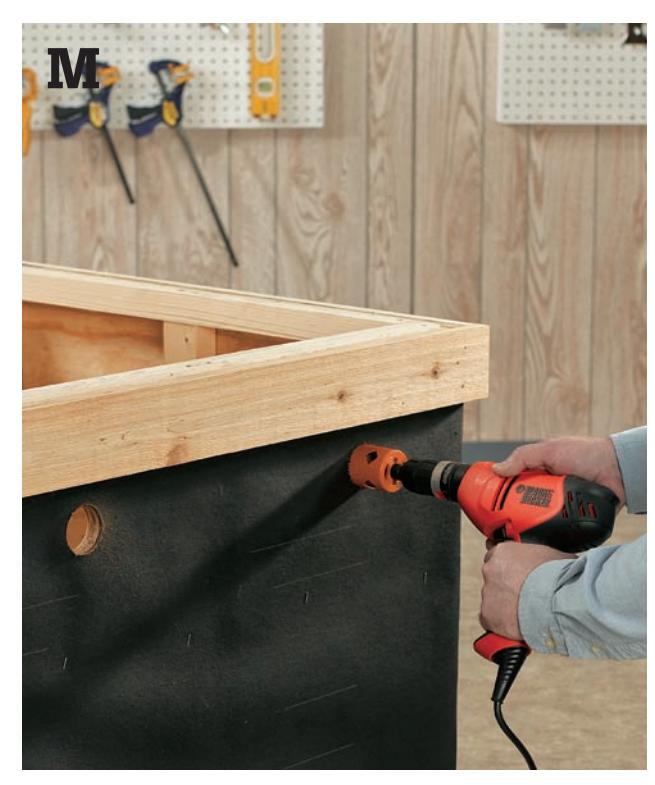
Drill two 2”-dia. holes in the back panel, near the top to create openings for round louver vent covers.
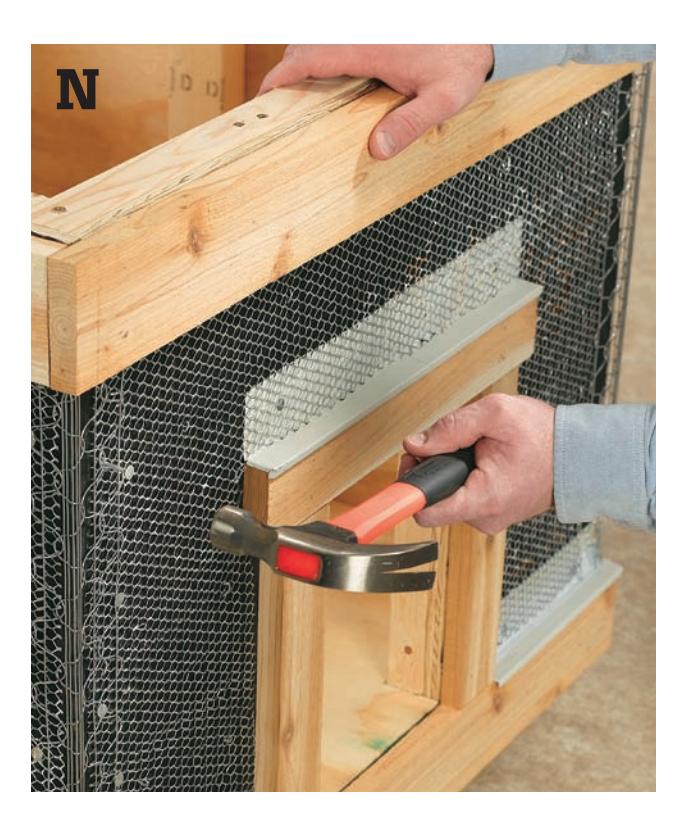
Attach stucco edging to the corners of the doghouse, using $1frac{1}{2}$” roofing nails. Stucco lath should already be attached.
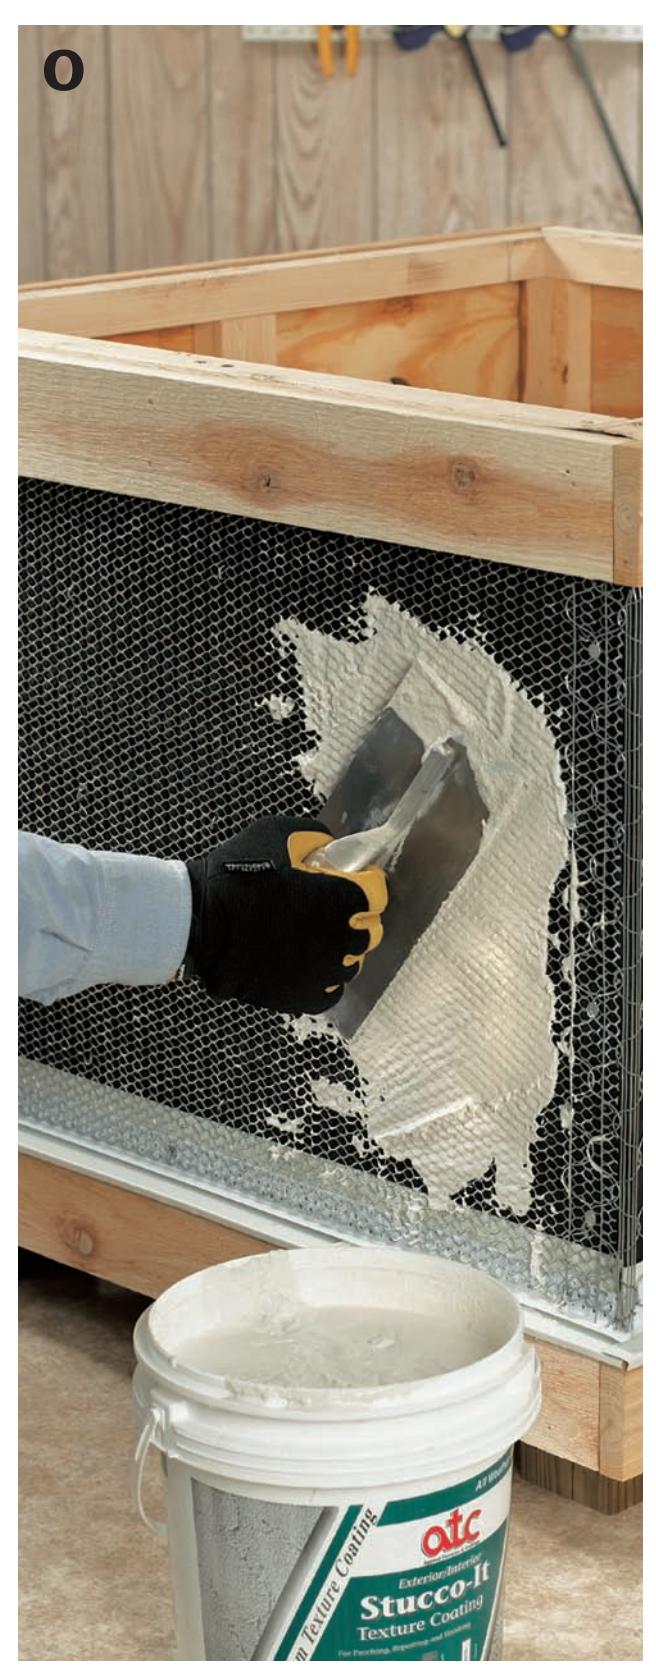
Apply premixed stucco (or a traditional stucco finish if you prefer) over the stucco lath according to the manufacturer’s directions.
BUILD THE GRASS ROOF
The grass roof on this doghouse, while optional, is responsible for much of the structure’s charm and efficiency. There is no standard way to construct a grass doghouse roof, but the main points are to make it leakproof, strong enough to support the sod, and to create some allowance for drainage.
Cut the plywood roof deck to size and coat it with waterproof deck sealer. Cut a piece of $frac{5}{8}$”-thick cement board to the same size. Cut cement board the same way you cut wallboard: score it with a utility knife and straightedge and then snap it over a $2 times 4$ (photo P). The cement board is an optional underlayment for the sod. It is not waterproof, but it will not disintegrate and prevents the sod from skidding or sliding. You can use two or three layers of 6-mil plastic instead.
Cut the deck frame pieces to length and attach them around the underside of the deck frame by driving $1frac{5}{8}$” deck screws down through the plywood and into the frame pieces. Also cut and install the stop frame that will fit inside the roof opening, centering the frame so it will be inset $3frac{1}{2}$” from all edges of the plywood deck. To create controlled roof runoff, cut a piece of $2^{7}/_{16}$” drip-edge flashing the same length as the width of the roof deck (in the back). Nail the drip edge to the top, back edge of the plywood deck. Then, apply construction adhesive to the underside (the smooth side) of the cementboard and place it on top of the plywood, capturing the edge of the drip edge between the layers. Caulk around the edges.
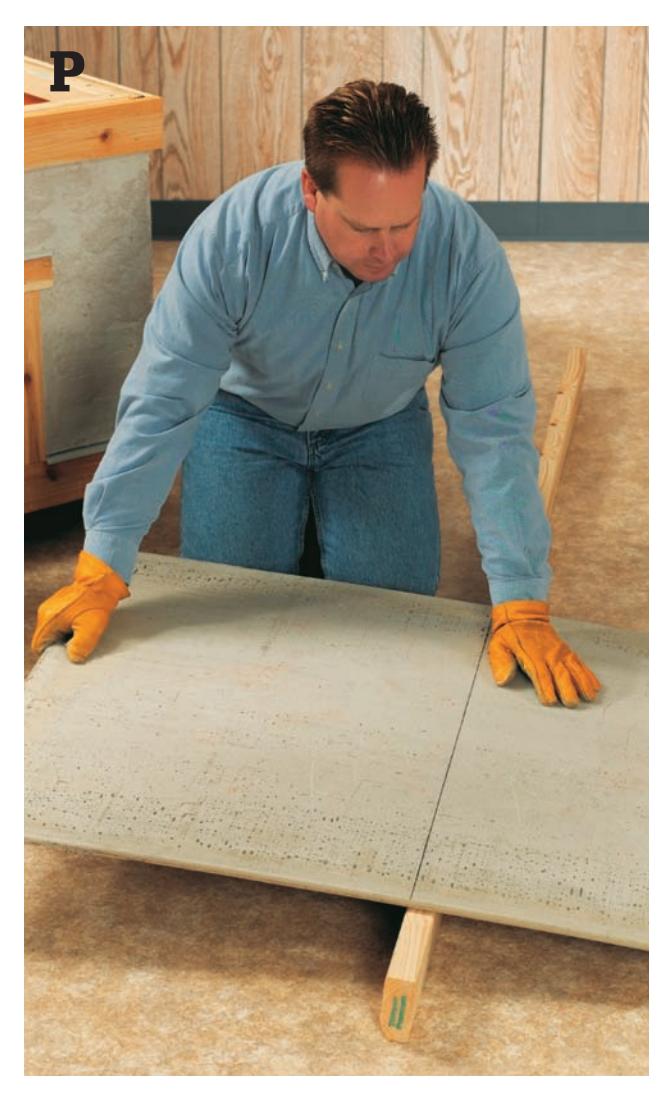
Cut a subbase for the sod roof from cementboard or a waterproof membrane.
Drive galvanized finish nails through the back fascia and into the front ends of the side fascia pieces.
Cover the roof with sod. Unless you have a ready supply of replacement sod, lay down a layer (1” or so) of growing medium.
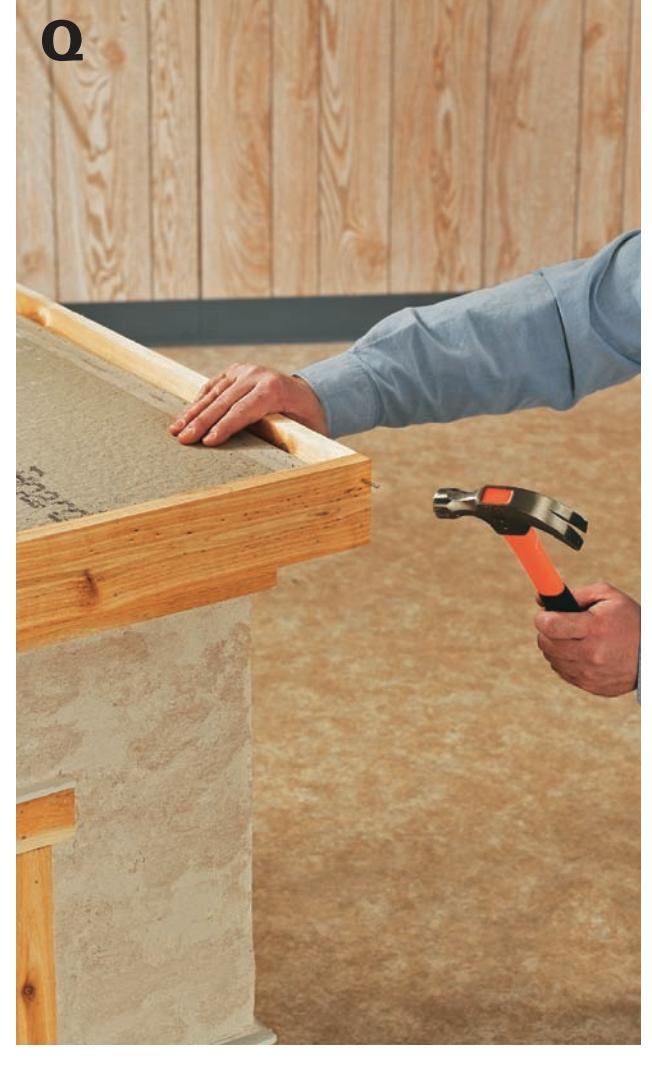
Cut the fascia to length. Attach the front fascia board with construction adhesive and 2” finish nails (galvanized) driven into the roof frame. The bottom edge of the fascia should be flush with the bottom edge of roof frame, leaving about $frac{1}{2}$” projecting above the surface of the roof deck. Attach the side fascia so the tops are flush with the front fascia, and then drive two nails through each end of the front fascia to lock-nail the side fascia pieces to it. Then attach the back fascia piece by driving finish nails through its face and into the ends of the side fascia boards. This should create a $frac{1}{2}$” drainage gap between the back fascia and the roof deck (photo Q).
Position the doghouse in your yard. To improve drainage, shim under the front legs about $1frac{1}{4}$” to pitch the doghouse toward the drainage gap in the back edge of the roof. Set the roof onto the house. Cut sod to fit and cover roof with it (photo R). Water sod frequently, as it will be vulnerable to drying out (positioning the house in partial shade will help prolong the life of the sod).
Small Animal Cage
Guinea pigs, ferrets, rats, and other small, furry pets require a bit more real estate than a small aquarium-size cage. Their available housing tends to fall into two categories: stark cages fabricated from metal hardware cloth, welded wire or mesh, or expensive plastic contraptions with coated wire walls. Both solutions leave a bit to be desired. If you long for a small animal cage that has the feel of home furnishings at the cost of a basic wire hutch, this cage project may be just the solution for you.
Because most small furry pets are gnawers, you don’t want to leave any wood structural members exposed to the cage inhabitants. So the wood corner posts and stiles on this plan are clad with light-gauge aluminum flashing, preserving the appeal of a wood frame. The frame itself is made from paint-grade poplar, which is a durable wood that’s naturally resistant to insects (hopefully, not something you need to be worrying about). We rip-cut some of the poplar parts to the exact dimensions we liked, but if you don’t have access to a table saw, you can modify the design pretty easily so the entire project can be made from stock dimensional lumber.
The galvanized sheet metal tray that fits inside the cage was fabricated for us at a sheet metal shop for around $40. If you prefer, you can try to make your own 24”-wide roll flashing, which is sold in 10-ft. lengths at most building centers. It’s considerably lighter than sheet metal, however, so you’ll probably want to add a rigid panel, if not a complete wood box that you can line with the flashing. Overall size of the structure is 15” deep x 15½” high x 66” long.
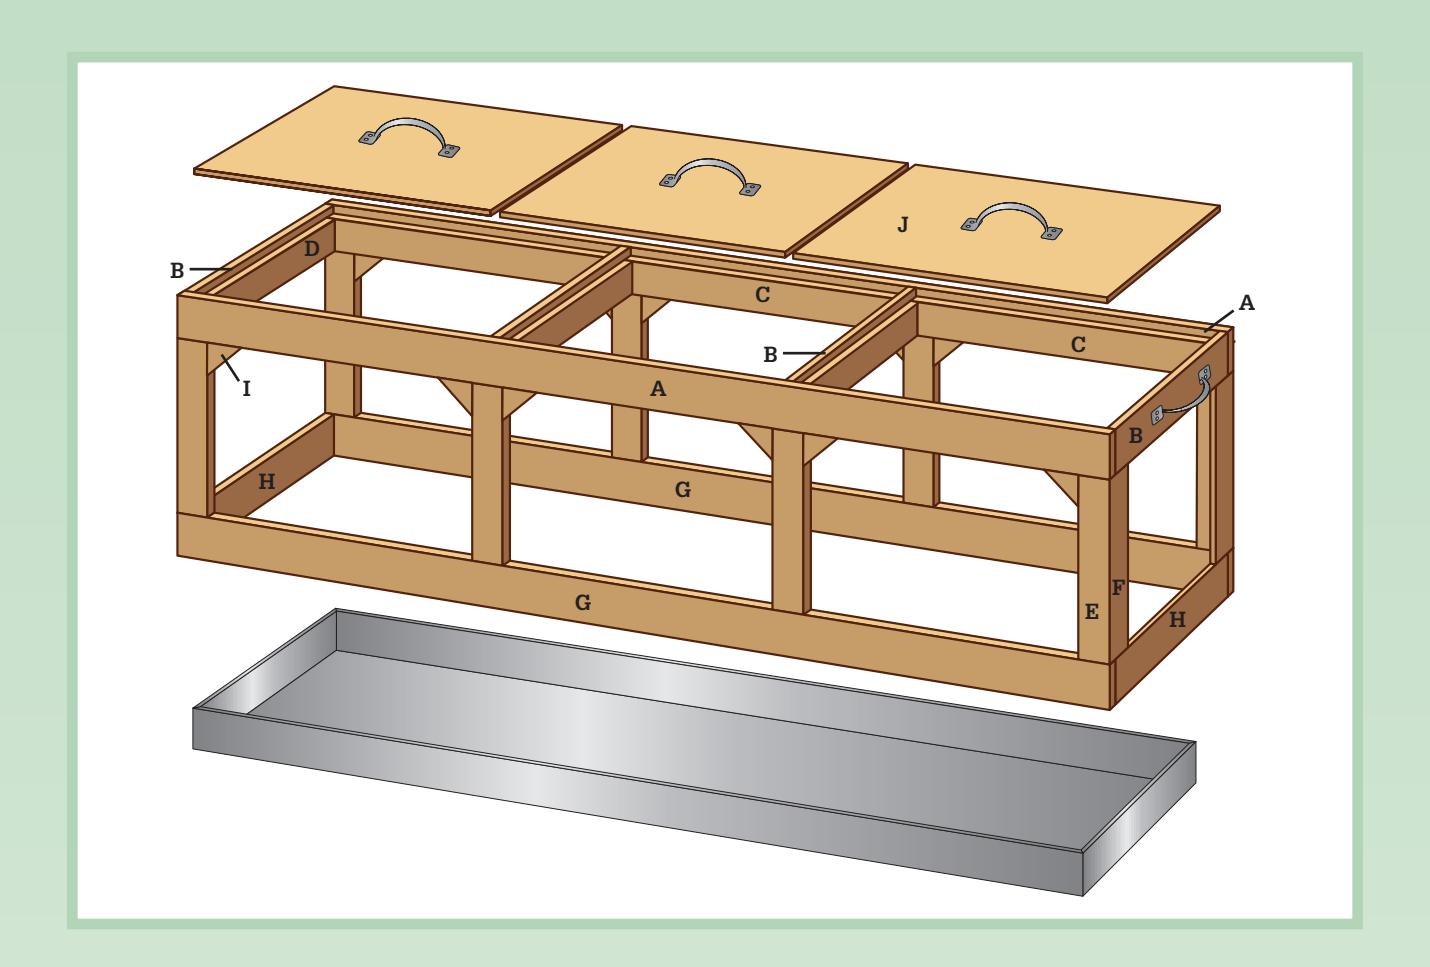
Materials
- (5) 3” aluminum utility handles
- Aluminum roll flashing
- (2) 1 x 2” x 8’ furring strips
- (2) 1/2” x 8 ft. retainer molding
- (3) 1 x 6 x 8 ft. poplar or pine
- (1) 1/2” x 4 ft. x 4 ft. plywood
- Aluminum brads
- 1/2” grid galvanized hardware cloth
Cutting List
| Key | Part | Size | Pcs. | Material |
|---|---|---|---|---|
| A | Cover frame-front/back | 3/4 x 2 x 66” | 2 | Poplar |
| B | Cover rail | 3/4 x 2 x 13 1/2” | 4 | Poplar |
| C | Cover ledge front/back | 3/4 x 1 1/2 x 21” | 6 | 1 x 2 Pine |
| D | Cover ledge – side | 3/4 x 1 1/2 x 12” | 6 | 1 x 2 Pine |
| E | Post | 3/4 x 2 x 10” | 8 | Poplar |
| F | Post filler | 3/4 x 1 1/4 x 10” | 4 | Poplar |
| G | Bottom rail front/back | 3/4 x 3 1/2 x 66” | 2 | Poplar |
| H | Bottom rail – side | 3/4 x 3 1/2 x 13 1/2” | 2 | Poplar |
| I | Corner block | 3/4 x 2 x 2” | 16 | Poplar |
| J | Lid | 1/2 x 13 1/4 x 20 3/4” | 3 | 1/2” Plywood |
| K | Decorative lid trim | 1/2” (Cut to fit) | Half-round retainer molding | |
| L | Metal tray | 4 x 13 x 64” | 1 | Galvanized sheet metal |
How to Build a Small Animal Cage
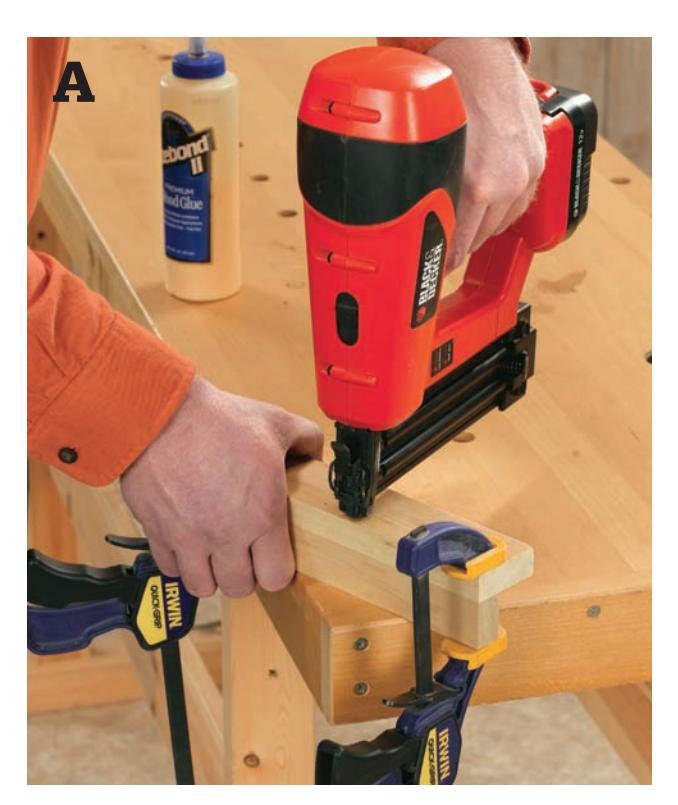
Rip nominal 1 x poplar into 2”-wide strips (you’ll need about 20 lineal feet 2” wide). Also rip stock to 3 1/2” wide for the bottom rail pieces and the post filler strips. If you do not have access to a table saw, purchase three 8-ft. long 1 x 2 and two 8-ft.-long 1 x 4. Cut the parts to length. Create the corner posts by butting a post filler strip against a post at a right angle and attaching with glue and finish nails or pneumatic brad nails (photo A). Clamp the parts together to help make a cleaner joint. After the glue has set up, sand the joints to smooth out any irregularities.
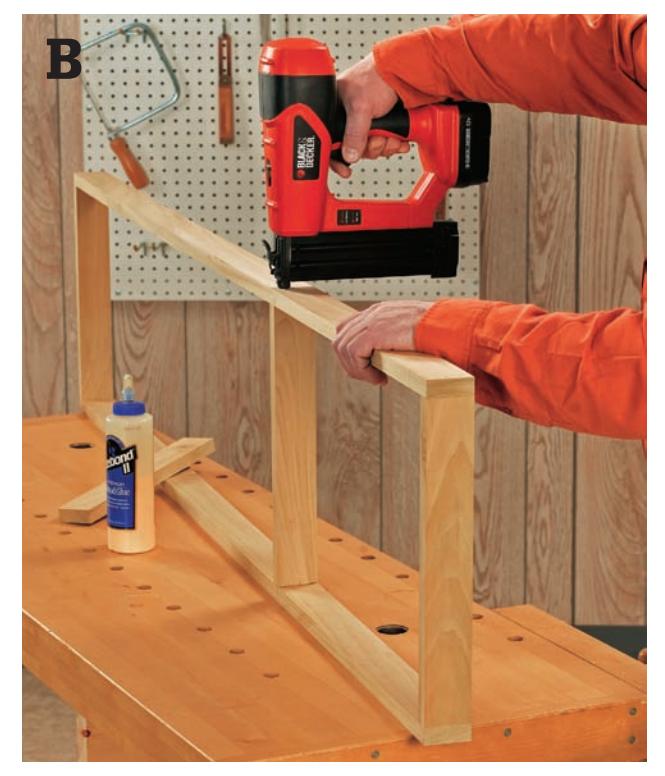
Assemble the cover frame with glue and finish nails (photo B). Check the corners for square with a framing square. The two end rails should be installed between the front and back rails. The intermediate rails should be centered between the end rails. Once the cover frame is assembled and the glue has dried, cut the cap ledges from 1 x 2 pine furring strips. Attach the ledges inside the top frame openings so the bottoms are flush with the bottoms of the frame rails. This will create a 1/2”-deep recess for the 1/2”-thick lids to fit into.
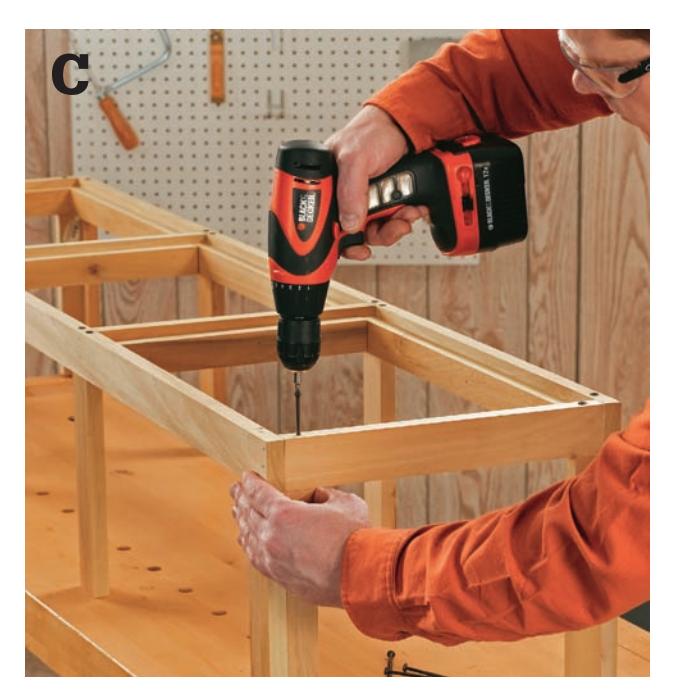
Mark locations for the corner post assemblies and the intermediate posts on the top frame. Drill countersunk pilot holes through the top frame at each post location (two pilot holes per post). Set the posts in position beneath the frame and extend the pilot holes into the top ends of the posts. Attach the posts with glue and 3” wood screws (photo C).
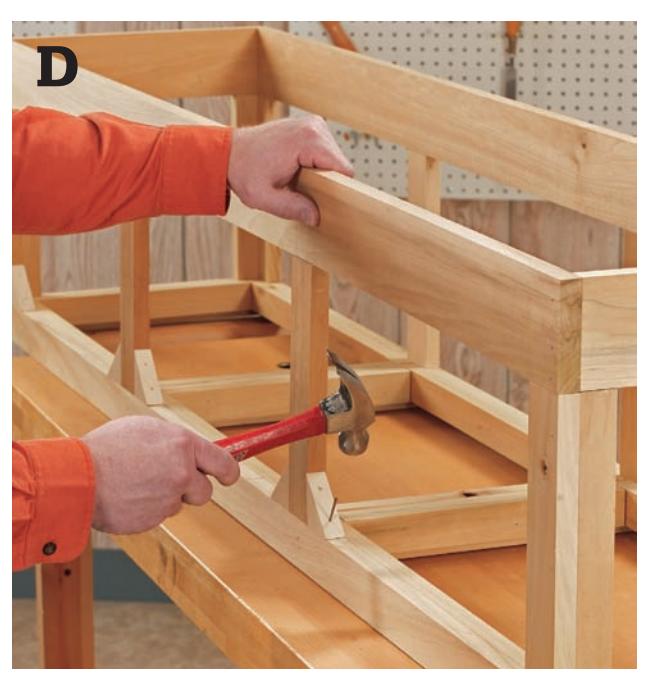
Once the top frame is attached to the posts, glue and nail the bottom frame parts together and, after the glue dries, attach the bottom frame to the bottoms of the posts with glue and 6d finish nails driven toenail style into pilot holes in the bottoms of the posts. Cut triangular nailing blocks (2” legs) from 2”-thick strips and glue and nail them into the top and bottom corners of the wall frame bays (photo D). Be sure to drill pilot holes before nailing.
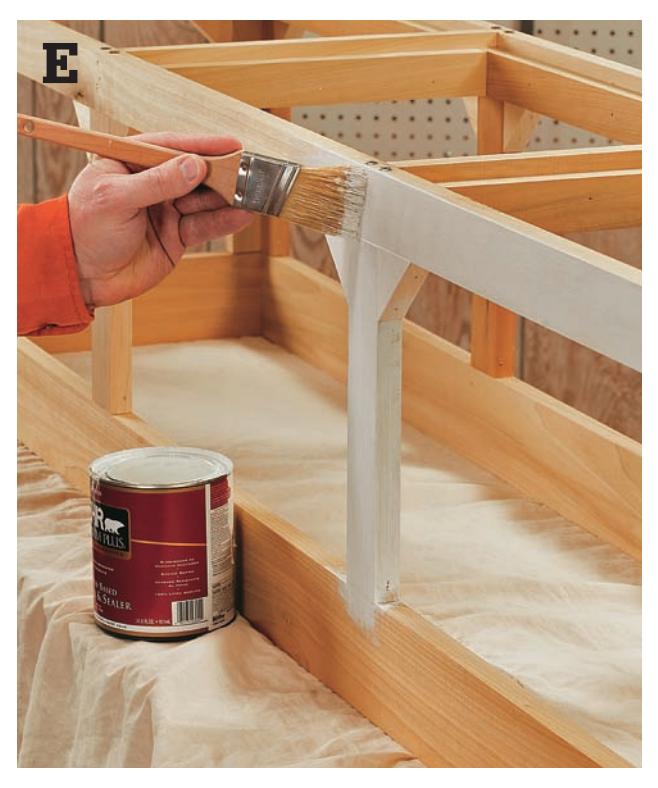
Fill nail and screw holes with wood putty; then sand the frame so the surfaces are smooth and the joints are even. Apply a coat of primer (photo E) and at least one coat of enamel paint (or finish with stain and polyurethane if you are using hardwood).
Material Usage Tip
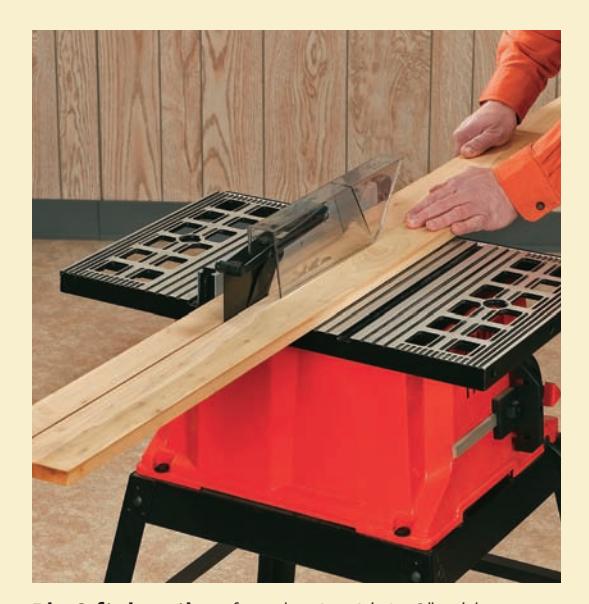
Rip 8 ft.-lengths of poplar 1 x 6 into 2”-wide strips on your table saw (or use a circular saw and straightedge). If you use nominal 1 x 6, with its actual size of 5 1/2” wide, you can rip two 2” strips and a 1 1/4” strip from each board.
Nail cladding (aluminum flashing) on the inside faces of the corner posts to discourage gnawing.
To clad the inside post faces (not a critical step, but recommended), cut four strips of aluminum flashing to 3 1/2” wide and 10” long for the corners. Crease the strips in half lengthwise and insert each piece of flashing into the inside angle of a frame corner. Nail the flashing to the wood surfaces with aluminum brads. Then, crease the free edges of the flashing so they fold crisply over the edges of the corner posts. Flatten the free ends against the post side and nail securely (photo F). For the intermediate posts, cut the flashing strips to 3 x 10” and crease the strips to conform to the back faces of the posts, nailing them on the side edges.
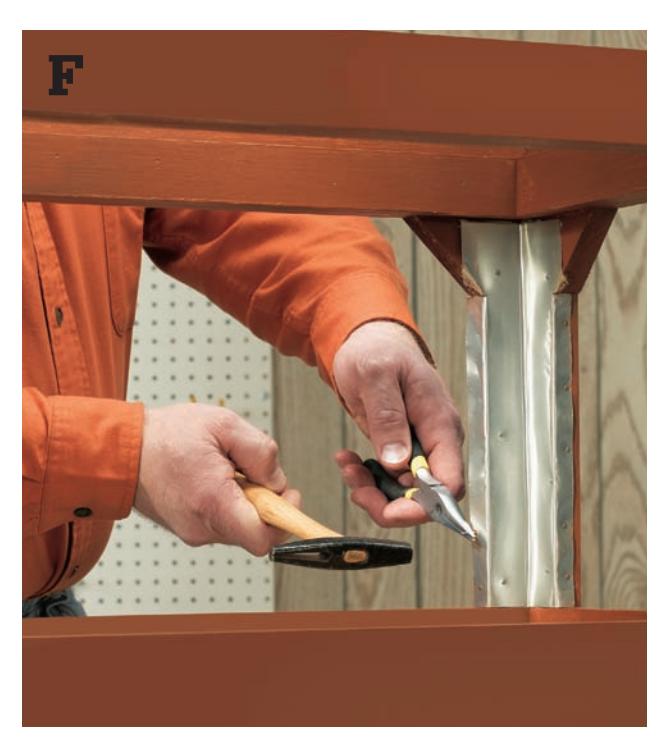 on the inside faces of the corner posts to discourage gnawing.”)
Cut the lids to size from 1/2”-thick plywood or particleboard. Paint the lids (a contrasting color can have a nice design impact here). For a decorative touch, make a mitered frame from half-round molding and glue and nail it to the top of each lid, inset about 1” from the lid edges (photo G).
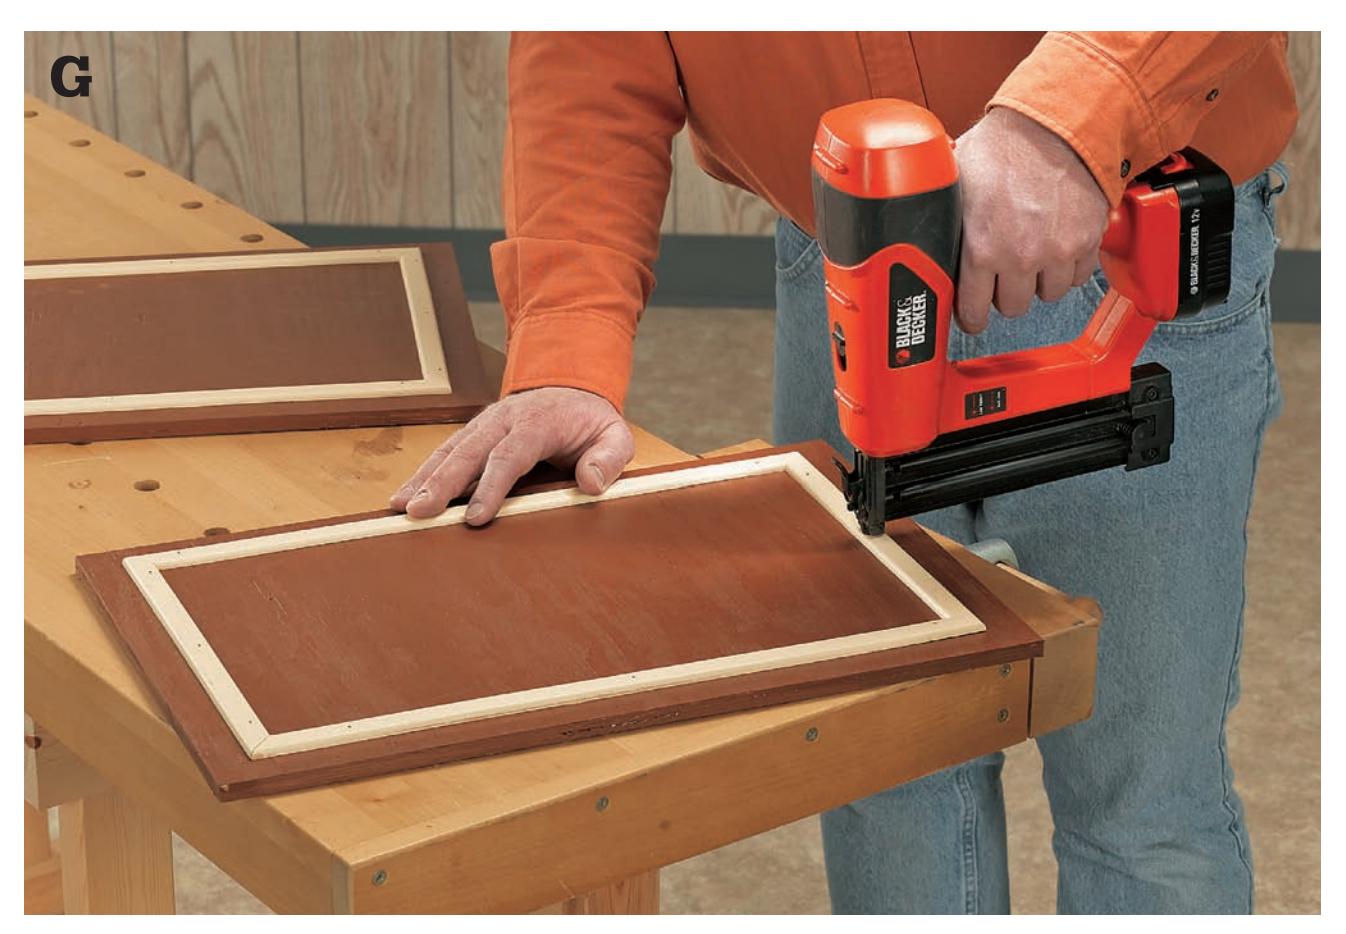 and install them on the tops of the lids.”)
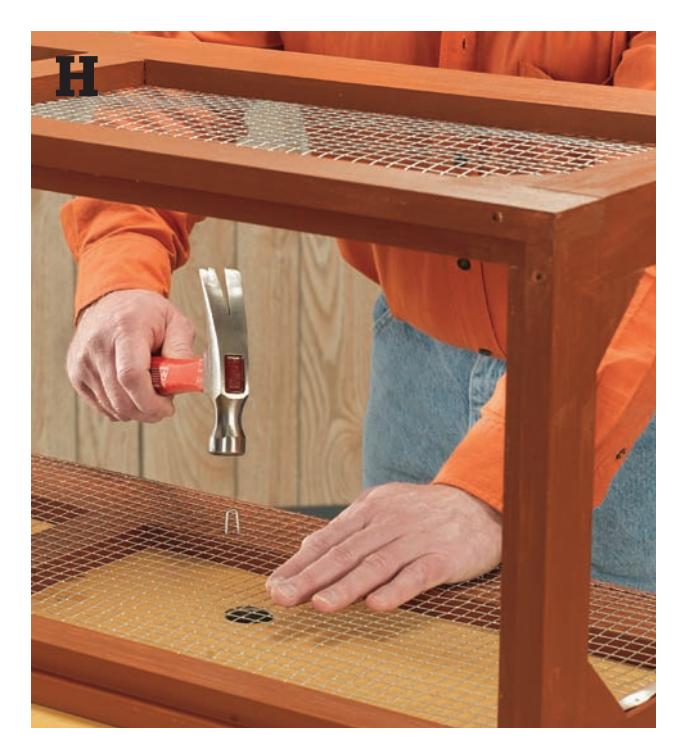
Install a 3” utility handle in the center of each lid. Also install handles at the top side frame members, centered front to back. Cut the fencing or hardware cloth into sections to fit the four walls. We used 1/2” grid hardware cloth. Attach the fencing or cloth to each wall with fencing staples that are hammered into the backs of the posts and the frame (photo H). Make sure there are not sharp wire ends exposed.
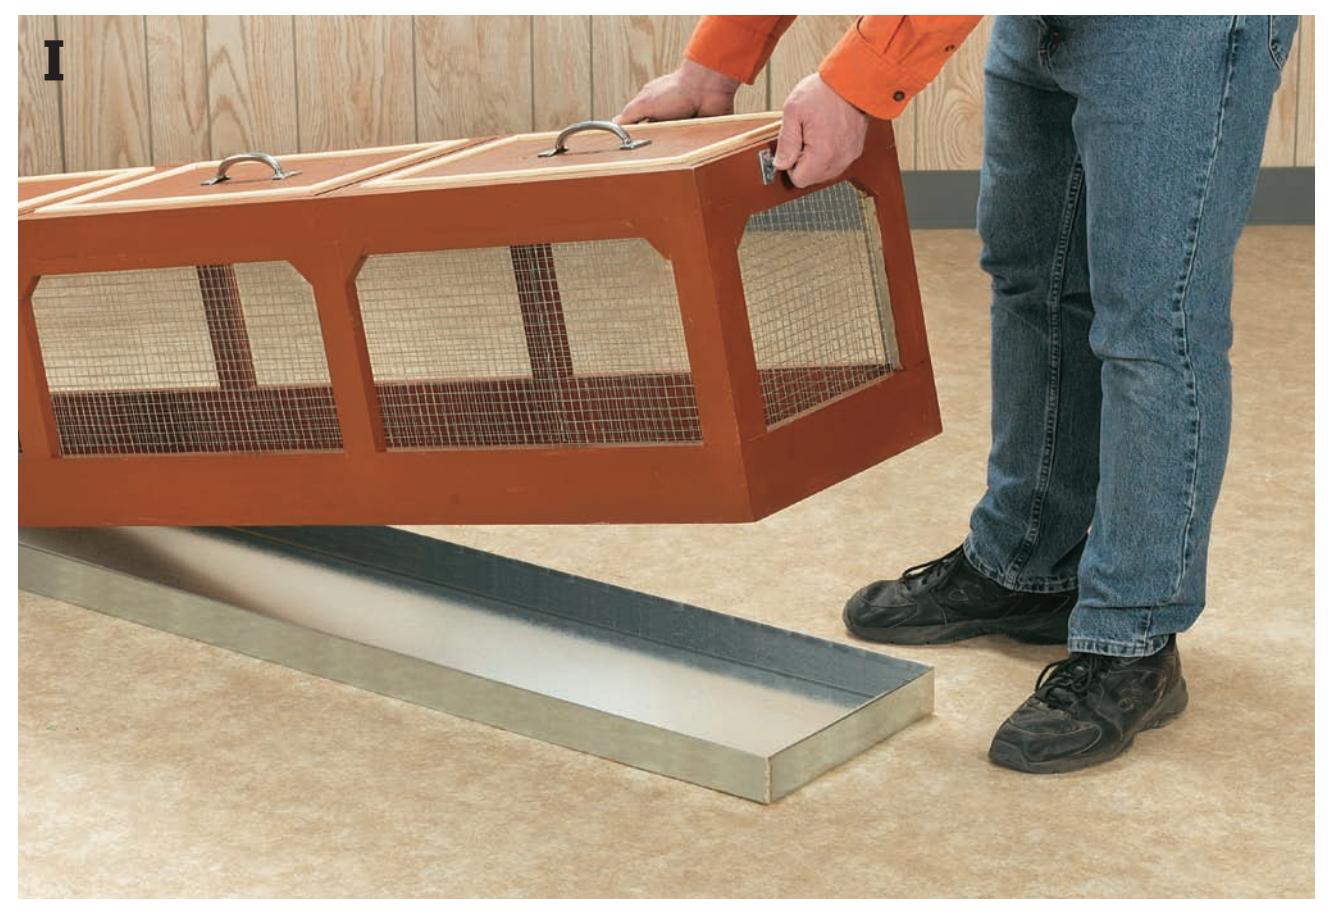
Make (or have fabricated) a 4” high by 13”-wide by 64”-long sheet metal tray. We had ours made from 20-gauge galvanized sheet steel at a local sheet metal fabricator. Set the tray on the surface where you will be keeping the animal house (photo I). Line the tray with newspapers and bedding as you prefer, and then set the framed cage down onto the surface so it fits around the tray. You should not need to fasten the frame down. If your cage will house pets such as ferrets that climb and may try to escape the cage, add turnbuckle latches to hold the lids down.
Rabbit Hutch
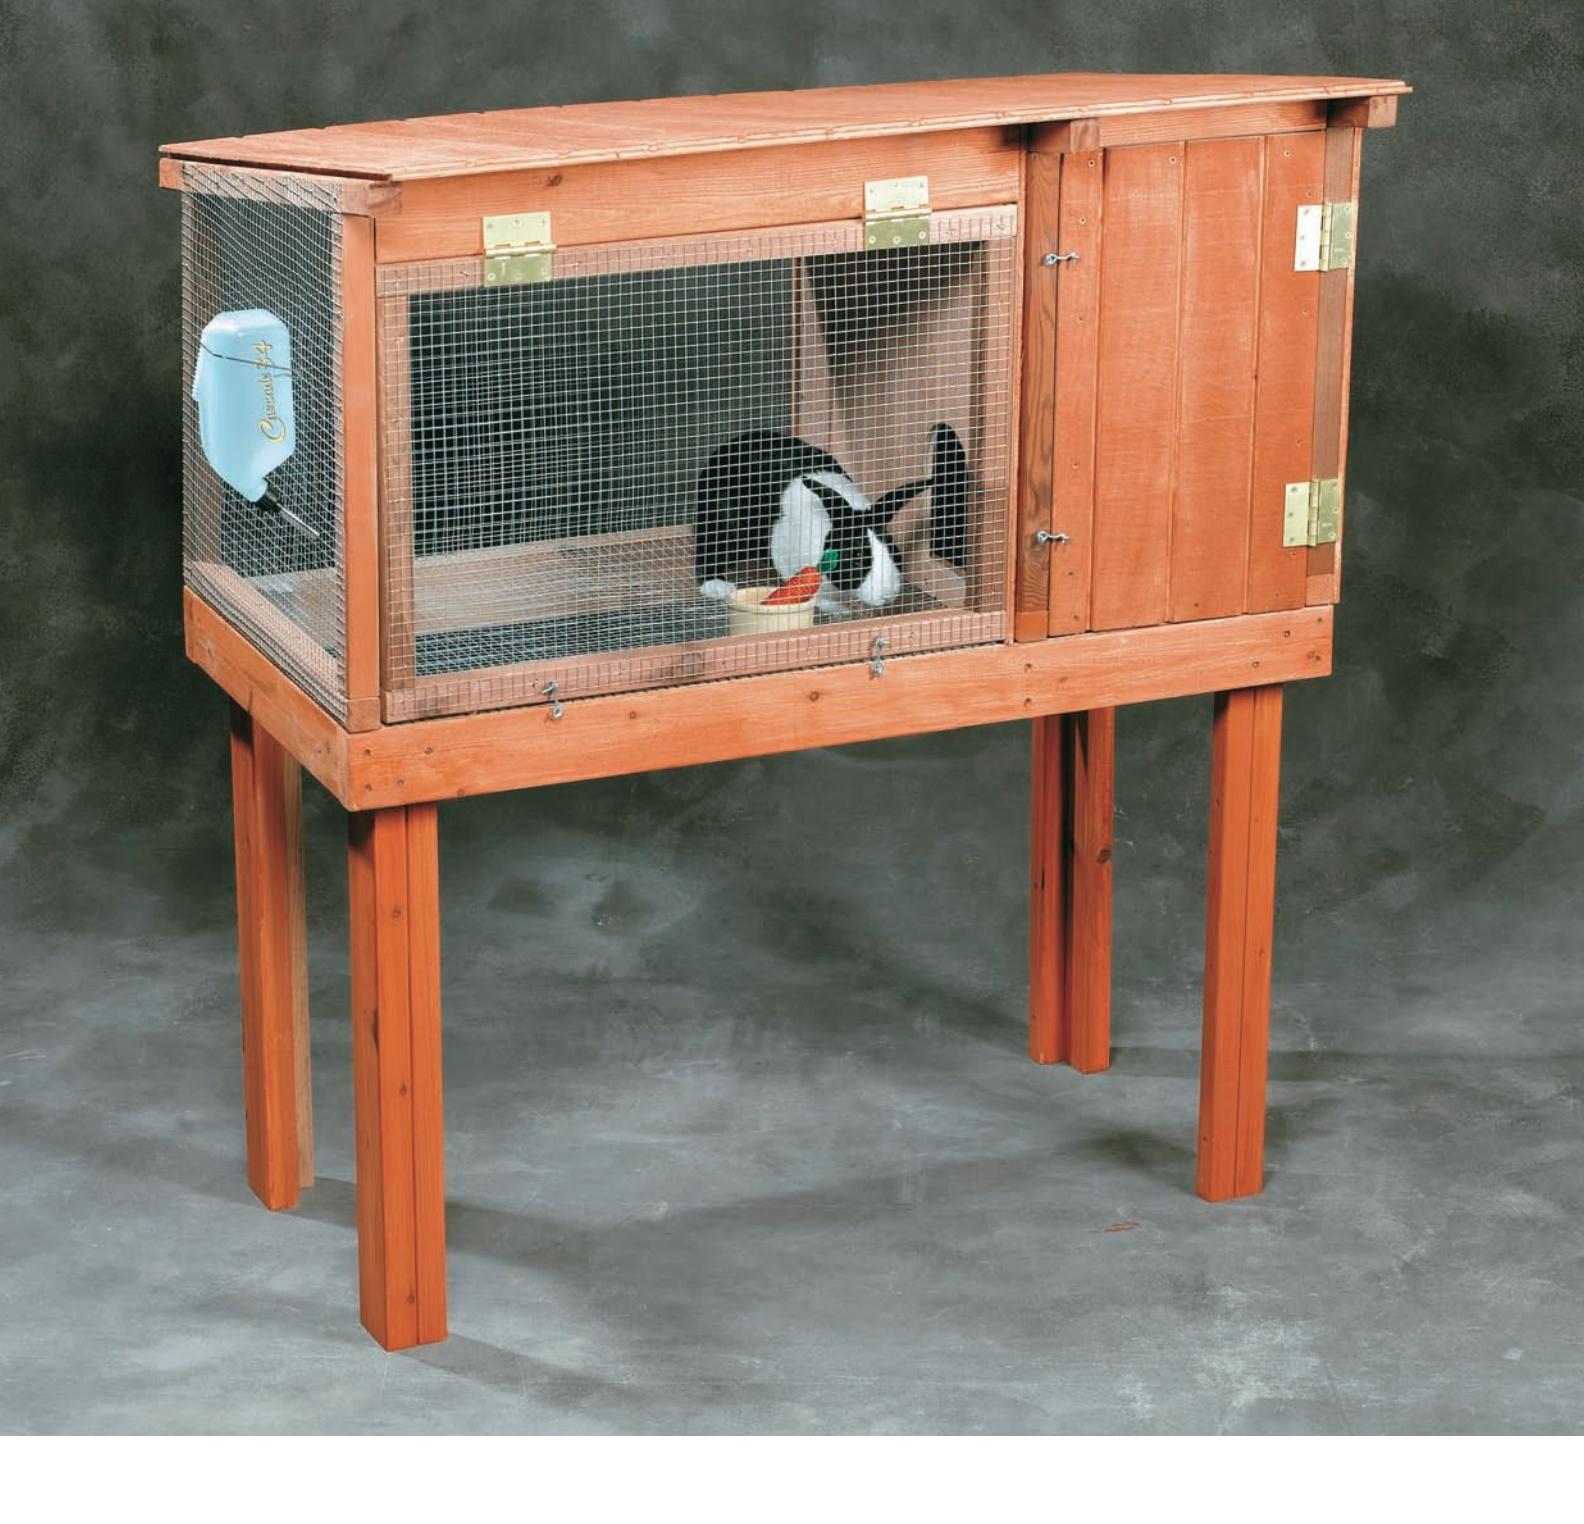
This rabbit hutch is an easy-to-build outdoor shelter for your bunny. The floor is made of hardware cloth which allows droppings to fall through, but is easy on the rabbit’s feet. A large airy compartment is enclosed with hardware cloth and a cozy smaller compartment is sided. Each compartment has a door to make feeding and cage cleaning an easier task.
Place straw or wood shavings in the compartment to make comfortable bedding for bunny.
Finish the rabbit hutch with an animal safe exterior stain. Place the hutch in a protected area out of direct sun.
Materials
- 1/2” x 4 x 8’ hardware cloth
- 3/4” fence staples
- 1/4” and 2-1/2” deck screws
- (4) 3 x 3” hinges
Cutting List
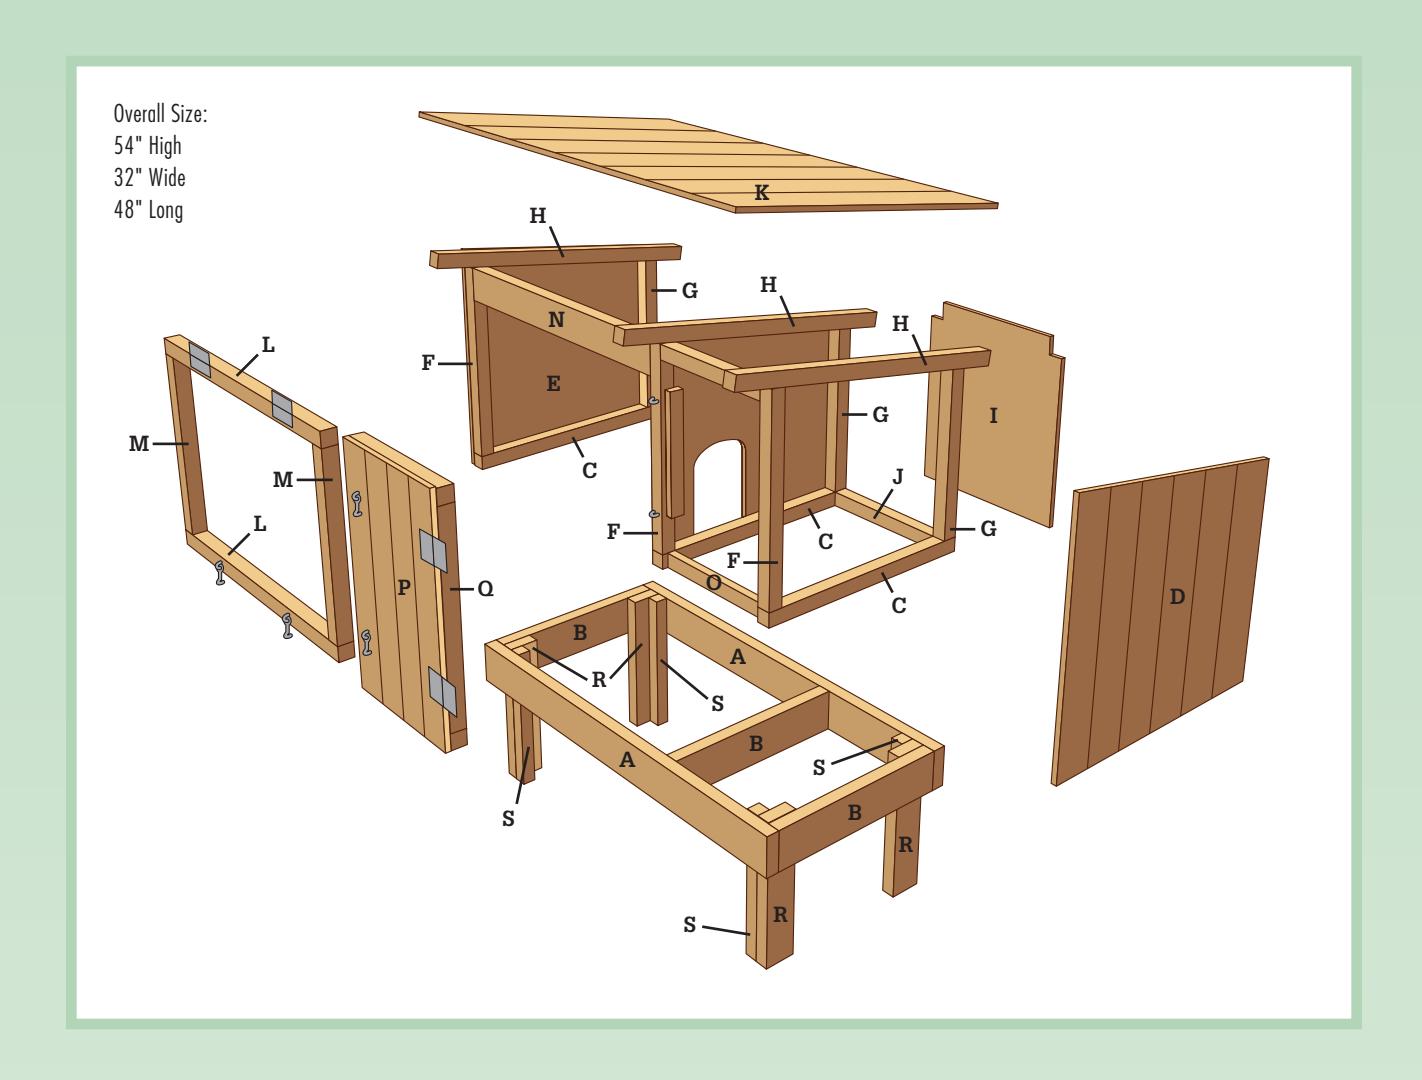
| Key | Part | Dimension | Pcs. | Material |
|---|---|---|---|---|
| A | Floor side | 11/2 × 31/2 × 471/2” | 2 | Cedar |
| B | Floor crosspiece | 11/2 × 31/2 × 21” | 3 | Cedar |
| C | Frame base | 11/2 × 11/2 × 24” | 3 | Cedar |
| D | Right side wall | 1/2 × 24 × 24” | 1 | Siding |
| E | Left side wall | 1/2 × 24 × 24” | 1 | Siding |
| F | Frame front | 11/2 × 11/2 × 21”* | 3 | Cedar |
| G | Frame back | 11/2 × 11/2 × 171/2”* | 3 | Cedar |
| H | Frame top | 11/2 × 11/2 × 32” | 3 | Cedar |
| I | Back wall | 1/2 × 171/4 × 20” | 1 | Siding |
| J | Back wall stop | 11/2 × 11/2 × 131/4” | 1 | Siding |
| K | Roof | 1/2 x 32 x 48” | 1 | Siding |
| L | Door crosspiece | 11/2 x 11/2 x 291/2”* | 2 | Cedar |
| M | Door side | 11/2 x 11/2 x 173/4”* | 2 | Cedar |
| N | Hinge support | 11/2 x 31/2 x 291/2”* | 1 | Cedar |
| O | Door jamb | 11/2 x 11/2 x 131/4”* | 1 | Cedar |
| P | Compartment door | 1/2 x 13 x 221/2”* | 1 | Siding |
| Q | Door supports | 11/2 x 11/2 x * | 4 | Cedar |
| R | Legs | 11/2 x 31/2 x * | 4 | Cedar |
| S | Legs | 11/2 x 11/2 x * | 4 | Cedar |
- (4) hook and eye fasteners
- (7) 2 x 2” x 6’ cedar
- (7) 2 x 4” x 6’ cedar
- (1) 1/8 x 4 x 8 grooved cedar plywood siding (T1-11)
*Cut to fit.
How to Build a Rabbit Hutch
Build the Floor
For all screws in this project, drill a 1/4” pilot hole and a 1/8”-deep counterbore.
Cut the floor sides and crosspieces. Mark a point 15 3/4” from the right ends of the side pieces.
Set the pieces on edge and apply exterior glue to the crosspiece ends. Drive 21/2” deck screws through the sides into the ends. Center the third crosspiece at the mark and attach (photo A).
Cut a six-foot section of hardware cloth. Align one corner of the cloth with the right front corner of the floor. Attach it with 3/4” fence staples every 4”.
Build the Compartment Sides
Cut the frame bases and side walls. Place the walls together with the smooth sides facing in. Make a mark at 20” on a lengthwise side. Draw a line from the mark to the nearest opposite corner. Cut on the line to create the left and right peaked walls.
Make the door cutout on the inside wall by marking a 5 x 5” square 11/2” up from the bottom and 4” from the front (longer) edge. Use a compass to draw an arch on top of the square. Drill a starter hole and use a jig saw to cut along the lines.
Align a frame base with the inside bottom of a wall. Attach the wall to the frame with 11/4” deck screws. Repeat with the second wall and base.
Draw a line across the inside of the walls, 11/2” down from the peaked edge. Cut three sets of frame fronts and backs to fit between the frame base and the angled line. Attach using 11/4” deck screws through the siding into the frames.
Cut the frame tops. Center a top against each wall. Mark the ends so they are parallel with the sides and cut (photo B). Using one of these frame tops, cut the third frame top to match.
Build the Cage Side
Assemble the third set of frame pieces cut in the previous step. Drive 21/2” deck screws through the frame base into the square ends of the frame front and frame back.
Center the frame top across the front and back. Make sure it matches the extension of the two compartment sides. Use 21/2” deck screws to attach the top to the mitered ends of the front and back (photo C).
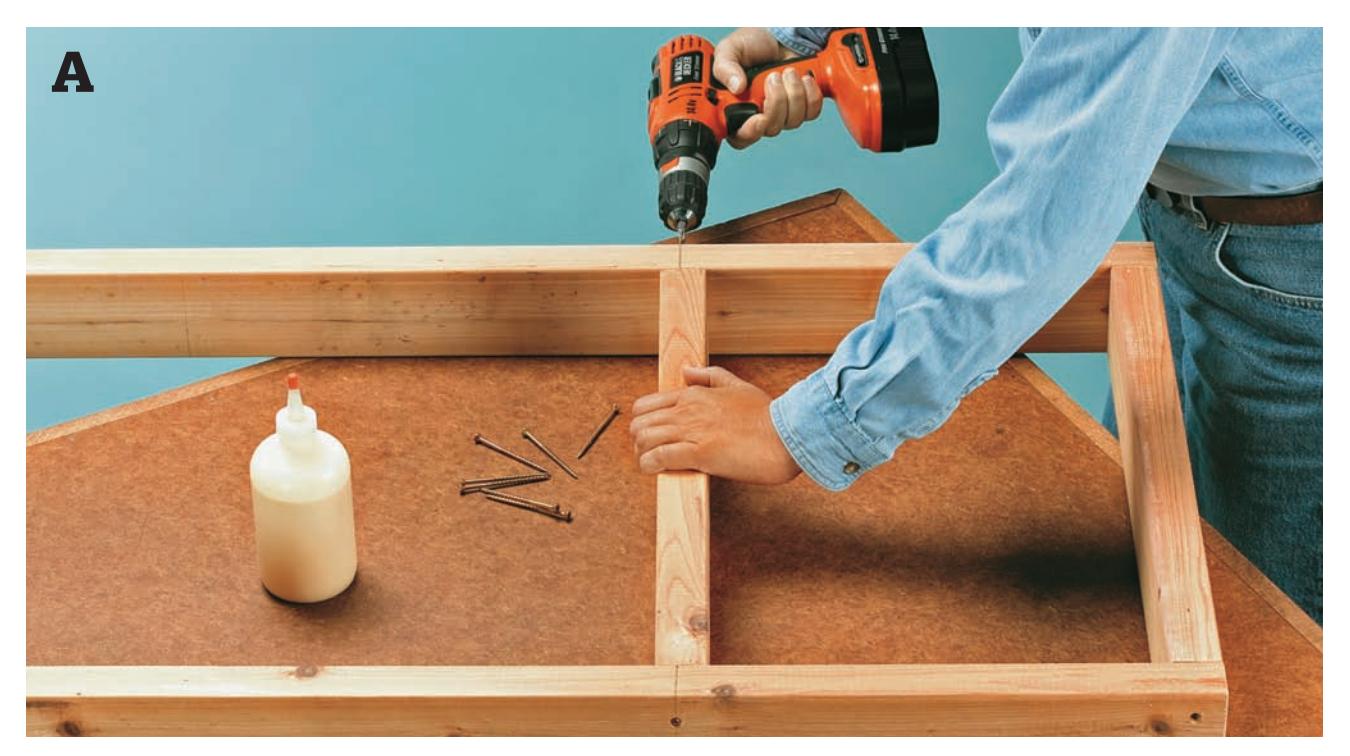
Attach the crosspieces between the sides to make the floor.
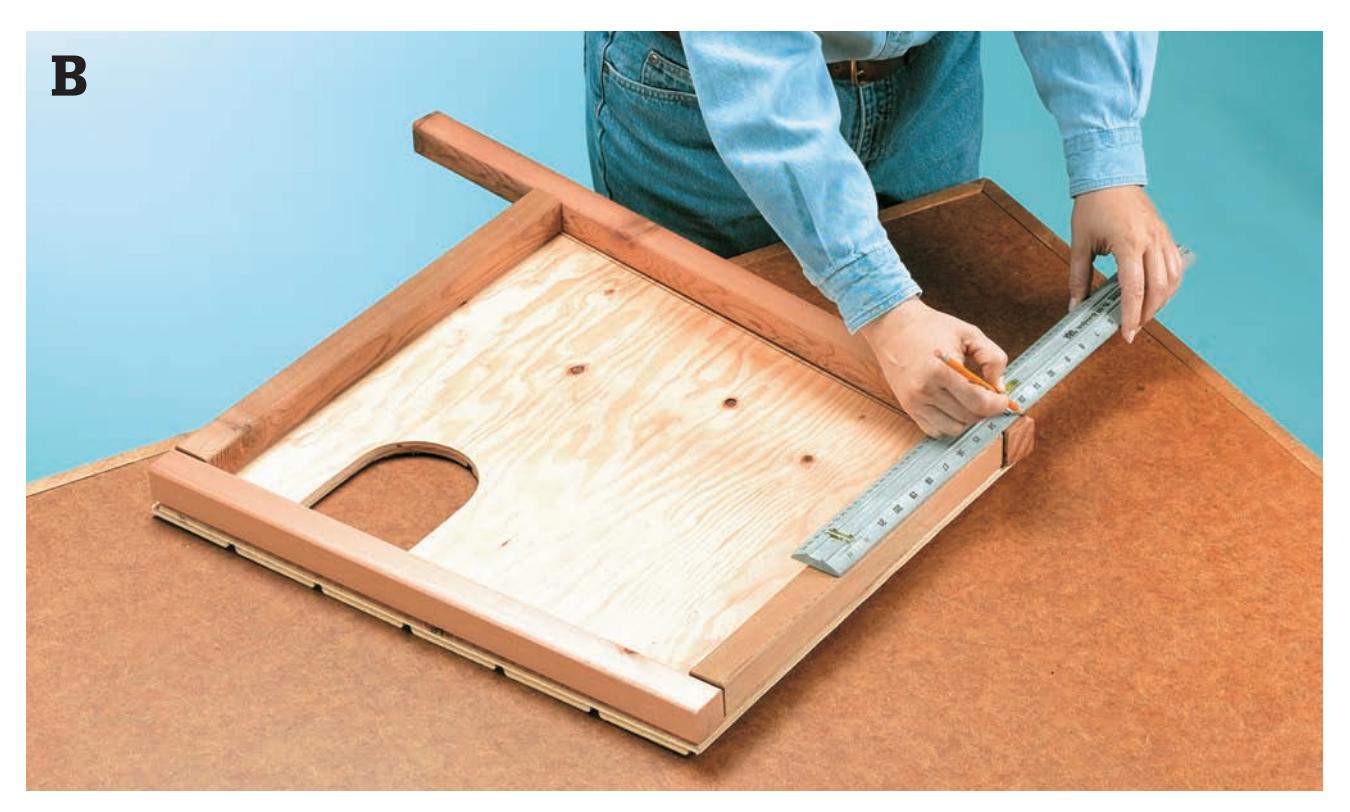
Center the frame top and mark the ends so they are parallel to the wall sides.
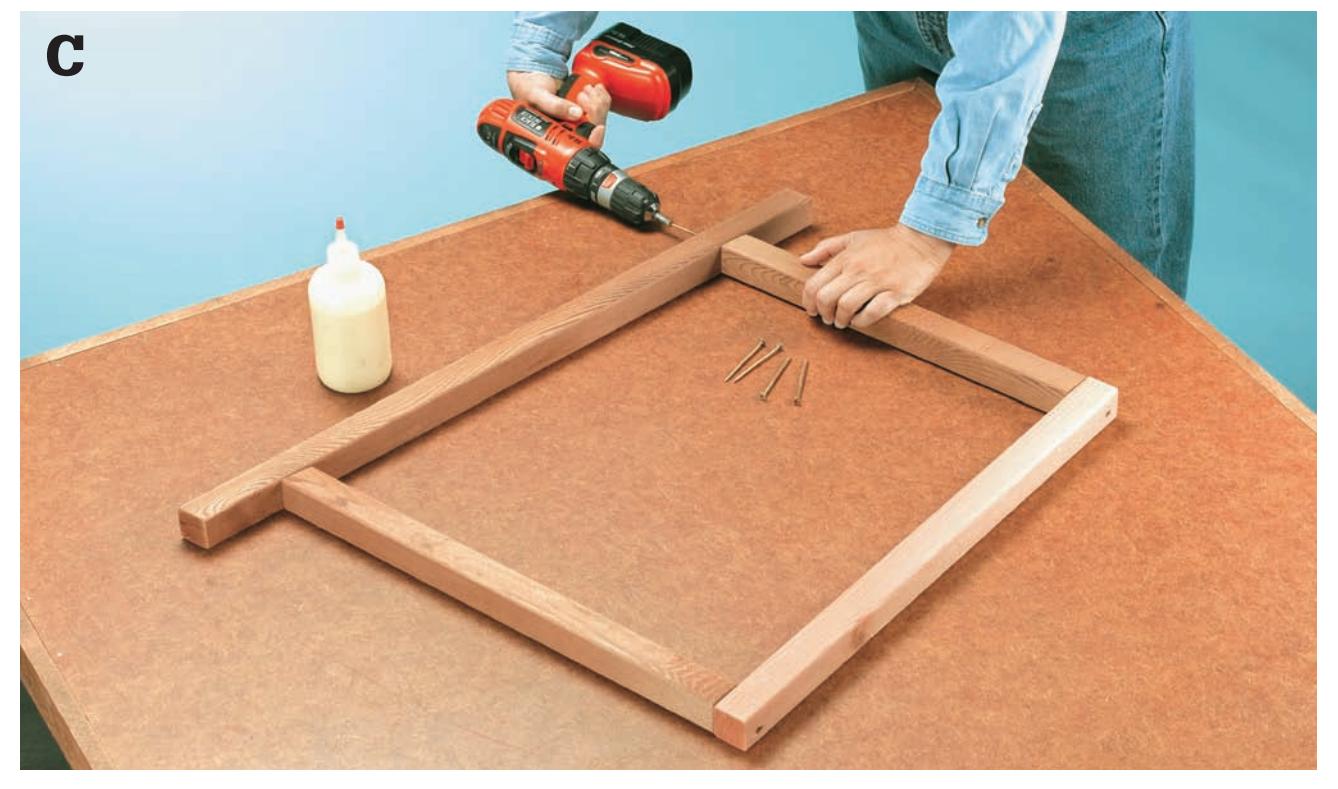
Attach the frame top to the frame back, sides, and base to create the cage side.
Attach the Frames
Place the cage frame over the left floor crosspiece and attach using 21/2” deck screws.
Place the sided frames on the middle and right end crosspiece, and attach using 21/2” deck screws (photo D).
Make the Cage
Fold the hardware cloth against the back of the frames. Attach it to the left side frame and middle frame, using 3/4” fencing staples every 4”. Cut the hardware cloth along the edges of the middle and left end frame. Cut along the floor by the enclosed compartment and discard this piece.
Fold the hardware cloth up against the left frame and attach using 3/4” fencing staples every 4” (photo E). Cut off the excess hardware cloth.
Make the Roof and Back Wall
Cut the back wall and back wall stop. Notch the wall upper corners to fit around the top frames.
Attach the stop to the floor between the side walls using 21/2” deck screws. Attach the back to the back frames and stop with 11/4” deck screws.
Cut the roof, with the siding grooves oriented vertically. Attach the roof to the top frames with 11/4” deck screws (photo F).
Make the Doors
Measure the openings for the doors to make sure sizing is correct, then cut the door crosspieces, sides hinge support and door jamb.
Place the sides between the crosspieces, apply exterior glue and attach with 21/2” deck screws. Cut hardware cloth to fit the frame and attach with 3/4” fencing staples.
Position the door jamb between the compartment sides and attach with 21/2” deck screws. Position the hinge support between the cage sides and attach with 21/2” deck screws.
Cut the compartment door and door supports. Attach the door supports to the back of the door, using 11/4” deck screws.
Mount the doors with two 3” hinges each (photo G). Attach two hook and eye fasteners to secure each door.
Attach the Legs
Cut the legs to the desired length. Align a 2 x 2 against the wide side of a 2 x 4 to make an L. Use 21/2” deck screws to attach. Attach the legs to the inside corners of the base with 21/2” deck screws.
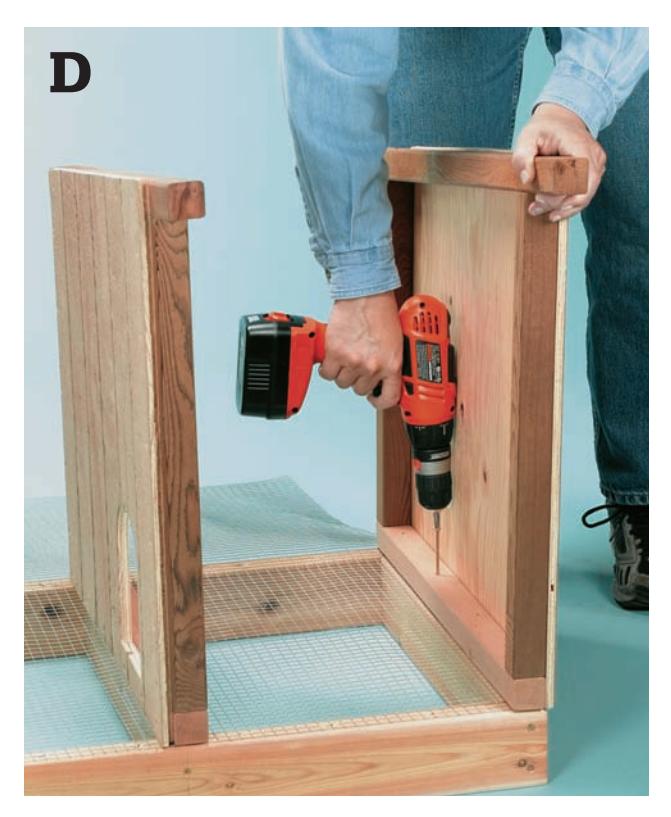
Attach the frames to the floor crosspieces.
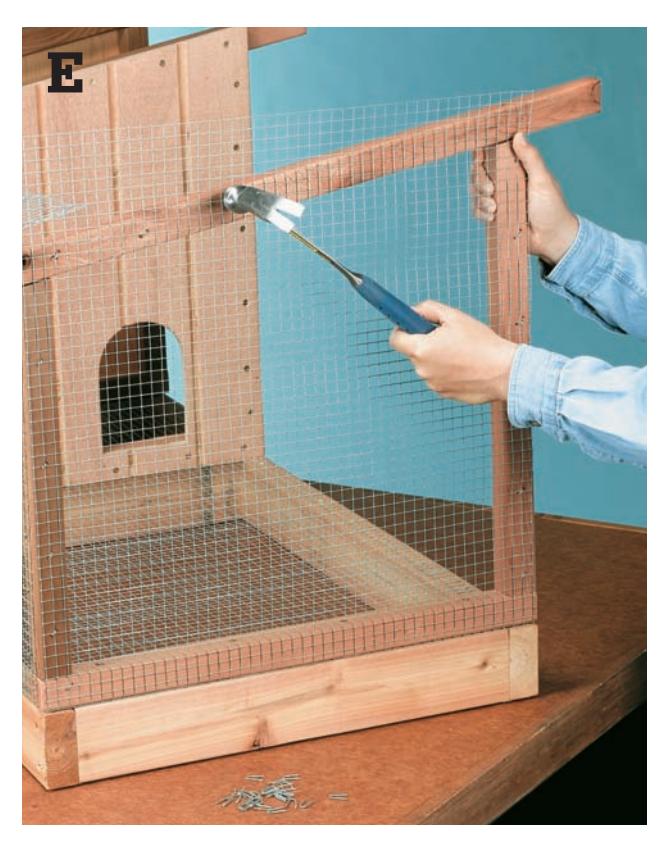
After folding and attaching the hardware cloth to the back, cut off excess cloth.

Attach the roof to the frames using 11/4” deck screws.
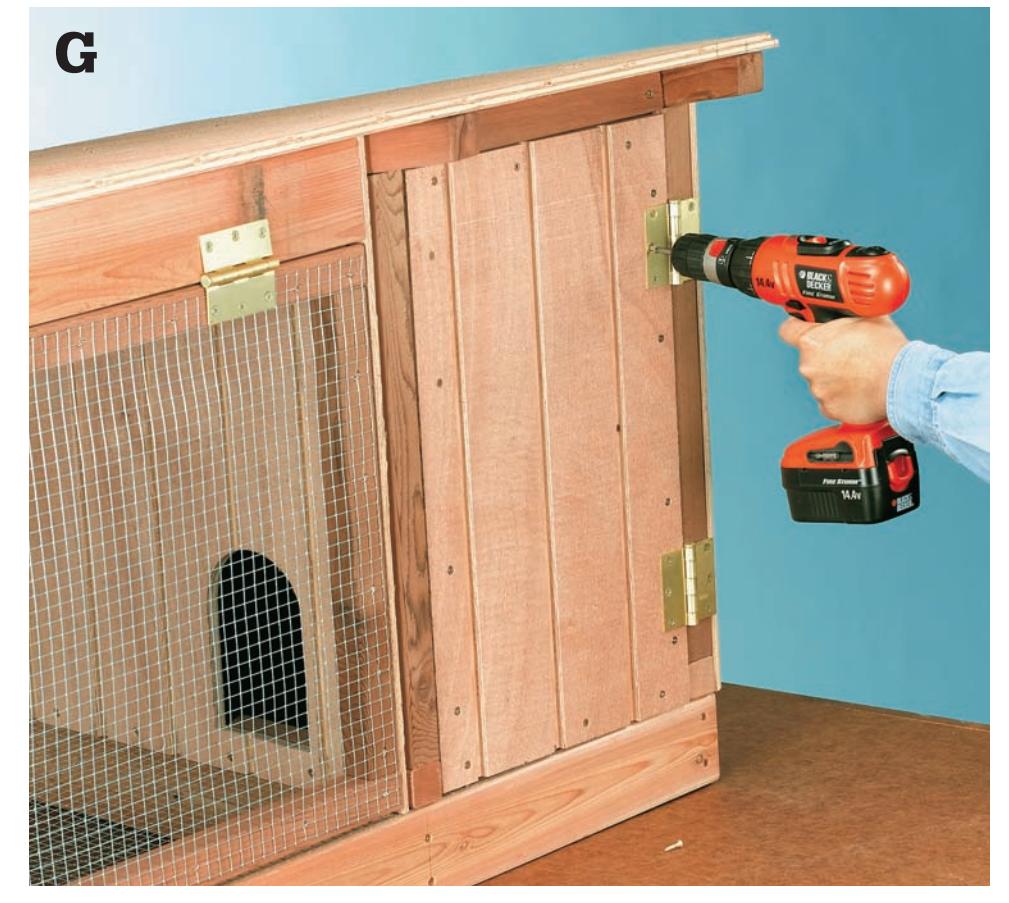
Mount the doors with 3” hinges.