THE BOOK OF HOW-TO
COMPLETE PHOTO GUIDE TO HOME REPAIR
Wiring • Plumbing • Floors • Walls • Windows & Doors
The Editors of Cool Springs Press


NOTICE TO READERS
For safety, use caution, care, and good judgment when following the procedures described in this book. The publisher and BLACK+DECKER cannot assume responsibility for any damage to property or injury to persons as a result of misuse of the information provided.
The techniques shown in this book are general techniques for various applications. In some instances, additional techniques not shown in this book may be required. Always follow manufacturers’ instructions included with products, since deviating from the directions may void warranties. The projects in this book vary widely as to skill levels required: some may not be appropriate for all do-it-yourselfers, and some may require professional help.
Consult your local building department for information on building permits, codes, and other laws as they apply to your project.
CONTENTS
- Tuning Up Garage Doors
- INTRODUCTION
- FLOORS
- Cleaning & Maintaining a Wood Floor
- Removing Stains from Wood Floors
- Repairing Scratches & Dents in Hardwood Floors
- Fixing Loose & Squeaky Floorboards
- Replacing Damaged Floorboards
- Replacing Laminate Flooring
- Repairing Vinyl Flooring
- Repairing Tile Floors
- Repairing Carpet
- WIRING & LIGHTING
- Wiring Safety
- Basic Wiring Skills
- Replacing Switches
- Replacing Receptacles
- GFCI Receptacles
- Repairing Light Fixtures
- Repairing Chandeliers
- Fluorescent Lights
- Repairing & Adjusting Ceiling Fans
- Replacing Plugs & Cords
- WALLS & CEILINGS
- PLUMBING
- Toilet Repairs
- Unclogging Toilets
- Fixing Sink Faucets
- Kitchen Sprayers
- Sink Drains
- Fixing Tub & Shower Faucets
- Fixing & Replacing Showerheads
- WINDOWS & DOORS
- CREDITS & RESOURCES
INTRODUCTION
For even the most seasoned home repair expert, gaining experience begins with one project. It might be as simple as painting a wall or unclogging a sink. Then, he or she might tackle a drafty window and then a damaged floorboard. As the projects mount, confidence grows and comfort level increases. Soon, the budding DIYer attains a new level of self-sufficiency. Then, when a new problem or challenge arises, it can be dealt with immediately and at little or no cost. That is the goal.
The home repair projects featured in this book were chosen because they are the ones a new homeowner is most likely to encounter: and they are achievable even for folks with little or no DIY experience and only a handful of basic tools. They range in difficulty from the quick and simple to the somewhat more ambitious and time consuming. But each featured project or skill is shown in full detail with clear color photos and comprehensive, step-by-step instructions.
Sure, these days you can go online and find dozens or hundreds or thousands of articles and videos that claim to show you how to fix your house. Some are helpful, others are incomplete or even wrong. In BLACK+DECKER The Book of Home How-To Complete Photo Guide to Home Repair you can be assured and confident that the information and guidance you find is reliable and exceptionally helpful. We have been making books like this for more than 30 years using a vast network of professional tradespeople to guide the information. But perhaps the best reason to own this book and keep it close at hand is that you will always know where to find the information—no backtracking over dozens of links or discovering that the information you were using is missing or has changed.
So consider this book to be something of a primer for your new adventure in home ownership and home care. You can find many other home repair books that are far thicker than this one and tackle many more projects, including several in the BLACK+DECKER family. But we are confident that the carefully chosen projects featured here will help you solve the home repair projects that are the most likely to come up. Thank you for relying on us to get you started in your handy career and best of luck!
FLOORS
Floorcoverings wear out faster than other interior surfaces because they get more traffic. And so they require more maintenance. The issue with floors is not just cosmetic: surface damage can affect more than appearance. Scratches or gouges in resilient flooring and cracks in grouted tile joints let moisture into the floor underlayment, leading to rot. Whether your floorcovering is wood strips, parquet, sheet vinyl, laminate, or anything else, it is helpful to view it as a protective membrane for the bones of your house.
Bathroom floors suffer the most from moisture problems, with kitchen floors coming in a close second. You can fix most problems yourself, including squeaks, scratches and dents, and other minor damage to floorcoverings.
There is a reason that some flooring products are described as “low maintenance.” If you are considering installing new floorcoverings, maintenance is definitely something to think about. In very broad terms, on the next page is a ranking of floorcoverings and their maintenance requirements. It is also worth knowing this information if you are interested in keeping your current floorcoverings in good repair: some types simply require more attention than others.
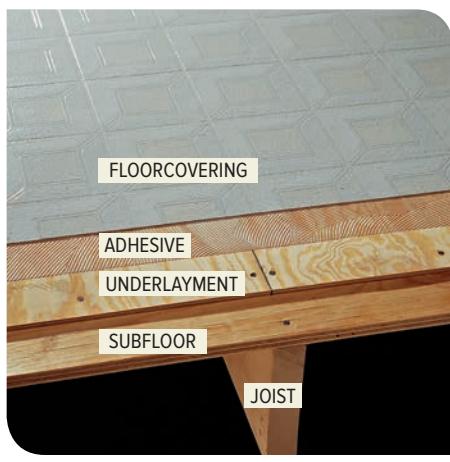
In a typical residence, the floors in the habitable spaces have a foundation of subfloor (usually 3/4” plywood or oriented strand board) attached to the floor joists. The subfloor is too rough and uneven to serve as a good substrate for floorcoverings, so it is usually covered with a thin (1/4” thick is typical) underlayment of sanded plywood or lauan plywood. The floorcovering is bonded to the underlayment (sheet vinyl or nonceramic tile). Ceramic tile is bonded to an underlayment of cementboard, not plywood. Laminate “floating” floors rest on the underlayment without attachment—the individual flooring strips interlock and typically “float” on a thin, cushiony pad. Traditional hardwood strip flooring is nailed down, usually with an underlayment of rosin paper or, in older homes, tar paper.
FLOORING MAINTENANCE REQUIREMENTS BY TYPE
- Wood Strip Flooring. Solid wood flooring is seldom installed in high-moisture areas, but in other parts of the house it is very common and is considered to be a strong selling point for a home. Most “gleaming” wood flooring is hardwood, primarily oak and maple. Softwood floors such as pine are beautiful but less durable and typically are reserved for low-impact areas, like dining rooms or bedrooms. Wood floors are among the biggest demanders when it comes to maintenance. Not only are they prone to surface damage, they are natural products and subject to dimensional stresses from changes in atmospheric humidity. They require periodic refinishing, which is a major project.
- Ceramic Tile. Tile floors are very popular for good reasons. They are resistant to moisture and relatively easy to clean, making them good choices for kitchens and baths. They are also easy for DIYers to install. And tile manufacturers pay close attention to design trends, so if you are remodeling, a ceramic tile floor can offer cutting-edge design features. Made of ceramic or porcelain, the tiles themselves are quite durable, although they will chip or break if you drop a cast iron pan. The main maintenance issue with tile is grout lines. Grout is a cementitious material, but contains additives so it can flex a bit as it fills the gaps between tiles. After a while grout loses its flexibility and starts to crumble. It also is susceptible as a host for mold and is prone to staining and discoloring.
- Sheet Vinyl. Low maintenance to the extreme. Current products have greatly expanded the traditional styles, which have suffered from plainness. Not a high-end floorcovering, but as long as you keep it in good repair it can function for many years with just some sweeping and mopping.
- Laminate Flooring. Laminate strip flooring has greatly expanded its market share in the past decades. It’s cheap, looks more or less like wood, and is relatively easy to install. It is also formulated from relatively cheap materials, including what is basically a photograph of the flooring beneath a wear layer of aluminum oxide. It is difficult to patch up if you get a dent or scratch because there is not much material to work with.
- Carpeting. Wall-to-wall carpeting is essentially in its own separate category when it comes to floorcoverings. But it is a common home material and one that definitely needs attention—often beyond the basics of vacuuming and occasional steam-cleaning. If you are having it installed, here’s a good tip: obtain and save any leftover carpeting. It can be used for patching. You can also find usable carpeting in closets and other out-of-the-way spaces to claim for repairing carpet damage in the more visible living areas.
CLEANING & MAINTAINING A WOOD FLOOR
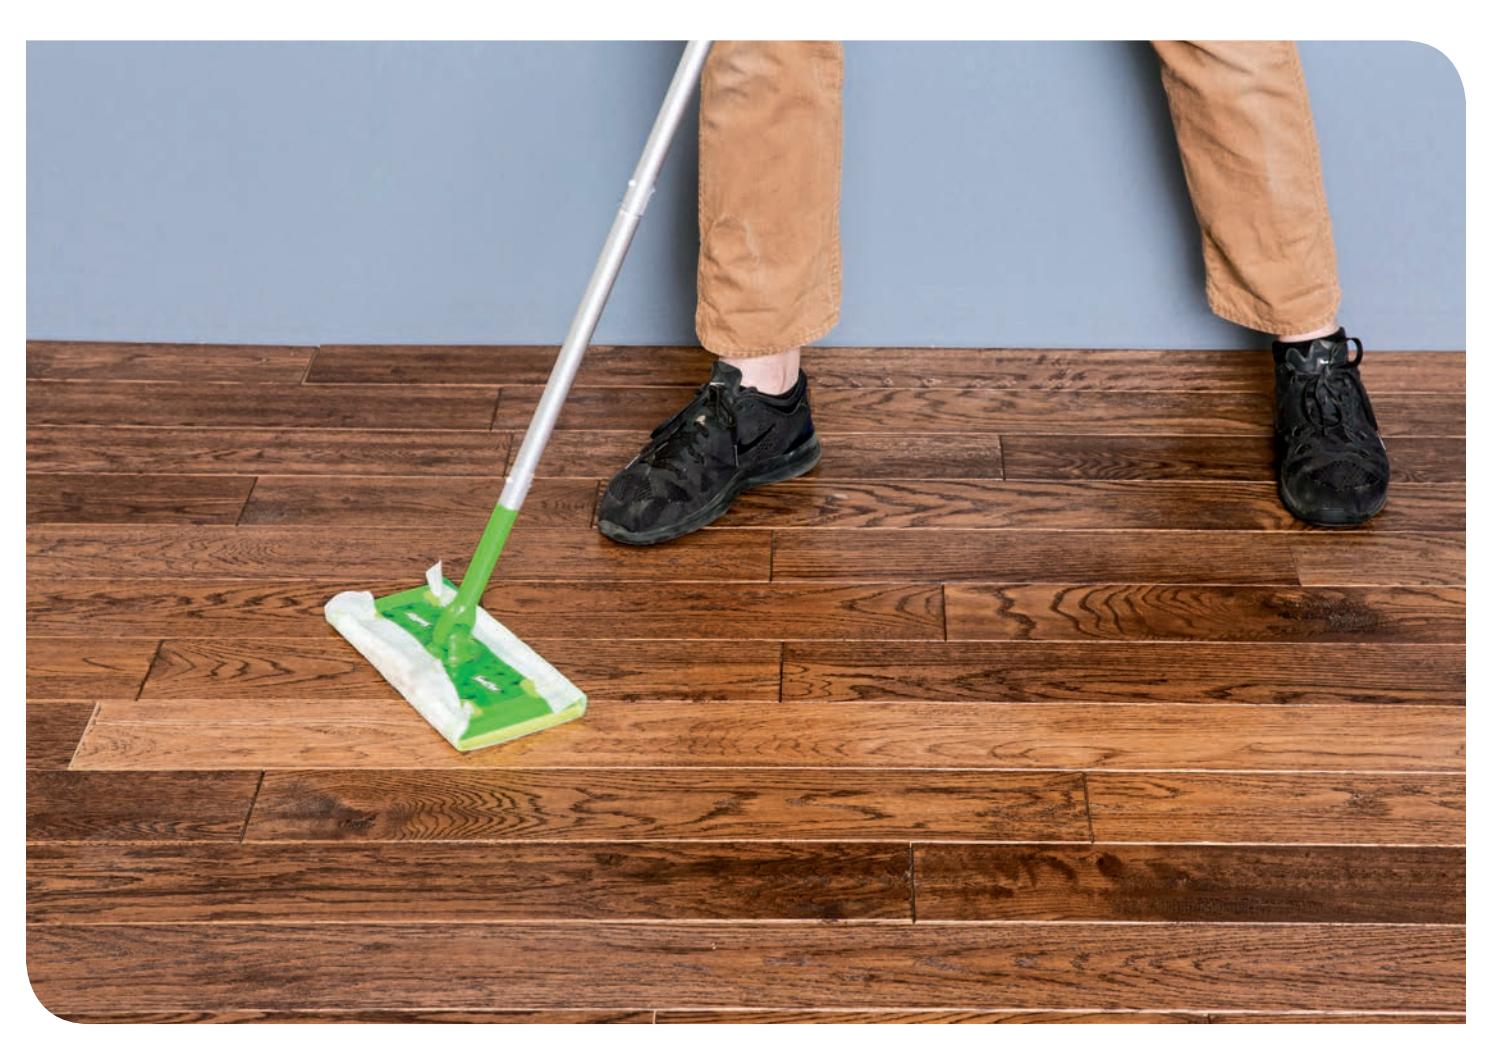
Cleaning resilient floor surfaces like sheet vinyl and ceramic tile is pretty easy—basically, you sweep or vacuum and then mop. Wood floors, however, are a bit trickier. With wood floors it is important to evaluate the floor carefully before charging in with a bucket of soapy water. The type of finish and its condition are critical in choosing the right type of cleaning products and methods.
Wood floors are among the most durable flooring materials you can install, but like any flooring, they require occasional maintenance to preserve their look and function. Years of regular use can wear out the surface finishes, and even the hardest woods can be scratched by pets with sharp toenails or by furniture dragged along their surface. Impact by heavy items—tools or even heavy dishes—can dent a wood floor. And the biggest enemy of all is water.
How to Evaluate & Clean Wood Floors
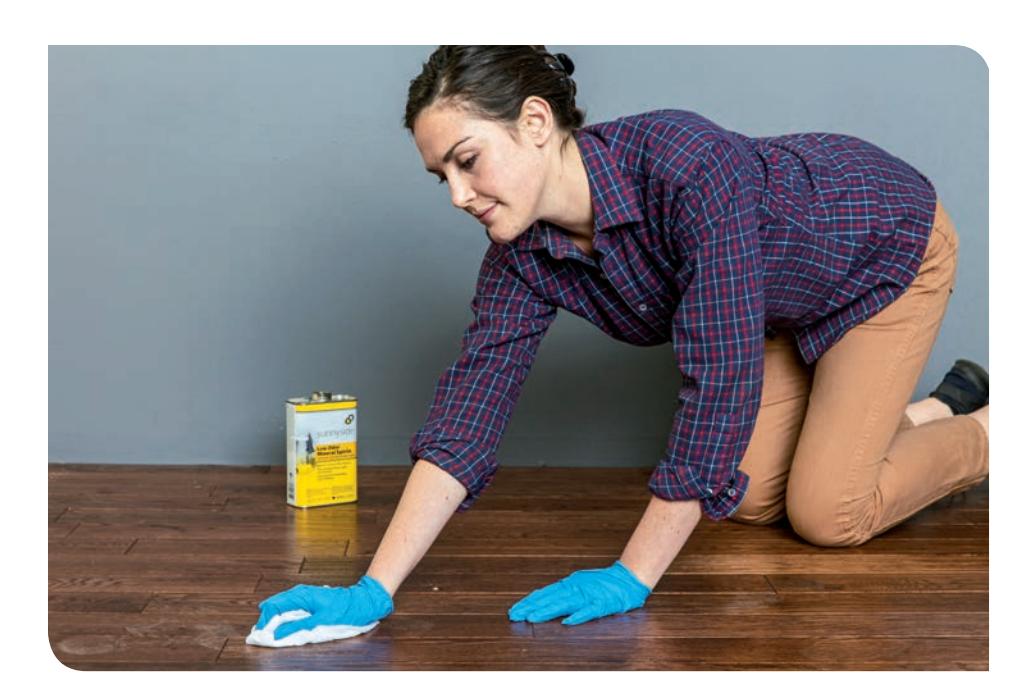
If the floor finish is not sound, water will soak into the wood immediately. Do not clean with a water-based product, because it will stain and damage the floor. Instead, clean the floor with cloths dampened with mineral spirits. An unsound floor finish will eventually need to be either recoated with the same finish currently on the floor or rewaxed.
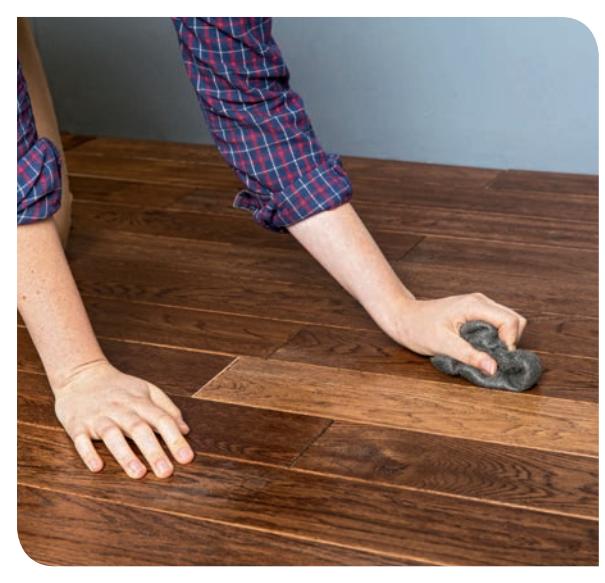
Next, test to see if your floors have a paste wax finish.
Slightly dampen a piece of extra-fine steel wool and rub the floor in several areas. Paste wax will show up by leaving a gray smudge on the steel wool pad. On a paste-wax floor, clean the floor with cloths moistened with odorless mineral spirits. Let dry completely, then apply a new coating of paste wax, and buff it thoroughly, following manufacturer’s directions.
NOTE: NEVER apply a finish coat over a waxed floor.
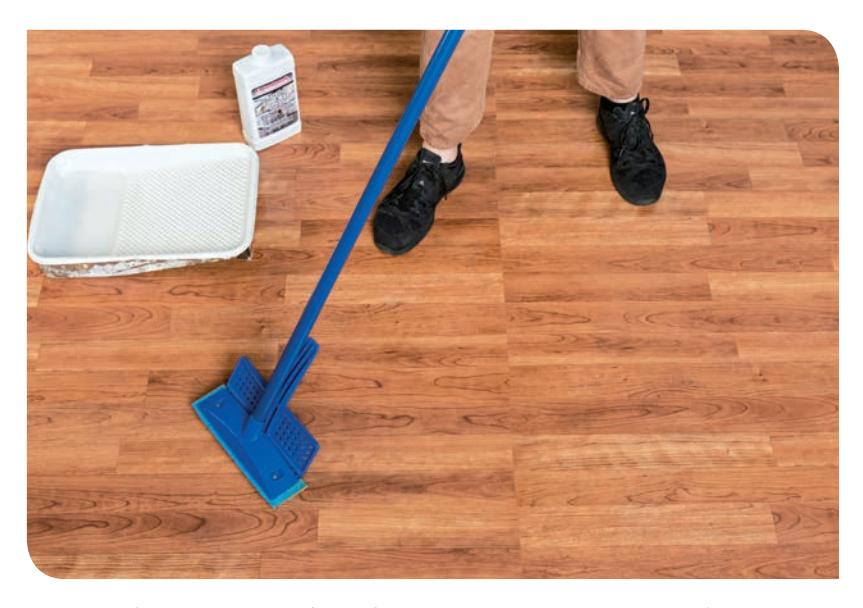
Does your floor have an acrylic wax? These newer waxes are best identified by the dirty, patch-like appearance they have as they begin to wear. If your floor has this kind of synthetic wax, use an ammonia-based wax stripper to remove the wax layer, then apply a new layer of acrylic wax. Be aware that acrylic waxes will need frequent reapplication.
REMOVING STAINS FROM WOOD FLOORS
Just about anything can stain wood floors. Many stains are surface discolorations that may be able to be removed with nothing more than a light scraping or rubbing with an abrasive pad or fine sandpaper. Always try this before reaching for more serious solutions, some of which require the use of dangerous chemicals.
Some stains, especially water stains or stains from pet urine, can soak very deeply into the wood and are difficult or impossible to fully remove. In these instances, you should consider replacing entire floorboards. Another solution is to use a bleach to lighten the color of the stain. Be aware, though, that bleach does not remove a stain, but just lightens it. After bleaching, you will likely be left with the task of restaining the bleached area to match the surrounding floor.
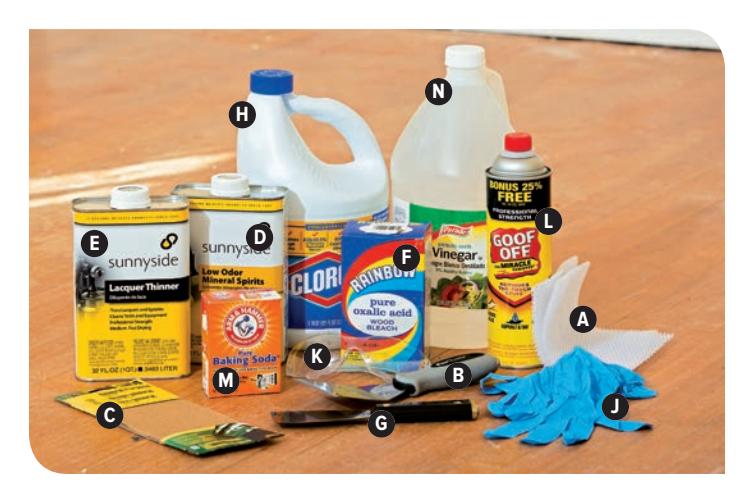
Products you may need to remove stains from a wood floor include extra-fine nylon scrubbing pad (A); sharp scraper (B); sandpaper (C); mineral spirits (D); lacquer thinner (E); oxalic acid (F); putty knife (G); chlorine bleach (H); protective gloves (J); eye protection (K); Goof Off stain remover (L); baking soda (M); and vinegar (N).
GUIDE TO DEALING WITH WOOD FLOOR STAINS
- Paint. Obvious drips can often be scraped off with a sharp paint scraper. If the paint has penetrated into the wood you should be able to remove it with light sanding with a scrub pad or fine sandpaper. A commercial removal product, such as Goof Off, may also work well.
- Crayon, black heel marks. Try a water-based cleaner first, then a cloth lightly dampened with mineral spirits.
- Gum. Chill with ice and chip off; or try mineral spirits.
- Fingernail polish. Moisten a cloth with lacquer thinner, and carefully dab the stain. Avoid getting it on the rest of the finish, as it will likely dissolve it. After removal, you may have to touch up the finish.
- Glue. Most wood glues or household glues are water based. Begin by trying to simply scrape away the glue. Next, try a water-based cleaner. Last resort: a chemical removal product, like Goof Off.
- Construction adhesive. Chip away as much as you can, then apply steam with a household iron, and try to scrape away as much as possible. Remaining adhesive may need to be sanded away.
- Coffee and tea. Dilute 1/4 cup of apple cider vinegar in 1 gallon of water and use a sponge to moisten the stain. Let it sit for 1 to 2 hours, then scrub with a clean sponge. Rinse with a damp sponge and dry immediately.
- Water, iron rust stains. Mix a solution of oxalic acid and water, following label directions. Apply the solution carefully to the stain and wait several hours, or overnight. Thoroughly wash away the residue with water mixed with baking soda, which neutralizes the acid. Oxalic acid is caustic, so make sure to wear protective gloves and avoid getting it on your skin. This solution will lighten the wood, and you may need to sand and restain the area to match the surrounding floor.
- Grape juice, dye, blood. Apply household bleach to the stain and blot it up. If it does not remove the stain immediately, reapply and let sit overnight. Neutralize the bleached area with vinegar, then rinse with clear water. If the bleach has removed too much wood color, restain the area to match surrounding wood.
- Urine. Use a product like Klean Strip, which is a mixture of hydrogen peroxide and sodium hydroxide. This is very caustic and toxic material, so handle carefully. Apply the bleach and let stand as directed. Rinse with clear water. This product will bleach the wood quite light, so staining and refinishing the area will be necessary.
How to Use Wood Bleaches
- Choose a bleach appropriate for the stain. Wearing protective gloves, apply the bleach solution to the stain area, being careful to confine it to that area. Let the bleach remain on the stain for the recommended time, then neutralize the bleach with the recommended agent (baking soda solution for oxalic acid, vinegar solution for household bleach, clear water for Klean Strip). Wash the area thoroughly with clear water, wipe up excess water, and let dry.
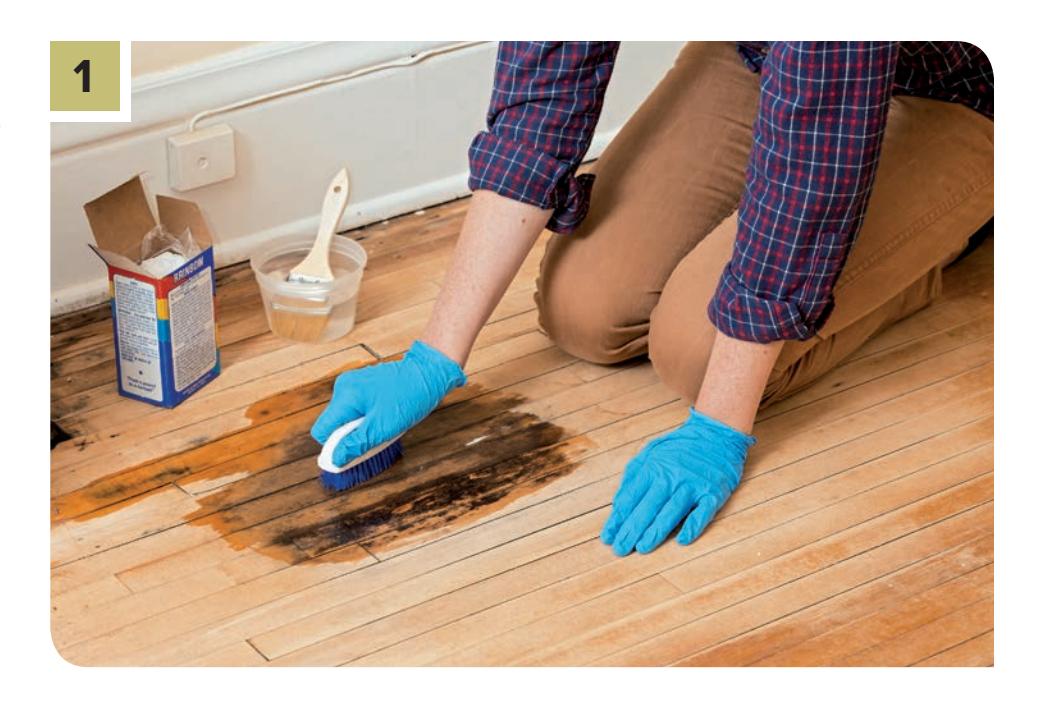
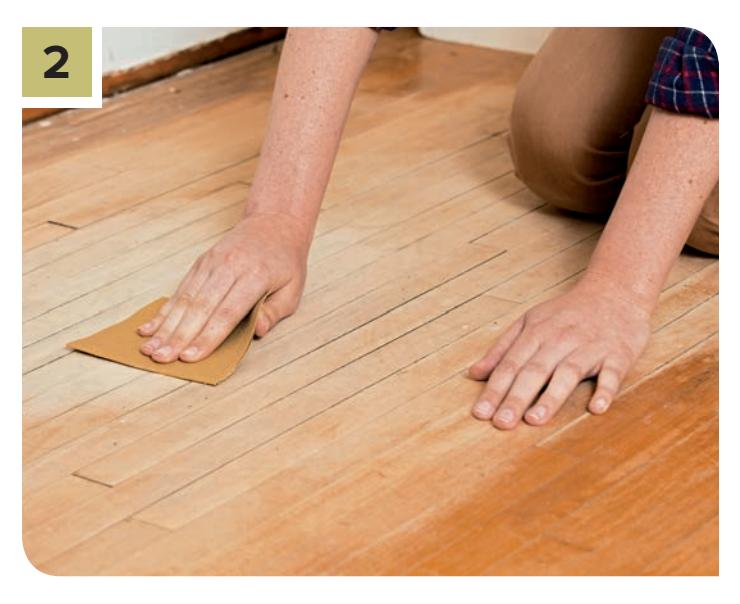
- Once dry, lightly sand the area. All bleaches will raise the wood grain, and before applying a wood stain, the grain must be sanded smooth.
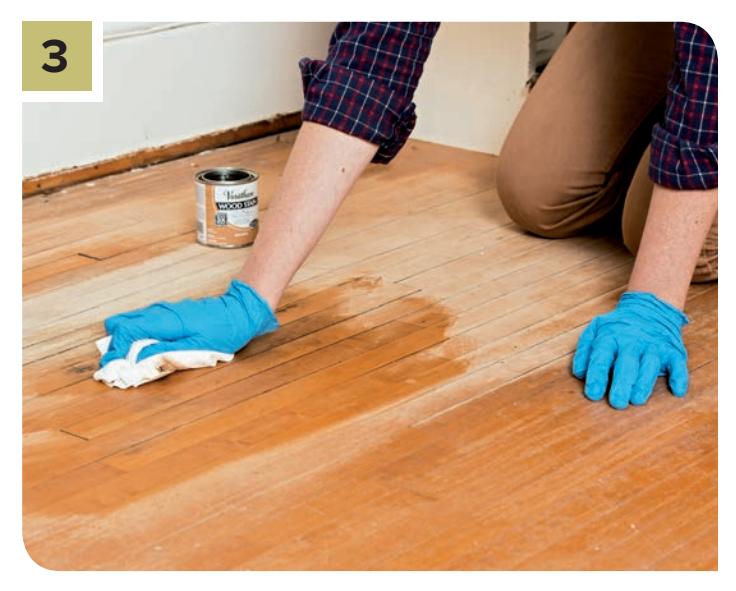
- Apply a rub-on wood stain that closely matches the tone of the surrounding floor using a soft rag. Let dry completely, then carefully apply a polyurethane or other matching surface finish to blend the stain area with the surrounding floor.
REPAIRING SCRATCHES & DENTS IN HARDWOOD FLOORS
Most scratches and dents in solid wood floors can be repaired. Dents occur when wood fibers become compressed. If the wood fibers are not broken, dents can often be removed by expanding the wood fibers using heat and moisture. Whatever repair you attempt, confine your work as narrowly as possible to the damaged area only—the smaller the repair area, the less noticeable it will be.
Often the trickiest part in making a scratch or dent disappear is matching and blending the surrounding finish. This is especially true if you end up taking sandpaper to the damage area, so view sanding as a last resort. Most hardware stores and flooring specialty stores sell touch up pens or pencils in a range of tints. These are worth a try. If you don’t find an exact match, choose one that is slightly darker rather than lighter.
If the easy fixes fail and the scratch is still there, then you’ll need to go for the sandpaper and perhaps some wood putty. Here’s how to do it.
How to Repair Shallow Scratches
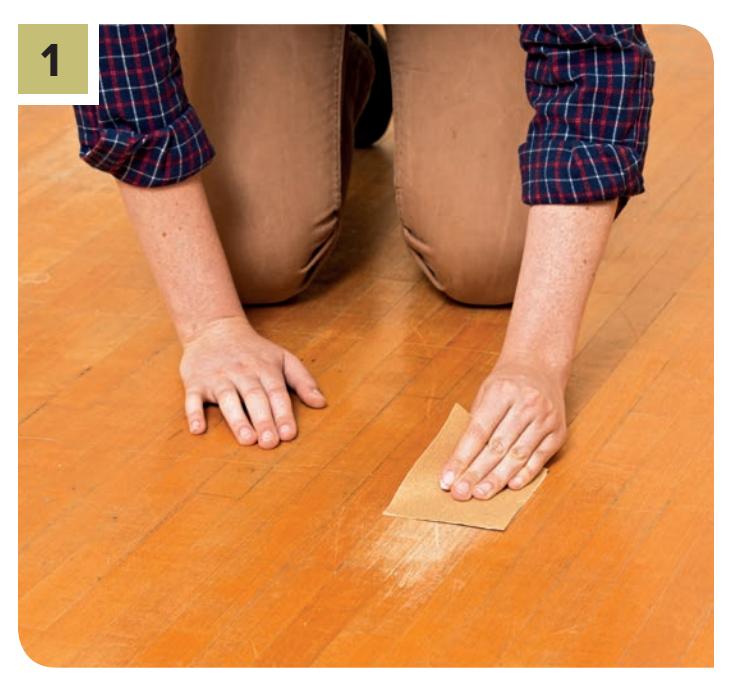
- Sweep the floor clean, then wash the area around the scratch with a cloth moistened with odorless mineral spirits. Let the floor dry. With fine or very fine sandpaper (150 grit), lightly sand the scratched area, sanding parallel to the wood grain and periodically wiping away the sanding dust. It is possible that light sanding will remove the scratch if the damage is only in the surface finish.
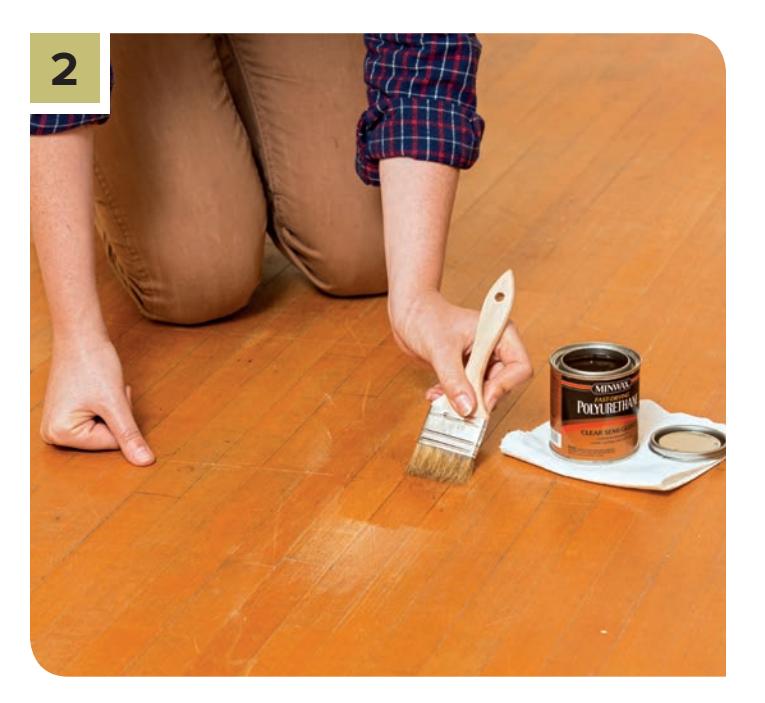
- After the scratch is removed, clean the area with mineral spirits, let dry, and lightly touch up the surface with the same finish used on the rest of the floor, restoring its shine.
How to Repair Deep Scratches
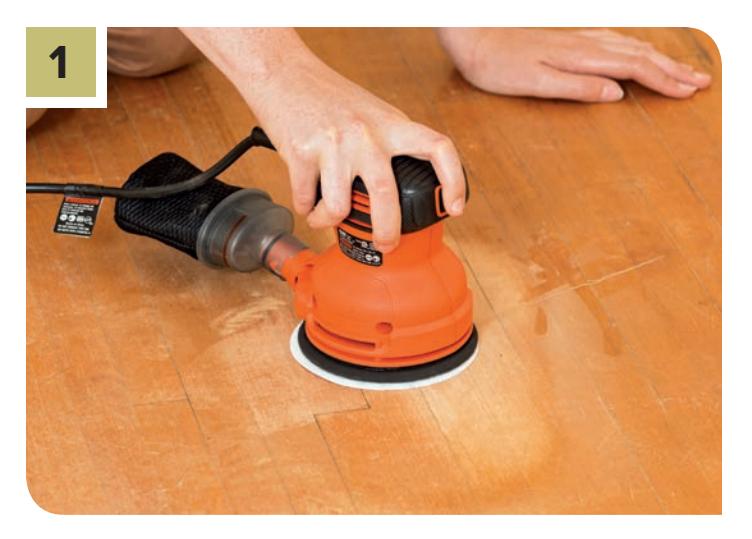
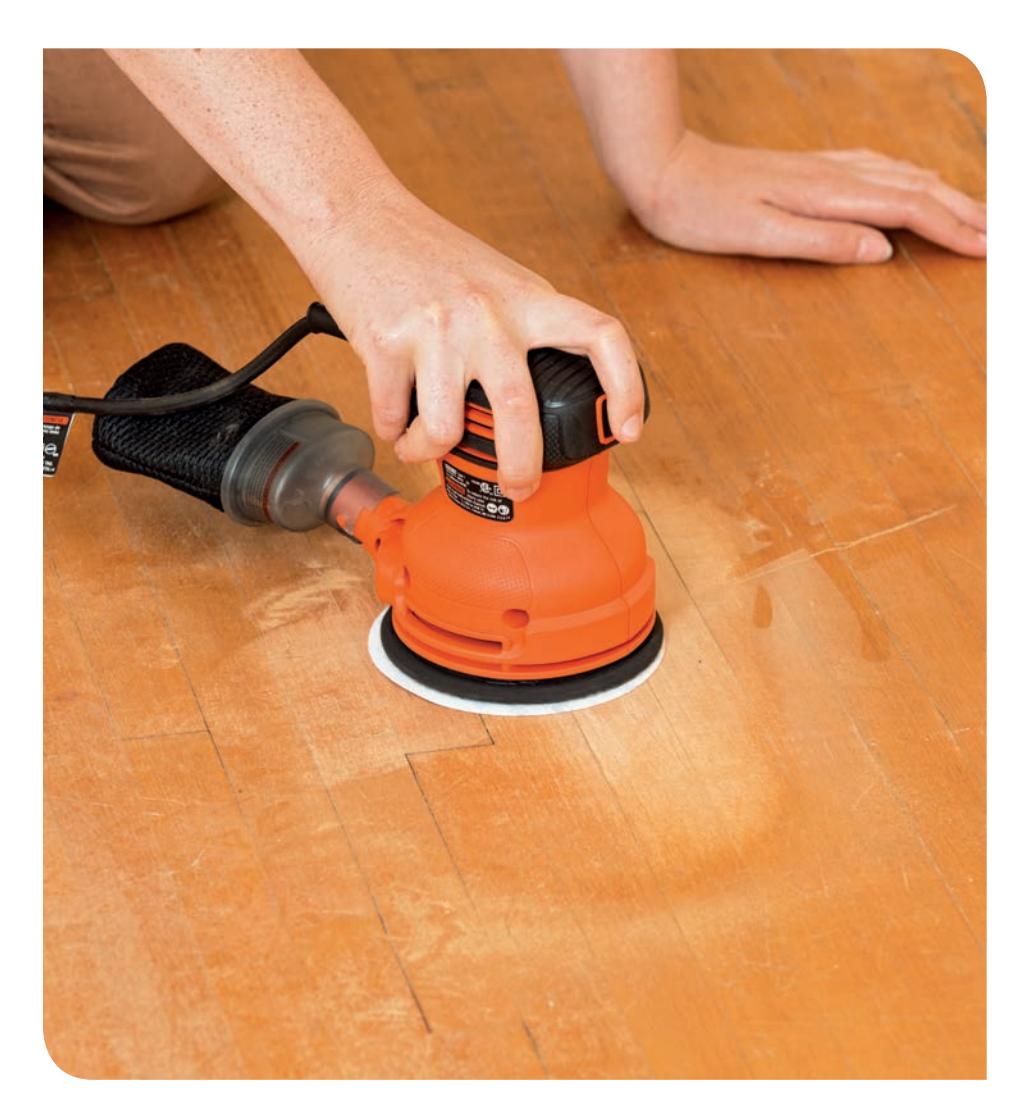
Clean the scratched area with odorless mineral spirits, then lightly sand away the surface finish down to bare wood, using 150-grit sandpaper. For faster results use a random orbit sander. For more control, hand sand.
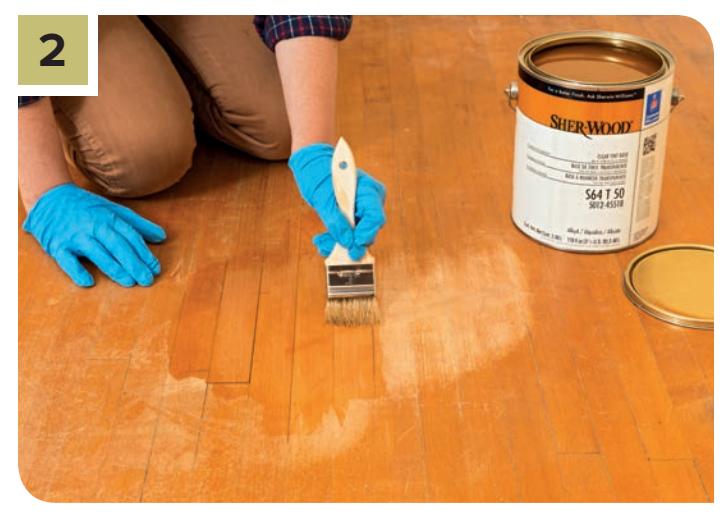
When the bare wood is exposed, carefully apply a nonwax wood filler to the crack. Colored wood fillers may be available that closely match the color of your floor. If not, you can apply an uncolored wood filler, then stain it to match the floor. After the filler dries, lightly sand it. Wipe away all dust, then apply a rub-on wood stain or finish with a small brush, if needed. Reapply as needed.
How to Repair Dents
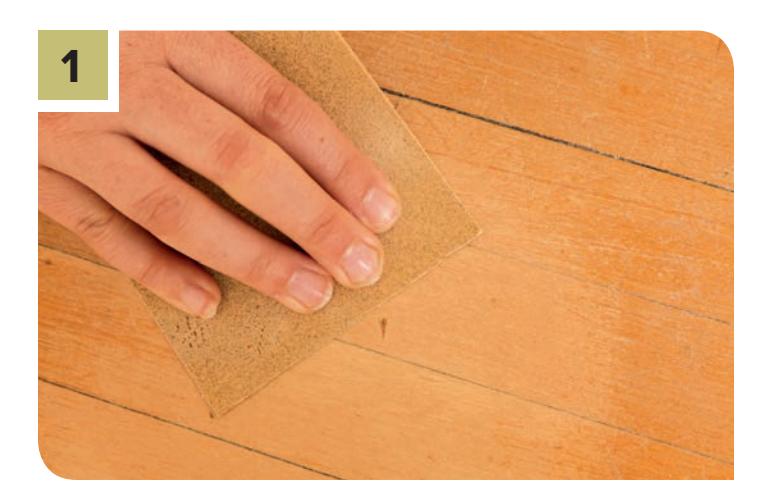
Clean the area around the dent, then sand the dented area with fine (150-grit) sandpaper to completely remove the surface finish down to bare wood. Sand very lightly past the damage area to “feather it in” so you do not have any hard ridges of finish.
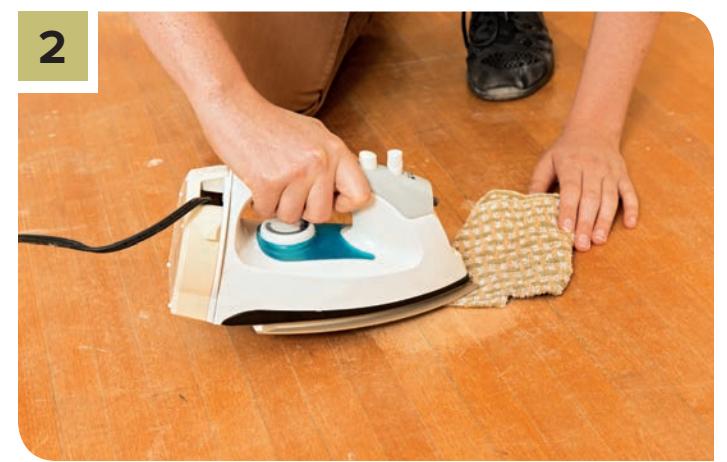
Moisten a clean cloth with water and place it over the dent. Apply the hot tip of a household clothes iron over the wet cloth, moving it around to drive moisture down into the wood fibers. Try to avoid steaming the surrounding wood finish, as it may discolor it. The dented area should soon swell back, eliminating the dent. Let the wood dry completely overnight. Sand the area lightly, if necessary, and remove the dust. Carefully apply finish touch-ups to match the rest of the floor.
FIXING LOOSE & SQUEAKY FLOORBOARDS
Loose floorboards can be extremely obvious or as subtle as a faint squeak. Deciding whether to fix the problem should start by questioning if the loose board or boards present any kind of a tripping hazard. If so, naturally, the floorboards should be secured. This can be done either from above, working through the surface or edges of the floorboard, or from below if you have access to the joists to which the floorboards are fastened. Simple squeaks are another matter. If they irritate you, the remedies are generally easy to effect. Or you can choose to live with the squeak—it’s a good way to keep tabs on your kids.
Solutions for Loose Floorboards
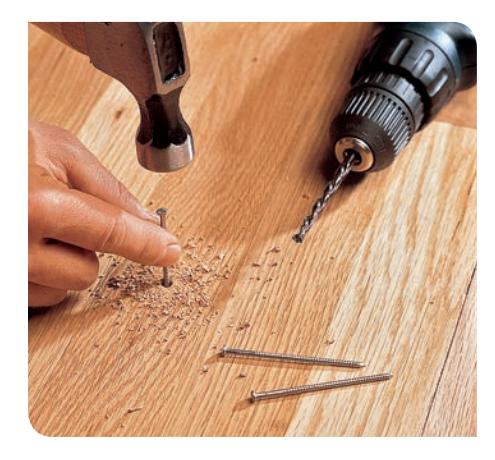
The surest way to reattach loose or buckled floorboards is driving new fasteners from above. Start by drilling pilot holes for several flooring nails in the floorboard only. The nail will grip better if you do not predrill the wood underlayment and subfloor. Flooring nails are spiral or ribbed for better gripping power.
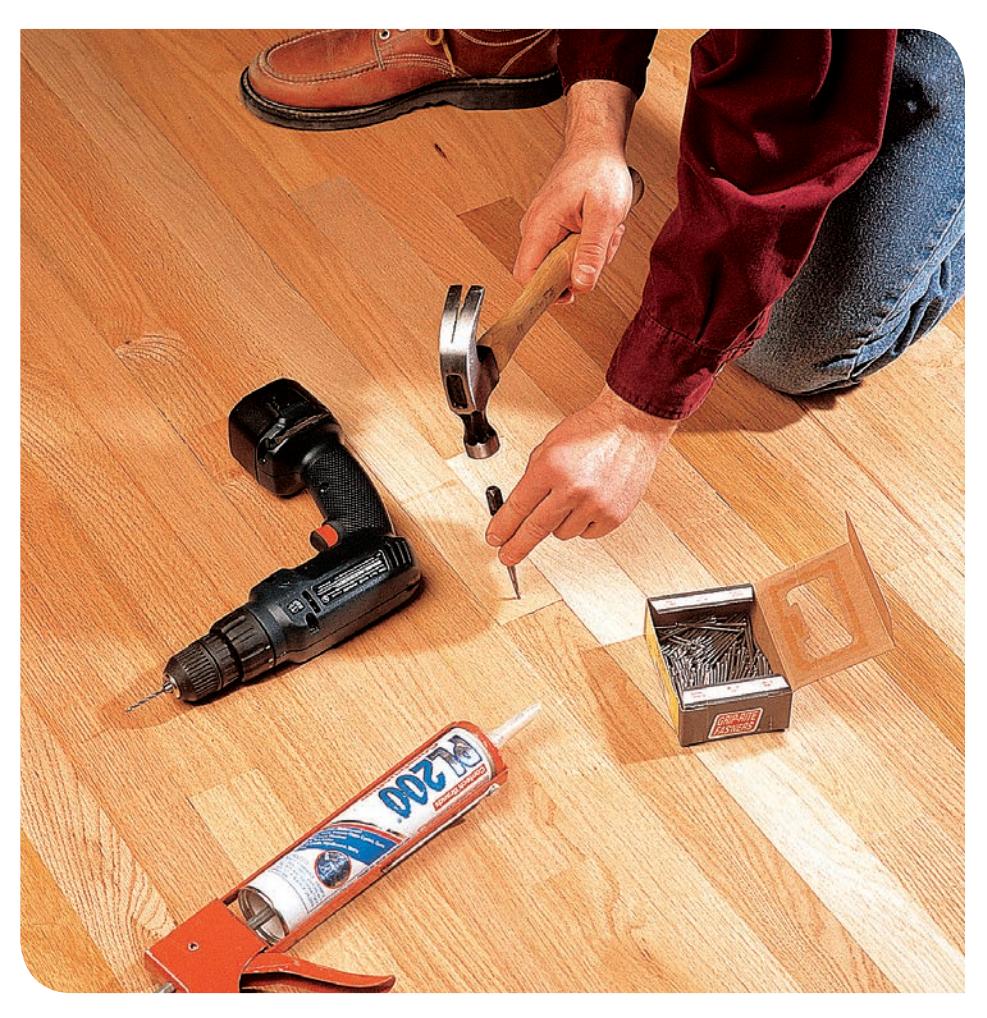
Existing flooring nails may have simply loosened from the underlying subfloor, allowing the floor to buckle upward. Look for nail heads securing the flooring, and use a nail set to drive them back down into the subfloor. If the nails are hidden in the tongue-and-groove joints, drill pilot holes on the loose floorboards, and drive finish nails down into the subfloor. Recess the nail heads with a nail set, then fill the holes with wood putty.
Solutions for Squeaky Floors
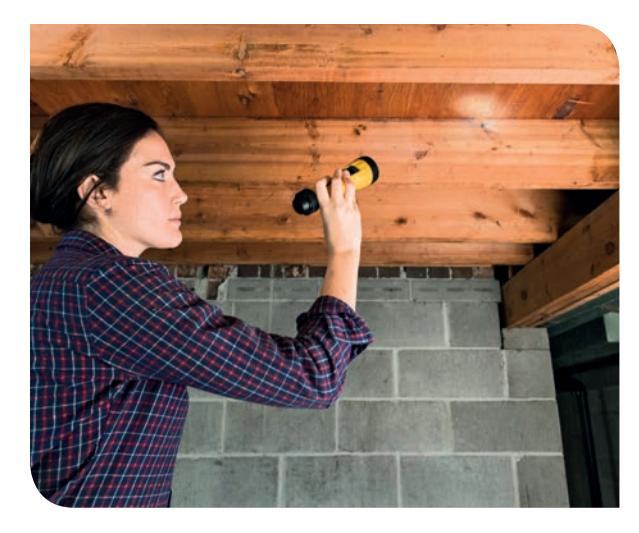
Find the source of the squeak, if possible. Look for flexing or gaps between the subfloor and joists. Fill these areas with shims glued into place or with construction adhesive that will dry hard and eliminate the space for movement (right). This method also works if you spot areas where the subfloor is flexing and rubbing against pipes or HVAC ducts.
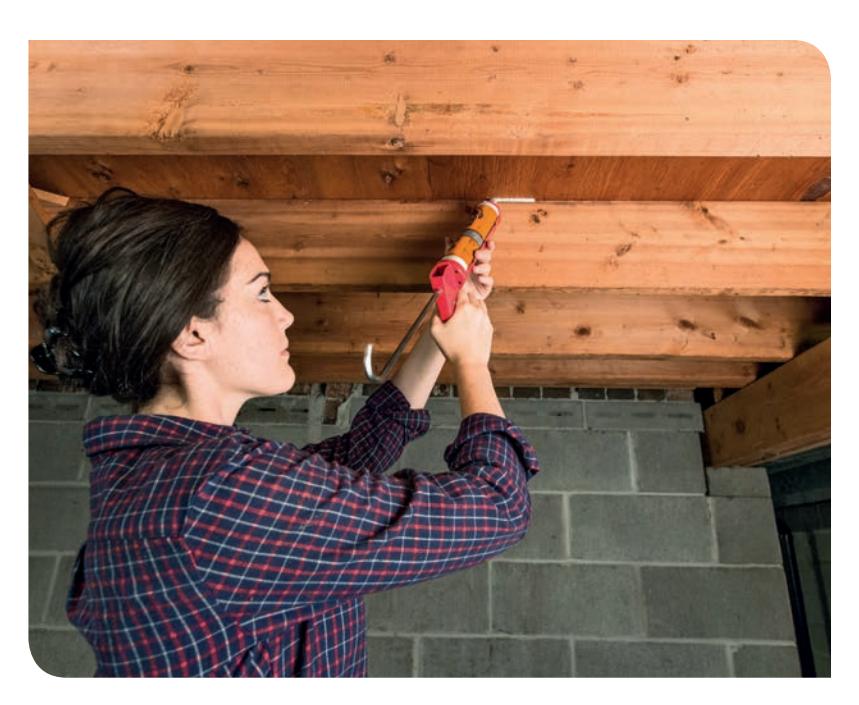
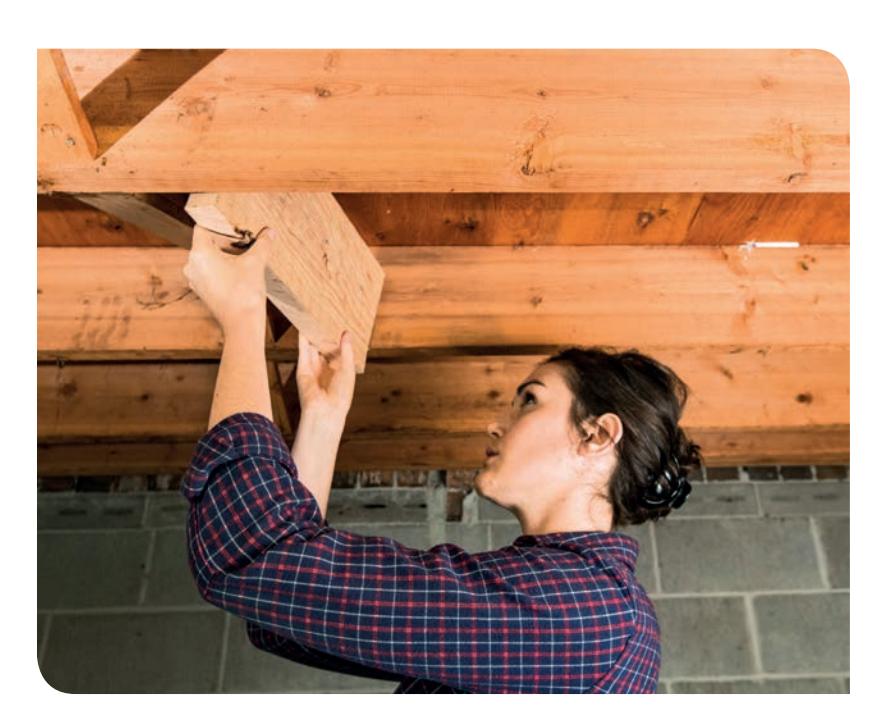
Install solid cross blocking between joists to reinforce the floor and eliminate the squeak by eliminating flexing. Apply a bead of construction adhesive along the top of the blocking, then nail it to the adjoining joists so it is flush up against the subfloor.
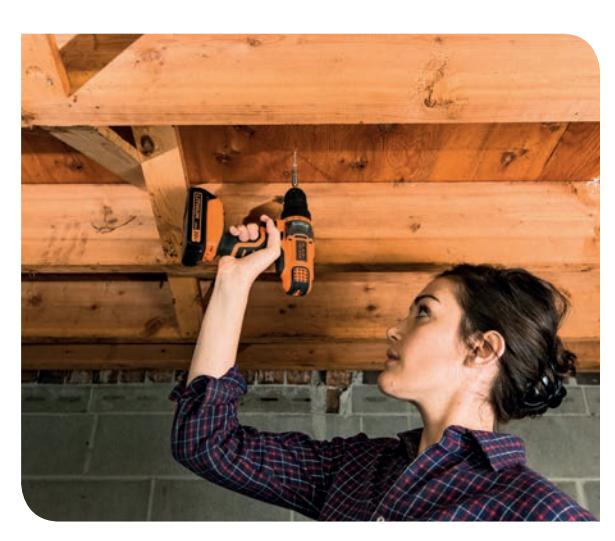
The squeaking may also be caused by gaps between the surface flooring and the subfloor. The solution here is to drive screws from below, drawing down the surface flooring and snugging it up against the subfloor
REPLACING DAMAGED FLOORBOARDS
There will be instances in which flooring boards are too badly damaged or stained to be repaired with acceptable results. In these instances, replacing the boards will be the best option, and in most cases it will be possible to do this in a way that makes the repair invisible to all but the keenest eye.
On a solid hardwood floor, a very good time to replace floorboards is when you are already planning on sanding and refinishing. Once the replaced flooring is installed, a complete sanding down to bare wood will nicely blend in the original floor with the new replacement boards.
Whenever possible, hardwood boards should be replaced along their entire length, not just patched in as a short segment. A replacement board running full length and matching the pattern of the other boards will be almost invisible, especially if the entire floor is being refinished. Where this is not possible, you can outline the damaged area, cut it away with a circular saw and chisel, and cut a tight-fitting replacement piece to insert in the space.
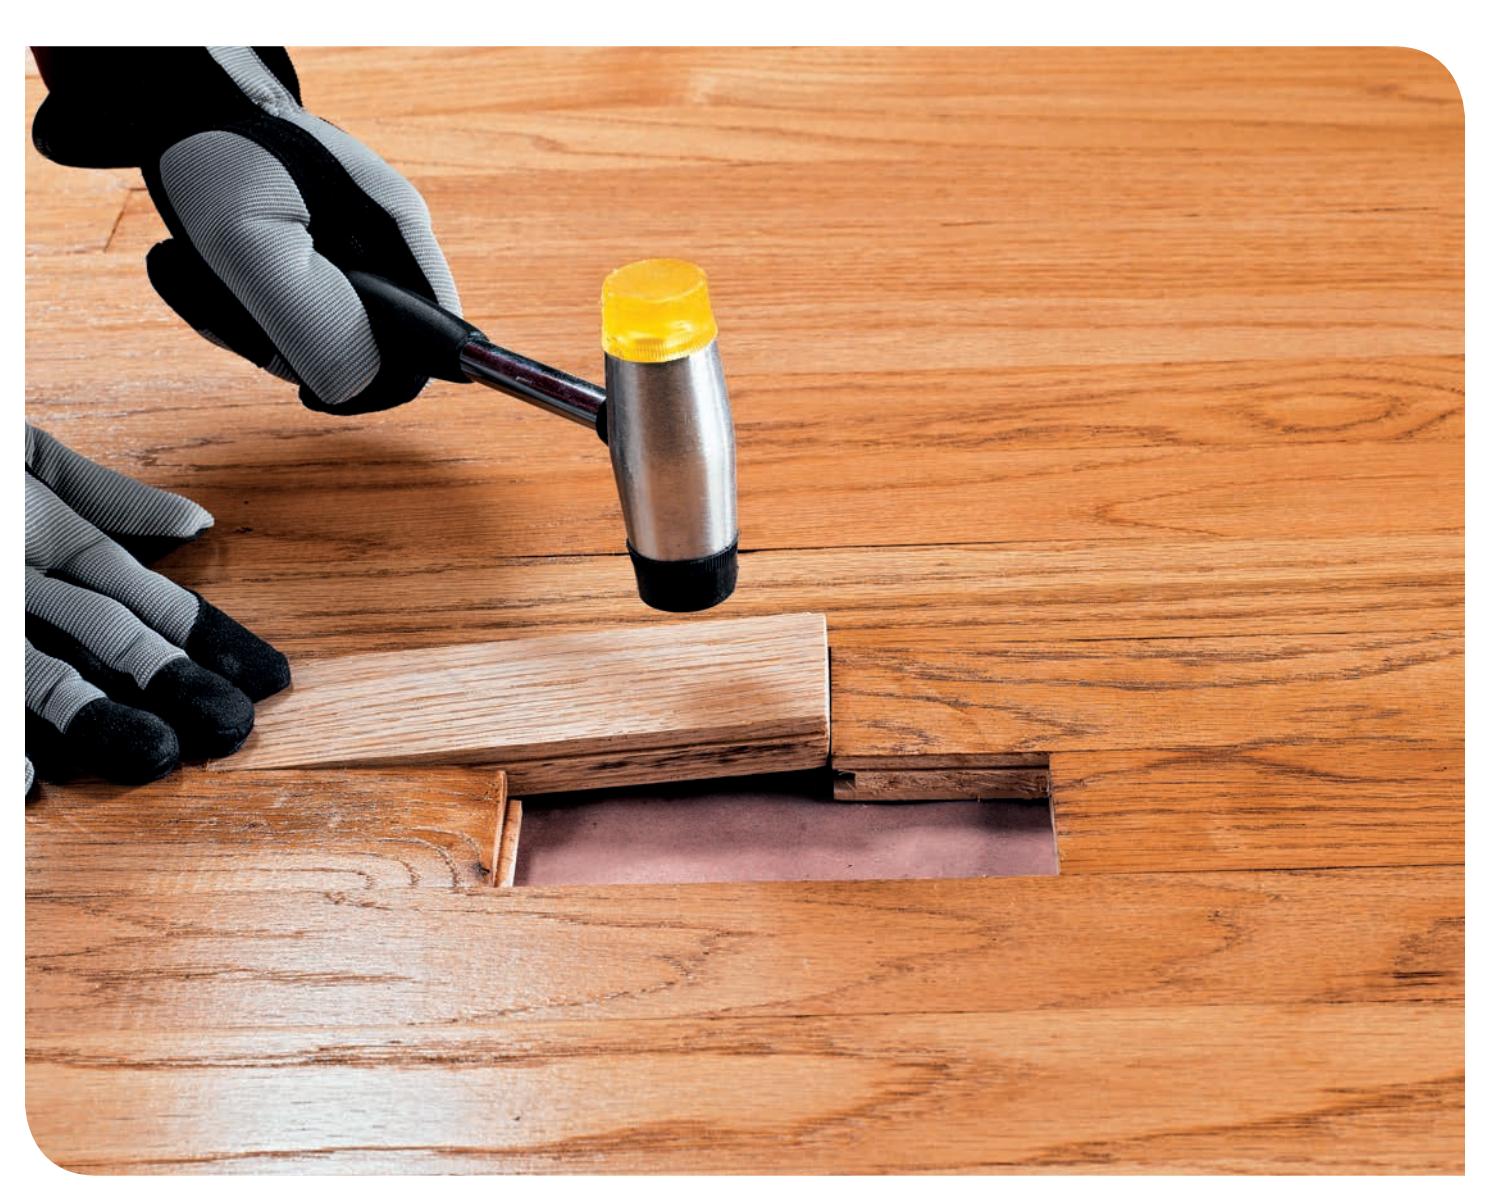
Ideally, floorboards are replaced in full lengths so the original pattern can be preserved. However, it is sometimes most expedient to replace only the damaged area with small, custom-cut segments and do your best to blend it in.
How to Replace a Hardwood Plank
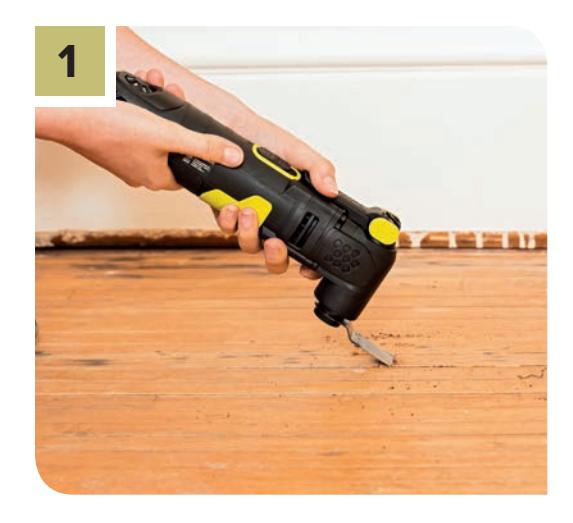
Use an oscillating multitool to cut the end of a hardwood plank. These relatively new power tools are good for making isolated cuts.
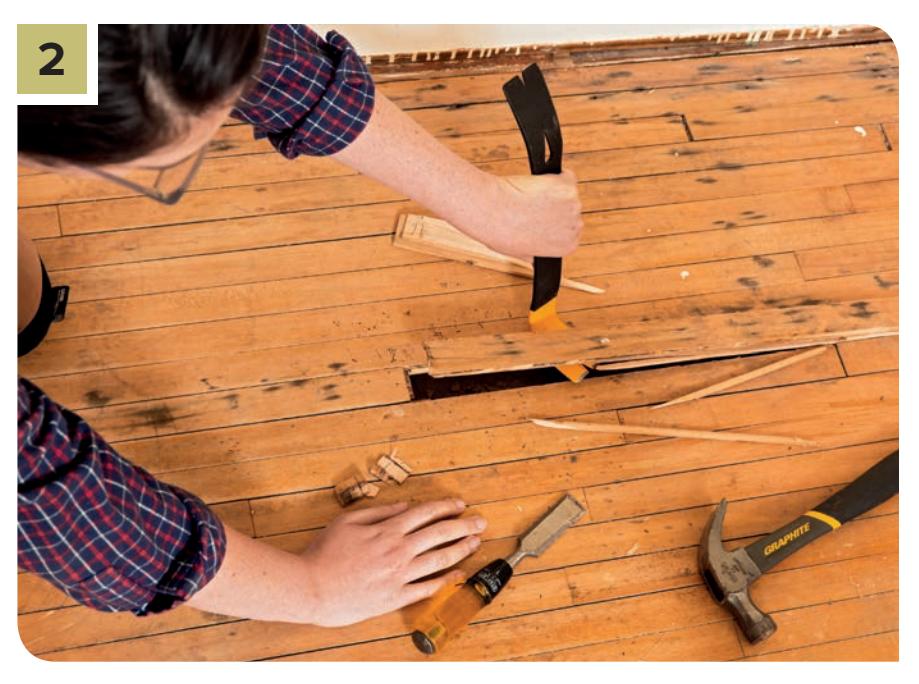
Use a chisel to pry out the flooring pieces, and to complete the cuts at the end of the board so they are smooth. Remove any exposed nails visible in the cutout area.
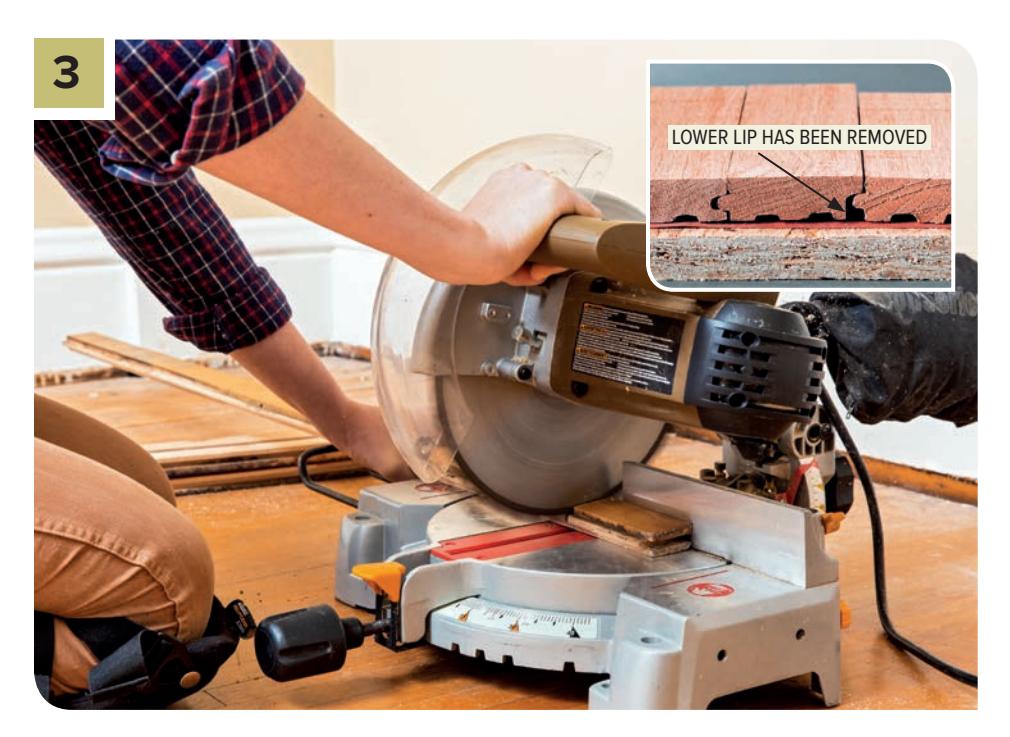
Cut a new flooring board to length. Then use a circular saw, table saw, or wood chisel to cut away the bottom lip of the board’s groove. Insert the tongue edge of the new board into the groove of the existing board, and lever the board down into place, so that the remaining top groove edge fits over the tongue of the board at the other side of the cutout, as shown in the inset photo.
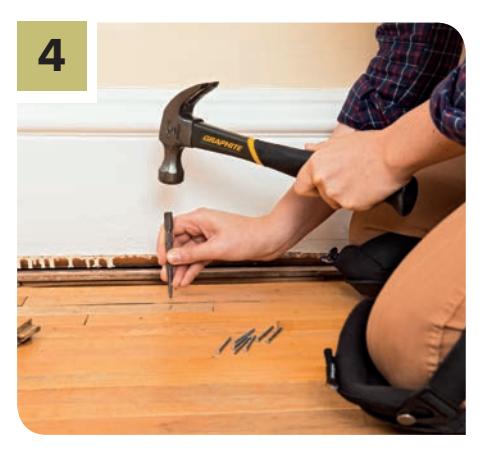
Facenail the new board in place by drilling pilot holes and driving finish nails down through the replacement board and into the subfloor. Recess the nail heads with a nail set, and fill the nail holes with putty. Finish the new board with stain and top coat finish to match the rest of the floor.
How to Replace a Section of Hardwood Flooring
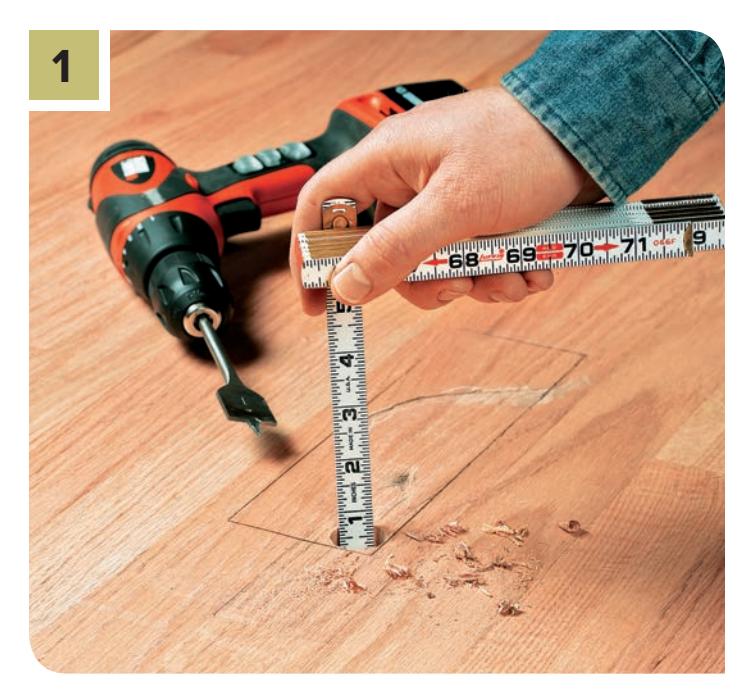
Outline cutting lines around the damaged board. To avoid nails, keep the outline at least 1/4” inside the seams between boards. Drill a hole through the damaged board, using a spade bit. Drill until you can see the top of the subfloor. Measure the thickness of the floorboard, then set your circular saw to this depth.
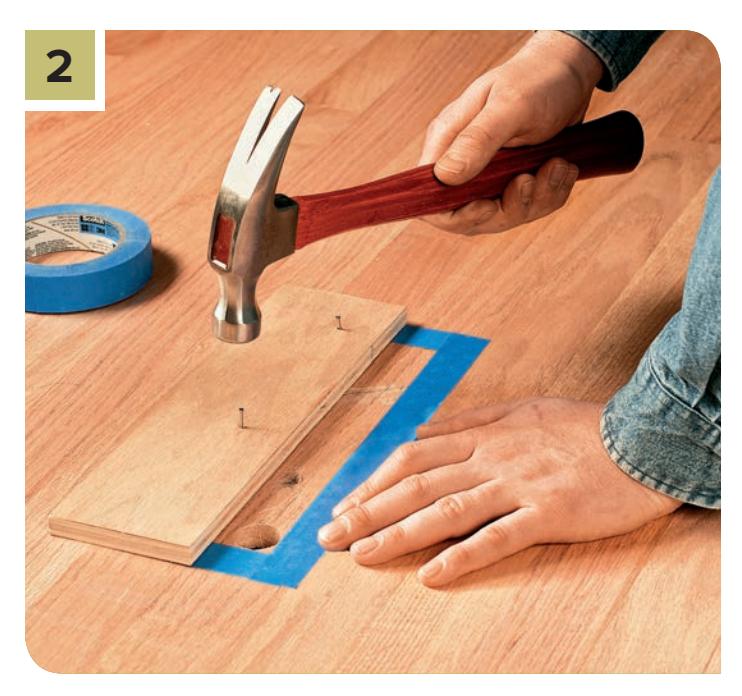
To prevent the boards from chipping, place painter’s tape along the outside of the pencil lines. To create a straightedge guide for your saw, tack a straight wood scrap inside the damaged area. Set this straightedge guide back from the cutting line a distance equal to the measurement between the saw blade and the edge of the saw foot plate.
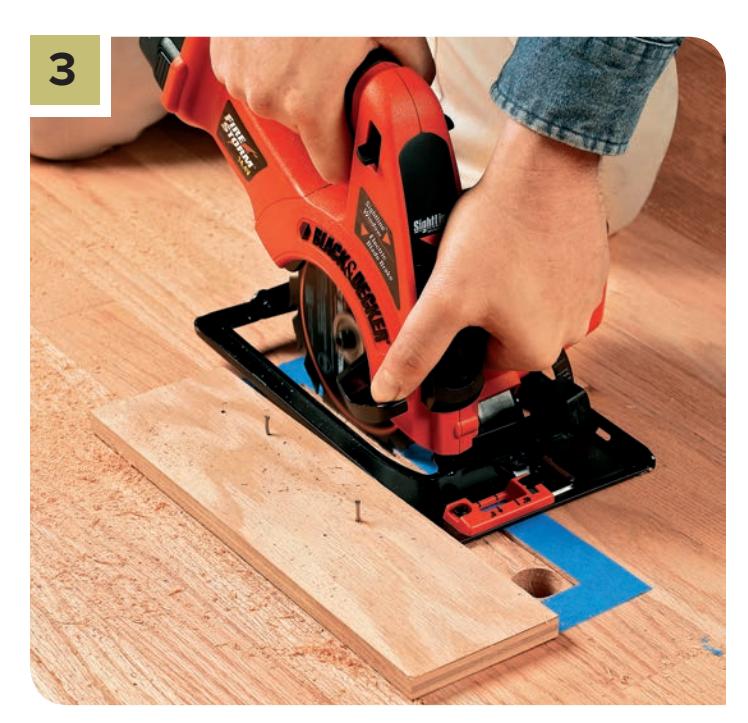
Align the circular saw so the front of the saw foot is against the straightedge guide. Cut along the cutting line, stopping $frac{1}{4}$” from the corners. Remove the straightedge guide and repeat along other cutting lines. Complete the cuts with a sharp chisel to loosen the damaged board from the subfloor. For clean cuts, the chisel’s beveled side needs to face the damaged area.
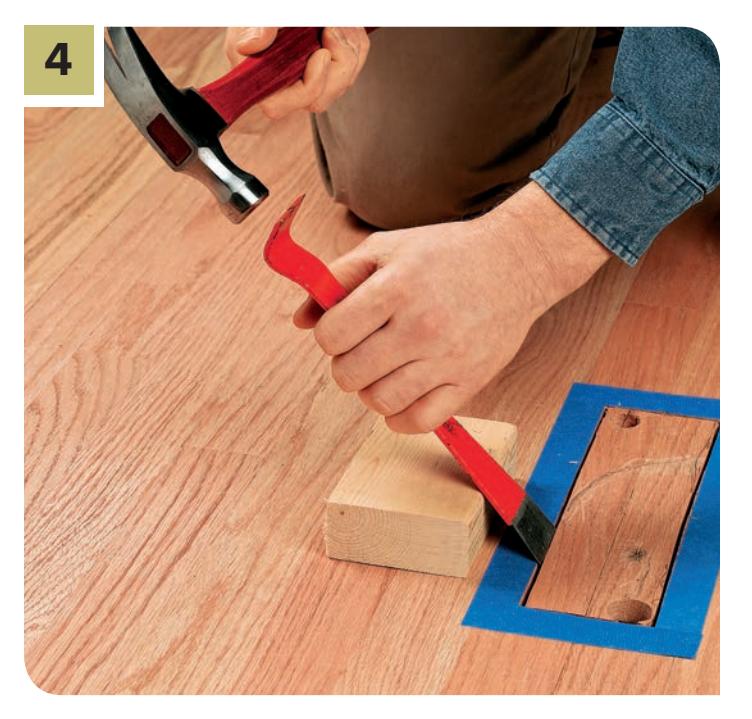
Using a pry bar, hammer, and 2 × 4 leverage block, pry up the split board. Remove any nails showing.
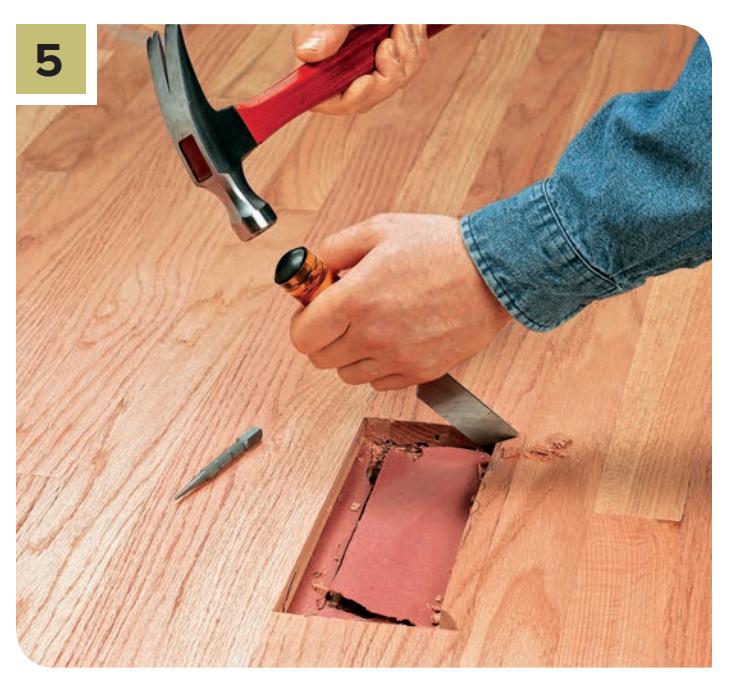
Use the chisel to remove the narrow strips of remaining wood between the cutout area and the adjoining flooring boards. For a good fit of the replacement board, it is very important to make these cuts as square as possible. Cut a segment of new flooring board to length, then cut away the lower lip of the groove on one side of patch board.
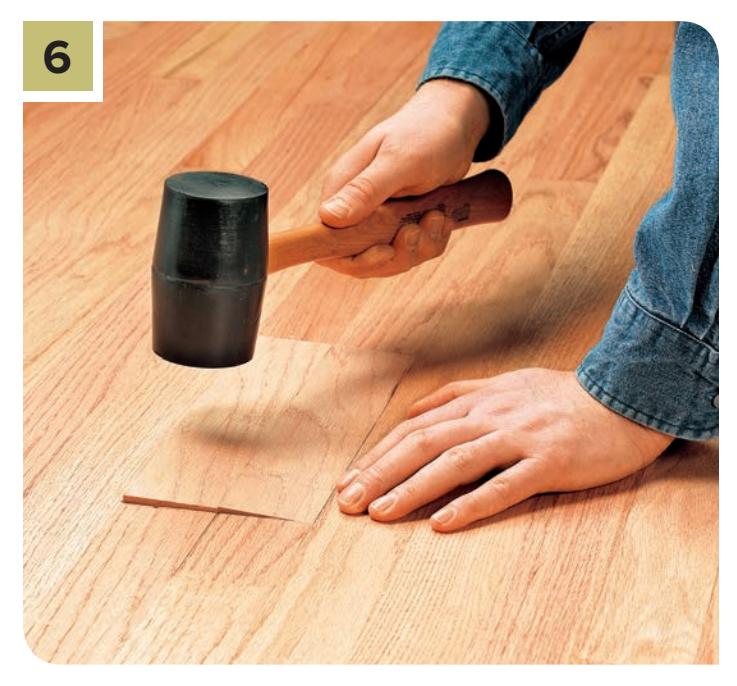
Hook the tongue of the replacement piece into the exposed groove of the adjoining old floorboard and use a rubber mallet to tap the groove side down until it is flush with the surrounding floor.
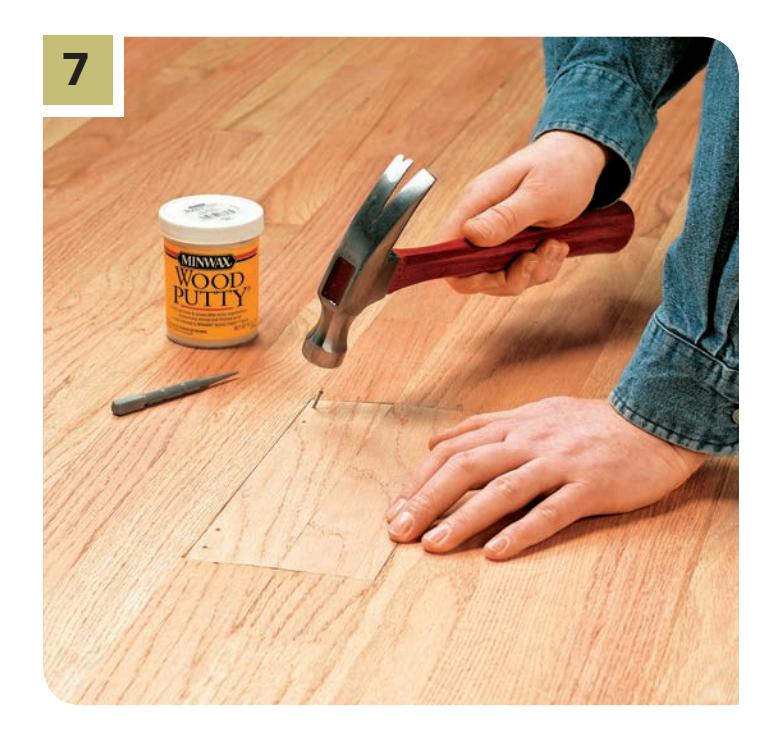
On the face of the replacement board, drill pilot holes angled outward at each end, about $frac{1}{2}$” from the ends. Drive $frac{1}{2}$” 8d finish nails into the pilot holes, securing the repair board to the adjoining floorboards. Recess the nail heads with a nail set, and fill the nail holes with wood putty. If there are any gaps along the edges of the replacement piece, also fill them with wood putty. Once the putty is dry, sand the putty and patch area smooth with fine-grit sandpaper. Apply matching wood stain, and let dry; then apply two coats of matching finish.
REPLACING LAMINATE FLOORING
In the event that you need to replace a laminate plank, you must first determine how to remove the damaged plank. If you have a glueless “floating” floor it is best to unsnap and remove each plank starting at the wall and moving in until you reach the damaged plank. However, if the damaged plank is far from the wall, cut out the damaged plank. Fully-bonded laminate planks are secured directly to the underlayment. When you remove the damaged plank, you run the risk of gouging the subfloor, so work with care or call in a professional.
From bottom to top, laminate planks are engineered to resist moisture, scratches, and dents. A melamine base layer protects the inner core layer, which is most often HDF (high-density fiberboard). This is occasionally followed by kraft paper saturated in resins for added protection and durability. The print film is a photographic layer that replicates the look of wood or ceramic. The surface is a highly protective wear layer. The tongue-and-groove planks fit together tightly and may be glued together for added stability.
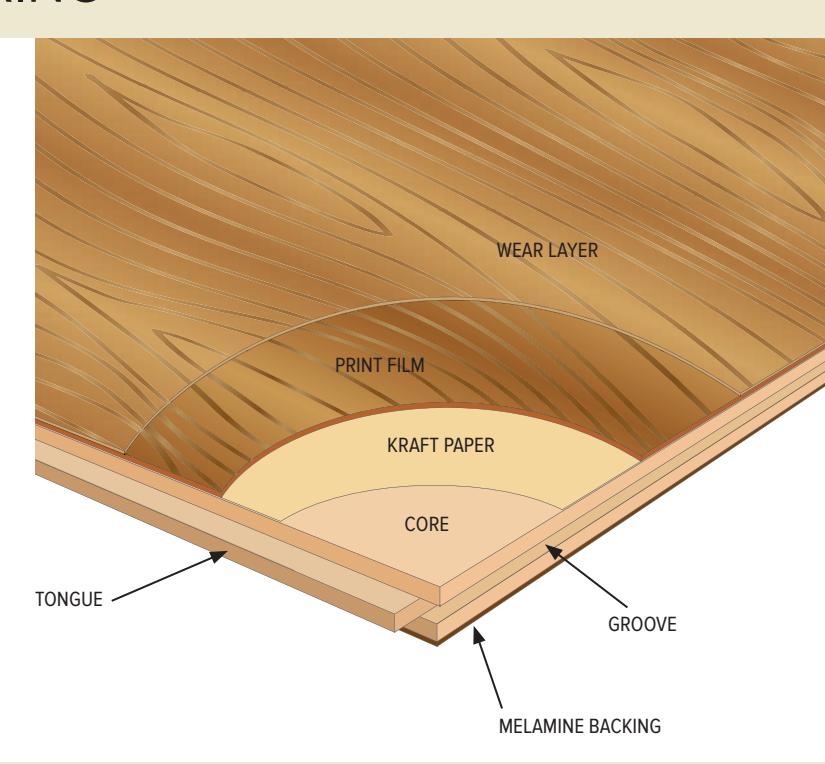
How to Replace Laminate Planks
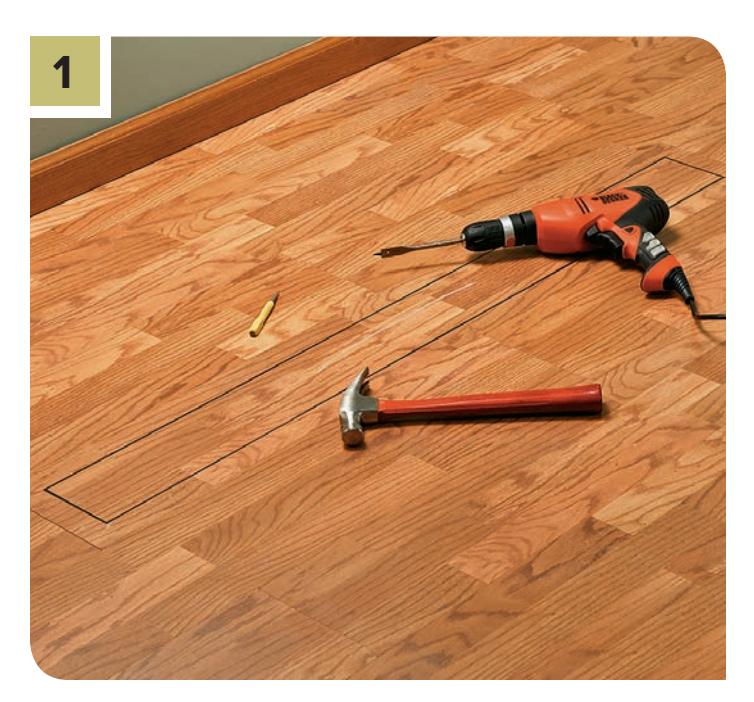
Draw a rectangle in the middle of the damaged board with a 1$frac{1}{2}$” border between the rectangle and factory edges. At each rectangle corner and inside each corner of the plank, use a hammer and nail set to make indentations. At each of these indentations, drill $frac{3}{16}$” holes into the plank. Only drill the depth of the plank.
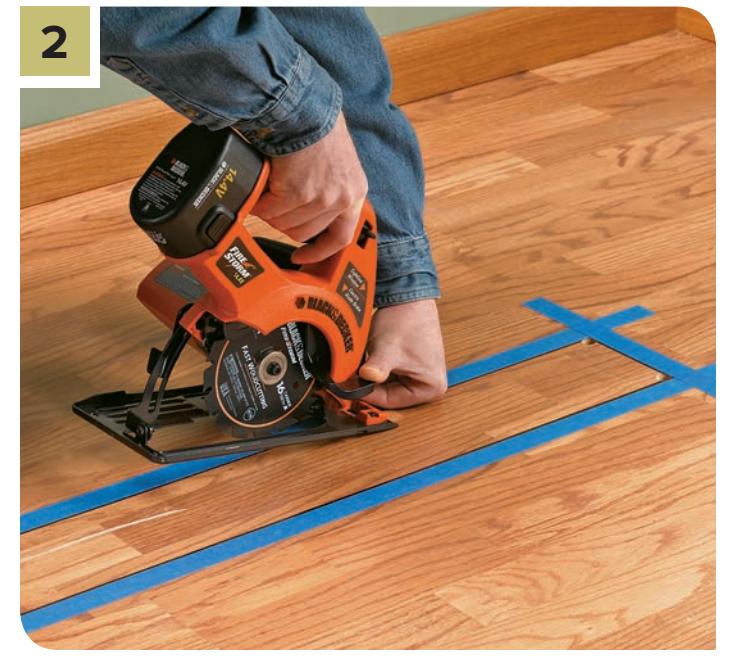
To protect the floor from chipping, place painter’s tape along the cutlines. Set the circular saw depth to the thickness of the replacement plank. To plunge-cut the damaged plank, slowly lower the saw blade into the cutline until the foot rests flat on the floor. Push the saw from the center of the line out to each end. Stop 1/4” in from each corner. Use a hammer to tap a pry bar or chisel into the cutlines. Lift and remove the middle section. Place a sharp chisel between the two drill holes in each corner and strike with a hammer to complete each corner cut. Vacuum.
To remove the remaining outer edges of the damaged plank, place a scrap $2 times 4$ wood block along the outside of one long cut and use it for leverage to push a pry bar under the flooring. Insert a second pry bar beneath the existing floor (directly under the joint of the adjacent plank) and use pliers to grab the 1 1/2” border strip in front of the pry bar. Press downward until a gap appears at the joint. Remove the border piece. Remove the opposite strip and then the two short end pieces in the same manner. Remove all of the old glue from the factory edges with a chisel.
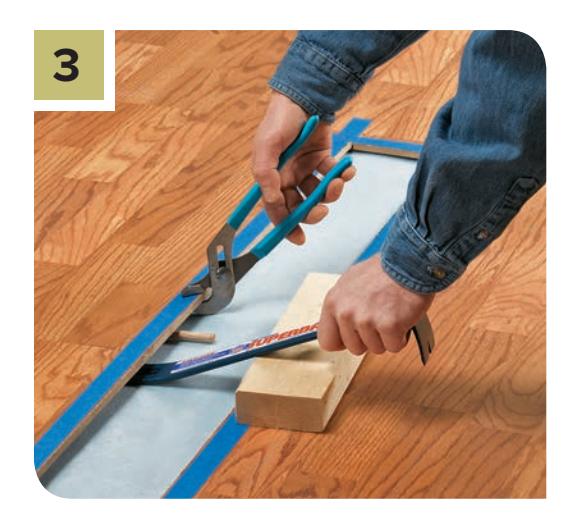
Using a pry bar to remove a damaged plank edge.
To remove the tongues on one long and one short end, clamp a straight cutting guide to the replacement plank so the distance from the guide causes the bit to align with the tongue and trim it off. Pressing a router or laminate trimmer against the cutting guide, slowly move along the entire edge of the replacement plank to remove the tongue.
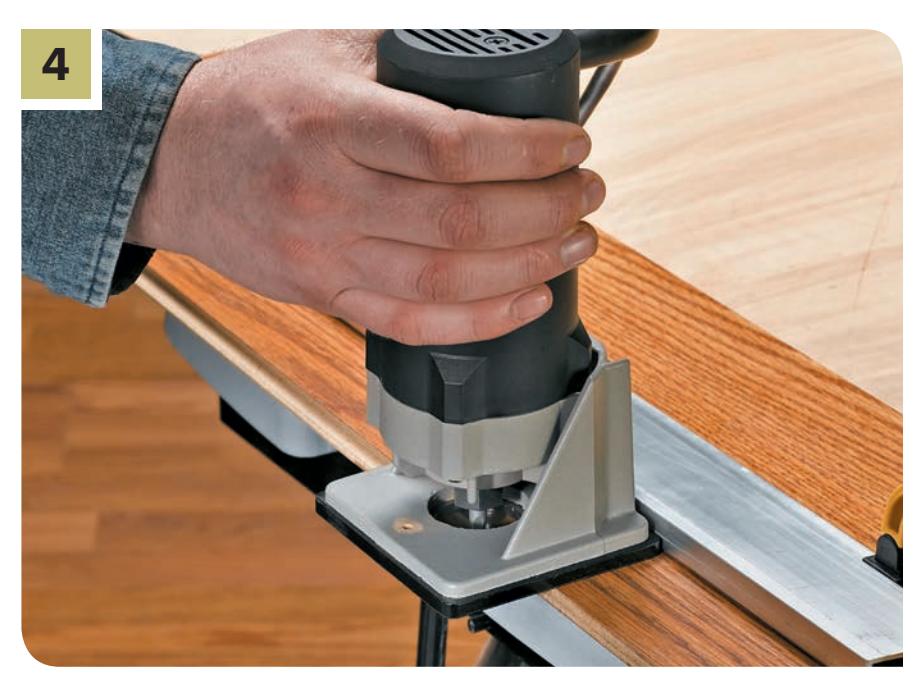
Trimming the tongue of a replacement plank with a router and cutting guide.
Dry-fit the grooves on the replacement board into the tongues of the surrounding boards and press into place.
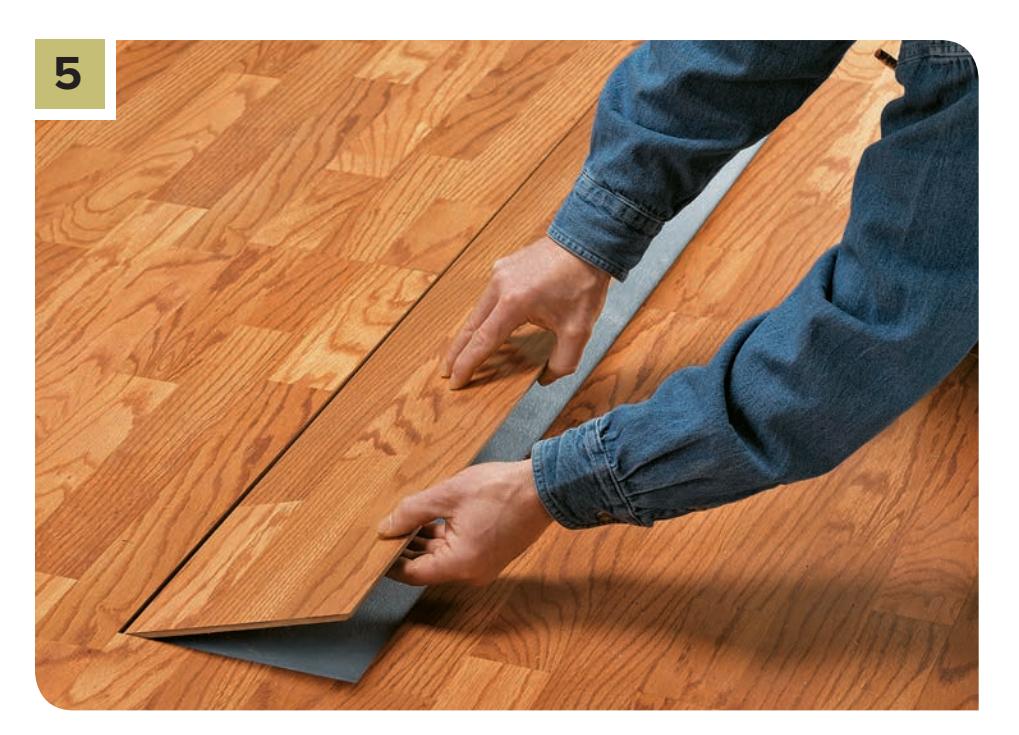
Dry-fitting a replacement plank into existing floor tongues.
Set the replacement plank by applying laminate glue to the removed edges of the replacement plank and into the grooves of the existing planks. Firmly press the plank into place. Clean up glue with a damp towel. Place a strip of wax paper over the new plank and evenly distribute some books on the wax paper. Allow the adhesive to dry for 12 to 24 hours.
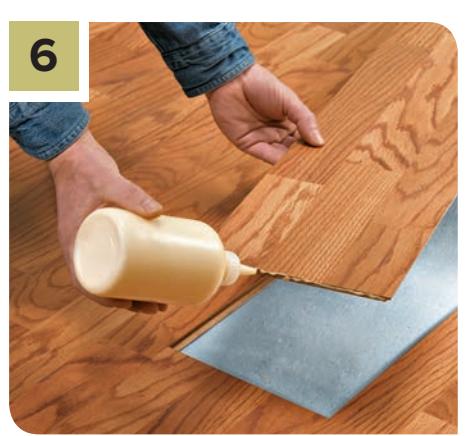
Applying glue and weighting down a newly installed replacement plank.
REPAIRING VINYL FLOORING
Repair methods for vinyl flooring depend on the type of floor as well as the type of damage. With sheet vinyl, you can fuse the surface or patch in new material. With vinyl tile, it’s best to replace the damaged tiles. Small cuts and scratches can be fused permanently and nearly invisibly with liquid seam sealer, a clear compound that’s available wherever vinyl flooring is sold. For tears or burns, the damaged area can be patched. If necessary, remove vinyl from a hidden area, such as the inside of a closet or under an appliance, to use as patch material.
How to Replace Resilient Tile
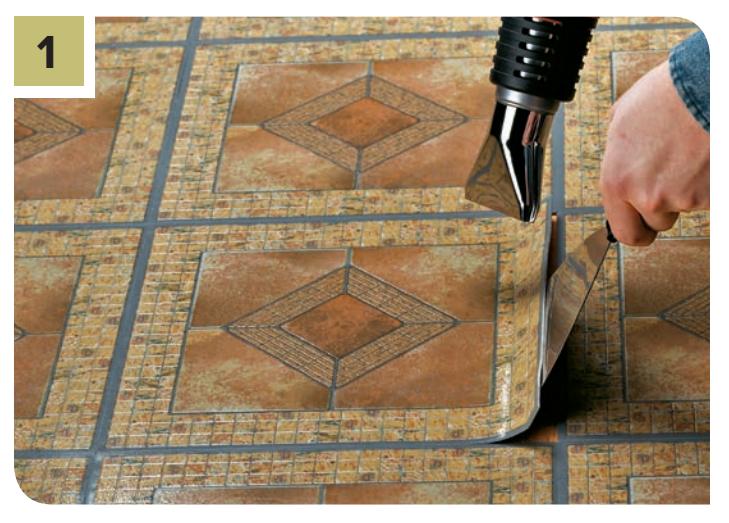
Using a heat gun and putty knife to remove a damaged vinyl tile.
Use an electric heat gun to warm the damaged tile and soften the underlying adhesive. Keep the heat source moving so you don’t melt the tile. When an edge of the tile begins to curl, insert a putty knife to pry up the loose edge until you can remove the tile.
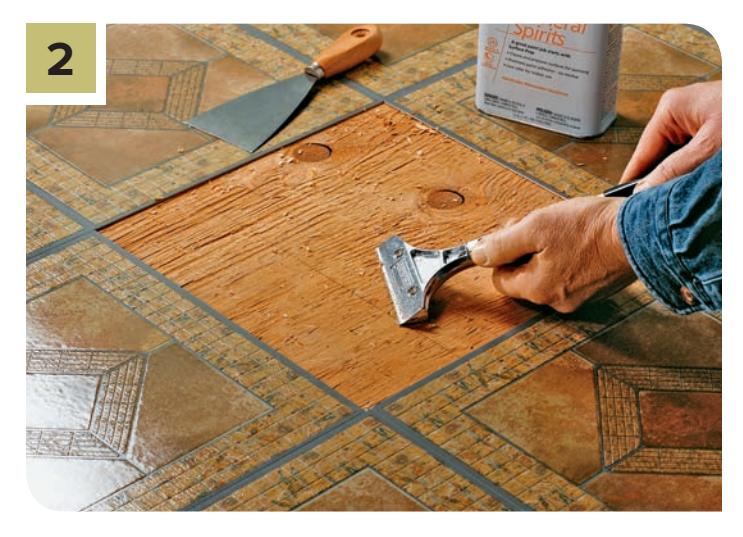
Scraping old adhesive from the subfloor after tile removal.
Scrape away remaining adhesive with a putty knife or, for stubborn spots, a floor scraper. Work from the edges to the center so that you don’t accidentally scrape up the adjacent tiles. Use mineral spirits to dissolve leftover goop.
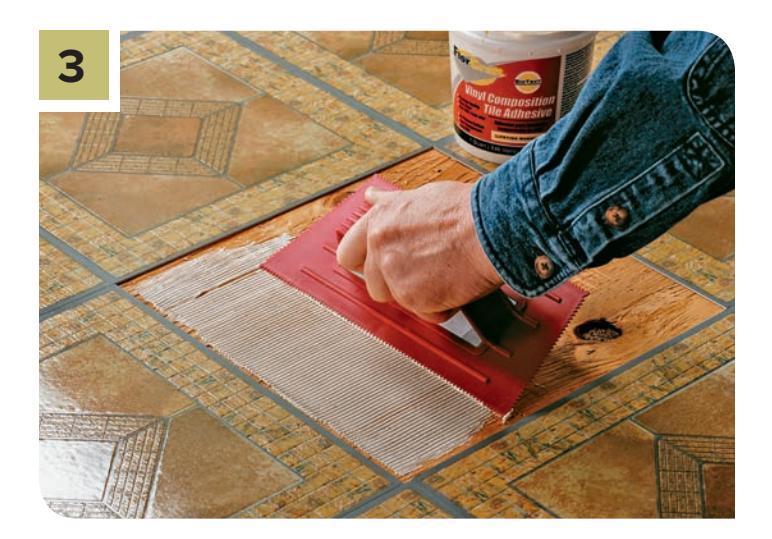
Applying vinyl tile adhesive with a notched trowel.
When the floor is dry, use a notched trowel—with 1/8” V-shaped notches held at a 45° angle to apply a thin, even layer of vinyl tile adhesive onto the underlayment.
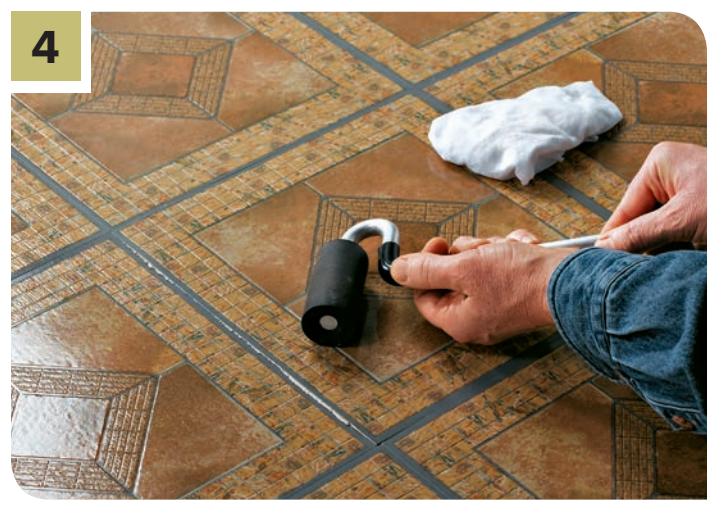
Setting a new vinyl tile and pressing it with a J-roller.
Set one edge of the tile in place. Lower the tile onto the underlayment and then press it into place. Apply pressure with a J-roller to create a solid bond, starting at the center and working toward the edge to work out air bubbles. If adhesive oozes out the sides, wipe it up with a damp cloth or sponge. Cover the tile with wax paper and some books, and let the adhesive dry for 24 hours.
How to Patch Sheet Vinyl
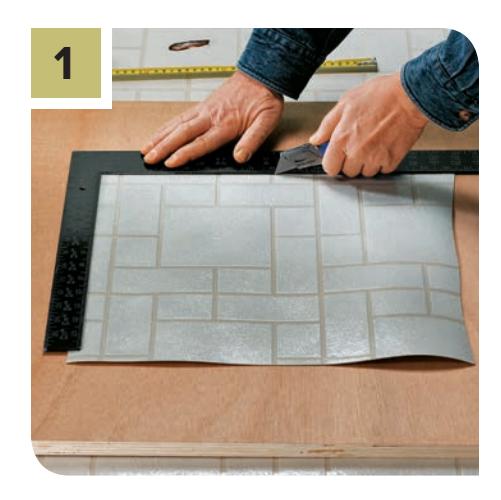
Measuring and cutting a new sheet vinyl patch.
Measure the width and length of the damaged area. Place the new flooring remnant on a surface you don’t mind making some cuts on like a scrap of plywood. Use a carpenter’s square for cutting guidance. Make sure your cutting size is a bit larger than the damaged area.
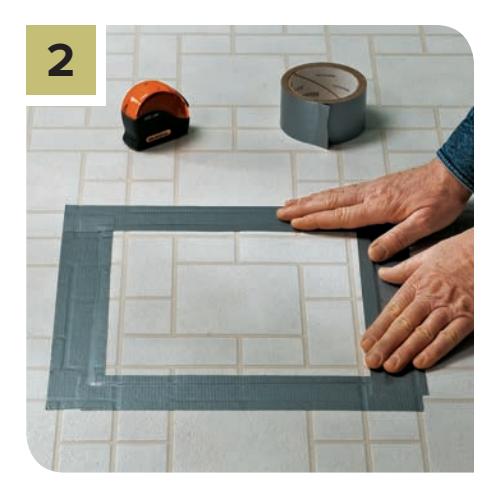
Cutting through new and old sheet vinyl layers for a patch.
Lay the patch over the damaged area, matching pattern lines. Secure the patch with duct tape. Using a carpenter’s square as a cutting guide, cut through the new vinyl (on top) and the old vinyl (on bottom). Press firmly with the knife to cut both layers.
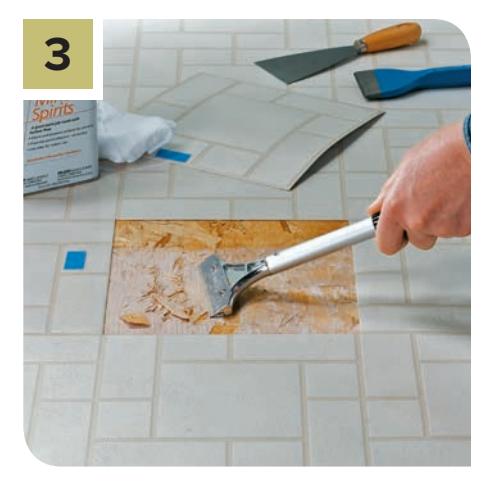
Removing the damaged section of sheet vinyl flooring.
Remove the damaged section of floor. Work from edges in. When the tile is loosened, insert a putty knife and pry up the damaged material. Scrape off the remaining adhesive with a putty knife or chisel or paint scraper.
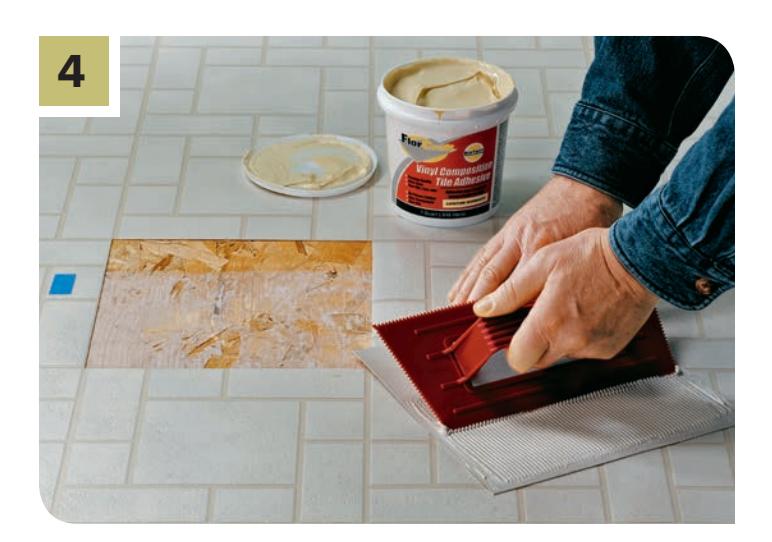
Applying adhesive to the back of a new sheet vinyl patch.
Apply adhesive to the patch, using a notched trowel (with 1/8” V-shaped notches) held at a 45° angle to the back of the new vinyl patch.
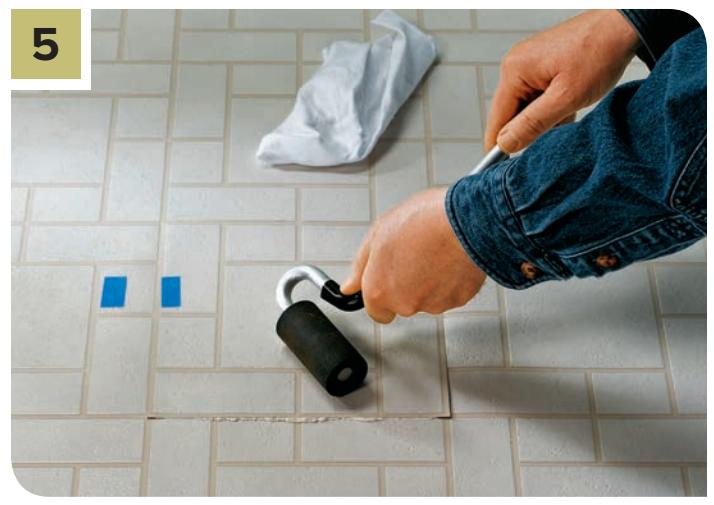
Setting a new sheet vinyl patch and pressing it into place.
Set one edge of the patch in place. Lower the patch onto the underlayment. Press into place. Apply pressure with a J-roller or rolling pin to create a solid bond. Start at the center and work toward the edges, working out air bubbles. Let the adhesive dry overnight. Use a soft cloth dipped in lacquer thinner to clean the area. Mix the seam sealer according to the manufacturer’s directions.
REPAIRING TILE FLOORS
Although ceramic tile is one of the hardest floorcoverings, it is also fragile and sometimes problems occur. Tiles break and crack. Usually fixing the problem is simply a matter of removing and replacing individual tiles. However, floor movement can cause the adhesive layer beneath the tile to deteriorate. In this case, the adhesive layer must be replaced in order to create an effective, longlasting repair.
Any time you remove tile, check the underlayment. If it’s no longer smooth, solid, and level, repair or replace it before replacing the tile. When removing grout or damaged tiles, be careful not to damage surrounding tiles. Always wear eye protection when working with a hammer and chisel. Any time you are doing a major tile installation, make sure to save extra tiles. This way, you will have materials on hand when repairs become necessary.
How to Replace Ceramic Tiles
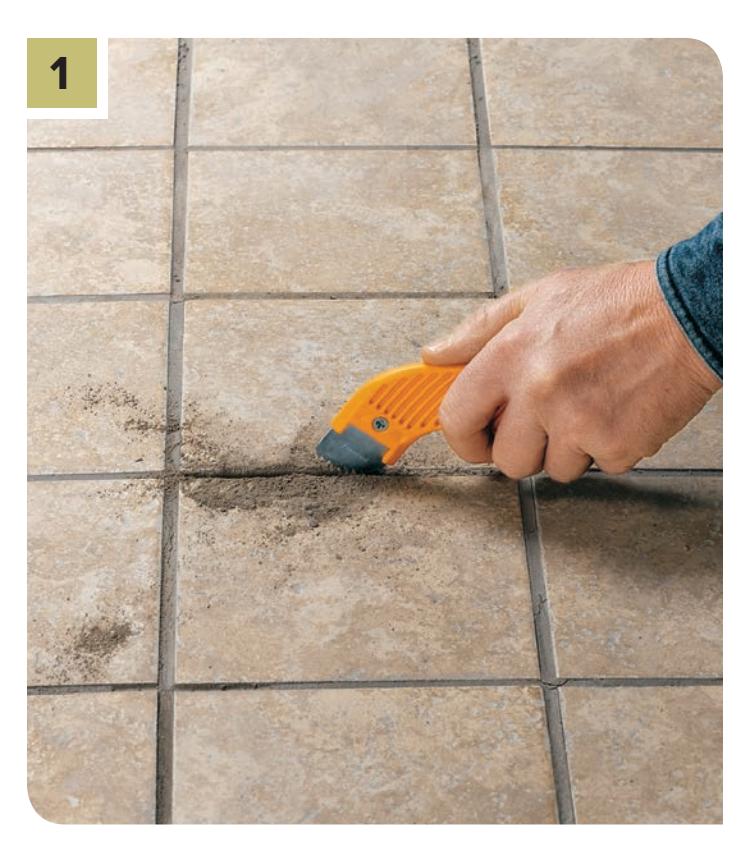
Removing grout with a saw and breaking a ceramic tile with a hammer and nail set.
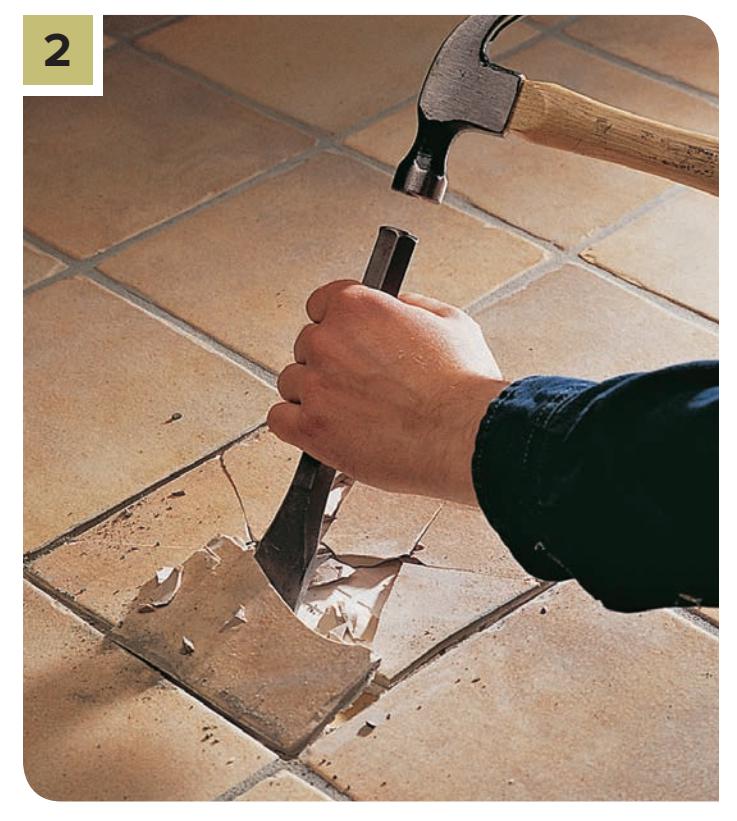
Chiseling out broken ceramic tile pieces.
Insert a cold chisel into one of the cracks and gently tap the tile. Start at the center and chip outward so you don’t damage the adjacent tiles. Be aware that cementboard substrate looks a lot like mortar when you’re chiseling. Remove and discard the broken pieces.
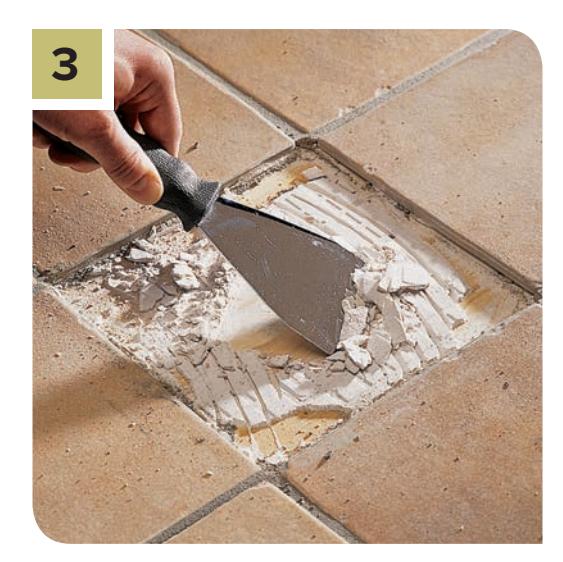
Scraping old thinset adhesive from the underlayment.
Use a putty knife to scrape away old thinset adhesive; use a chisel for poured-mortar installation. Once the adhesive is scraped from the underlayment, smooth the rough areas with sandpaper. If there are gouges in the underlayment, fill them with epoxy-based thinset mortar (for cementboard) or a floor-leveling compound (for plywood).
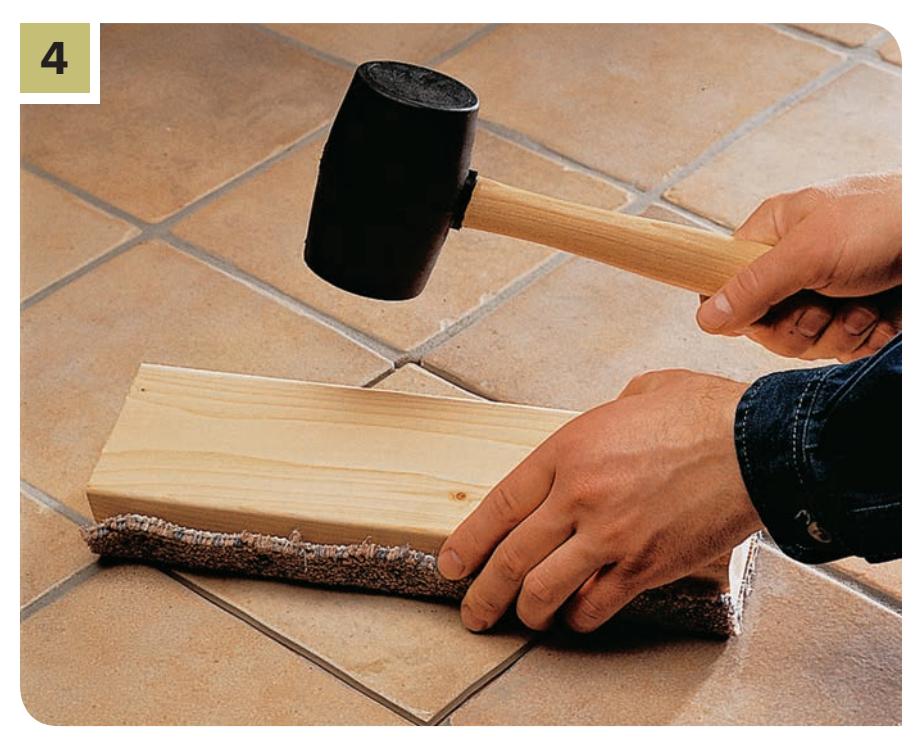
Applying thinset adhesive and setting a new ceramic tile.
Use a notched trowel to apply thinset adhesive to the back of the replacement tile. Set the tile down into the space, doing your best to get it as level as you can with the surrounding tile and to keep it centered in the open area. Use a mallet or hammer and a block of wood covered with cloth or a carpet scrap to lightly tap on the tile, setting it into the adhesive.
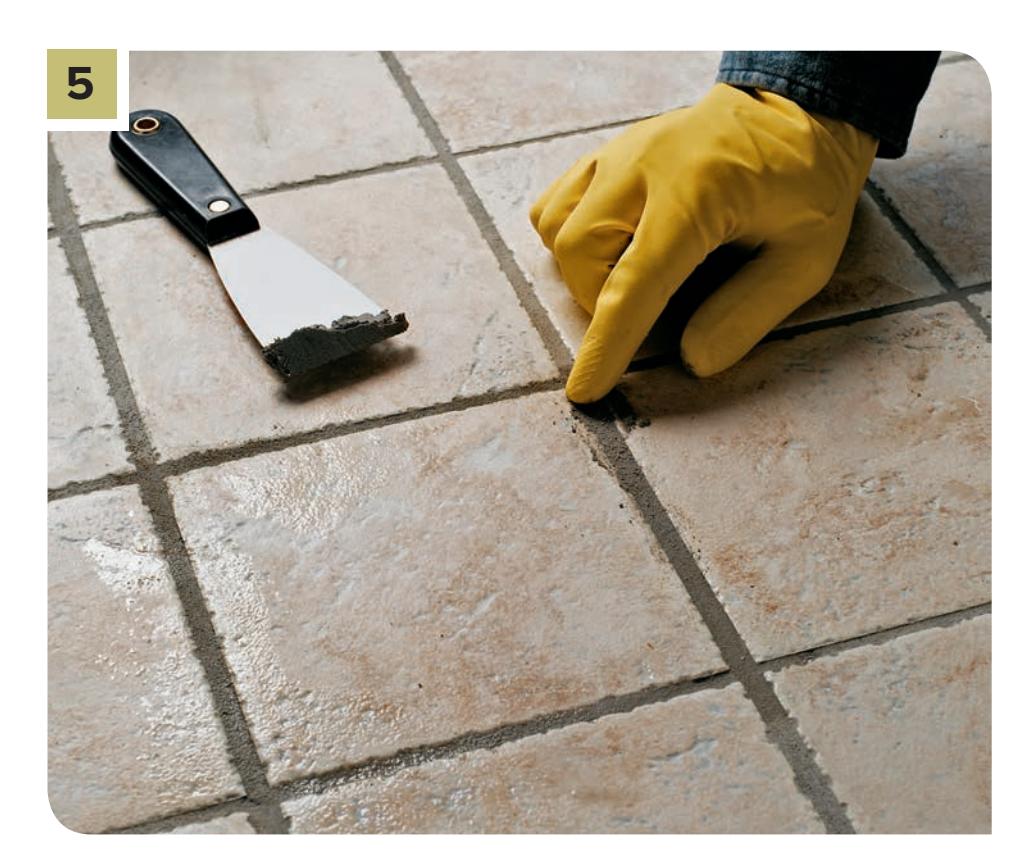
Applying grout to the joints of a newly set ceramic tile.
Use a putty knife to apply grout to the joints. Fill in low spots by applying and smoothing grout with your finger. Use the round edge of a toothbrush handle to create a concave grout line, if desired. Wipe away excess grout with a clean, damp sponge.
REPAIRING CARPET
Burns and stains are the most common carpeting problems. You can clip away the burned fibers of superficial burns using small scissors. Deeper burns and indelible stains require patching by cutting away and replacing the damaged area.
CUSHION-BACK CARPET
Most wall-to-wall carpeting installed today has a stiff, woven backing often made of jute. It is normally installed over a thick carpet pad to create cushion. Other carpet, usually on the more inexpensive side, has a cushion layer bonded to the carpeting permanently. This type of carpet is not stretched so it does not need a kicker or tack strips around the room perimeter. The repair techniques are very similar: you simply remove the damaged area and glue a patch in place.
How to Repair Spot Damage
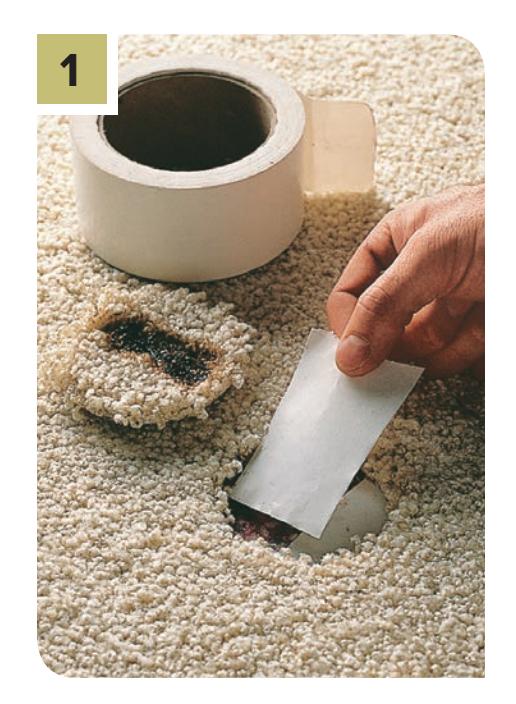
Using a cookie-cutter tool to remove damaged carpet.
Remove minor damage or stains with a “cookie-cutter” tool, available at carpeting stores. Press the cutter down over the damaged area and twist it to cut away the damaged carpet.
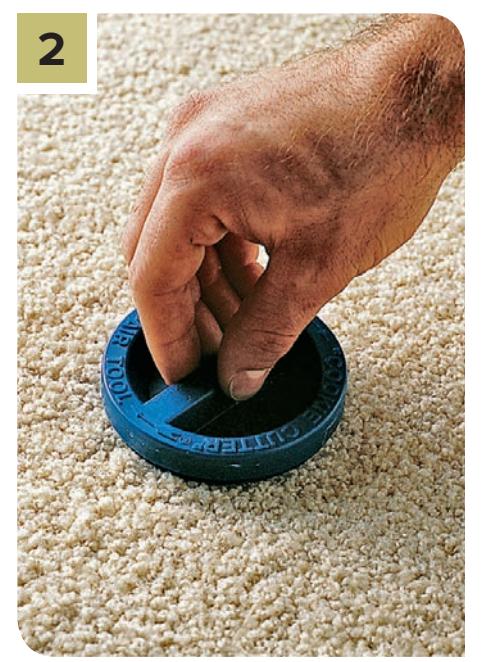
Cutting a replacement carpet patch from scrap material.
Using the cookie-cutter tool again, cut a replacement patch from scrap carpeting. If you did not reserve any, check in a nearby closet for usable, matching material. Insert double-face carpet tape under the cutout, positioning the tape so it overlaps the patch seams.
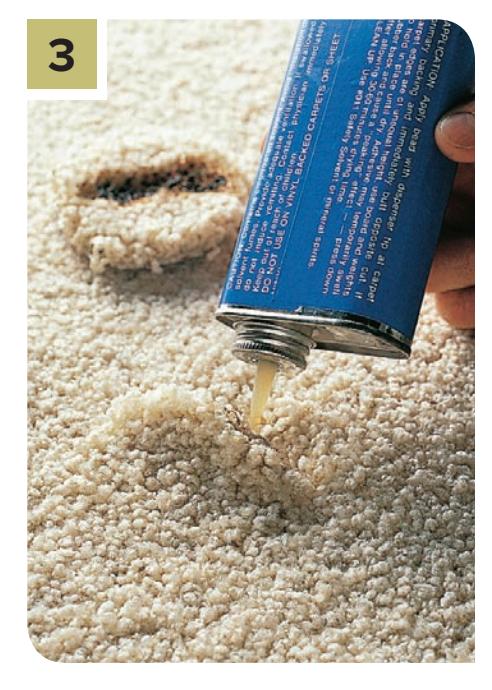
Inserting a carpet patch and applying seam adhesive.
Press the patch into place. Make sure the direction of the nap or pattern matches the existing carpet. To seal the seam and prevent unraveling, apply seam adhesive to the edges of the patch.
How to Restretch Loose Carpet
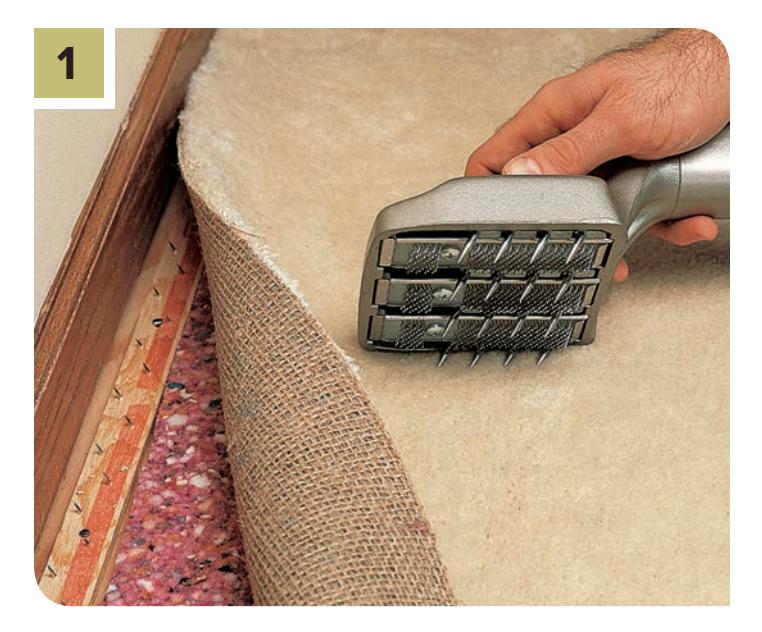
Adjusting the knob on a knee kicker.
Adjust the knob on the head of the knee kicker so the prongs grab the carpet backing without penetrating through the padding. Starting from a corner or near a point where the carpet is firmly attached, press the knee kicker head into the carpet, about 2” from the wall.
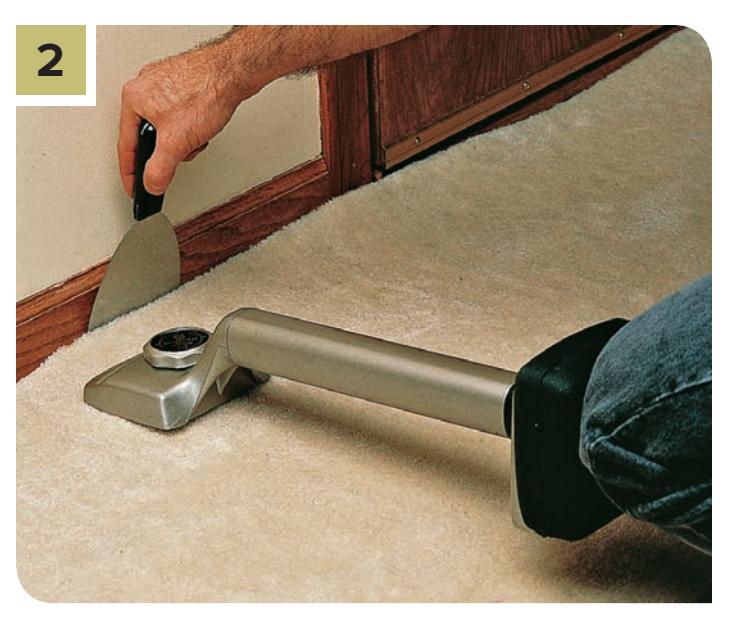
Using a knee kicker to stretch carpet towards the wall.
Thrust your knee into the cushion of the knee kicker to force the carpet toward the wall. Tuck the carpet edge into the space between the wood strip and the baseboard using a 4” wallboard knife. If the carpet is still loose, trim the edge with a utility knife and stretch it again.
KNEE KICKERS
Knee kickers have teeth that grab the carpet backing. These teeth should be set to grab the backing without grabbing the padding. There is an adjustable knob to do this. You can tell if the knee kicker is grabbing the padding by the increased pressure needed to move it forward. To release the tension just before a damaged area of carpet you intend to patch, place your feet on the floor and use your knee to press it toward the damaged area.
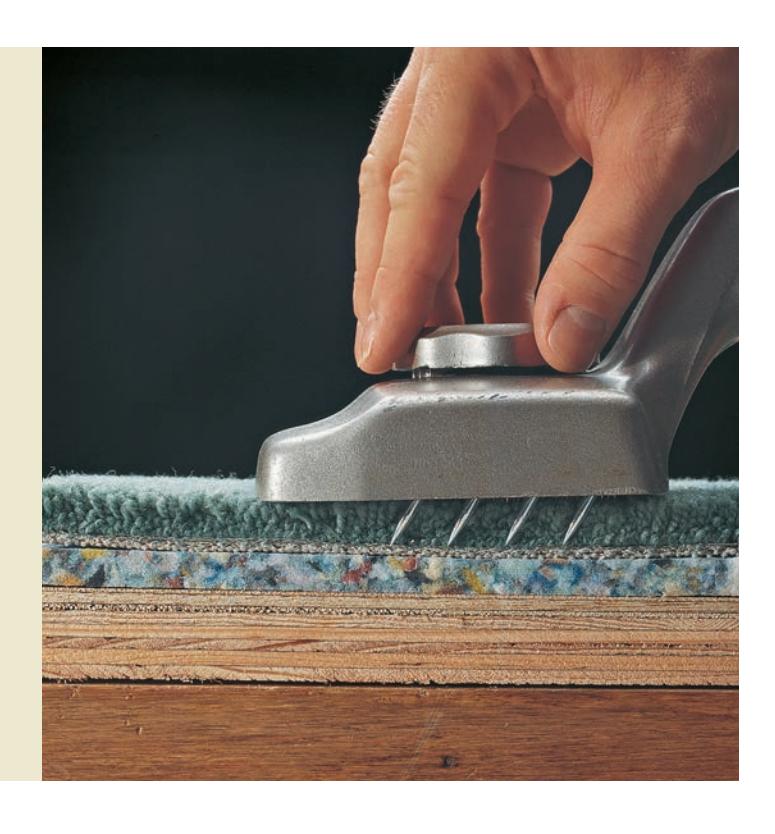
Close-up view of a knee kicker tool.
WALLS & CEILINGS
Unless you are planning a major remodeling project, walls and ceilings do not require much attention beyond occasional repair of slight damage and updating of surface with paint or wallcoverings—all common DIY projects. Most often, damage is caused by accidental impact from things like doorknobs or moving furniture. You may also have an occasional nail hole or screw hole to fill, especially if you are redecorating. All of these minor touch ups and repairs are shown in this chapter.
There is, however, another potential cause of damage to walls and ceilings that is less common, but can create huge problems when it makes its presence felt: water. Water can find its way into walls and ceilings through leaky plumbing, clogged and
overflowing fixtures, or via leaks in your roofing system. If the source of the water infiltration is caught in time and addressed, damage repair can be limited to cosmetic touch-ups. This is why it is important to keep a close eye on your walls and ceilings for any signs of water—usually indicated by paint blistering or discoloration. Leaks more often are slow and gradual than instantly catastrophic. But the latter can happen, too. Once your wall or ceiling materials (usually drywall these days) become saturated, deterioration is rapid and mold can form quickly. Addressing this type of issue is beyond the scope of a basic home repair book and it is highly recommended that you seek professional home service as soon as possible.
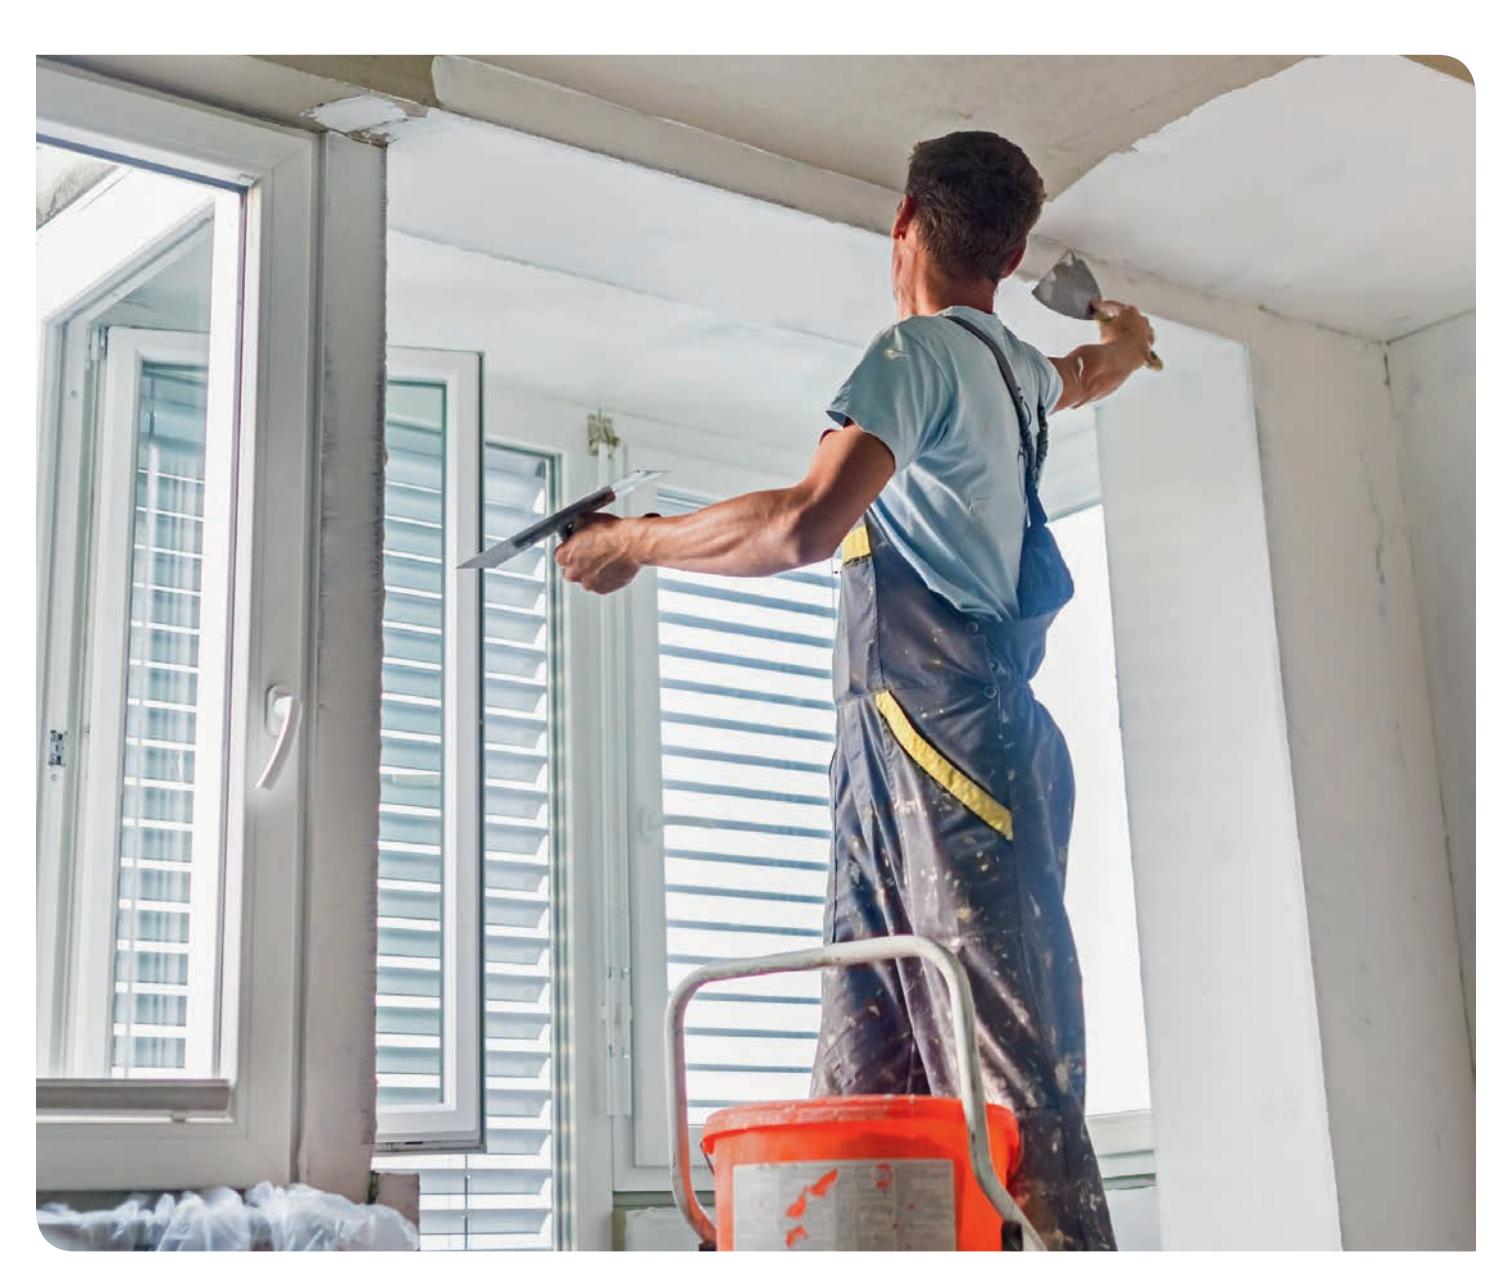
It’s a pretty sure bet that once you turn your attention to walls and ceilings, it won’t be long before you find yourself on a ladder with a putty knife in your hand.
WALL MAINTENANCE & TOUCH-UPS
Wall maintenance, including washing, should be done on a regular basis, especially in kitchens and bathrooms where grime and humidity are more present. If you are lucky, your kitchen and bathroom walls have a washable surface: this includes most wallcoverings except flat paint, uncoated wallpapers, or delicate paneling. If your kitchen or bathroom wall surfaces are not washable, you should seriously think about upgrading to a gloss paint or vinyl-coated wallpaper, or even ceramic tile.
Most other rooms in your house likely have flat wall paint. This is good from the standpoint that flat paint conceals wall imperfections and is not reflective. But flat paint is very difficult to wash without streaking or altering the finish in a very noticeable way. It is also hard to spot clean.
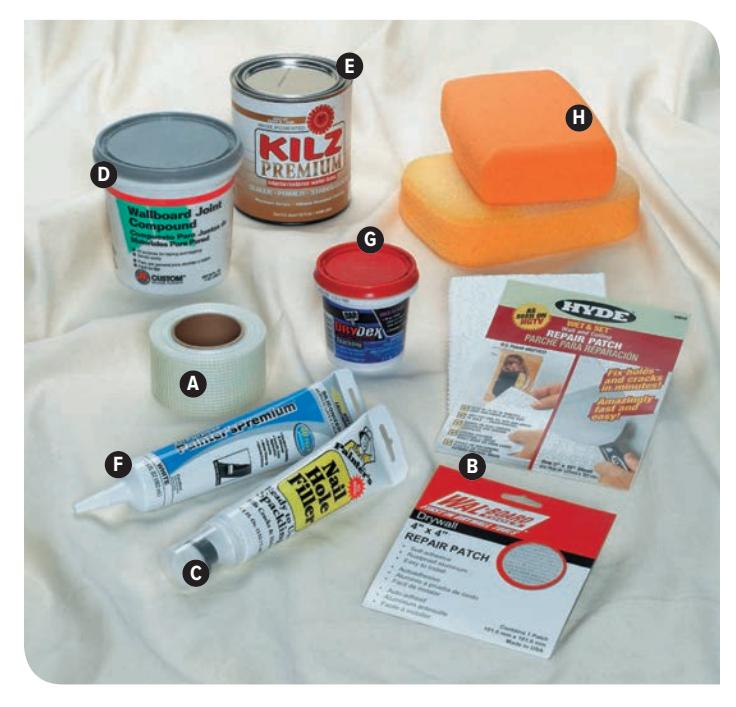
Wall touch-up/repair materials include self-adhesive seam tape (A); hole-patching kit (B); nail hole filler (C); joint compound (D); stainblocking primer/sealer (E); and sink and tub caulk (F). Some new spackling compounds (G) start out pink and dry white so you can see when they’re ready to be sanded and painted. Sponges (H) are useful for smoothing damp joint compound to reduce the amount of sanding that’s necessary later.
HOW TO CLEAN WALLS THAT HAVE FLAT PAINT
Start with a brand-new, very clean sponge.
- Fill a bucket with clean, cool water and no detergent or other chemicals. Wring the sponge out so it is almost dry.
- Start at the top of the area you are cleaning and begin lightly wiping, working your way downward. Clean the sponge and the water very frequently.
- For stubborn stains where some additional solvent is needed, try adding a small amount of white vinegar to the bucket water. Wipe with plain, clean water afterwards.
- TIP: For scuff marks or waxy marks like crayon, try using an eraser sponge—sold at most hardware and even grocery stores—to spot clean the marking. These can be effective for some surface buildup, but won’t do much to address staining. Don’t get too aggressive with them.
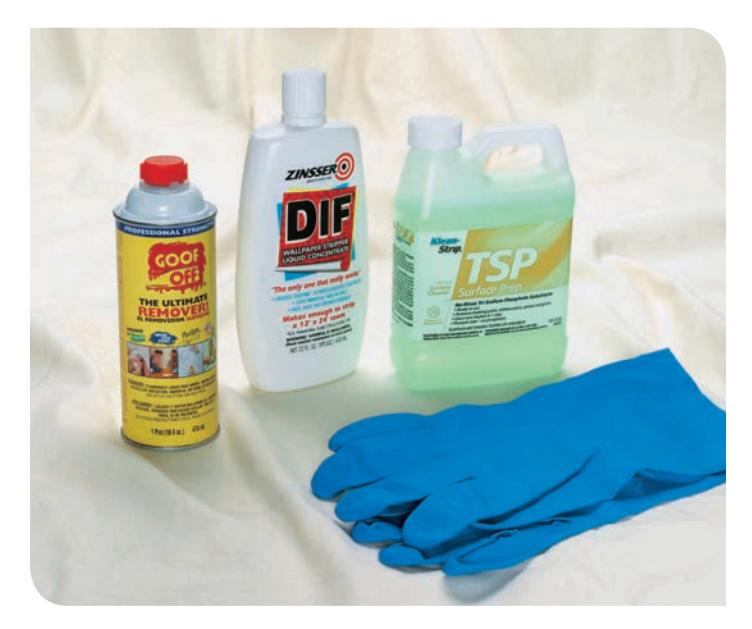
Wall cleaning and degreasing products are needed for both regular maintenance and to prepare walls for paint or wallpaper before a painting project. If wallpaper is to be removed, a wallpaper-removal agent is extremely helpful. Clockwise from top left are cleanup solution to remove old drips and splatters, wallcovering remover to strip old wallcoverings, trisodium phosphate (TSP) for washing the walls, and rubber gloves, which should be worn when using chemicals such as these.
FIXING DRYWALL DAMAGE
Whether in a wall or ceiling, patching holes and concealing popped nails are common drywall repairs. Small holes can be filled directly, but larger patches must be supported with some kind of backing. To repair holes left by nails or screws, dimple the hole slightly with the handle of a utility knife or drywall knife and fill it with spackle or joint compound.
Use joint tape anywhere the drywall’s face paper or joint tape has torn or peeled away. Adhesive mesh tapes can make quick work of this, although they can be difficult to get to stick properly. Embedding paper tape in joint compound is more likely to produce satisfactory results but is more time consuming. Always cut away any loose drywall material, face paper, or joint tape from the damaged area, trimming back to solid drywall material.
Large drywall repairs require three coats of joint compound, just like in new installations. Lightly sand your repairs before painting, or adding texture. More minor repairs can usually be accomplished with a one-coat drywall repair compound.
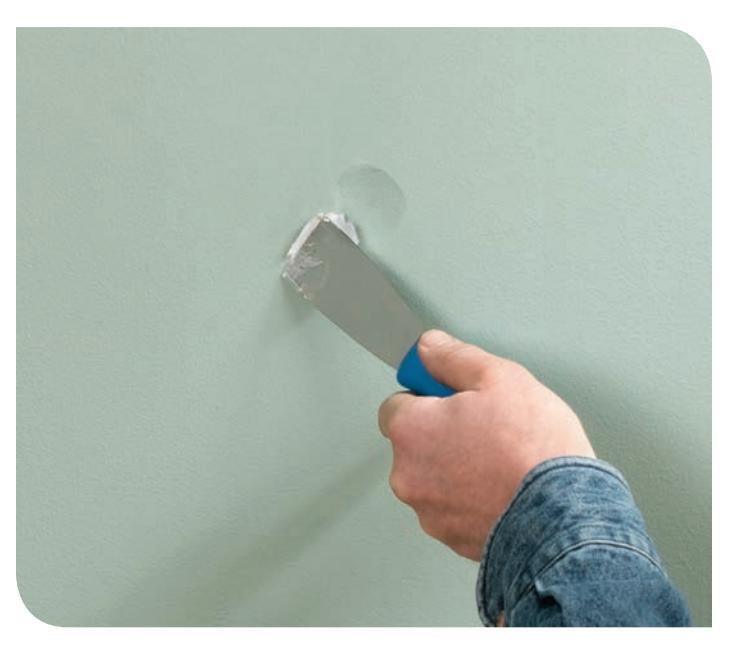
If wallboard is dented, without cracks or tears in the face paper, just fill the hole with lightweight spackling or all-purpose joint compound, let it dry, and sand it smooth.
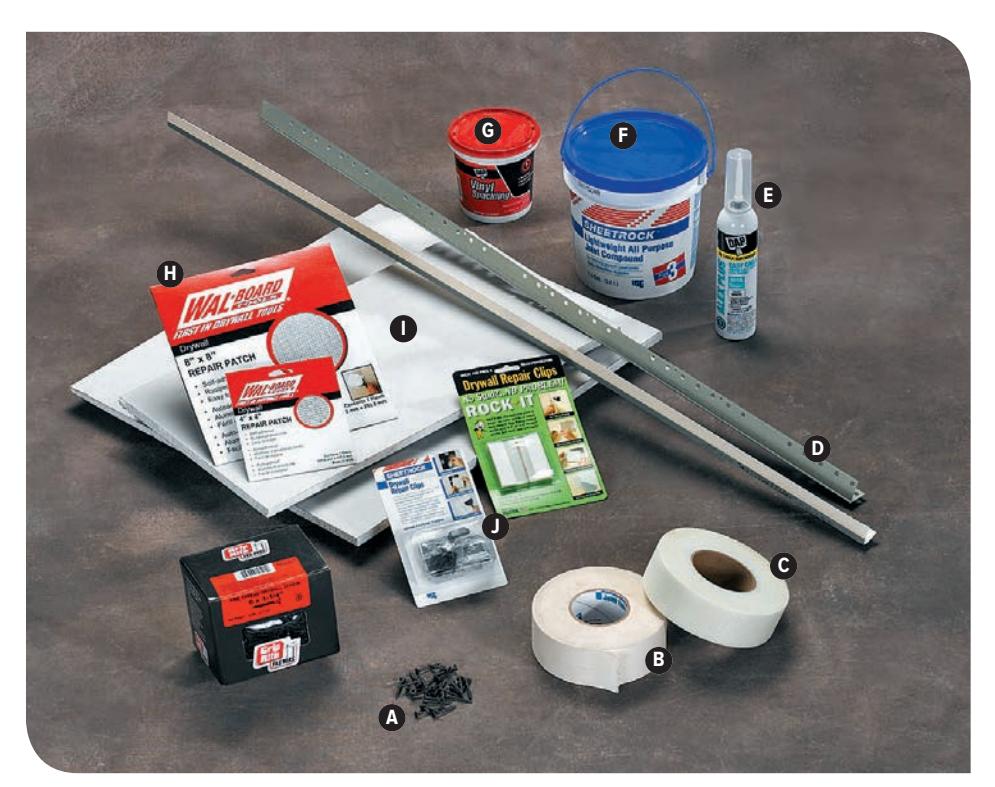
Most wallboard problems can be remedied with basic wallboard materials and specialty materials: (A) wallboard screws; (B) paper joint tape; (C) self-adhesive fiberglass mesh tape; (D) corner bead; (E) paintable latex or silicone caulk; (F) all-purpose joint compound; (G) lightweight spackling compound; (H) wallboard repair patches; (I) scraps of wallboard; (J) and wallboard repair clips.
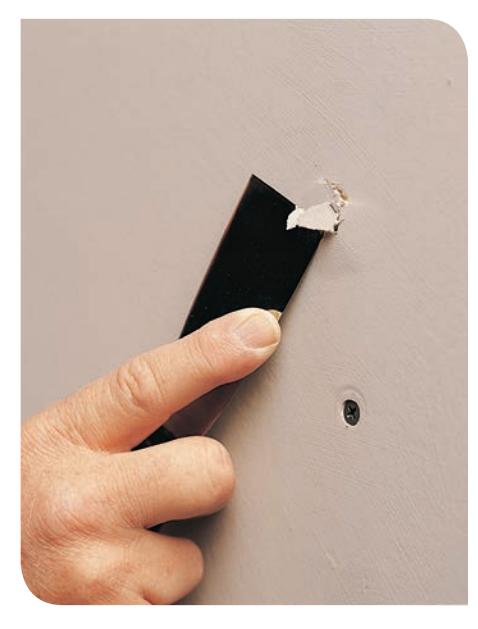
To repair a popped nail, drive a wallboard screw 2” above or below the nail, so it pulls the panel tight to the framing. Scrape away loose paint or compound, then drive the popped nail 1/16” below the surface. Apply joint compound to cover the holes.
How to Repair Cracks & Gashes
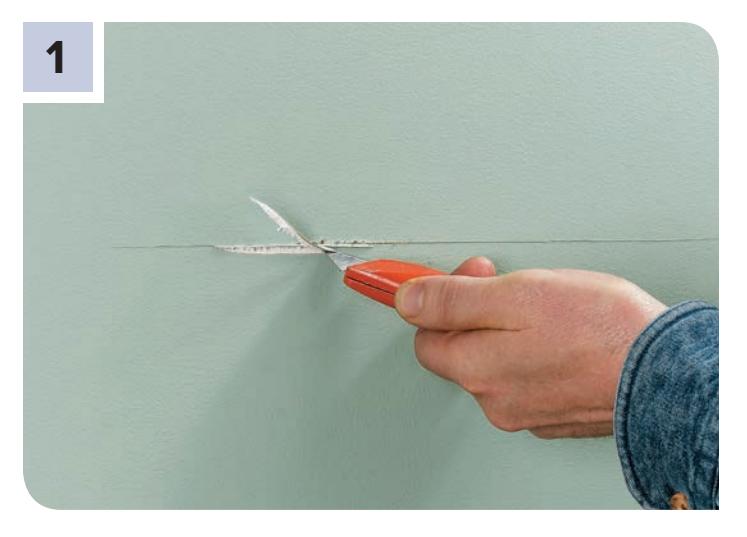
Use a utility knife to cut away loose drywall or face paper and widen the crack into a “V”; the notch will help hold the joint compound.
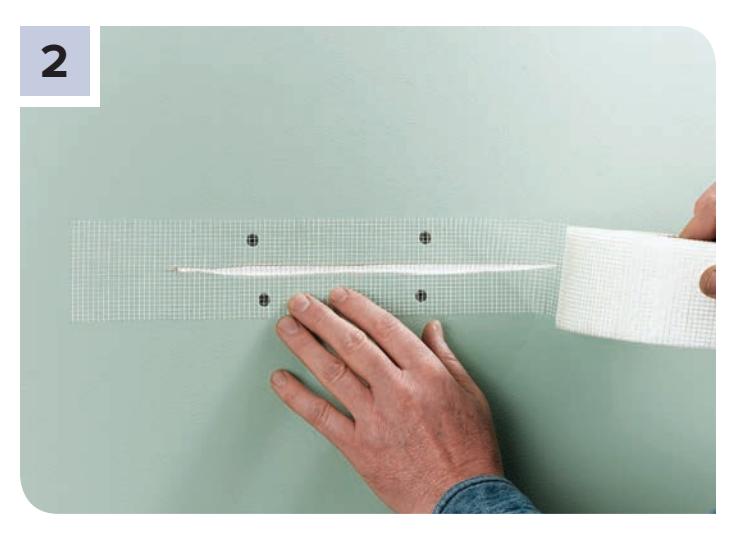
Push along the sides of the crack with your hand. If the drywall moves, secure the panel with 11/4” drywall screws driven into the nearest framing members. Cover the crack and screws with self-adhesive mesh tape.
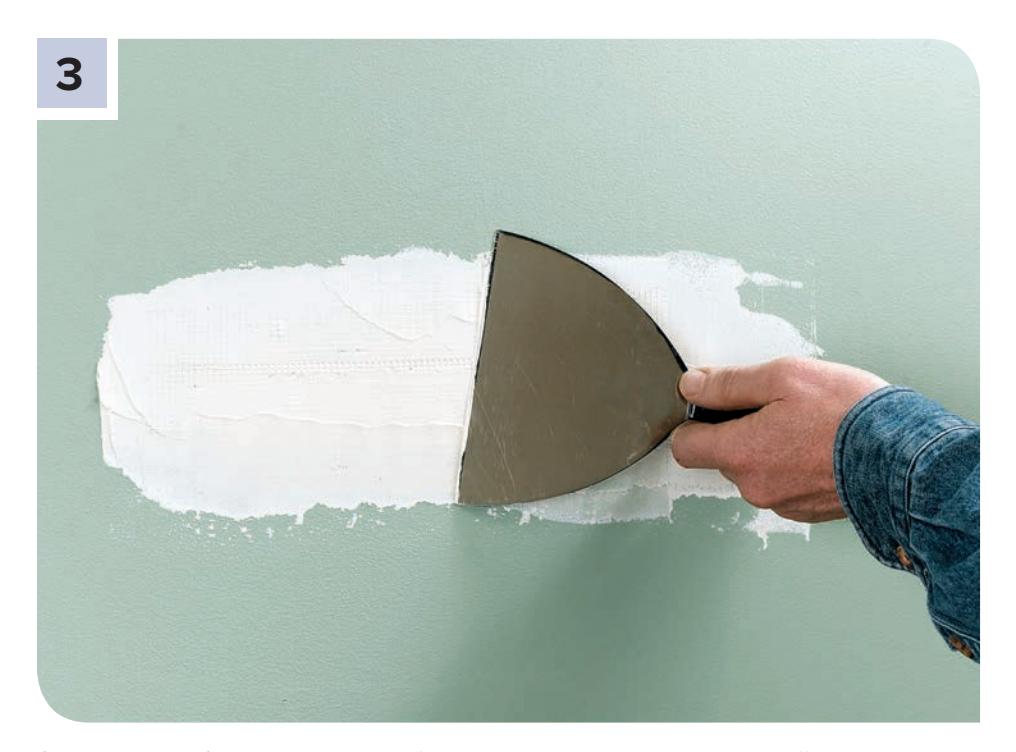
Cover the tape with compound, lightly forcing it into the mesh, then smooth it off, leaving just enough to conceal the tape. Add two more coats, in successively broader and thinner coats to blend the patch into the surrounding area.
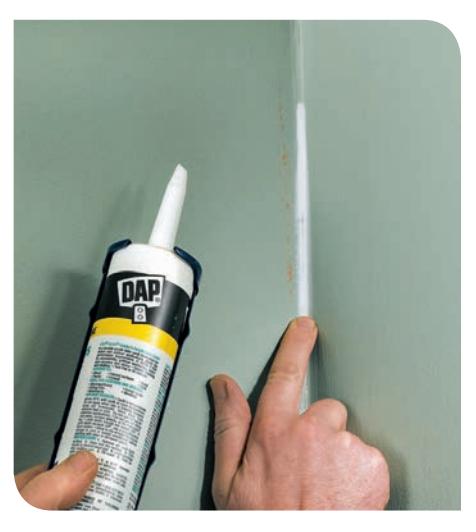
OPTION: For small cracks at corners, apply a thin bead of paintable latex or silicone caulk over the crack, then use your finger to smooth the caulk into the corner.
How to Patch Small Holes in Drywall
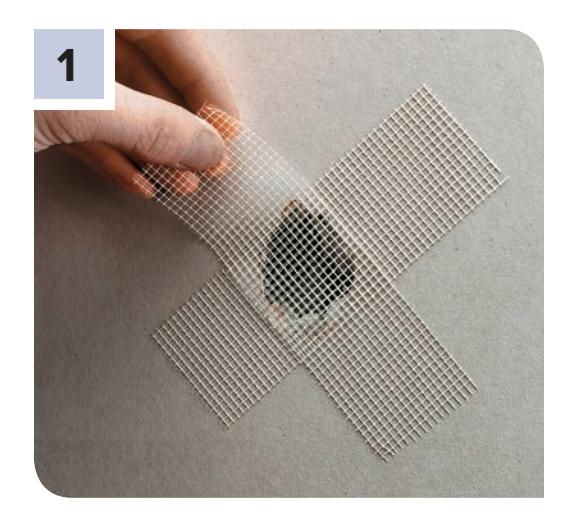
Trim away any broken drywall, face paper, or joint tape around the hole, using a utility knife. Cover the hole with crossed strips of self-adhesive mesh tape.
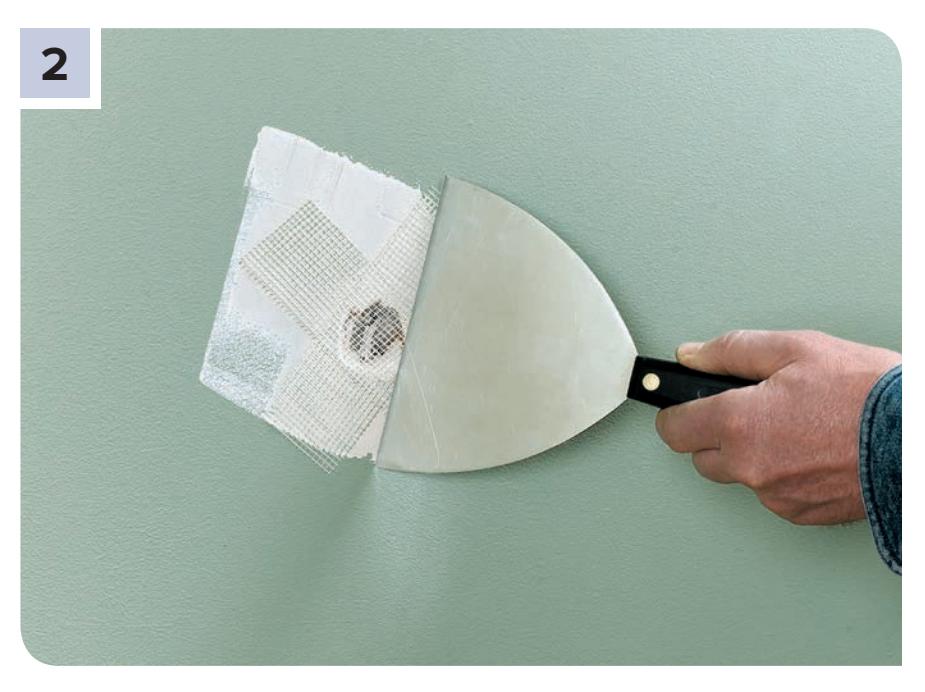
Cover the tape with all-purpose joint compound, lightly forcing it into the mesh, then smooth it off, leaving just enough to conceal the tape.
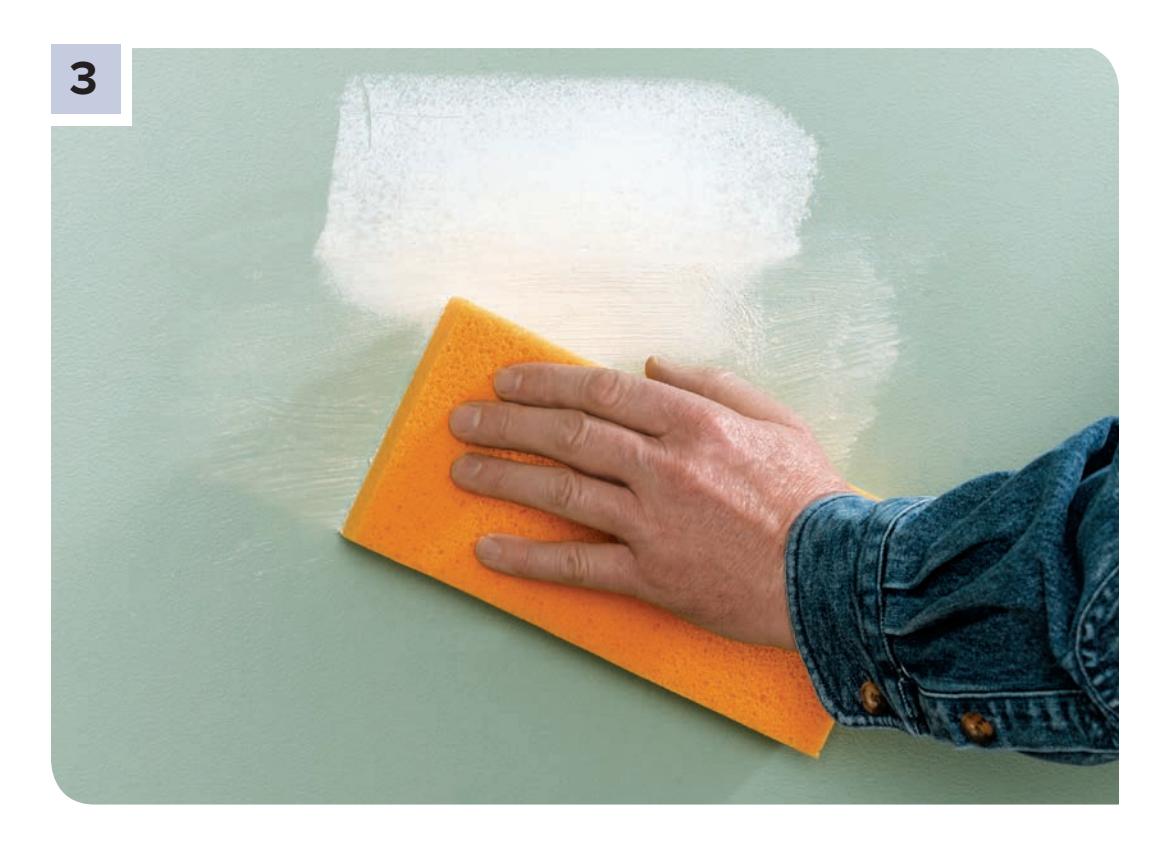
Add two more coats of compound in successively broader and thinner coats to blend the patch into the surrounding area. Use a drywall wet sander to smooth the repair area.
How to Patch Large Holes in Drywall
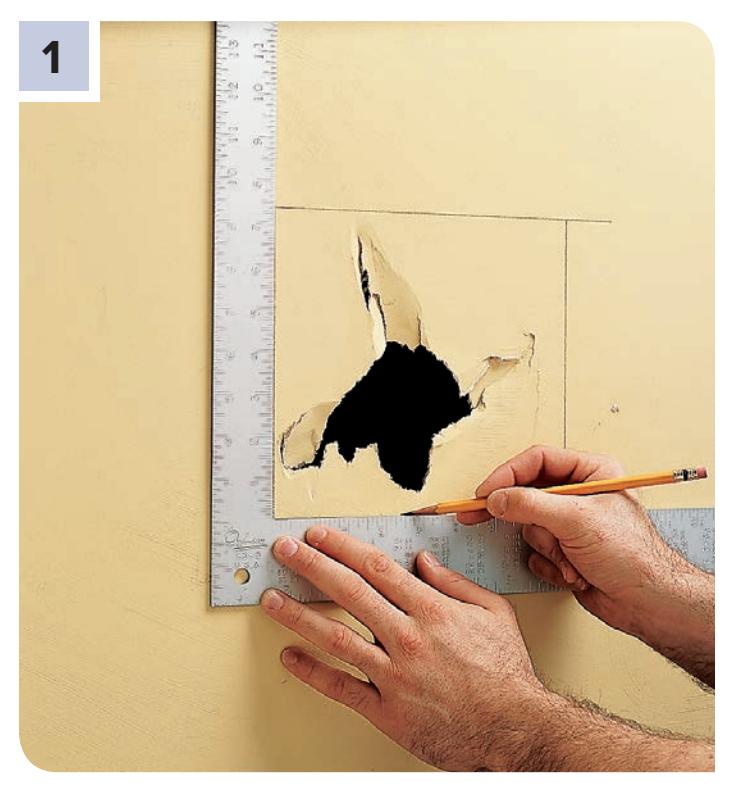
Outline the damaged area, using a framing square. (Cutting four right angles makes it easier to measure and cut the patch.) Use a drywall saw to cut along the outline.
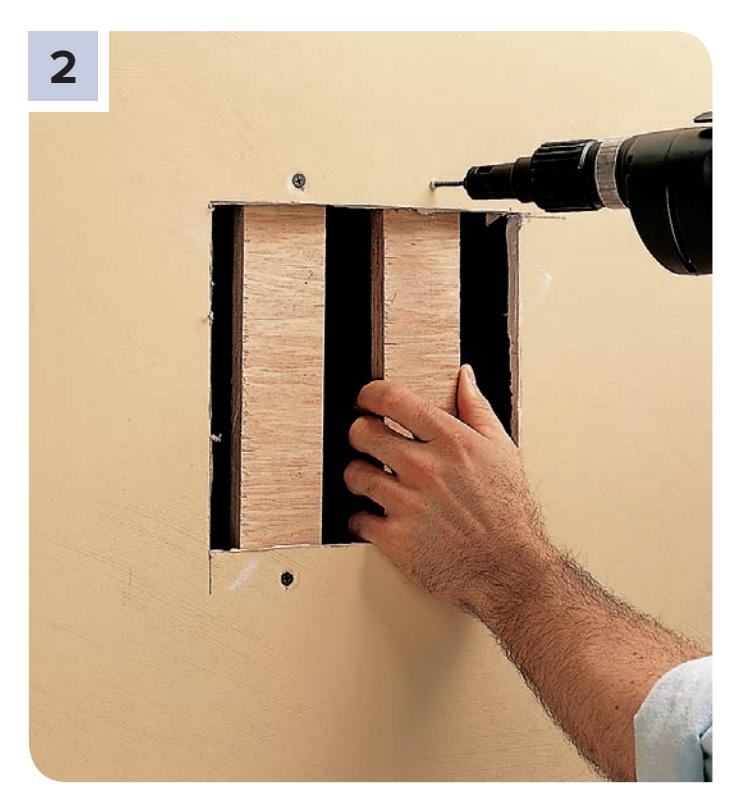
Cut plywood or lumber backer strips a few inches longer than the height of the cutout. Fasten the strips to the back side of the drywall, drilling through the front with 11/4” drywall screws.
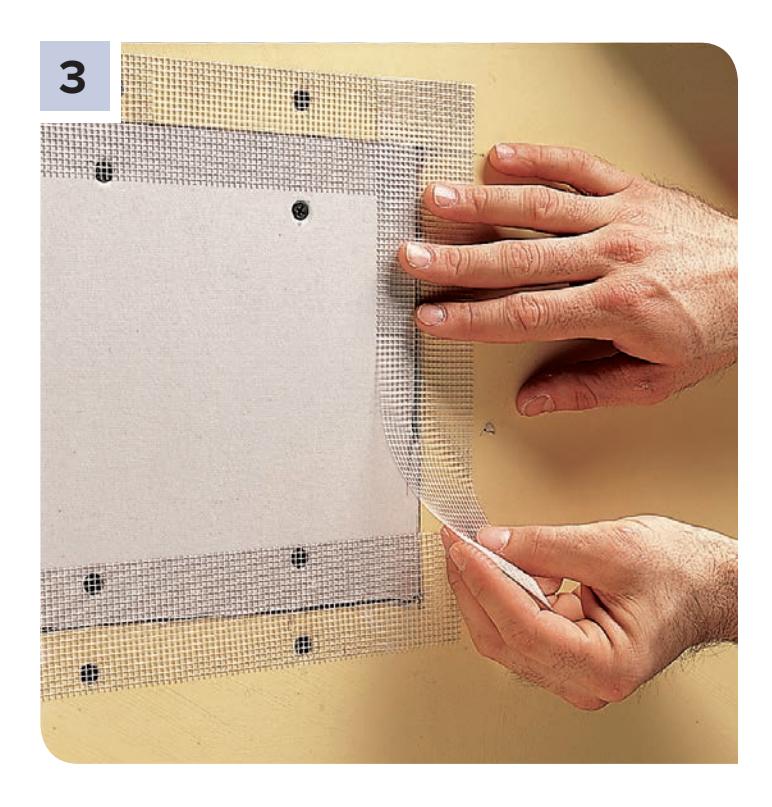
Cut a drywall patch 1/8” smaller than the cutout dimensions, and fasten it to the backer strips with screws. Apply mesh joint tape over the seams. Finish the seams with three coats of compound.
REPAIRING PLASTER
Plaster walls, common before the 1950s but somewhat rare these days, are created by building up layers of plaster to form a hard, durable wall surface. Behind the plaster itself is a gridlike layer of wood, metal, or rock lath that holds the plaster in place. Keys, formed when the base plaster is squeezed through the lath, hold the dried plaster to the ceiling or walls.
Before you begin any plaster repair, make sure the surrounding area is in good shape. If the lath is deteriorated or the plaster is soft, call a professional.
Use a latex bonding liquid to ensure a good bond and a tight, crack-free patch. Bonding liquid also eliminates the need to wet the plaster and lath to prevent premature drying and shrinkage, which could ruin the repair.
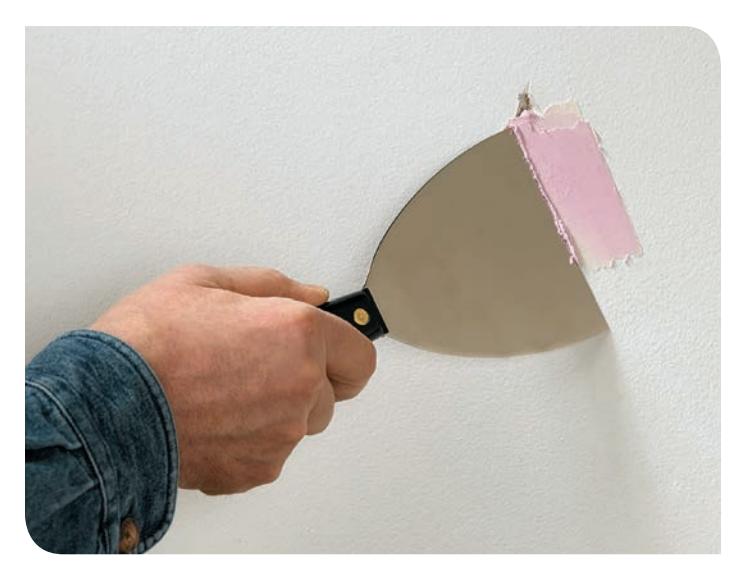
Spackle is used to conceal cracks, gashes, and small holes in plaster. Some new spackling compounds start out pink and dry white so you can see when they’re ready to be sanded and painted. Use lightweight spackle for low-shrinkage and one-application fills.
How to Fill Dents & Small Holes in Plaster
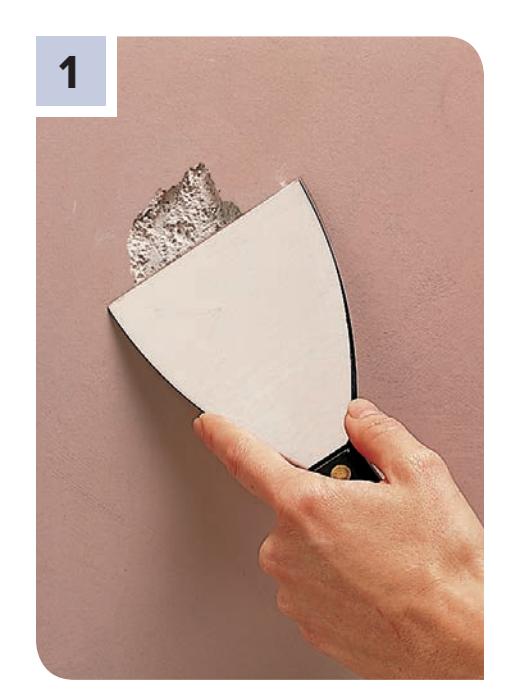
Scrape or sand away any loose plaster or peeling paint to establish a solid base for the new plaster.
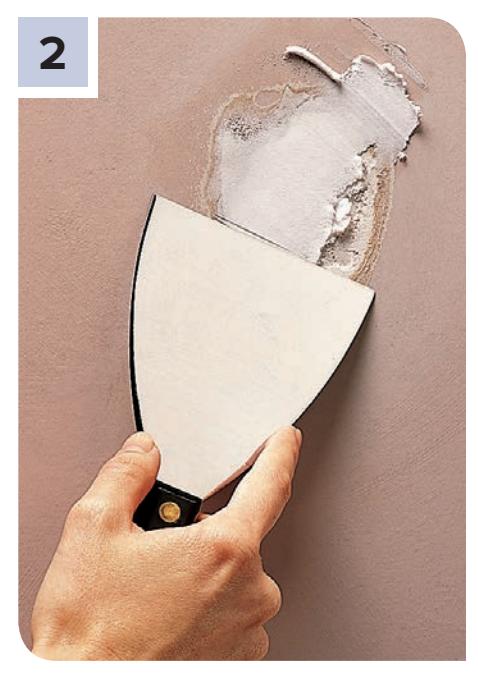
Fill the hole with lightweight spackle. Apply the spackle with the smallest knife that will span the damaged area. Let the spackle dry, following the manufacturer’s instructions.
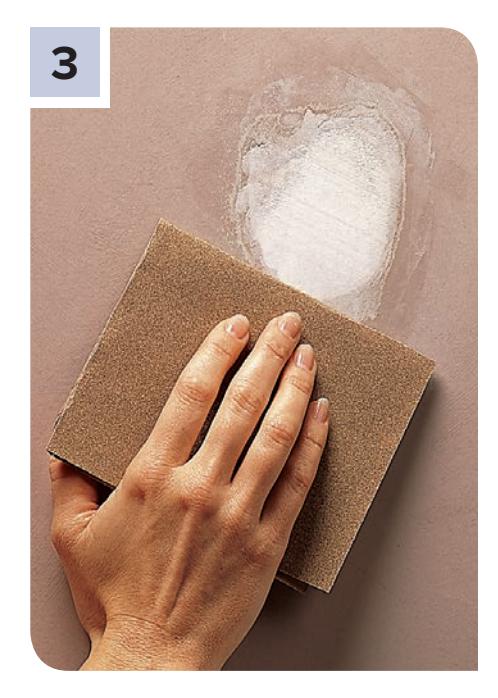
Sand the patch lightly with 150-grit sandpaper. Wipe the dust away with a clean cloth, then prime and paint the area, feathering the paint to blend the edges.
How to Patch Large Holes in Plaster
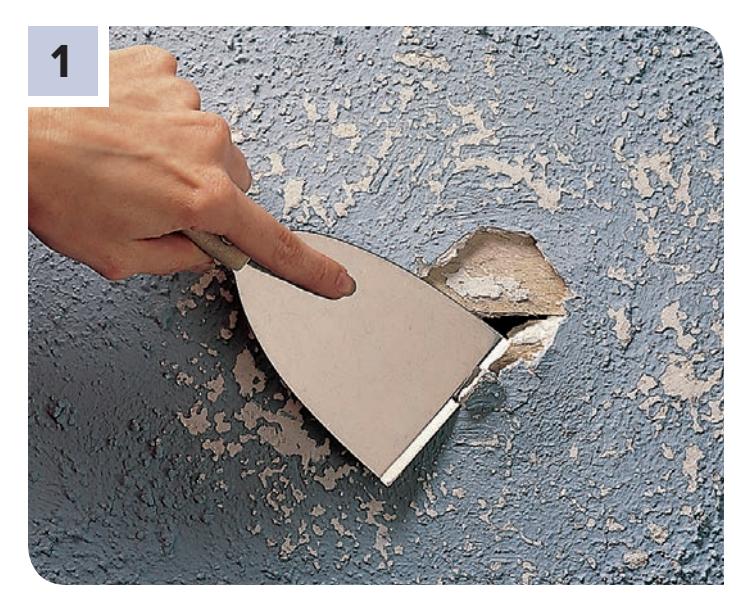
Sand or scrape any texture or loose paint from the area around the hole to create a smooth, firm edge. Use a wallboard knife to test the plaster around the edges of the damaged area. Scrape away all loose or soft plaster.
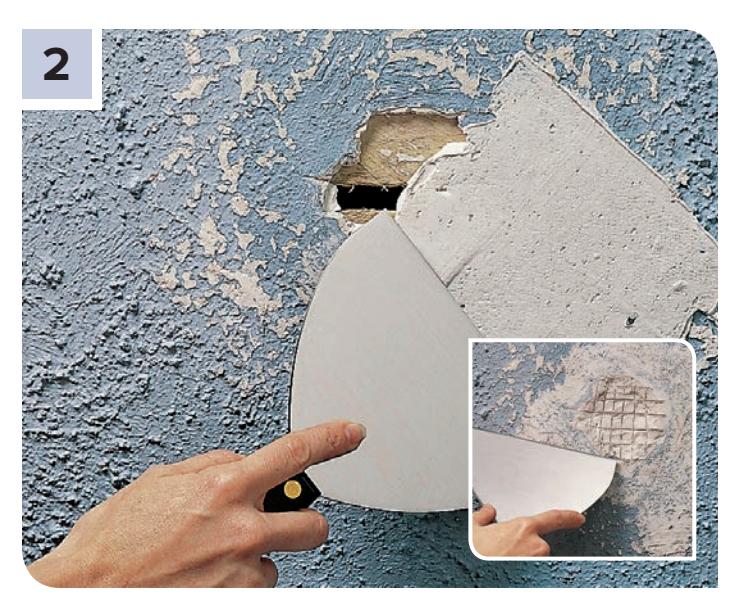
Mix patching plaster as directed by the manufacturer, and use a wallboard knife or trowel to apply it to the hole. Fill shallow holes with a single coat of plaster. For deeper holes, apply a shallow first coat, then scratch a crosshatch pattern in the wet plaster (inset photo). Let it dry, then apply a second coat of plaster. Let the plaster dry, and sand it lightly.
How to Repair Cracks in Plaster
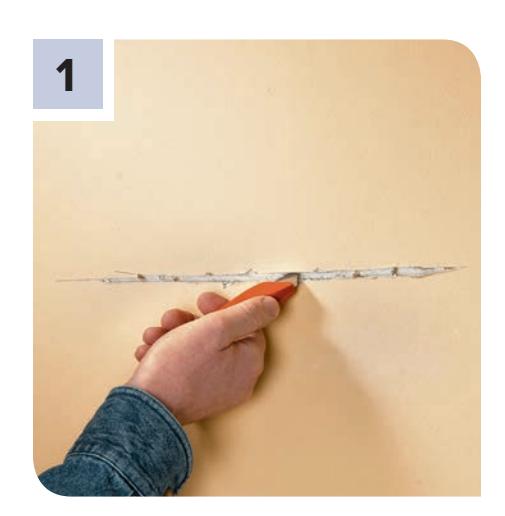
Scrape away any texture or loose plaster around the crack. Using a utility knife, cut back the edges of the crack to create a “keyway” along the crack so the repair product can get far enough in to stay in place.
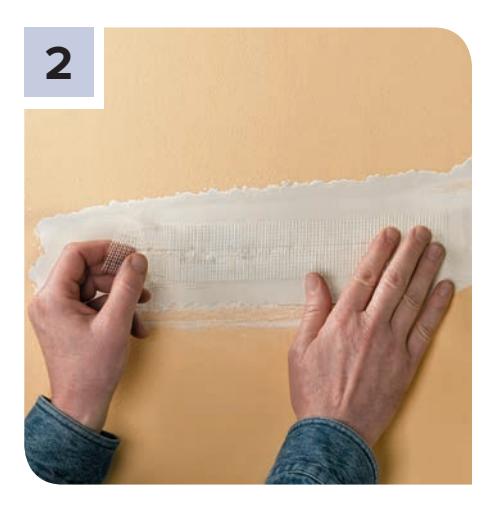
Work joint compound into the keyway using a 6” knife, then embed mesh tape into the compound, lightly forcing the compound through the mesh. Smooth the compound, leaving just enough to conceal the tape.
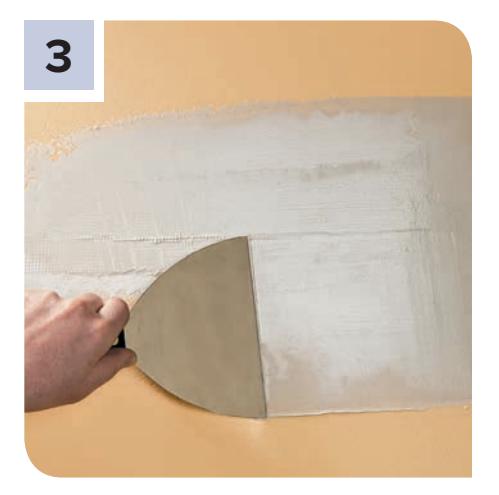
Add two more coats of compound, in successively broader and thinner coats, to blend the patch into the surrounding area. Lightly sand, then retexture the repair area to match the wall. Prime and paint it to finish the repair.
REPAIRING WATER-DAMAGED WALLS & CEILINGS
sure sign of a water problem is discoloration and bubbling on the ceiling surface. Water from a leaky roof or pipe above will quickly find a low spot or a joint between drywall panels, soaking through to the visible surface. Water in joints is especially damaging because it ruins the edges of two panels at once. If you have a water problem, be sure to fix the leak and allow the damaged drywall to dry thoroughly before making any repairs.
Whenever water or moisture infiltrates a house, there is always a concern regarding mold. Mold grows where water and nutrients are present—damp wallboard paper can provide such an environment. You can use a damp rag and baking soda or a small amount of detergent to clean up small areas of mold (less than 1 square yard), though you should wear goggles, rubber gloves, and a dust mask to prevent contact with mold spores. If mold occupies more area than this, you may have a more serious problem. Contact a mold abatement specialist for assessment and remediation. To help prevent mold growth, use exhaust fans and dehumidifiers to rid your home of excess moisture and repair plumbing leaks as soon as they are found.
How to Repair Water-Damaged Drywall
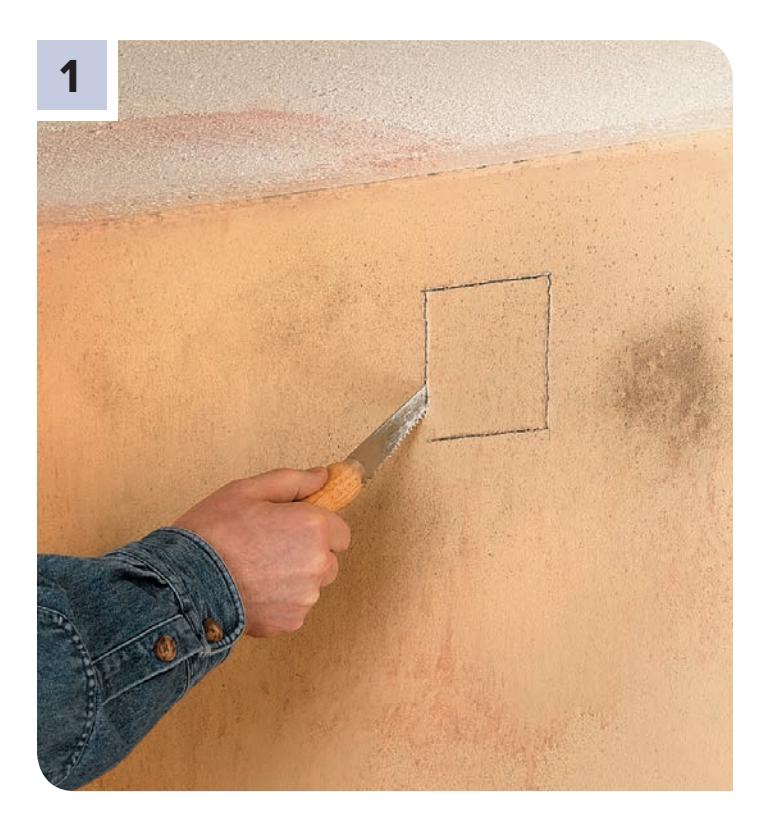
After the source for the water leak has been fixed, cut 4” holes at each end of joist and stud bays to help ventilation. Where possible, remove wet or damp insulation to dry out. Use fans and dehumidifiers to help speed up the drying process.
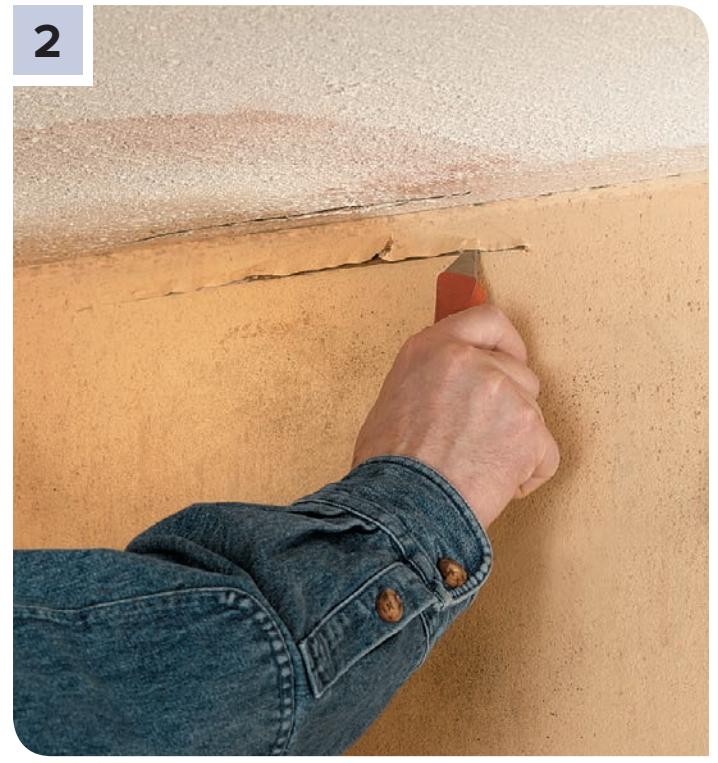
Remove loose tape and compound using a utility knife. Cut back areas of soft drywall to solid material. To prevent sagging, prop waterlogged ceiling panels against joists with “T” braces (a ceiling-height $2 times 4$ with a $2 times 4$ crosspiece attached to the top).
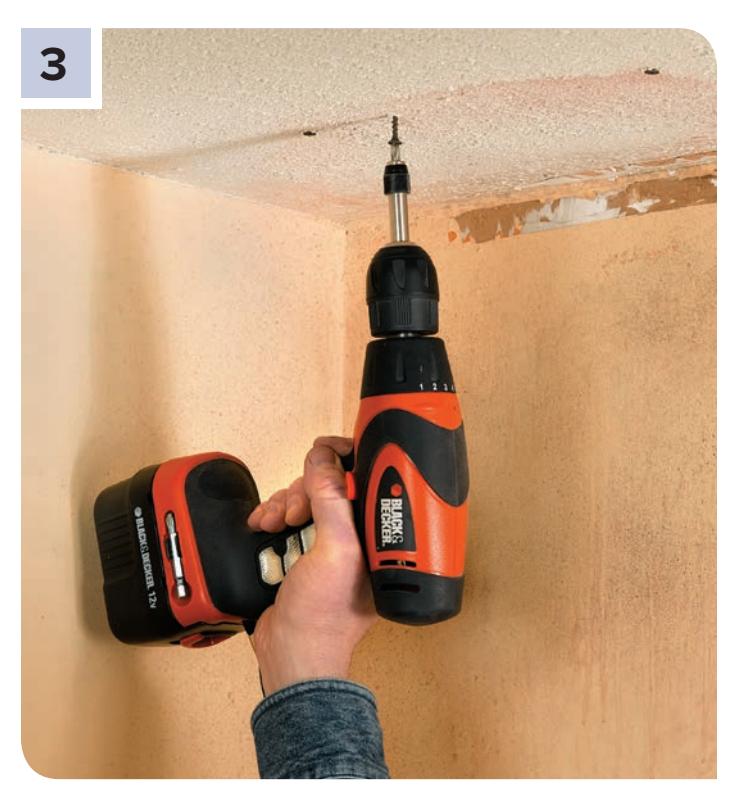
Once drywall is dry, refasten ceiling panels to framing or remove panels that are excessively bowed. Reinforce damaged wall panels with drywall screws driven 2” from the existing fasteners.
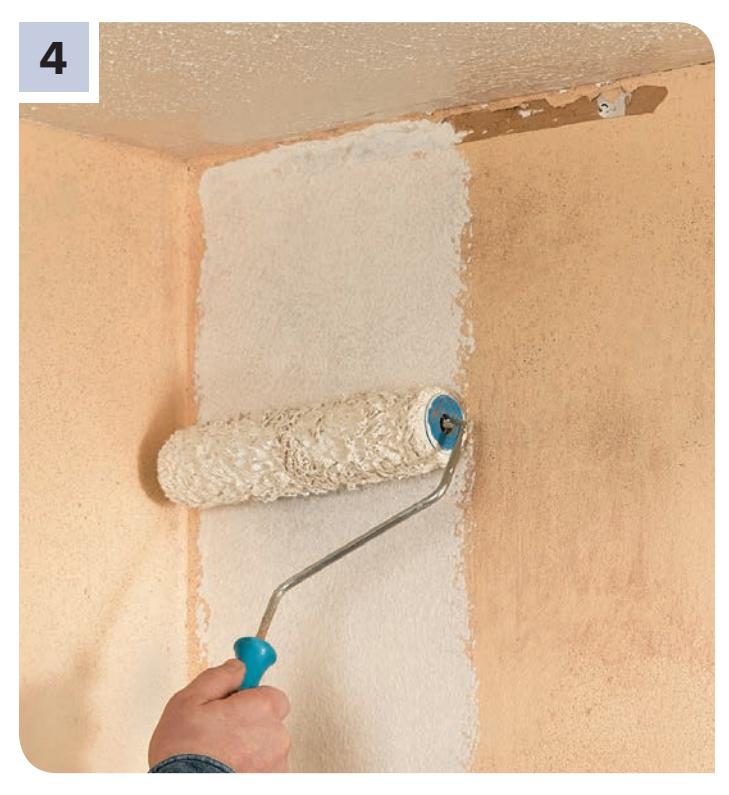
Patch all vent holes and damaged areas with drywall (see pages 32 to 35) and replace any insulation. Apply a quality stain-blocking primer/sealer to the affected area. Use an oil-based sealer; latex-based sealers may allow water stains to bleed through.
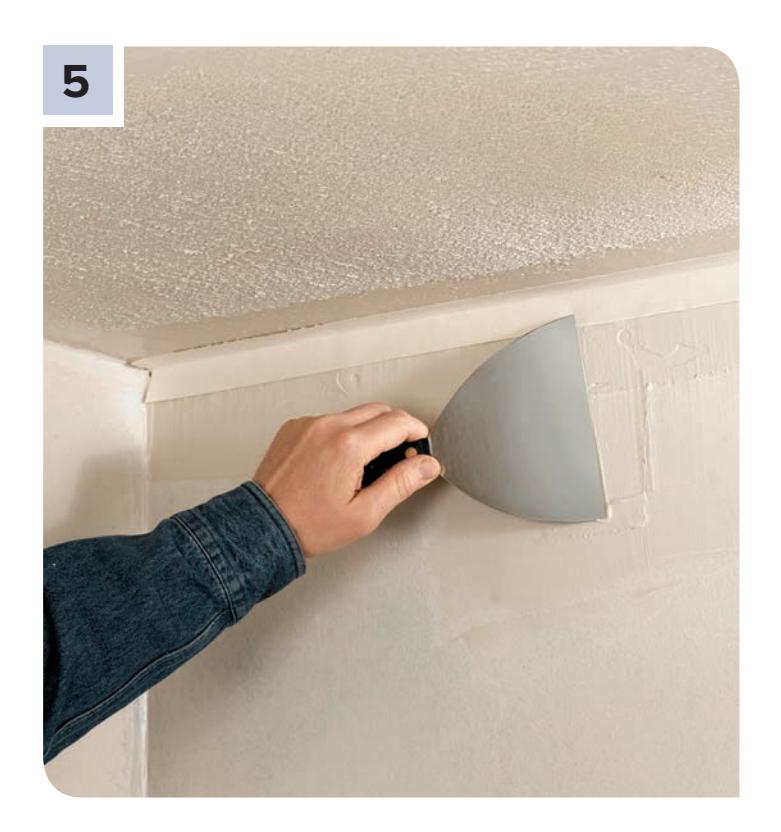
After the primer/sealer has dried, finish all joints and repairs with paper tape and three coats of compound. If water stains bleed through, reseal prior to final priming and painting.
REPAIRING WALL COVERINGS
Loosened seams and bubbles are common wallcovering problems, but both are easy to remedy using a little adhesive and a sponge. For papers that are compatible with water, use a clean, damp sponge. For other types of papers (grasscloth or flocked wallcoverings, for example), clean fingers are probably the best choice.
Scratches, tears, or obvious stains can be patched so successfully that the patch is difficult to spot. Whenever you hang wallcoverings, save remnants for future repairs. It’s also a good idea to record the name of the manufacturer as well as the style and run numbers of the wallcoverings. Write this information on a piece of masking tape and put it on the back of a switchplate in the room.
If you need to patch an area of wallcovering but don’t have remnants available, you can remove a section of wallcovering from an inconspicuous spot, such as inside a closet or behind a door. You can camouflage the spot by painting the hole with a color that blends into the background of the wallcovering.
How to Fix a Bubble
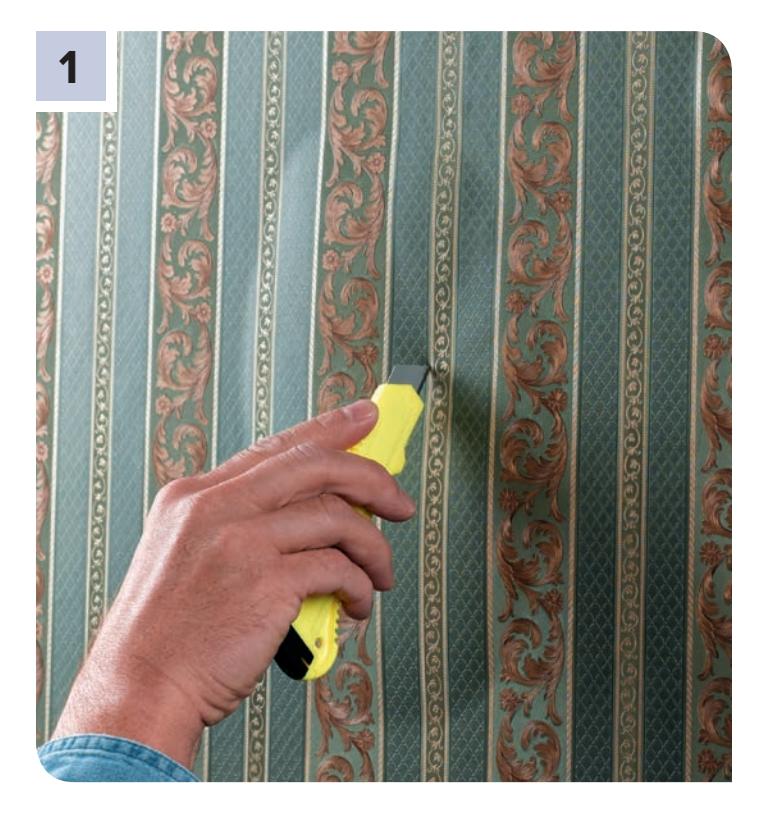
Cut a slit through the bubble, using a sharp utility knife. If there is a pattern in the wallcovering, cut along a line in the pattern to hide the slit.
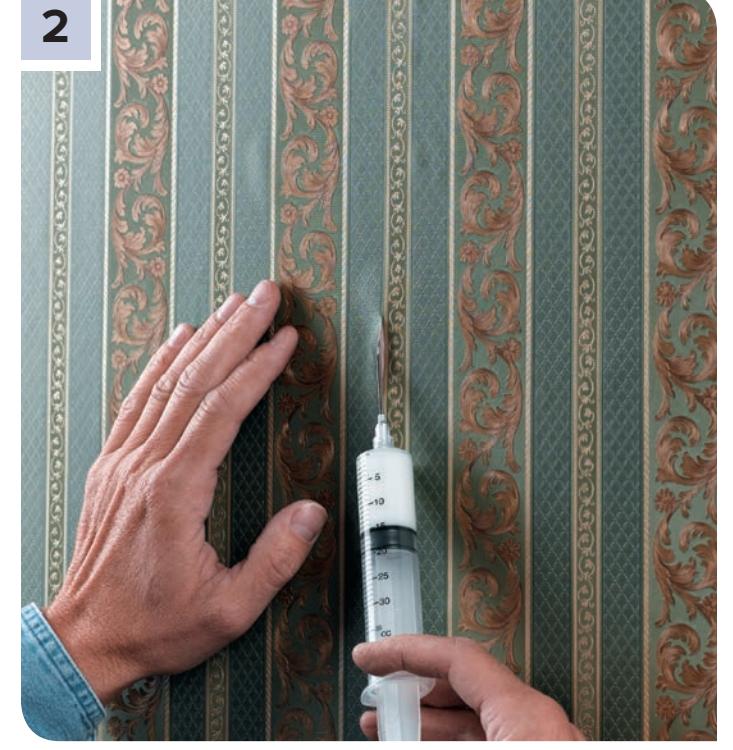
Insert the tip of a glue applicator through the slit and apply adhesive sparingly to the wall under the wallcovering. Press the wallcovering gently to rebond it. Use a clean, damp sponge to press the flap down and wipe away excess glue.
How to Patch Wallcoverings
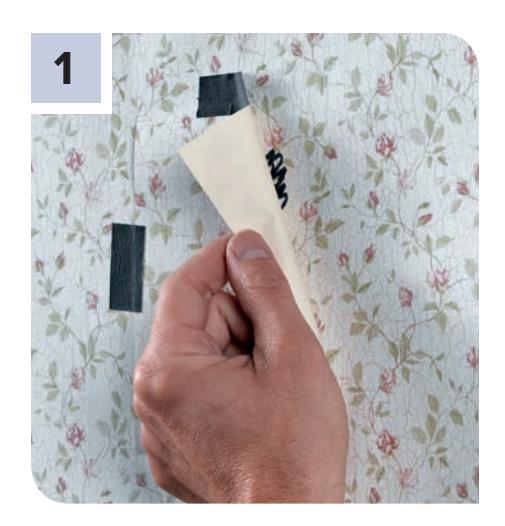
Fasten a scrap of matching wallcovering over the damaged portion with low-adhesive tape, so that the patterns match.
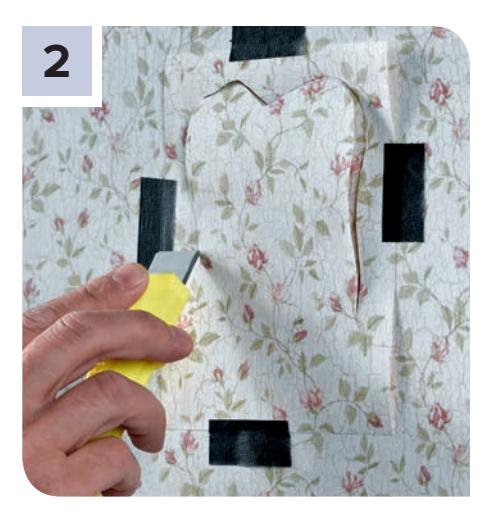
Holding a utility knife blade at a 90° angle to the wall, cut through both layers of wallcovering. If the wallcovering has strong pattern lines, cut along the lines to hide the seams. With less definite patterns, cut irregular lines.
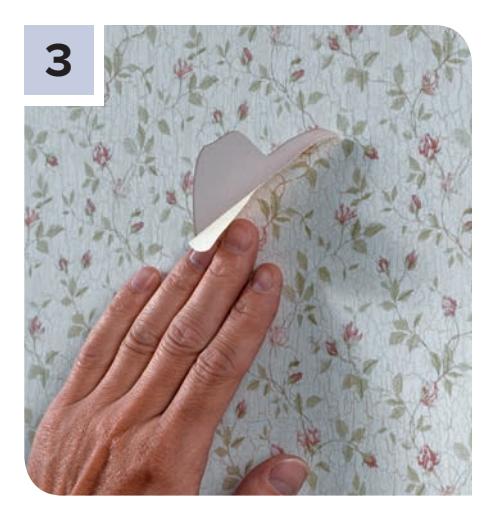
Remove the scrap and patch, then peel away the damaged wallcovering. Apply adhesive to the back of the patch and position it in the hole so that the pattern matches. Rinse the patch area with a damp sponge.
How to Remove Wallcovering
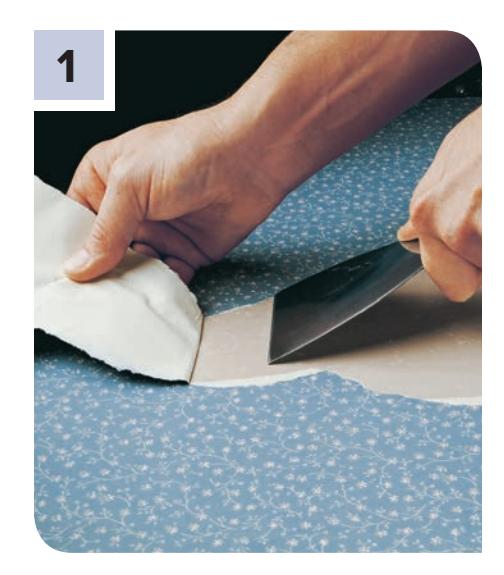
Find a loose edge and try to strip off the wallcovering. Vinyls often peel away easily. If the wallcovering does not strip by hand, cover the floor with layers of newspaper. Add wallcovering remover fluid to a bucket of water, as directed by the manufacturer.
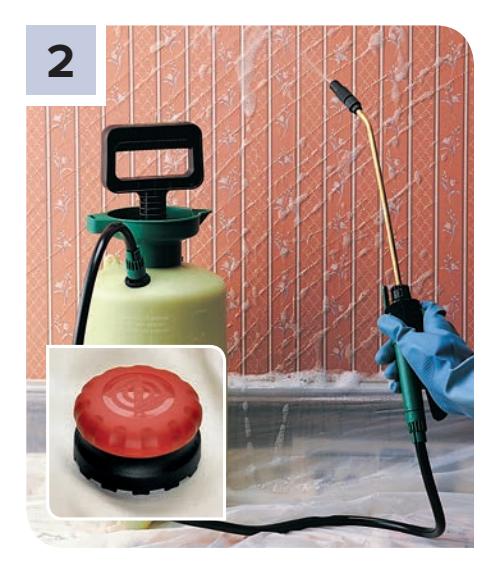
Pierce the wallcovering surface with a wallpaper scorer, sometimes called a tiger claw (inset) to allow remover solution to enter and soften the adhesive. Use a pressure sprayer, paint roller, or sponge to apply the remover solution. Let it soak into the covering, according to the manufacturer’s directions.
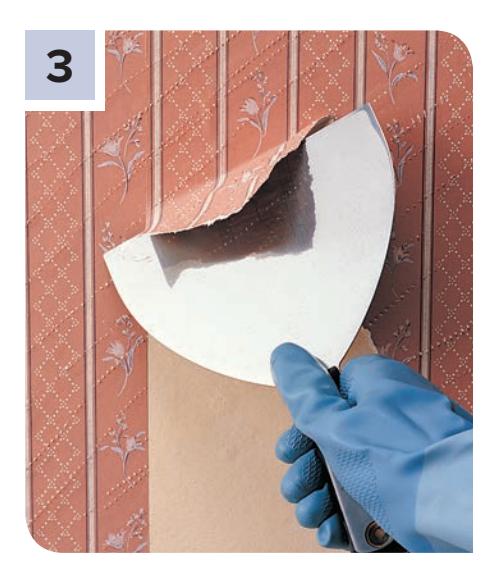
Peel away loosened wallcovering with a 6” wallboard knife. Be careful not to damage the plaster or wallboard. Remove all backing paper. Rinse adhesive residue from the wall with remover solution or TSP. Rinse with clear water and let the walls dry completely.