---
title: "**CARPENTRY FOR HOMEOWNERS**: Carpentry For Homeowners"
id: "5442"
type: "page"
slug: "01-carpentry-for-homeowners"
published_at: "2026-07-18T02:46:46+00:00"
modified_at: "2026-07-18T16:11:43+00:00"
url: "https://preppers-paradise.com/library/thecompleteguidetocarpentryforhomeowners/01-carpentry-for-homeowners/"
markdown_url: "https://preppers-paradise.com/library/thecompleteguidetocarpentryforhomeowners/01-carpentry-for-homeowners.md"
excerpt: "This comprehensive guide empowers homeowners with the essential carpentry skills needed for everyday repairs and ambitious renovation projects. Readers will learn how to plan projects safely, select a"
taxonomy_category:
- "Books"
- "DIY & Home Improvement"
- "Free Teaser"
taxonomy_post_tag:
- "building materials"
- "carpentry"
- "construction"
- "DIY"
- "home improvement"
- "home repair"
- "remodeling"
- "renovation"
- "tools"
- "woodworking"
---
# **CARPENTRY FOR HOMEOWNERS**: Carpentry For Homeowners
[← **CARPENTRY FOR HOMEOWNERS**](/library/thecompleteguidetocarpentryforhomeowners/)
Chapter 1 of 56 · Free teaser
# **CARPENTRY FOR HOMEOWNERS**
Basic Carpentry Skills & Everyday Home Repairs

## **Contents**
#### **The Complete Guide to Carpentry for Homeowners**
| Introduction | 5 |
|------------------------------------------|------------|
| Planning a Carpentry Project | 6 |
| Project Safety | 8 |
| Workshop Basics | 10 |
| Building a Workbench | 12 |
| Building a Sawhorse | 16 |
| Materials | 19 |
| Lumber | 20 |
| Transporting Materials | 24 |
| Plywood & Sheet Goods | 26 |
| Trim Moldings | 28 |
| Nails | 30 |
| Screws & Other Hardware | 32 |
| Glues & Adhesives | 34 |
| Tools & Skills | 37 |
| Prying Tools | 40 |
| Measuring & Marking Tools | 42 |
| Handsaws | 50 |
| Hammers | 52 |
| Screwdrivers | 56 |
| Clamps & Vises | 58 |
| Chisels | 59 |
| Planes & Surface Forming Rasps | 62 |
| Extension Cords | 64 |
| Circular Saws | 70 |
| Straightedge Guides | 77 |
| Power Miter Saws | 78 |
| Table Saws | 86 |
| Drills & Bits | 92 |
| Sanders | 96 |
| Pneumatic Nailers | 100 |
| Powder-Actuated Tools | 102 |
| Specialty Tools | 104 |
| Basic Carpentry | 107 |
| Anatomy of a House | 108 |
| Preparing the Work Area | 115 |
| Building Walls | 118 |
| Soundproofing Walls & Ceilings | 126 |
| Installing Wallboard | 128 |
| Installing Interior Doors | 136 |
| Mounting Bifold Doors | 148 |
| Installing a Storm Door | 150 |
| Installing Door & Window Casings | 152 |
| Installing Window Trim | 156 |
| Installing Base Molding | 160 |
| Paneling an Attic Ceiling | 164 |
| Installing Wainscoting | 168 |
| Covering Foundation Walls | 174 |
| Framing Basement Foundation Walls | 176 |
| Trimming Basement Windows | 178 |
| Advanced Carpentry | 185 |
| Enlarging Openings &
Removing Walls | 186 |
| Removing Wallboard | 188 |
| Removing Plaster | 190 |
| Removing Exterior Surfaces | 192 |
| Removing Doors & Windows | 196 |
| Removing a Non-loadbearing Wall | 198 |
| Installing an Attic Access Ladder | 200 |
| Framing & Installing Doors | 204 |
| Framing & Installing Windows | 220 |
| Installing New Window Sashes | 228 |
| Installing a Standard Skylight | 232 |
| Installing a Bay Window | 242 |
| Patching Wood Siding & Stucco | 252 |
| Patching Flooring | 254 |
| Cabinets & Countertops | 257 |
| Removing Trim & Old Cabinets | 258 |
| Preparing for New Cabinets | 260 |
| Installing Cabinets | 264 |
| Installing Countertops | 270 |
| Building a Custom
Laminate Countertop | 276 |
| Glossary | 284 |
| Index | 286 |
## **Introduction**
Unless you live in a brand-new home that's built exactly to your specifications, you probably consider your house to be a perpetual work-in-progress. Most homeowners feel this way. It could be that the previous owner didn't quite take regular repairs and maintenance as seriously as you do. You know those irritating blemishes: the scuffed door molding in the entryway, a ding in the wallboard from a wayward rocker, or the closet door that rubs the carpet and sticks in its opening every time you close it. You'd love to fix them, if only you knew exactly what to do. Or, maybe your home is still stuck in a bygone decade and needs a serious facelift. Those dark, chintzy hollow-core doors really have to go someday, right?
More than likely, you also have projects that get perpetually pushed deeper down the "to do" list because they just seem too daunting to start. Oh, how nice it would be to replace the drafty family room windows with a large bay window. Do you dream of a cozy casual space or home theater room in the basement, if only you had the skills to frame the walls and finish it all off without hiring it done?
This new book, *The Complete Guide to Carpentry for Homeowners*, is not written for the do-it-yourselfer who already has a truckload of tools and years of experience. Instead, it's written for the homeowner who simply needs the confidence and know-how to do the job right.
We've prepared this book in three major sections to make navigating the material as easy as possible. The first section on tools and materials will give you a shop-class crash course. You'll learn about essential carpentry tools and how to use them correctly and safely.
The second section focuses on basic carpentry skills and projects. Here you'll learn how your house is fundamentally put together so you can remove and build walls, frame and hang interior doors, install wallboard and finish up with trim and moldings. You could probably check off many of the "gotta do" projects on your list with this section alone.
The third part—an advanced projects section—will earn you your black belt in home carpentry. You'll discover how to enlarge window and door openings, learn how to install windows, exterior doors, and skylights, and flash them properly, just like the pros do. Finally, an extended section will show you how to remove and replace kitchen cabinets, install ready-made countertops, and even build your own custom version from scratch. Here's how you can create the room you've always wanted without hiring an expensive crew to do it.
So, read carefully and then start planning your first carpentry project. It's easier than you think. Be sure to keep this book handy. With this much helpful information, you'll come back to it again and again.
## **Planning a Carpentry Project**
A carpentry project can be fun and rewarding, but it requires more than just a knack for cutting lumber and pounding nails. In fact, your natural ability with tools may not affect the finished product as much as your attention to details, materials, costs, and local building codes. Address these issues in the planning stages so you can use your time efficiently once you start to cut. Start any project by asking yourself the questions below. Once you've addressed each question, you can feel confident about the project you're about to start.
Is a permit required? Most building departments require a permit if your carpentry project will significantly alter your home's condition. You'll probably need a permit for anything more extensive than replacing a rotted window. Permits are required for adding or replacing beams, posts, joists, rafters; for building additions; for converting a basement or attic; and for many other projects. Ask your building department for any literature on carpentry projects. If a permit is required, you'll need to show an inspector a detailed diagram and a list of building materials before you begin.
How will the project affect my living space? Building a wall or installing a new window may drastically change your living environment. Make sure you consider the pros and cons each project will produce before starting.
What types of materials will work best for my project? To maintain a common theme throughout a room, choose building materials that match your existing living space. Always choose well-crafted materials that meet the requirements of local building codes.
Which tools do I need? Each carpentry project in this book includes a list of tools, including portable power tools. Some tools, such as a power drill and circular saw, should be considered essential. Others—such as a power miter saw—simplify the job, but are not essential. Dado cuts for shelves can be made using a circular saw, instead of a router. Making miter cuts with a backsaw and miter box is also possible. Using different tools to complete specific tasks usually takes extra time, but you'll be able to enjoy a sense of craftsmanship that using hand tools brings to a project.
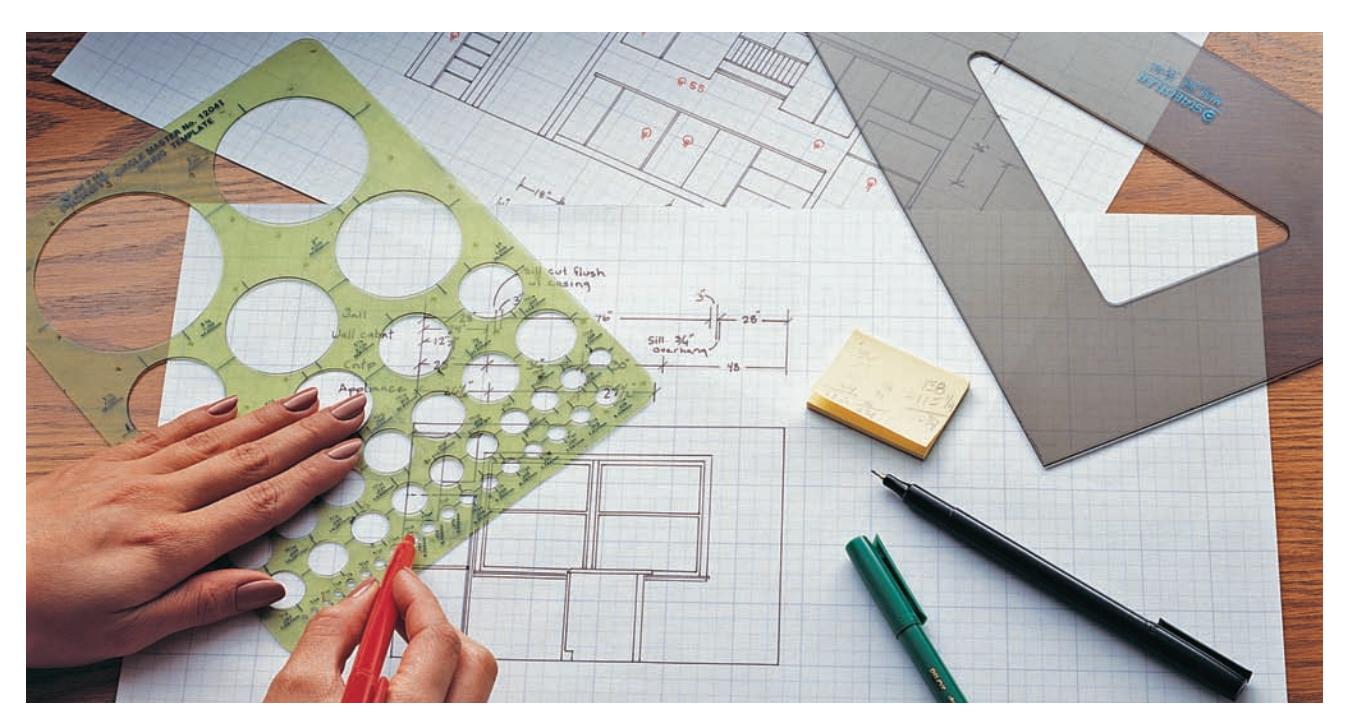
Begin any carpentry project by making pencil drawings of the project you have in mind. As you refine the project idea, add as much detail as possible to the drawing, so you can anticipate issues such as what tools and materials the project will require and how the project will affect your living space.
#### ■ **How to Plan a Carpentry Project**
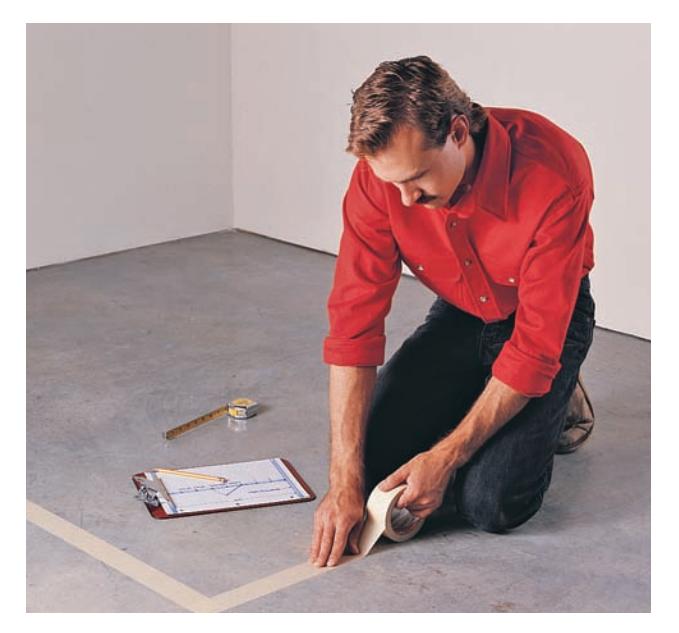
**Lay out the project** using 2" masking tape on the floor to indicate the boundaries of the project. An actual-size layout will help you visualize the end result and can often draw your attention to issues that aren't obvious from a scale drawing.
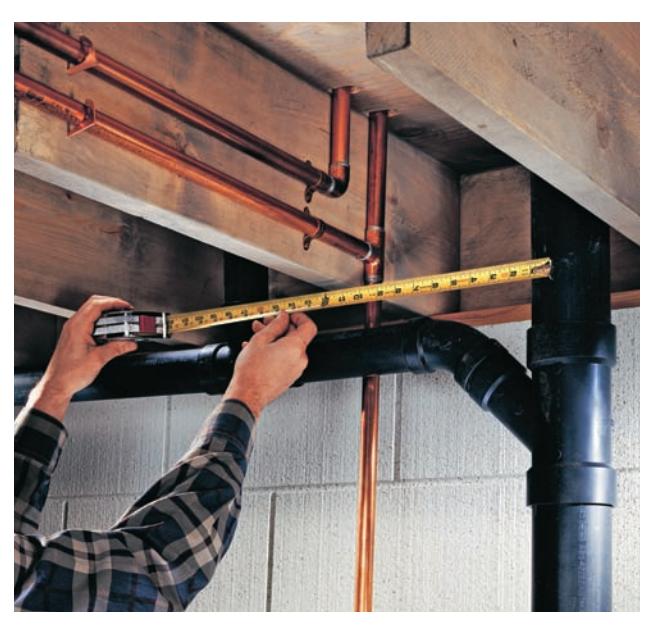
**Examine the areas** directly below and above the project before cutting into a wall to determine the location of water lines, ductwork, and gas pipes. In most cases, pipes, utility lines, and ductwork run through the wall vertically between floors. Original blueprints for your house, if available, usually show the locations of the utility lines.
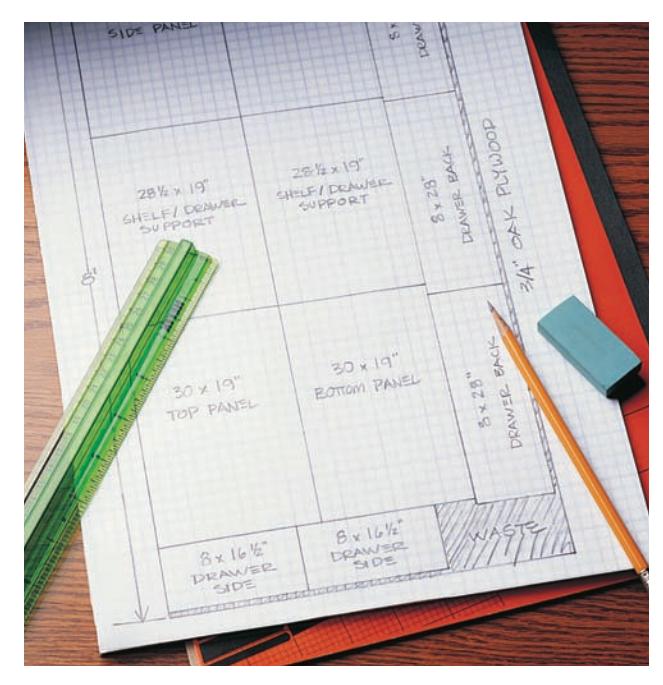
**Draw cutting diagrams** to help you make efficient use of materials. Make scale drawings of sheet goods on graph paper, and sketch cutting lines for each part of your project. When laying out cutting lines, remember that the cutting path (kerf) of a saw blade consumes up to 1 ⁄8" of material.
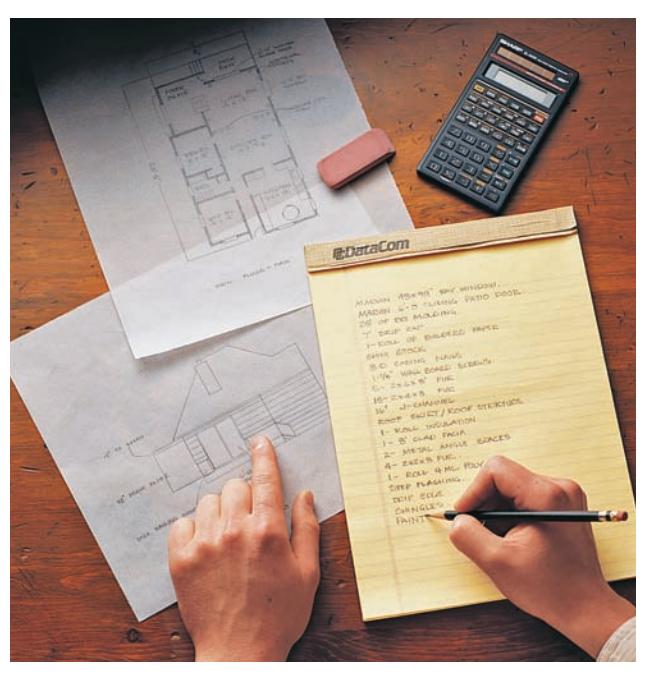
**Make a list of materials,** using your plan drawings and cutting diagrams as a guide. Photocopy the materials list, and use it to organize your work and estimate costs.
## **Project Safety**
## Workshop Safety
Our personal safety when working on carpentry projects depends greatly on what safety measures you take. The power tools sold today offer many safety features, such as blade guards, locks to prevent accidental starts, and double insulation to reduce the risk of shock in the event of a short circuit. It's up to you to take advantage of these safety features. For example, never operate a saw with the blade guard removed. You risk injury from flying debris as well as from being cut by the blade.
Follow all precautions outlined in the owner's manuals for your tools and make sure you protect yourself with safety glasses, earplugs, and a dust mask or respirator to filter out dust and debris.
Keep your work environment clean. A cluttered work area is more likely to result in accidents. Clean your tools and put them away at the end of every work period, and sweep up dust and debris.
Some materials emit dangerous fumes or particles. Keep such materials stored away from heat sources and out of the reach of children; always use these products in a well-ventilated area.
Maintaining safety is an ongoing project. Take the time to update your first-aid kit and evaluate your workspace, tools, and safety equipment on a regular basis. To avoid accidents, repair and replace old and worn-out parts before they break.
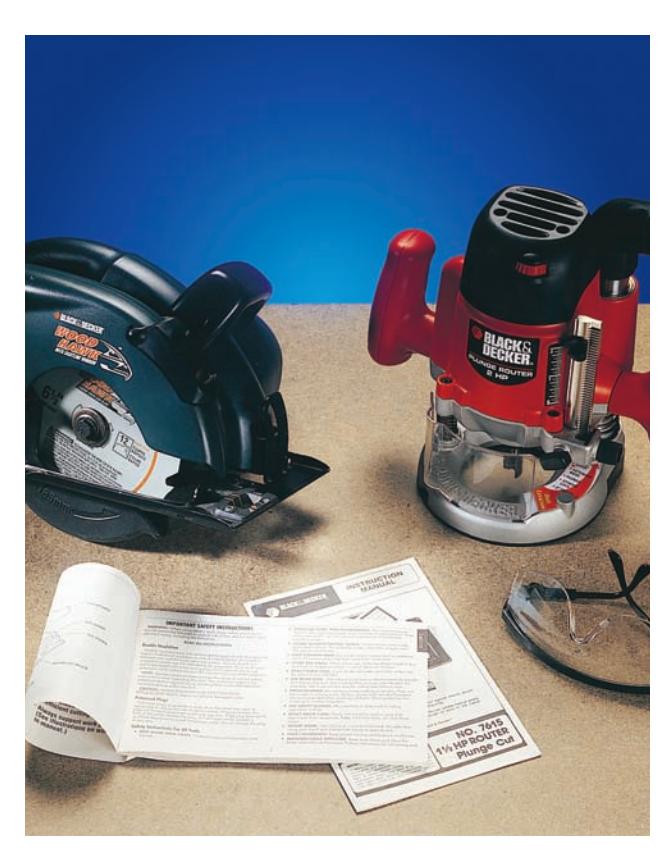
A person wearing safety glasses and ear protection operating a power tool.
**Read the owner's manual** before operating any power tool. Your tools may differ in many ways from those described in this book, so it's best to familiarize yourself with the features and capabilities of the tools you own. Always wear eye and ear protection when operating a power tool. Wear a dust mask when the project will produce dust.
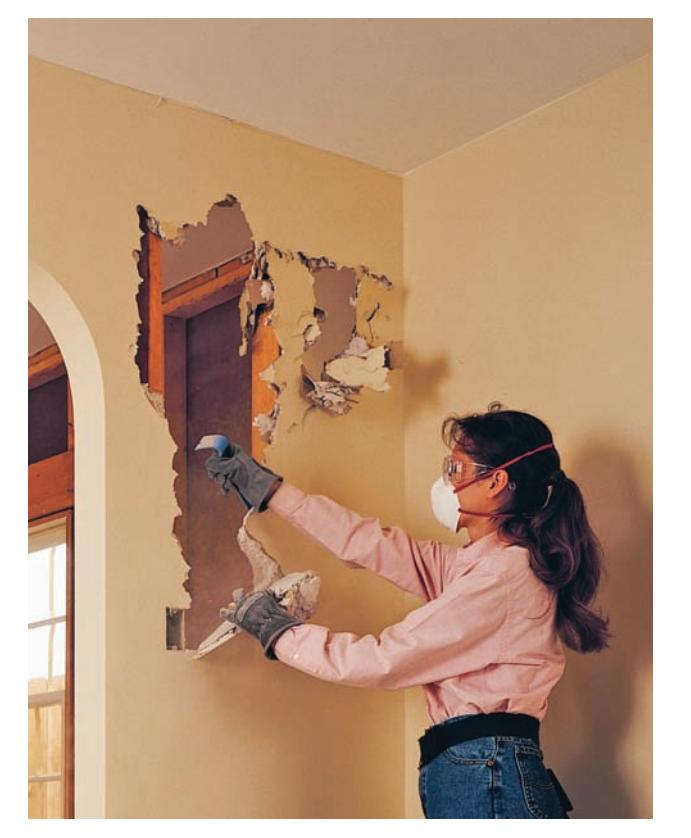
A person wearing a particle mask and safety glasses while working on a wall.
Some walls may contain asbestos. Many homes built or remodeled between 1930 and 1950 have older varieties of insulation that included asbestos. Consult a professional for removal of hazardous pollutants like asbestos, and if you find asbestos or materials that may contain asbestos, do not attempt to remove them on your own. Even if you determine that no asbestos is present, it is a good idea to wear a particle mask and other safety gear when doing demolition.
### First-Aid Kits
Assemble a first-aid kit. Cuts from a hand or power tool can be serious and require prompt and thoughtful attention. Be prepared for such situations with a well-equipped first-aid kit that is easy to find. Record any emergency telephone numbers on the first-aid kit or by the nearest phone so they are available in an emergency.
Equip your kit with a variety of items (photo right), including bandages, needles, tweezers, antiseptic ointment, cotton swabs, cotton balls, eye drops, a first-aid handbook, a chemical-filled cold pack, elastic bandages, first-aid tape, and sterile gauze.
For puncture wounds, cuts, burns, and other serious injuries, always seek medical attention as soon as first aid—such as washing and wrapping of cuts has been provided.
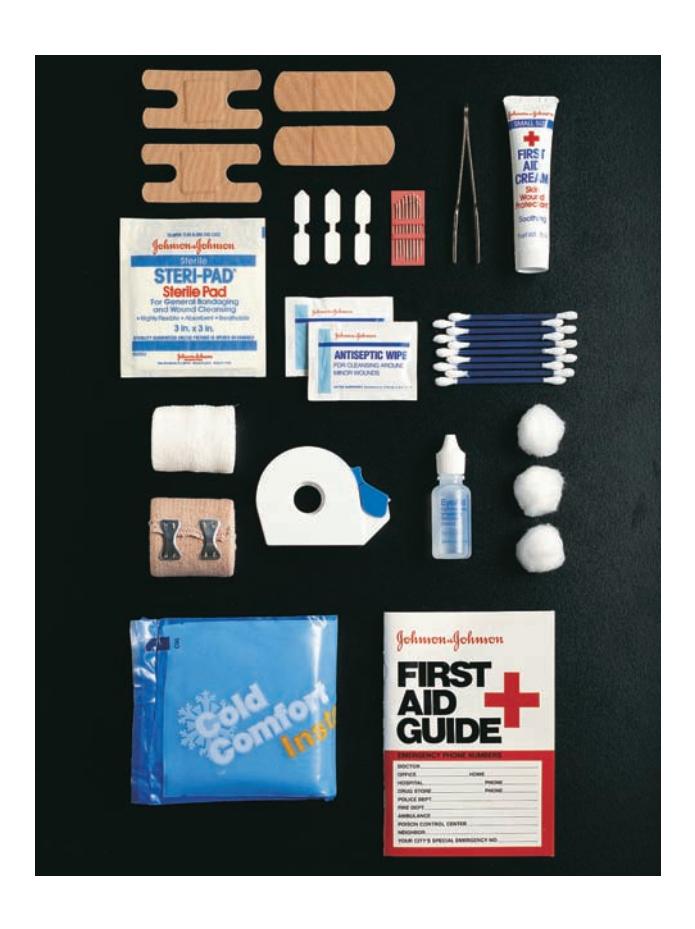
A well-stocked first-aid kit with various medical supplies.
### Safe Practices
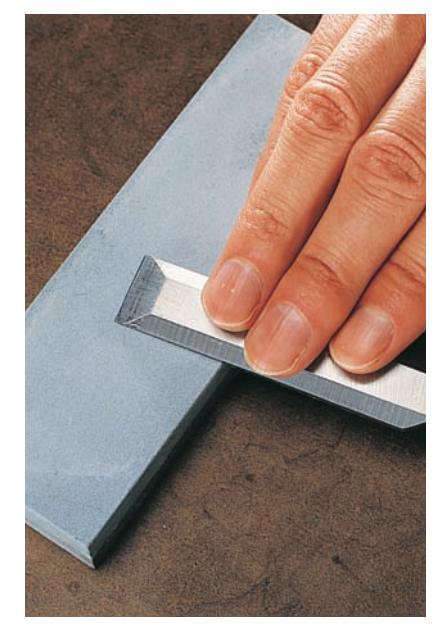
A close-up of a clean, sharp saw blade.
**Keep your tools sharp and clean.** Accidents are more likely when blades are dull and tools are filled with sawdust and dirt.
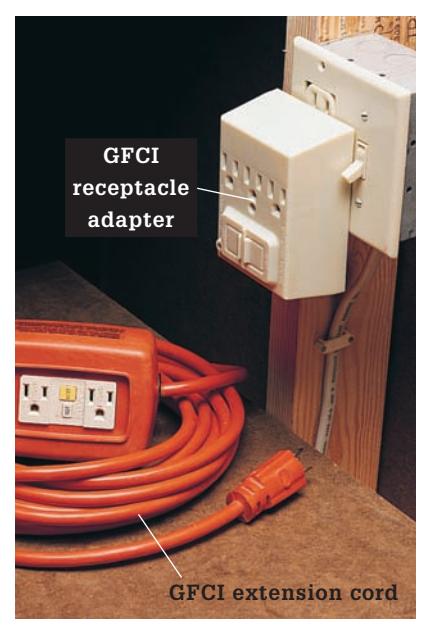
A GFCI adapter plugged into an outlet.
**Use a GFCI receptacle,** adapter, or extension cord to reduce the risk of shock while operating a power tool outdoors or in wet conditions.
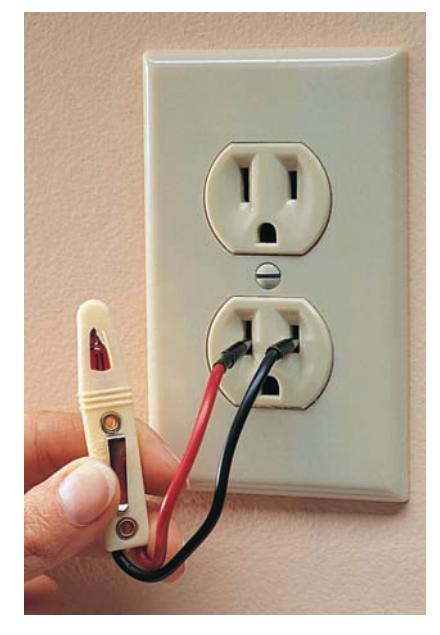
A neon circuit tester being used on electrical wiring.
**Check with a neon circuit tester** to make sure the power is off before removing cover plates, exposing wires, or drilling or cutting into walls that contain wiring.
## Workshop Basics
Whether your workshop is in a basement utility room, a shed, or a garage, it should be a comfortable place to work and should provide convenient space for organizing your tools and equipment. Your workshop should include a generous benchtop at a comfortable height, plenty of well-directed lighting, and ample floor space to operate a table saw or other stationary power tools. If you plan to store paints or solvents, make sure the room has plenty of ventilation and is equipped with a smoke detector and fire extinguisher.
Your workshop should have enough electrical circuits to supply power to the lights and several pieces of equipment without overloading a circuit. Calculate your shop's circuit capacity (opposite page), and contact an electrician if you need to add a circuit.
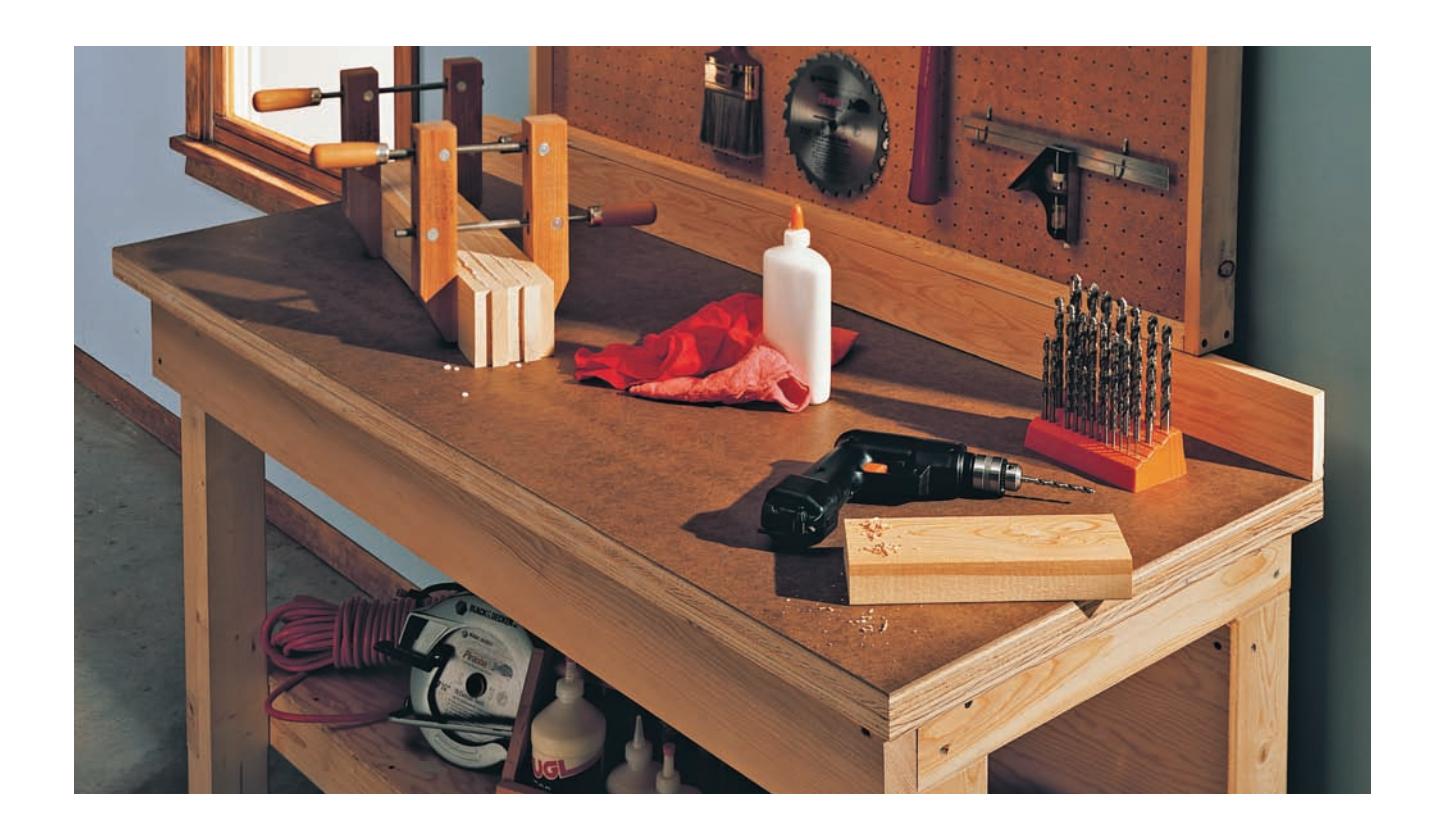
There are many devices for hanging tools on workshop walls, but the most versatile is still a sheet of pegboard with tool hooks hung from it (photo below). Pegboard allows you to organize the hooks to suit your needs.
Deep, sturdy shelves provide a great place to store toolboxes, buckets, and portable power tools. Ready-to-assemble shelf units are available at home centers.
If your workshop is in the house, you may want to add hollow-core tiles to the inside of the workshop door to reduce sound transmission and a door sweep to block noise and keep dust from traveling under the door.
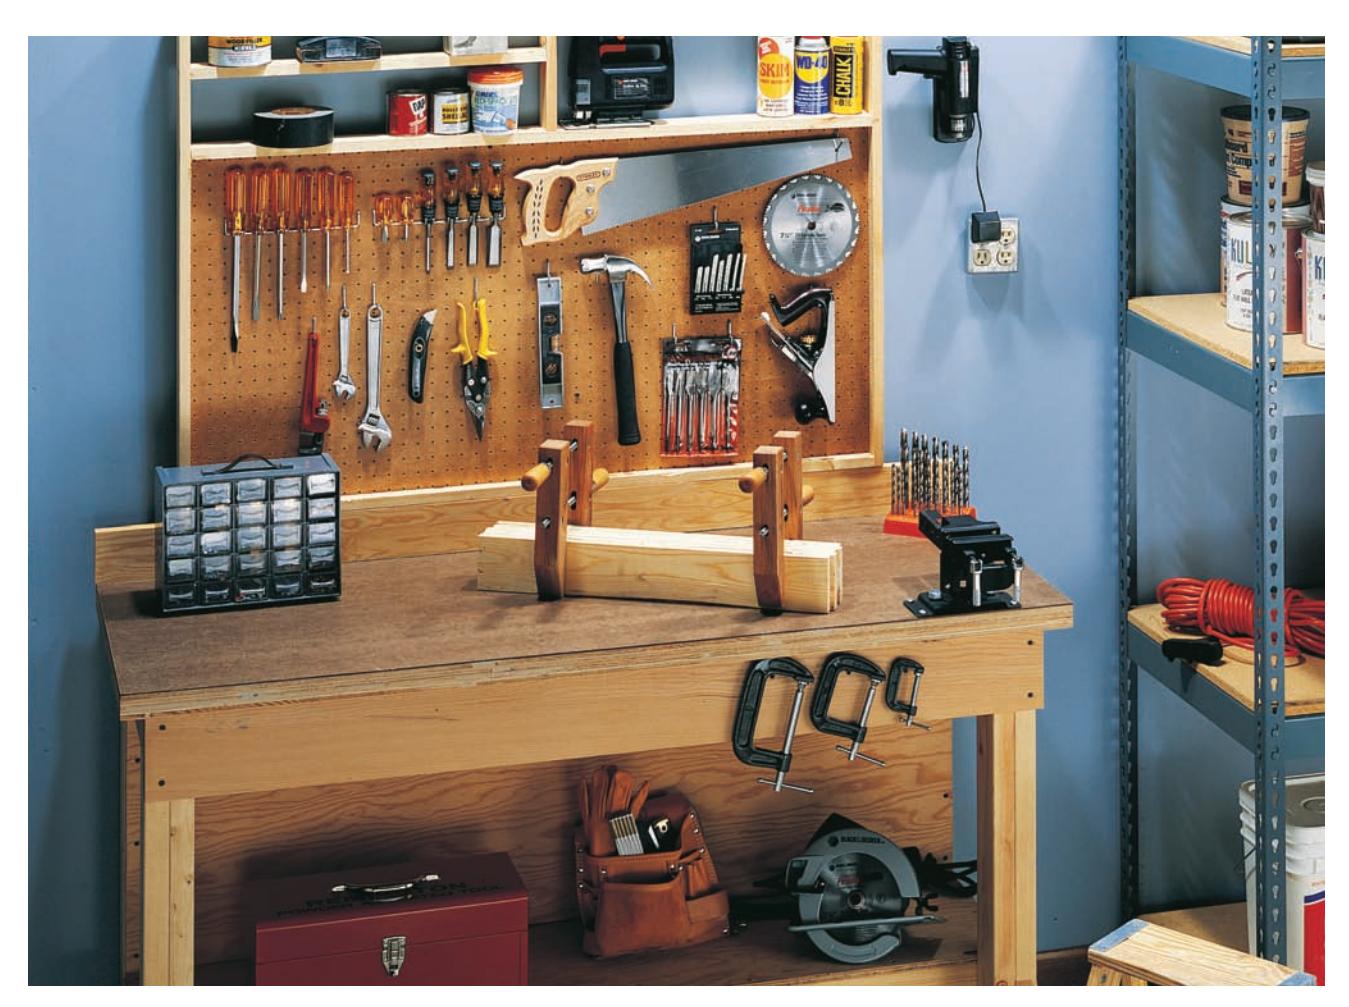
A well-organized workshop with tools on pegboard, a workbench, and ample space. A workbench is convenient for various tasks. To operate a table saw or other large power equipment, you'll need plenty of space for handling large lumber and sheet goods.
### Lighting and Dust Control
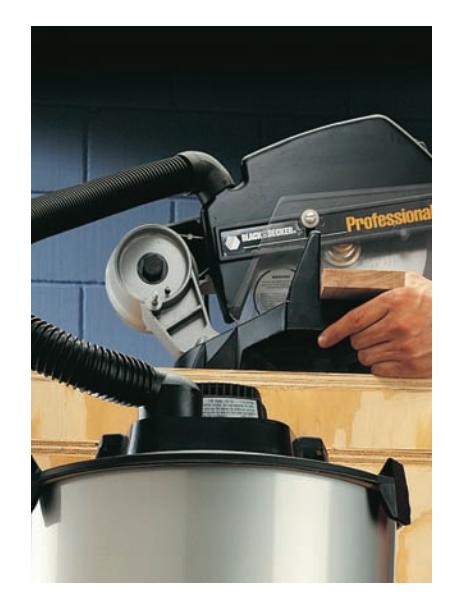
A wet/dry shop vacuum with its hose connected to a power tool for dust collection.
**Use a wet/dry shop vacuum** for quick cleanup. Many power tools have attachments that allow you to connect the vacuum's hose to the tool, so most debris is sucked directly into the cannister. Buy a vacuum with durable parts and a powerful motor.
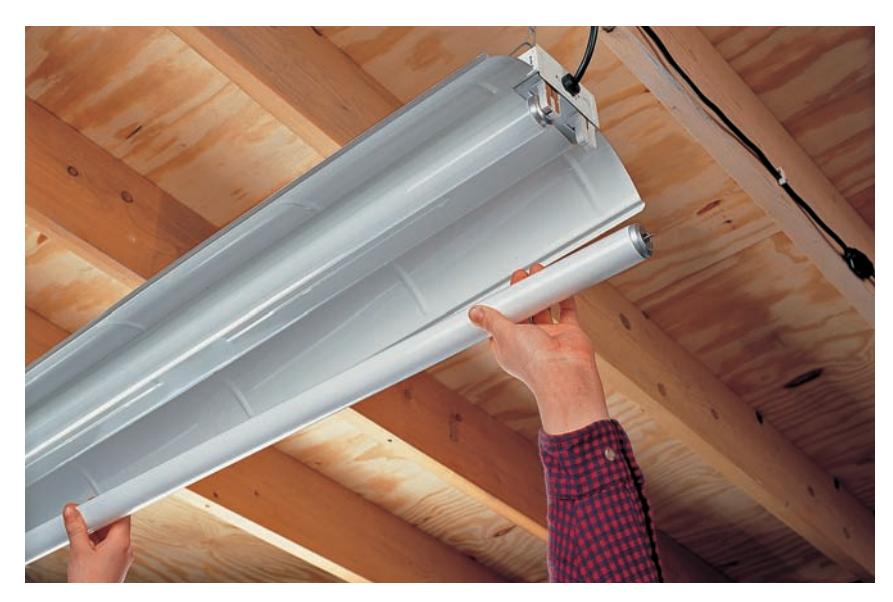
Bright fluorescent lighting fixtures in a workshop.
**Improve visibility in your shop** by replacing incandescent lights with fluorescent fixtures. Fluorescent lights provide more light than incandescent lights and are less expensive to operate. Some types of fluorescent light fixtures come with pre-attached cords for plugging into a receptacle. Other types are permanently wired; you may want to hire an electrician to make permanent installations.
### Assessing Your Workshop's Electricity Supply
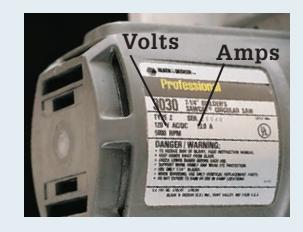
To know whether your workshop circuitry is sufficient to run your power tools and other equipment safely, first determine the circuit's safe capacity—the maximum load or wattage that it can handle without overheating. Locate the correct circuit on your service panel and check the amperage rating. Multiply that number by 120 volts, then subtract 20% to find the safe capacity. Next, find the wattage of each tool or appliance that will use that circuit. All tools and appliances are labeled with their amperage and voltage ratings. Calculate wattage by multiplying the amperage by the voltage. Add together the wattages of all of the tools and appliances you're likely to use simultaneously to find out whether they are within the circuit's safe capacity. The chart shows wattages for some common power tools and appliances. If the circuit's safe capacity is not high enough to handle the load, you may need another circuit in the workshop. Ask an electrician to inspect your service panel. You can probably add a circuit to the service panel and additional receptacles to your workshop.

An electrical service panel with circuit breakers.
A person using a multimeter to check the voltage of an outlet.
#### Typical Wattage Ratings
| Appliance | Amps | Watts |
|-------------------|----------|--------------|
| Circular saw | 10 to 12 | 1200 to 1440 |
| Drill | 2 to 4 | 240 to 480 |
| Fan (portable) | 2 | 240 |
| Heater (portable) | 7 to 12 | 840 to 1440 |
| Router | 10 to 12 | 1200 to 1440 |
| Sander | 2 to 5 | 240 to 600 |
| Table saw | 12 to 15 | 1440 to 1800 |
| Shop vacuum | 6 to 11 | 720 to 1320 |
## Building a Workbench
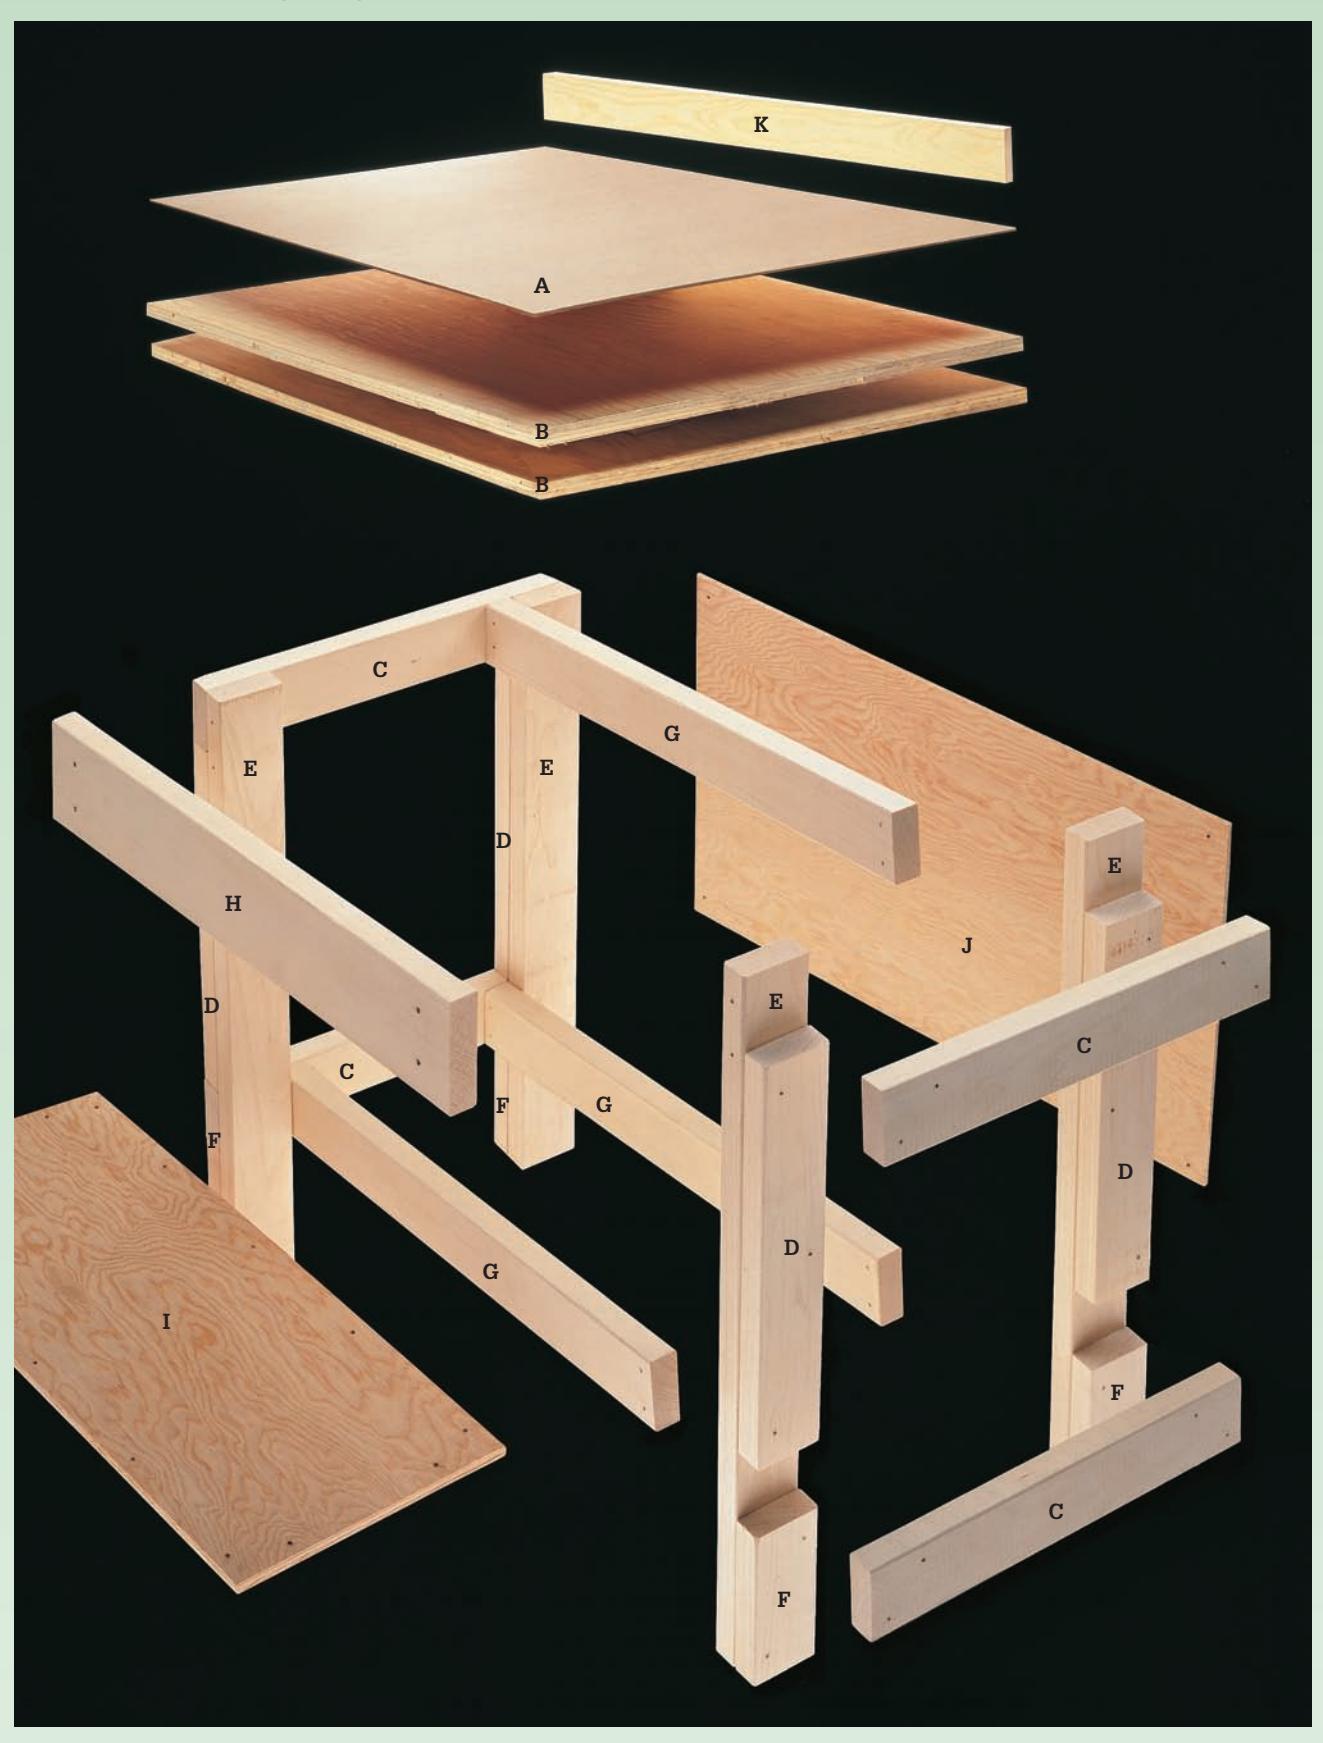
This workbench has heavy-duty legs to support big loads and a sturdy double-layer top to withstand pounding. Cover the top with a hardboard surface that can be removed when it becomes damaged. Build a shelf below the work surface for storing power tools. If desired, mount an all-purpose vise on top of the workbench.
### Tools, Materials & Cutting List:
Circular saw
Carpenter's square
Drill and bits, including screwdriver bits
Ratchet or adjustable wrench
Hammer
Nail set
Wallboard screws (1 5/8", 2 1/2", and 3")
Lag screws (1 1/2" and 3")
4d finish nails
Six 8-ft. 2 × 4s
One 5-ft. 2 × 6
One 4 × 8-ft. sheet of 3/4" plywood
One 4 × 8-ft. sheet of 1/2" plywood
One 4 × 8-ft. sheet of 1/8" hardboard
| Key | Pieces | Size and Description |
|-----|--------|------------------------------------|
| A | 1 | 1/8" hardboard top, 24 × 60" |
| B | 2 | 3/4" plywood top, 24 × 60" |
| C | 4 | 2 × 4 crosspieces, 21" |
| D | 4 | 2 × 4 legs, 19¾" |
| E | 4 | 2 × 4 legs, 34½" |
| F | 4 | 2 × 4 legs, 7¾" |
| G | 3 | 2 × 4 braces, 54" |
| H | 1 | 2 × 6 front (top) brace, 57" |
| I | 1 | 1/2" plywood shelf, 14 × 57" |
| J | 1 | 1/2" plywood shelf back, 19¼ × 57" |
| K | 1 | 1 × 4 backstop, 60" |
An exploded view diagram of a workbench showing its components and assembly.
### Workbench Cutting Diagram
A cutting diagram for workbench components from plywood and lumber sheets.
### How to Build a Workbench
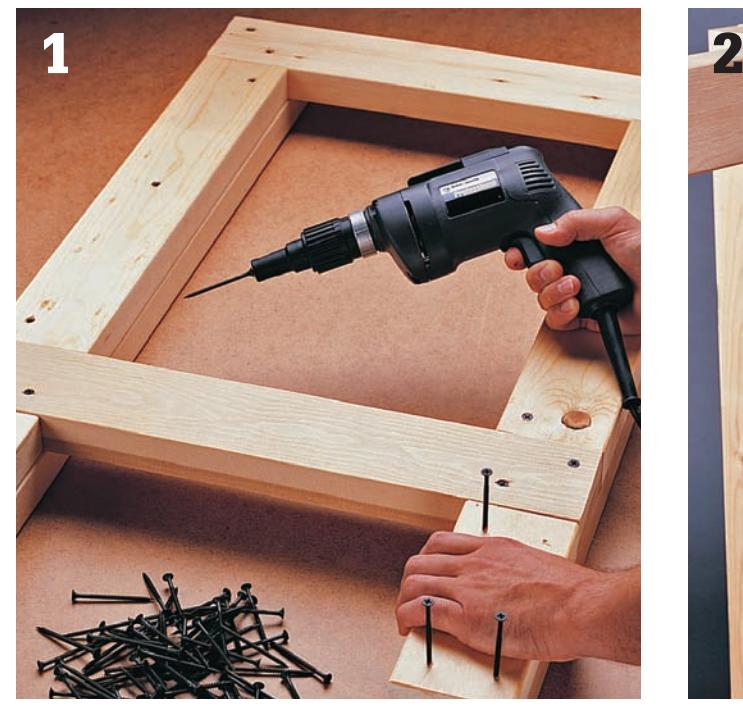
Step-by-step image: Assembling the workbench end frames with screws.
**Cut two pieces** of C, D, E, and F for each end of the bench. Assemble them with 2 1/2" wallboard screws.
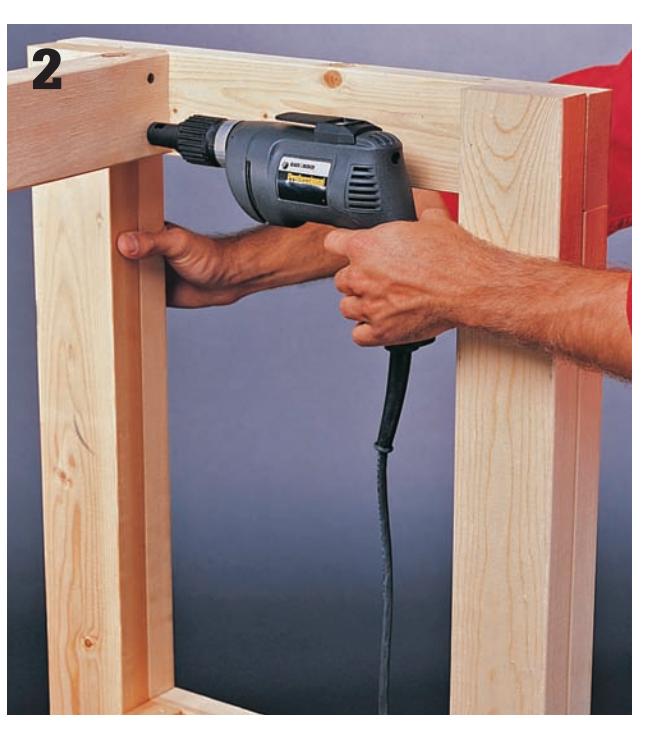
Step-by-step image: Attaching rear braces to the workbench end frames.
**Attach both** 2 × 4 rear braces (G) inside the back legs of the assembled ends, using 2 1/2" wallboard screws.
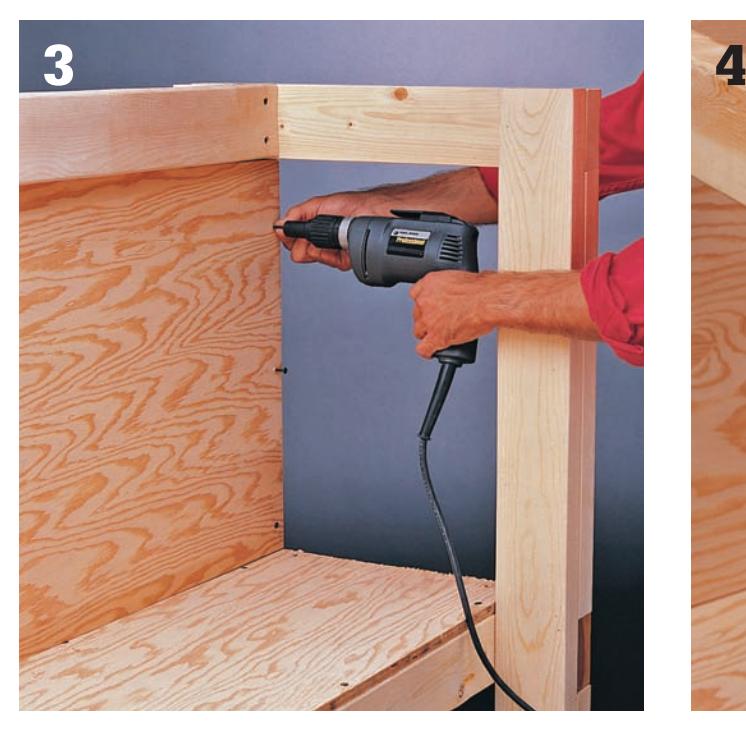
Step-by-step image: Attaching the front lower brace, bottom shelf, and back to the workbench frame.
**Attach** the 2 × 4 front lower brace (G) inside the front legs of the assembled ends. Secure the bottom shelf (I) and workbench back (J) to the assembled 2 × 4 frame, using 2 1/2" wallboard screws.
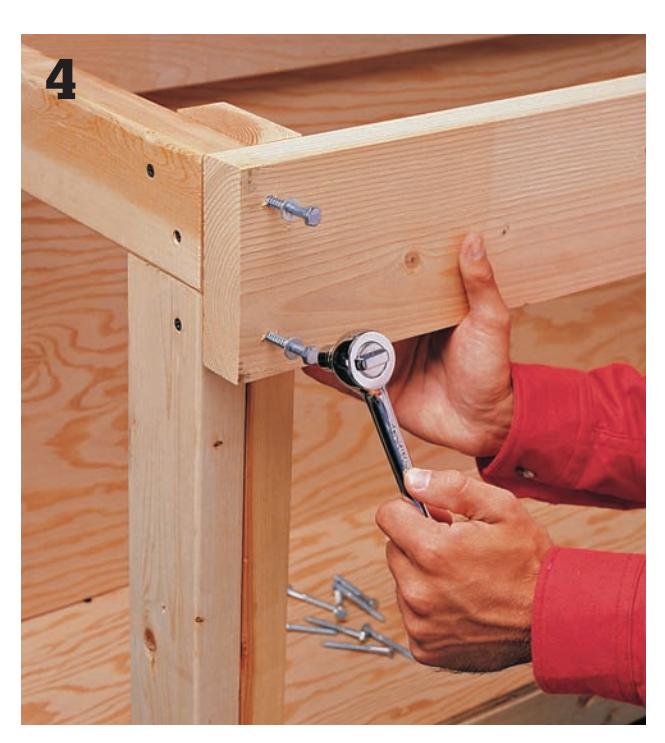
Step-by-step image: Drilling pilot holes and attaching the front upper brace with lag screws.
**Drill pilot holes** and join the 2 × 6 front upper brace (H) outside the front legs with 3" lag screws.
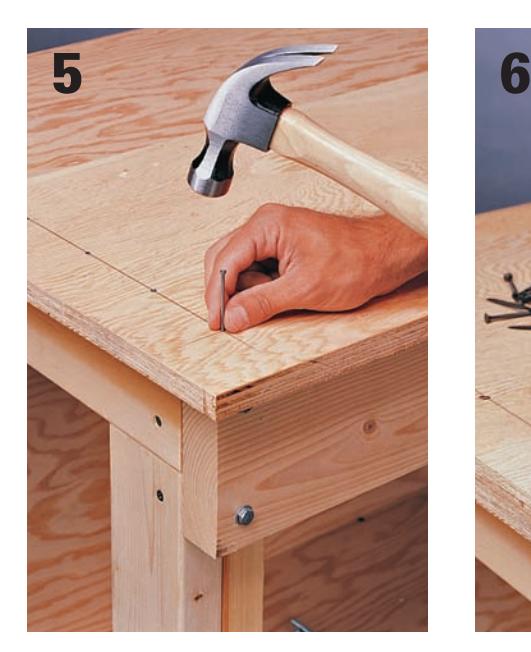
Step-by-step image: Nailing the bottom layer of the plywood work surface to the workbench frame.
**Center the bottom layer** of the 3/4" plywood work surface (B) on top of the frame. Align the plywood with the back edge, draw a reference line for driving the nails, and fasten it in place with 4d nails.
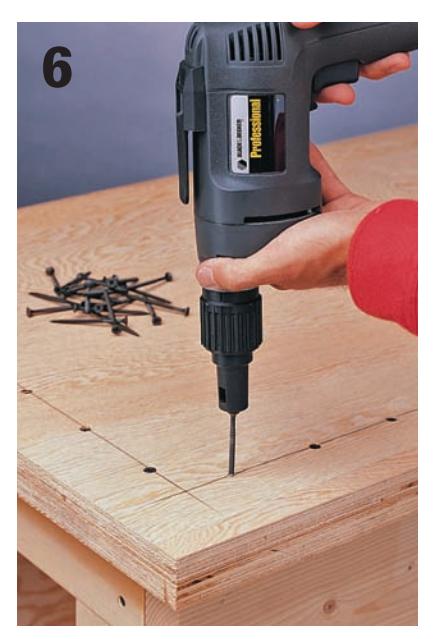
Step-by-step image: Screwing the top layer of the plywood work surface to the bottom layer and frame.
**Align the bottom and top layers** of the plywood work surface (B), and draw a reference line at least 1/2" closer to the edge to avoid the nails in the first layer. Drive 3" wallboard screws through both layers and into the bench frame.
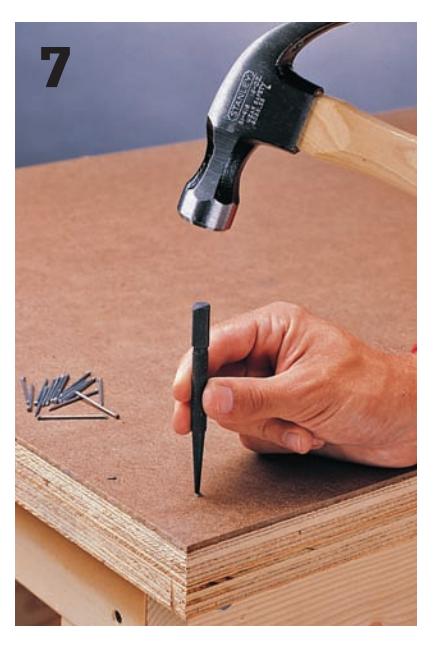
Step-by-step image: Nailing the hardboard work surface to the plywood substrate.
**Nail the hardboard work surface** (A) to the plywood substrate with 4d finish nails. Set the nails below the surface.
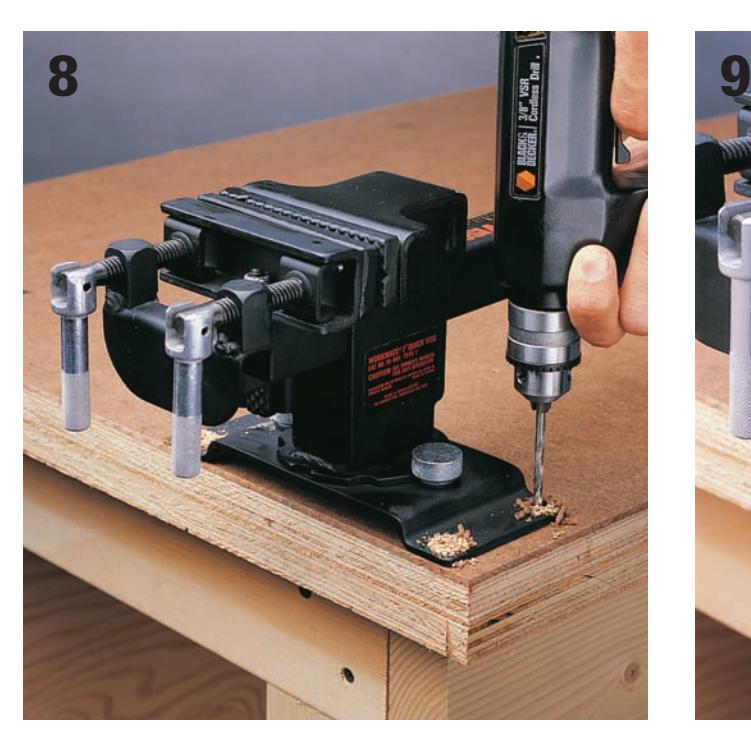
Step-by-step image: Marking pilot holes for a vise on the workbench top.
**Position the vise** at one end of the bench. On the bench top, mark holes for the vise base. Bore 1/4" pilot holes into the bench top.
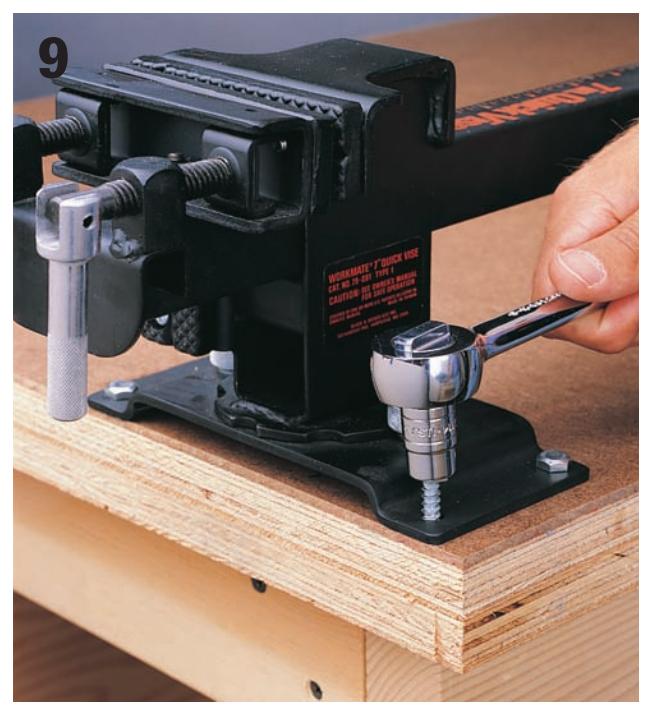
Step-by-step image: Attaching a vise and backstop to the workbench.
**Attach the vise** with 1 1/2" lag screws. Attach the backstop (K) to the back of the bench top, with 2 1/2" wallboard screws.
## Building a Sawhorse
awhorses provide a stable work surface that can support materials during marking and cutting. They can also form the base for temporary scaffolding to use while installing wallboard or ceiling panels. For scaffolding, place straight $2 times 10s$ or $2 times 12s$ across a pair of heavy-duty sawhorses (right). A wide top is best for supporting large loads. Small break-down sawhorses are a good choice if storage space is limited.
#### Tools & Materials
Circular saw
Tape measure
Screw gun or cordless screwdriver
Four 8-ft. $2 times 4s$
21/2" wallboard screws
- (2) Vertical braces, 151/2"
- (2) Top rails, 48"
- (1) Bottom brace, 48"
- (2) Horizontal braces, 111/4"
- (4) Legs, 26"
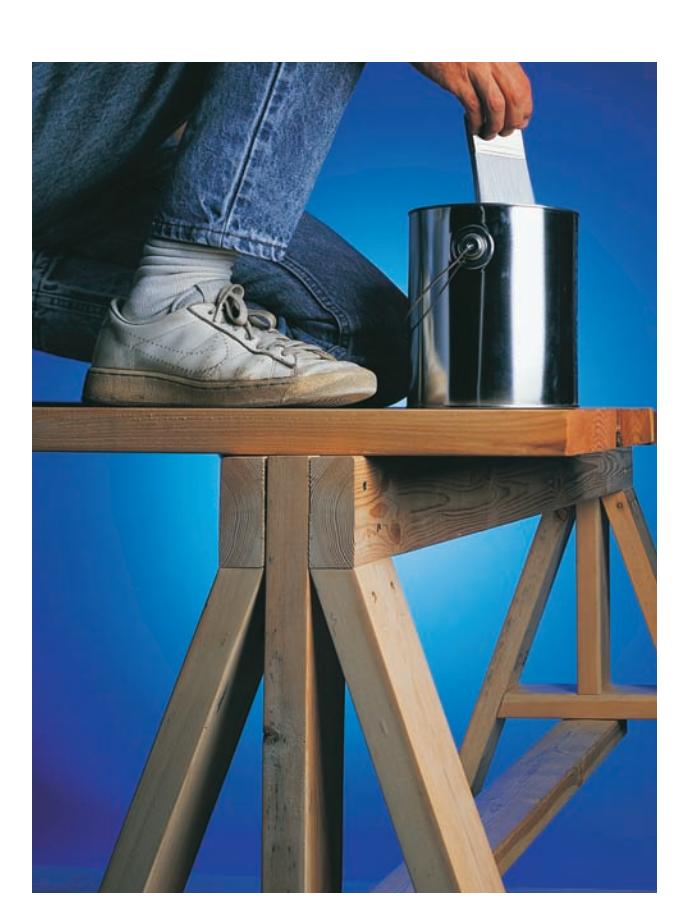
### Easy-storing Sawhorse Options
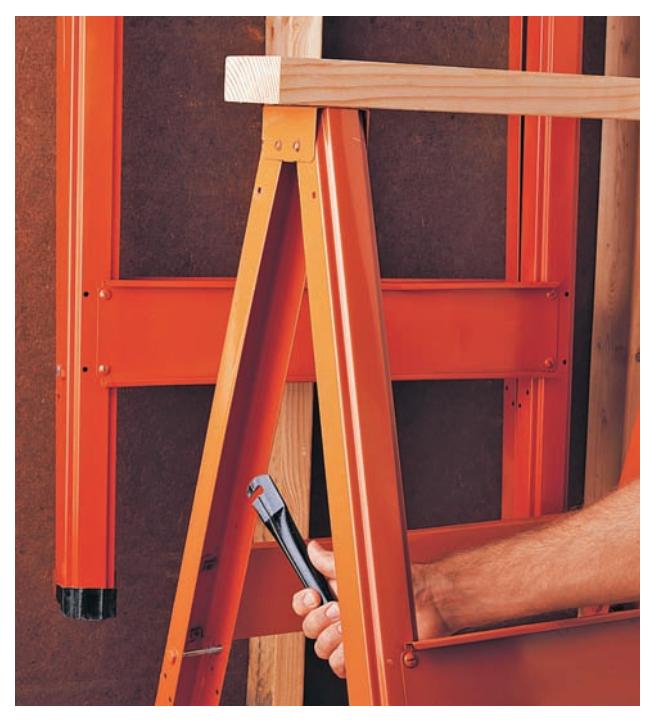
Fold metal sawhorses and hang them on the workshop wall when they are not in use.
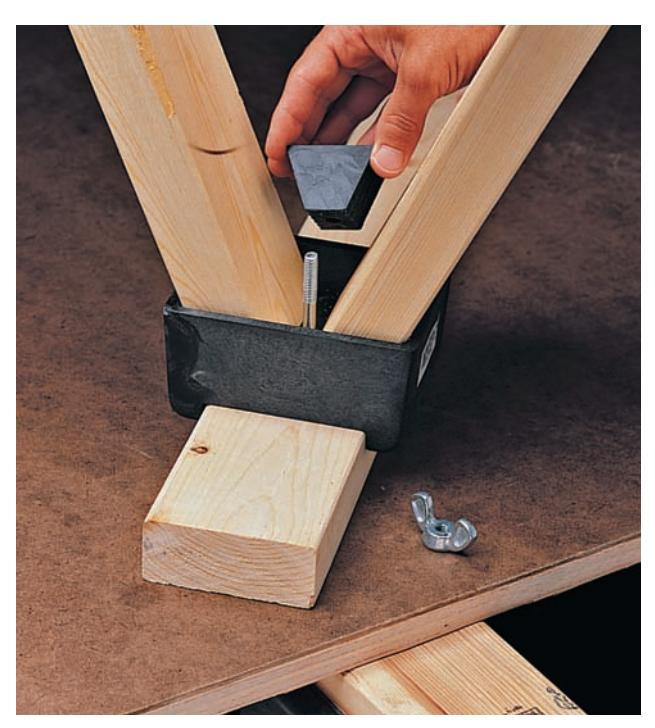
Buy brackets made from fiberglass or metal, and cut a 48" top rail and four 26" legs from 2 × 4s. Disassemble sawhorses for storage.
#### How to Build a Heavy-duty Sawhorse
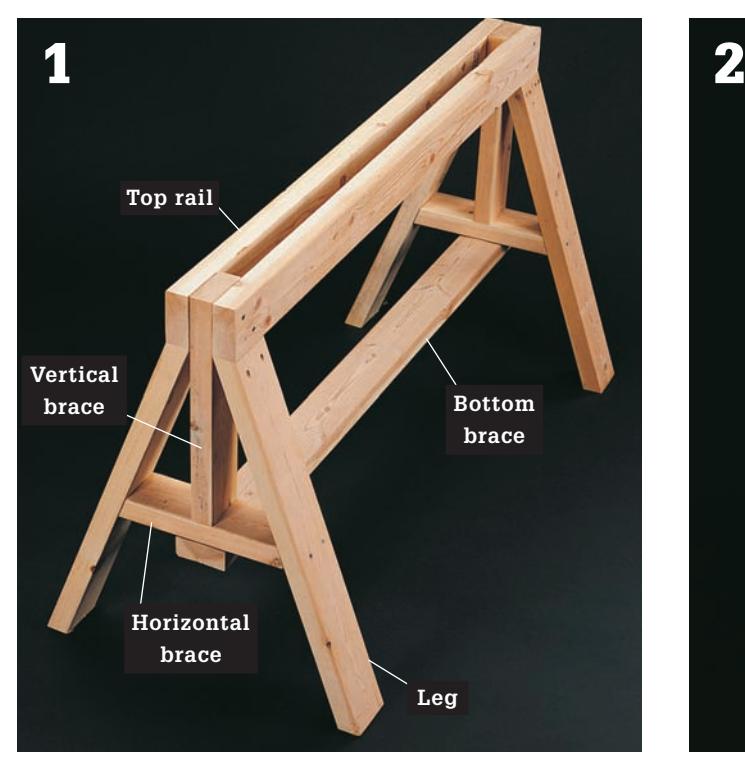
**Measure and cut** the vertical braces, top rails, and bottom brace to the lengths specified in the Material List (opposite page), using a tape measure and a circular saw.
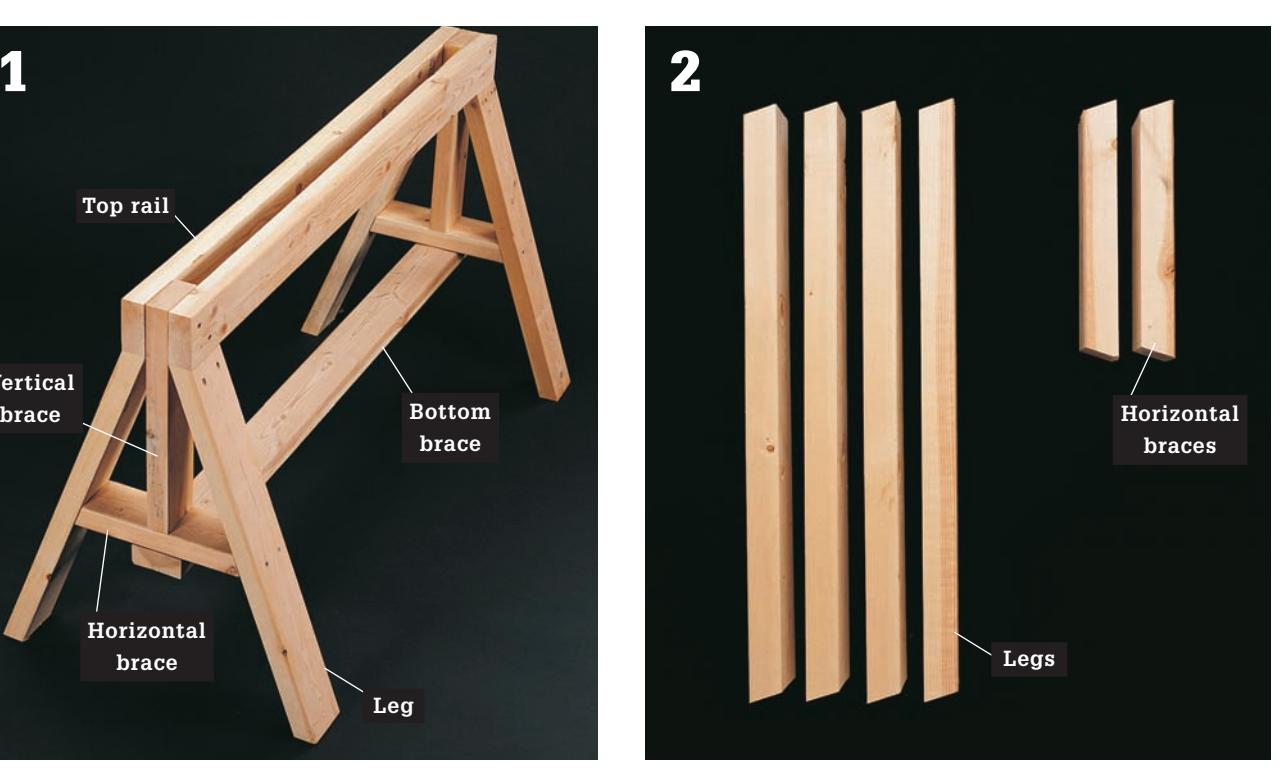
**Set a circular or miter saw** to a 17° bevel angle. (Bevel cuts will match the angle shown above.) Cut the ends of the horizontal braces with opposing angles. Cut the ends of the legs with similar angles.
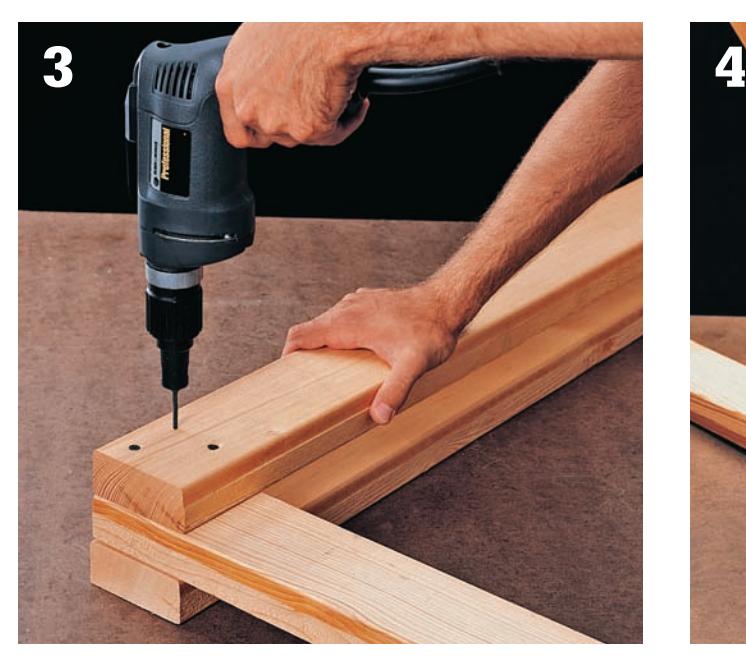
**Attach the top rails** to the vertical braces, as shown, using 21/2" wallboard screws.
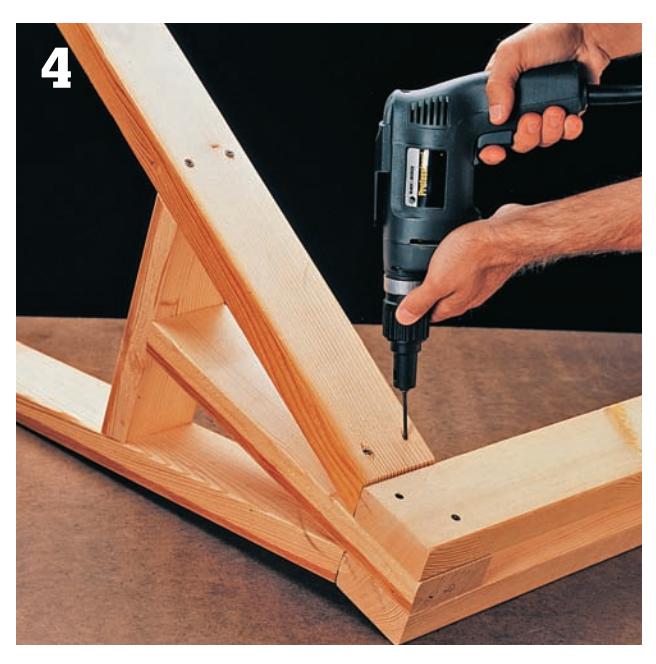
**Attach the horizontal braces** to the vertical braces, using 21/2" wallboard screws. Attach a pair of legs to the horizontal braces and then to the brace at each end. Complete the sawhorse by attaching the bottom brace to the horizontal braces.
## Materials
Materials selection is an important factor that contributes to a successful carpentry project. Choosing the right construction lumber and sheet goods will ensure that walls and floors can bear the loads applied to them, remain flat and plumb, and provide suitable surfaces for installing wall coverings and finished flooring. You should also know your options for nails, screws, and other metal connective hardware that are necessary for the job, especially when a project involves joining dissimilar materials like concrete and wood or when you're building with pressure-treated lumber. Carpentry often requires various glues, adhesives, and sealants for bonding, soundproofing, and weatherizing purposes. You don't have to be a chemist to choose the correct glue or caulk, but it helps to know the various families of these products so you can make informed decisions.
Since many home carpentry projects require a building permit, your local building inspector can also offer helpful advice about which materials you'll need for a project. Take that information to heart: using undersized or unsuitable lumber and fasteners can lead to failed inspections and extra work and expense for you in the end.
#### In This Chapter:
- Lumber
- Transporting Materials
- Plywood & Sheet Goods
- Trim Moldings
- Nails
- Screws & Other Hardware
- Glues & Adhesives
## Lumber
Lumber for structural applications such as walls, floors, and ceilings is usually milled from strong softwoods and is categorized by grade, moisture content, and dimension.
Grade: Characteristics such as knots, splits, and grain slope affect the strength of the lumber and determine the grade (chart, opposite page).
Moisture content: Lumber is also categorized by moisture content. S-DRY (surfaced dry) is the designation for lumber with a moisture content of 19 percent or less. S-DRY lumber is the least likely to warp or shrink and is a good choice for framing walls. S-GRN (surfaced green) means the lumber contains a moisture content of 19 percent or more.
Exterior lumber: Lumber milled from redwood or cedar is naturally resistant to decay and insect infestation and is a good choice for exterior applications. The most durable part of a tree is the heartwood, so specify heartwood for pieces that will be in contact with the ground.
Treated lumber: Lumber injected with chemicals under pressure is resistant to decay and is generally less expensive than decay-resistant heartwoods such as redwood and cedar. For outdoor structures like decks, use treated lumber for posts and joists and more attractive redwood or cedar for decks and railings.
Dimension lumber: Lumber is sold according to its nominal size, such as $2 times 4$. Its actual size (chart, page 23) is smaller. Always use actual sizes for measuring and estimating.
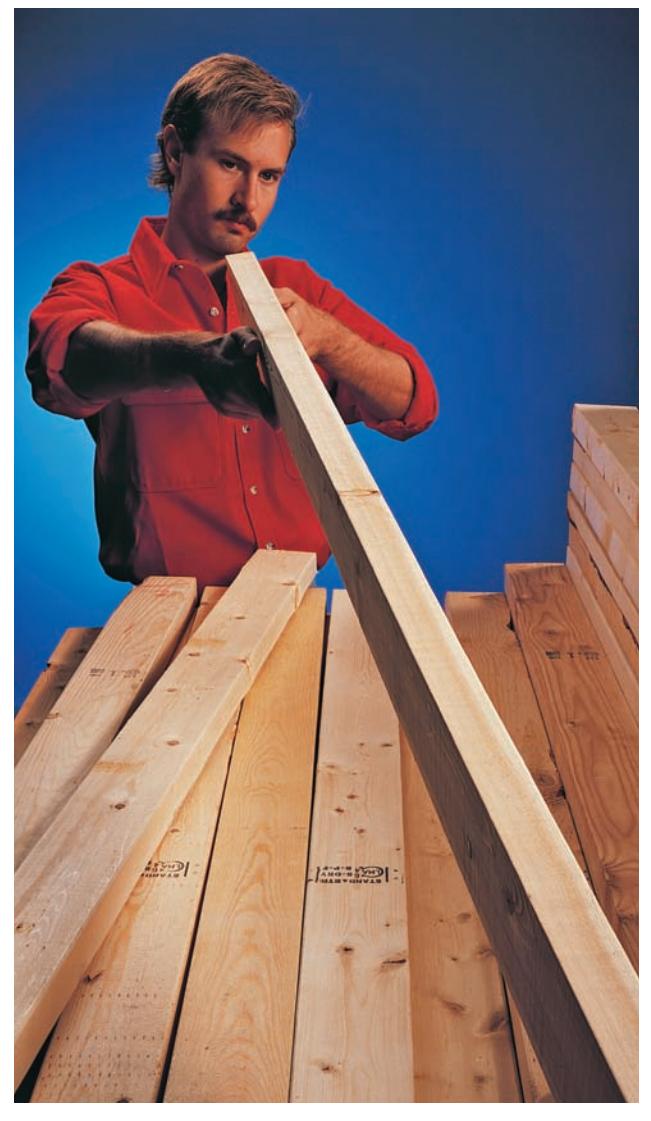
Check lumber visually before using it. Stored lumber can warp from temperature and humidity changes.
### The Steel-Framing Alternative
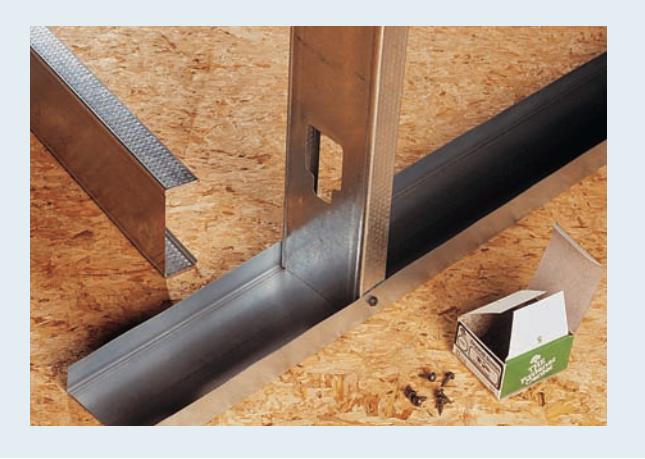
Lumber is not the only material available for framing walls. Metal studs and tracks offer an attractive—if less common—choice for new construction. Steel-framed walls can be installed faster than wood stud walls—the parts are attached by crimping and screwing the flanges—and the channels are precut to accommodate electrical and plumbing lines. Steel framing is also lighter in weight, easy to recycle, fireproof, and comparable in price to lumber. If you are interested in using steel framing for a new wall in a wood-framed home, consult a professional for information about electrical, plumbing, and load-bearing safety precautions. Steel framing is available at most home centers.
#### Lumber Grading Chart
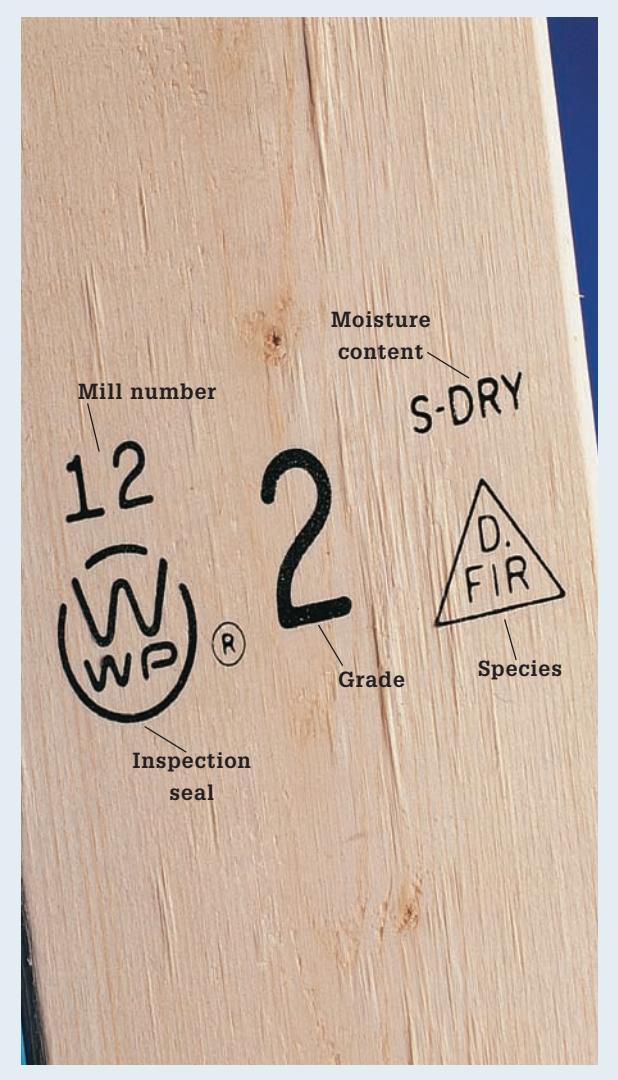
**Grade stamps provide valuable information** about a piece of lumber. The lumber's grade is usually indicated by the largest number stamped on the wood. Also stamped on each piece of lumber are its moisture content, species, and lumber mill of origin.
| Grade | Description, uses |
|------------------------------|------------------------------------------------------------------------------------|
| Clear | Free of knots and defects. |
| SEL STR or Select Structural | Good appearance, strength, and stiffness. |
| 1,2,3 | 1,2,3 grades indicate knot size. |
| CONST or Construction | Both grades used for general framing. |
| STAND or Standard | Good strength and serviceability. |
| STUD or Stud | Special designation used in any stud
application, including load-bearing walls. |
| UTIL or Utility | Economical choice for blocking and bracing. |
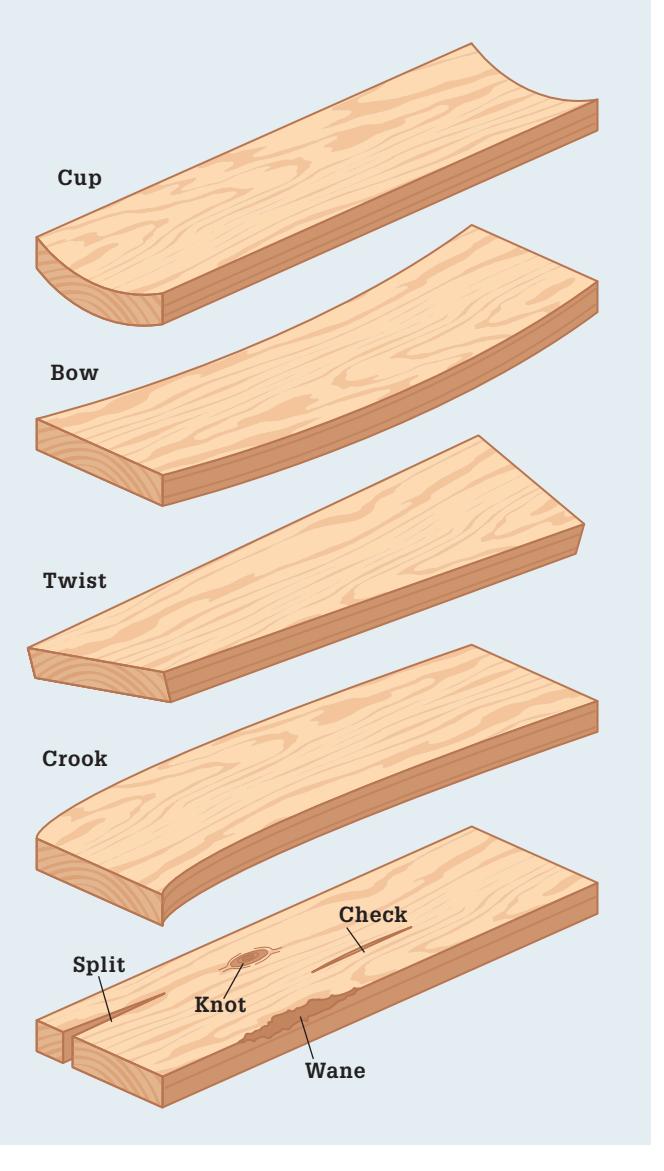
Much of today's lumber is still fairly wet when it is sold, so it's hard to predict how it will behave as it dries. But a quick inspection of each board at the lumberyard or home center will help you disqualify flawed boards. Lumber that is cupped, twisted, or crooked should not be used at full length. However, you may be able to cut out good sections for use as blocking or other short framing pieces. If a board is slightly bowed, you can probably flatten it out as you nail it. Checks, wanes, and knots are cosmetic flaws that seldom affect the strength of the board. The exception is a knot that is loose or missing. In this case, cut off the damaged area. Sections with splits should also be cut off. Splits are likely to spread as the wood dries.
### Selecting the Right Lumber for a Project
Picking the right wood for a project is a decision that will affect the durability and attractiveness of the final product. Some woods are more prone to warping than others, some are more resistant to decay, and some are superior when it comes to accepting a coat of paint. Matching styles and wood varieties will help to create a common theme throughout your home.
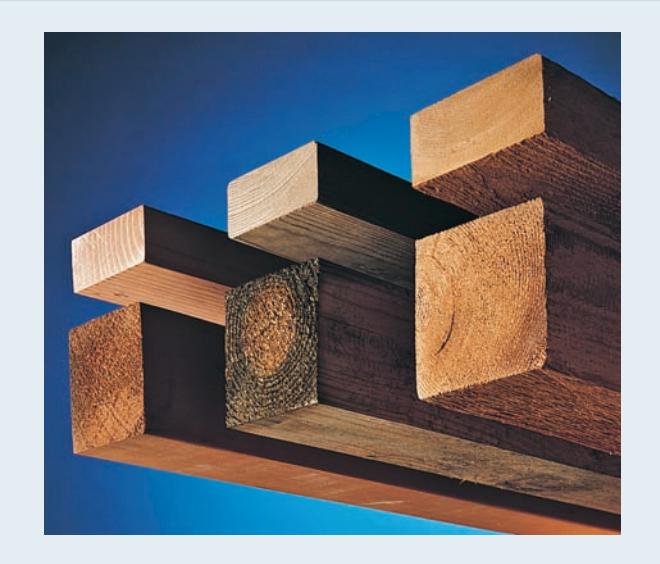
Lumber sizes such as 2 × 4 are nominal dimensions, not actual dimensions. The actual size of lumber is slightly smaller than the nominal size. When it is originally milled, lumber is cut at the nominal size; however, the boards are then planed down for a smoother finish, producing the actual dimensions you buy in the store. See the chart on the opposite page for nominal and actual dimensions.
| Softwood | Description | Uses |
|----------------|------------------------------------------------------------------------------------------------------------------------------------------------------------|---------------------------------------------------------------------------------------|
| Cedar | Easy to cut, holds paint well. Heartwood resists decay. | Decks, shakes, shingles, posts, and other decay-prone surfaces. |
| Fir, larch | Stiff, hard wood. Holds nails well. Some varieties are hard to cut. | Framing materials, flooring, and subflooring. |
| Pine | Lightweight, soft wood with a tendency to shrink. Holds nails well. Some varieties resist decay. | Paneling, trim, siding, and decks. |
| Redwood | Lightweight, soft wood that holds paint well. Easy to cut. Heartwood resists decay and insect damage. | Outdoor applications, such as decks, posts, and fences. |
| Treated lumber | Chemically treated to resist decay. Use corrosion-resistant fasteners only. Wear protective eye wear and clothing to avoid skin, lung, and eye irritation. | Ground-contact and other outdoor applications where resistance to decay is important. |
| Hardwood | Description | Uses |
|----------|-----------------------------------------------------------------------|------------------------------------------------------------------------|
| Birch | Hard, strong wood that is easy to cut and holds
paint well. | Painted cabinets, trim, and plywood. |
| Maple | Heavy, hard, strong wood that is difficult to cut
with hand tools. | Flooring, furniture, and countertops. |
| Poplar | Soft, light wood that is easy to cut with hand
or power tools. | Painted cabinets, trim, tongue-and-groove paneling, and plywood cores. |
| Oak | Heavy, hard, strong wood that is difficult to cut
with hand tools. | Furniture, flooring, doors, and trim. |
| Walnut | Heavy, hard, strong wood that is easy to cut. | Fine woodwork, paneling, and mantelpieces. |
| Type | Description | Common
Nominal Sizes | Actual
Sizes |
|----------------------------|-----------------------------------------------------------------------------------------------------------------------|-------------------------------------------------------------|--------------------------------------------------------------------------------------|
| Dimensional lumber | Used in framing of walls, ceilings, floors, and rafters, structural finishing, exterior decking, fencing, and stairs. | 1 × 4
1 × 6
1 × 8
2 × 2
2 × 4
2 × 6
2 × 8 | ¾" × 3½"
¾" × 5½"
¾" × 7¼"
1½" × 1½"
1½" × 3½"
1½" × 5½"
1½" × 7¼" |
| Furring strips | Used in framing of walls, ceilings, floors, and rafters, structural finishing, exterior decking, fencing, and stairs. | 1 × 2
1 × 3 | ¾" × 1½"
¾" × 2½" |
| Tongue-and-groove paneling | Used in wainscoting and full-length paneling of walls and ceilings. | 5/16" × 4
1 × 4
1 × 6
1 × 8 | Varies,
depending on
milling process
and application. |
| Finished boards | Used in trim, shelving, cabinetry, and other applications where a fine finish is required. | 1 × 4
1 × 6
1 × 8
1 × 10
1 × 12 | ¾" × 3½"
¾" × 5½"
¾" × 7½"
¾" × 9½"
¾" × 11½" |
| Glue laminate | Composed of layers of lumber
laminated to form a solid piece. Used
for beams and joists. | 4 × 10
4 × 12
6 × 10
6 × 12 | 3½" × 9
3½" × 12
3½" × 9
3½" × 12 |
| Micro-lam | Composed of thin layers glued together for use in joists and beams. | 4 × 12 | 3½" × 11¾" |
## Transporting Materials
Transporting building materials from the lumberyard or home center to your home is the first step in any workshop project—and it may be the most difficult. Framing lumber can be tied to a roof carrier rack for transporting, but sheets of plywood, paneling, or wallboard should be delivered by truck. Your lumberyard may deliver your materials for a small additional charge.
If you transport materials on a roof carrier, make sure to tie the load securely. Materials that extend past the rear bumper should be tagged with a red flag to warn drivers behind you. Drive carefully and avoid sudden starts and stops. When using your vehicle to carry heavy loads, like bags of concrete or sand, allow extra braking distance.
{alt="Man carrying a large sheet of plywood using a rope loop."}
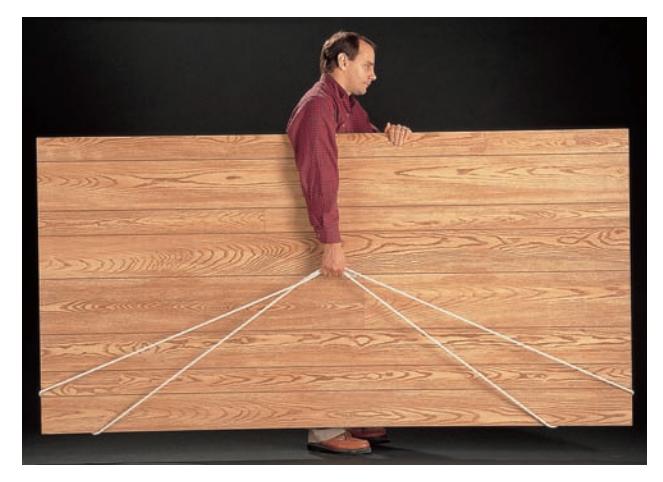
To carry full-sized sheets of plywood, paneling, or wallboard by yourself, tie a single length of rope, about 18 ft. long, in a loop. Hook the ends of the loop over the lower corners of the sheet, and grip the middle of the rope in one hand. Use the other hand to balance the sheet.
{alt="Man carrying a large sheet of plywood with a rope."}
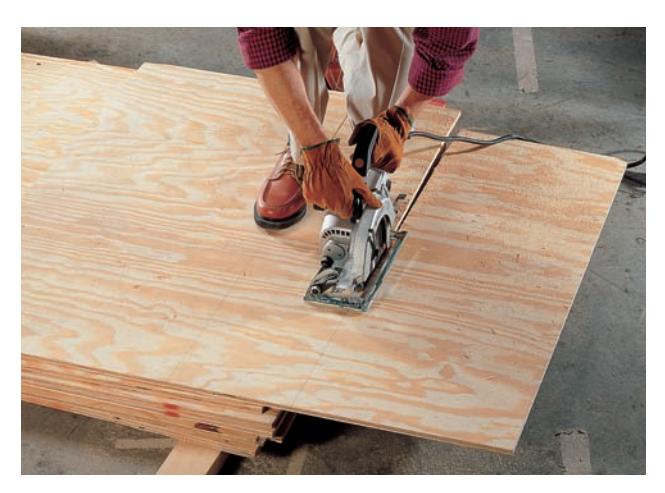
If you already know the cutting dimensions for plywood, paneling, or other sheet goods, you can make transportation easier by cutting the materials to size while still at the lumberyard or home center. Some lumberyards will cut your materials free of charge. Or, you can bring along a saw and cut the materials yourself.
{alt="Man cutting a sheet of plywood with a circular saw at a lumberyard."}
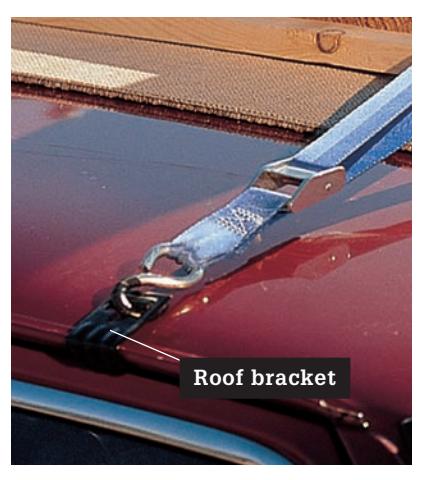{alt="Materials tied onto a car roof rack with brackets."}
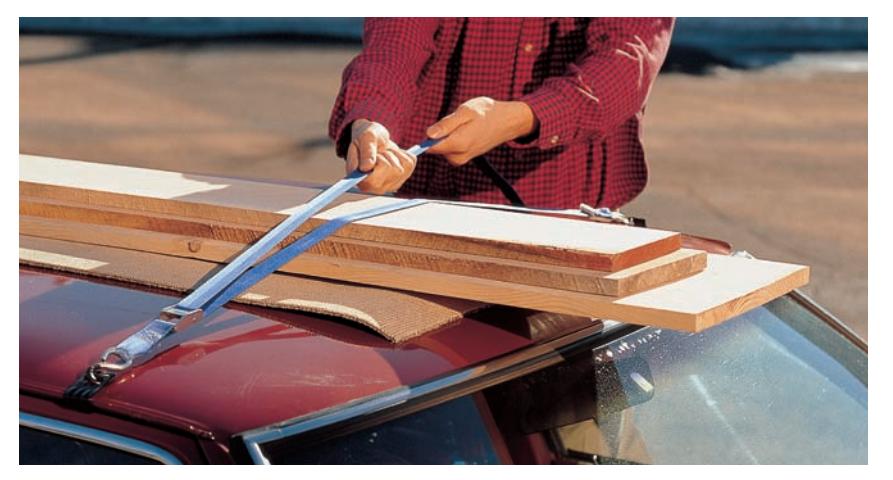
Tie materials onto the roof of your car using inexpensive, vinyl-coated roof brackets. Hook the brackets over the edge of the roof, then attach nylon packing straps or ropes to the brackets for cinching materials in place. Place carpet scraps under the materials to prevent scratches, and center the load on the car roof.
#### How to Tie a Load onto an Auto Roof Carrier
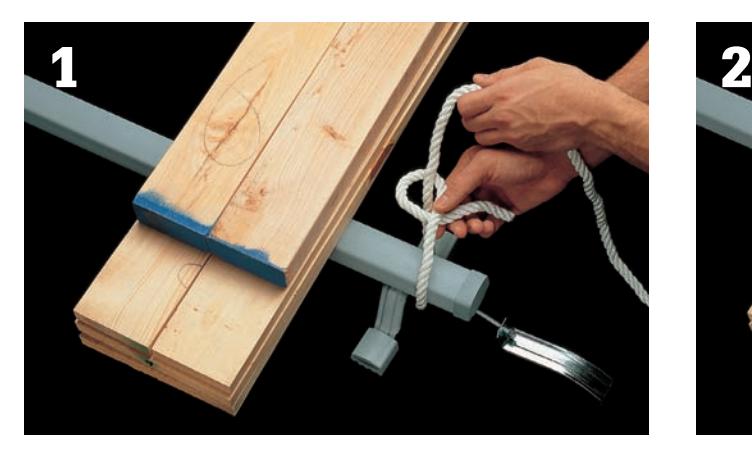{alt="Step 1: Tying a half hitch around a roof carrier bar."}
**Tie a half hitch** around one end of the roof carrier bar. Pull the knot tight.
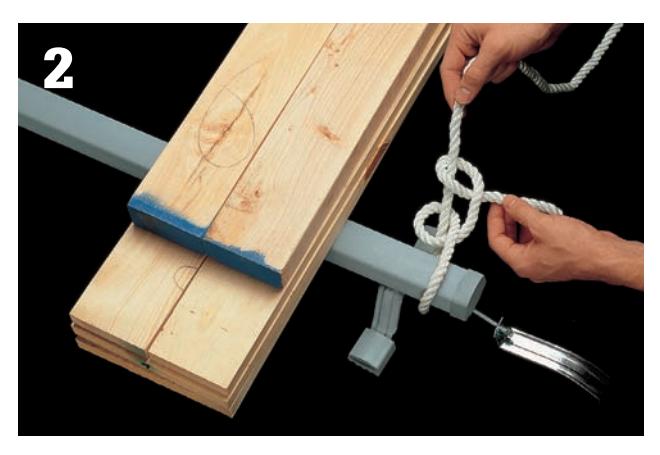{alt="Step 2: Tying a second half hitch in the rope."}
**Tie a second half hitch** in the rope, and pull the knot tight. A half hitch has good holding power, yet is easy to untie.
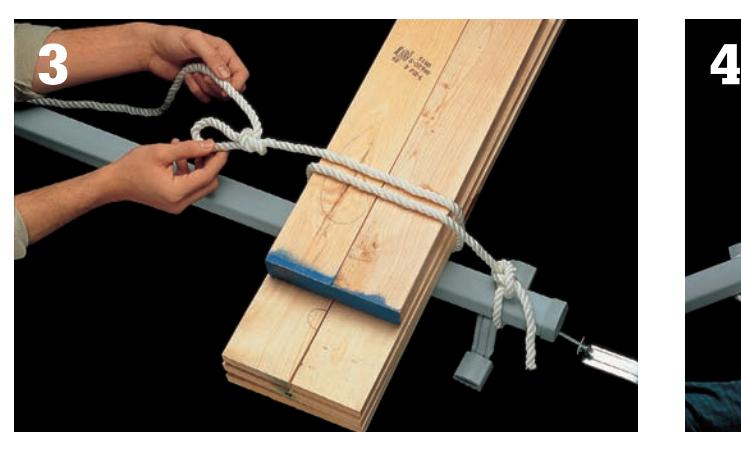{alt="Step 3: Pulling rope over the load and tying a slip loop."}
**Pull the rope** over the top of the load. If possible, wrap the rope once around the load. Tie a small slip loop in the rope.
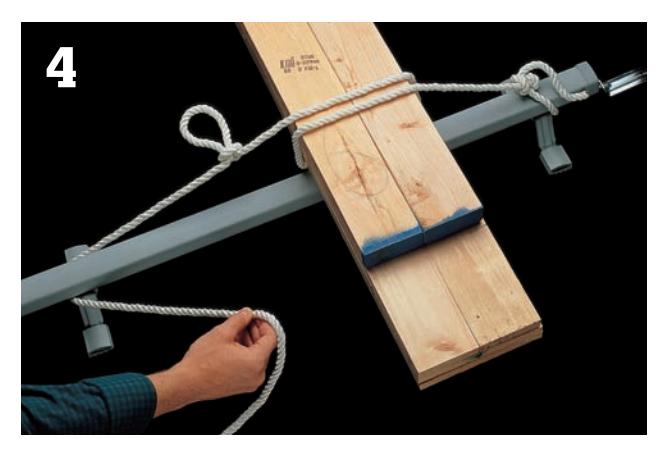{alt="Step 4: Stretching the rope around the opposite roof carrier bar."}
**Stretch the rope** around the opposite end of the roof carrier bar.
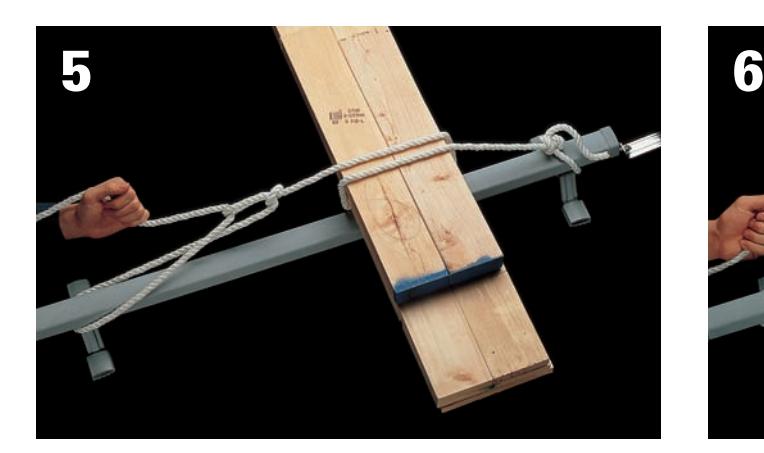{alt="Step 5: Threading rope through the slip loop and cinching tight."}
**Thread the end** of the rope through the slip loop. Pull the rope firmly against the loop to cinch the load tight against the roof carrier.
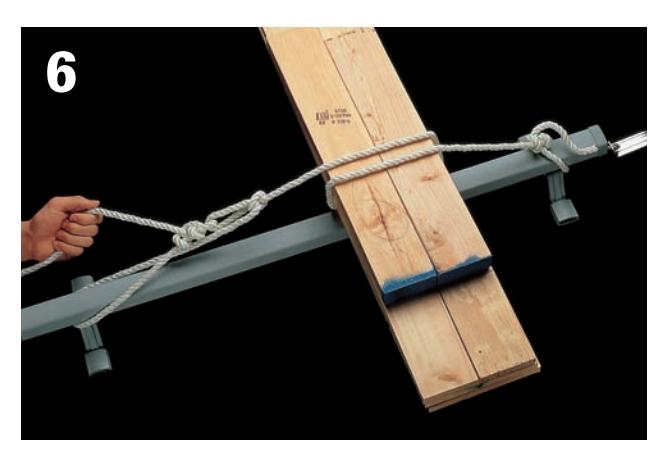{alt="Step 6: Tying off the rope with half hitches."}
**Tie off the rope** below the slip loop, using half hitches. Repeat steps 1 to 6 at the other carrier bar. If desired, large loads also can be tied to the front and rear bumpers of the car, using the same rope technique.
## Plywood & Sheet Goods
{alt="Stack of various plywood sheets."}
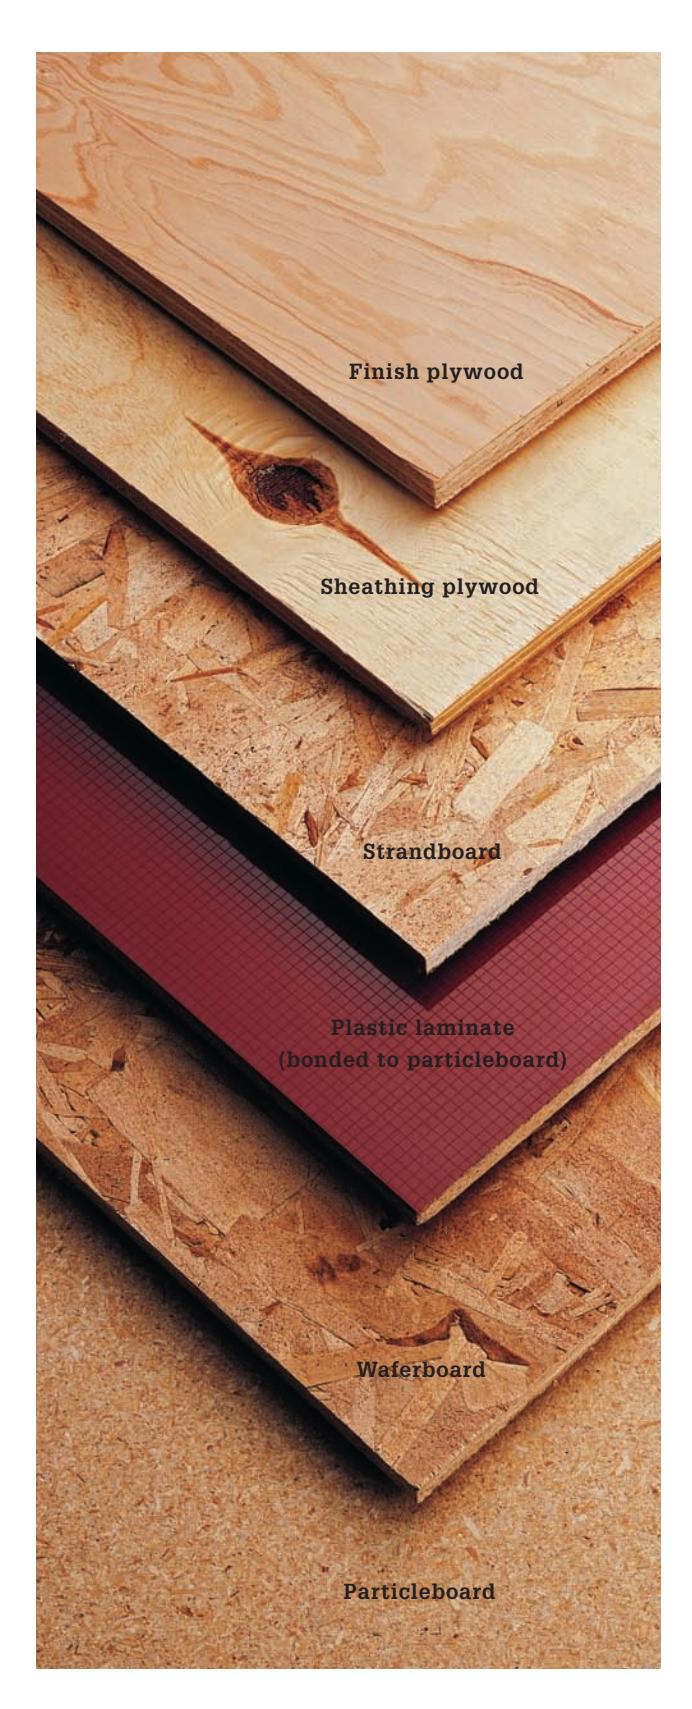
There are many different types of sheet goods, but plywood is the most widely used. Plywood is an extremely versatile sheet material that is made up of thinly sliced layers or plies of wood. Plywood is available in thicknesses ranging from 3/16" to 3/4" and is graded A through D, depending on the quality of the wood in its outer plies. It is also graded for interior or exterior usage. Classifications for plywood are based on the wood species used for the face and back veneers. Group 1 species are the strongest and stiffest, Group 2 is the next strongest.
Finish plywood is graded either A-C, meaning it has a finish-quality wood veneer on one side and a utility-grade ply on the other side, or A-A, indicating it has a finish veneer on both sides.
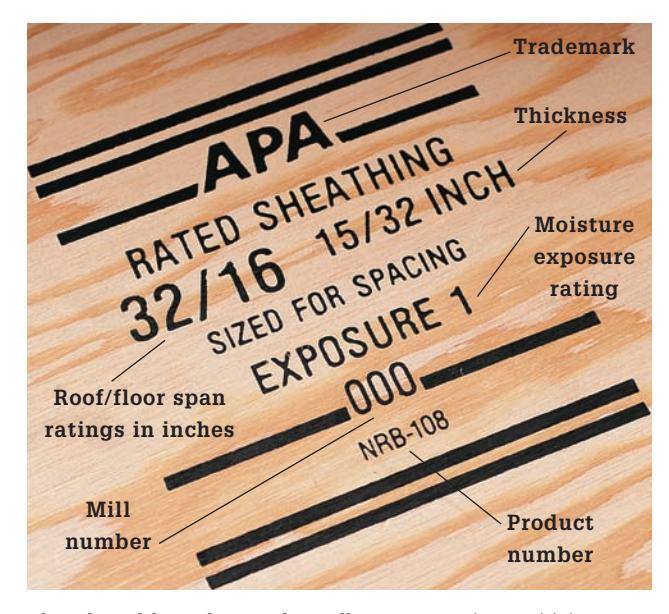
Sheathing plywood is graded C-D with two rough sides and features a bond between plies that is waterproof. Plywood rated EXPOSURE 1 is for use where some moisture is present, and plywood rated EXTERIOR is used in applications that are permanently exposed to weather. Sheathing plywood also carries a thickness rating and a roof and floor span index, which appear as two numbers separated by a diagonal slash. The first number, for roofing application, indicates the maximum spacing
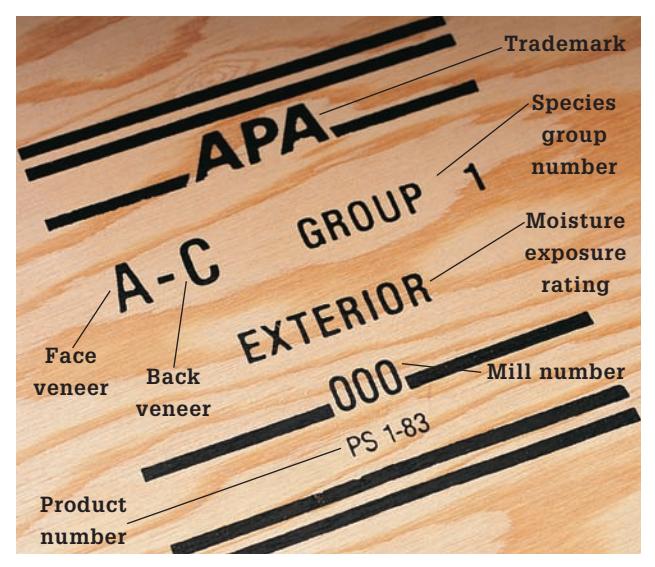{alt="Close-up of a finish plywood grading stamp."}
for rafters. The second number specifies the joist spacing when plywood is used for subflooring. Some plywood is stamped "sized for spacing." This means that the actual dimensions are slightly smaller than 4 x 8 ft. to allow space for expansion between sheets after installation.
Plastic laminates make durable surfaces for countertops and furniture. Plastic laminates are sometimes bonded to particleboard for use in shelving, cabinets, and countertops.
Strand-, particle-, and waferboard are made from waste chips or inexpensive wood species and are used for shelving and floor underlayment.
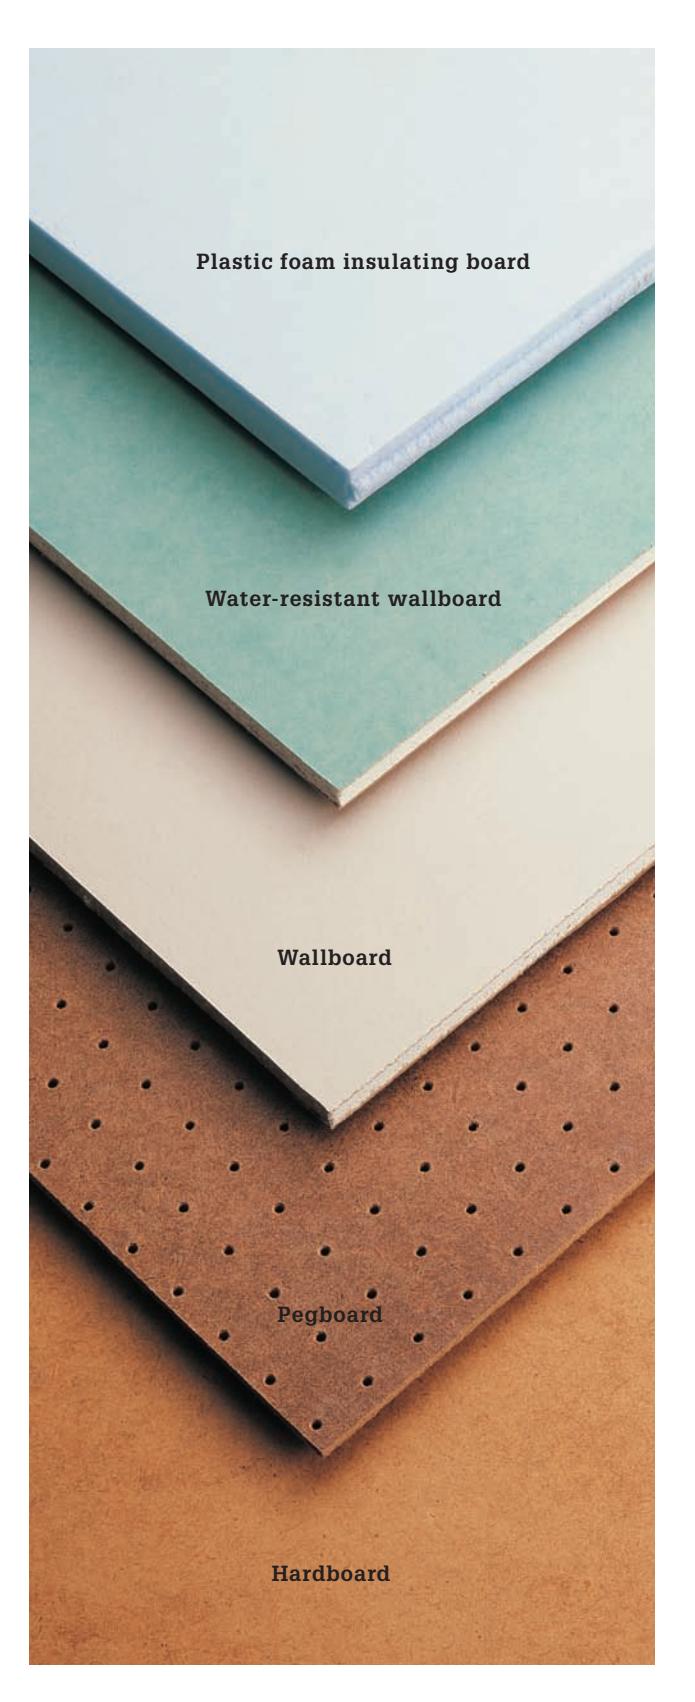
Foam insulating board is lightweight and serves as insulation for basement walls.
Water-resistant wallboard is used behind ceramic wall tiles and in other high-moisture areas.
Wallboard, also known as drywall, Sheetrock, and plasterboard, comes in panels 4-feet wide and 2, 4, 8, 10, or 12-feet long and in 3/8", ½", and 3/8" thicknesses.
Pegboard and hardboard are made from wood fibers and resins bonded together under high pressure and are used for tool organization with a workbench and as shelf backing.
{alt="Close-up of a sheathing plywood grading stamp."}
{alt="Pegboard with tools hanging on it."}
## Trim Moldings
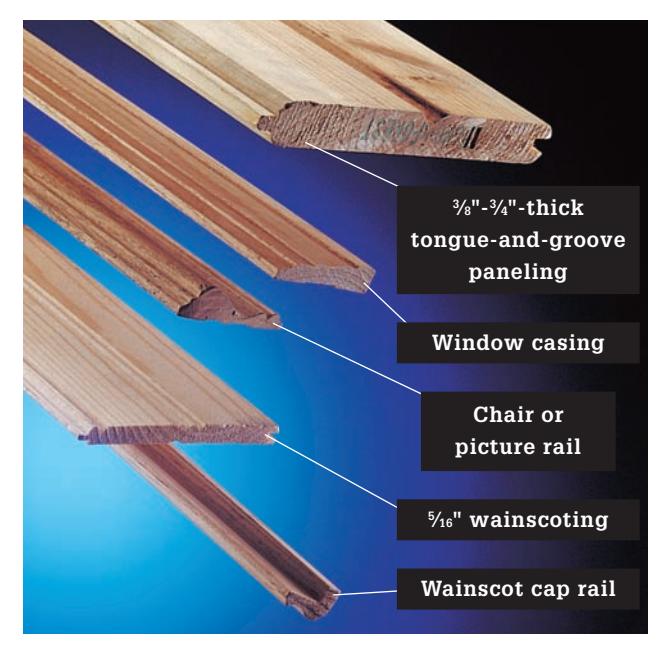
Trim moldings give character and definition to many carpentry projects. In addition, you can sometimes use them to cover up carpentry mistakes, such as hiding small gaps in wall corners when the wallboard hasn't been cut perfectly.
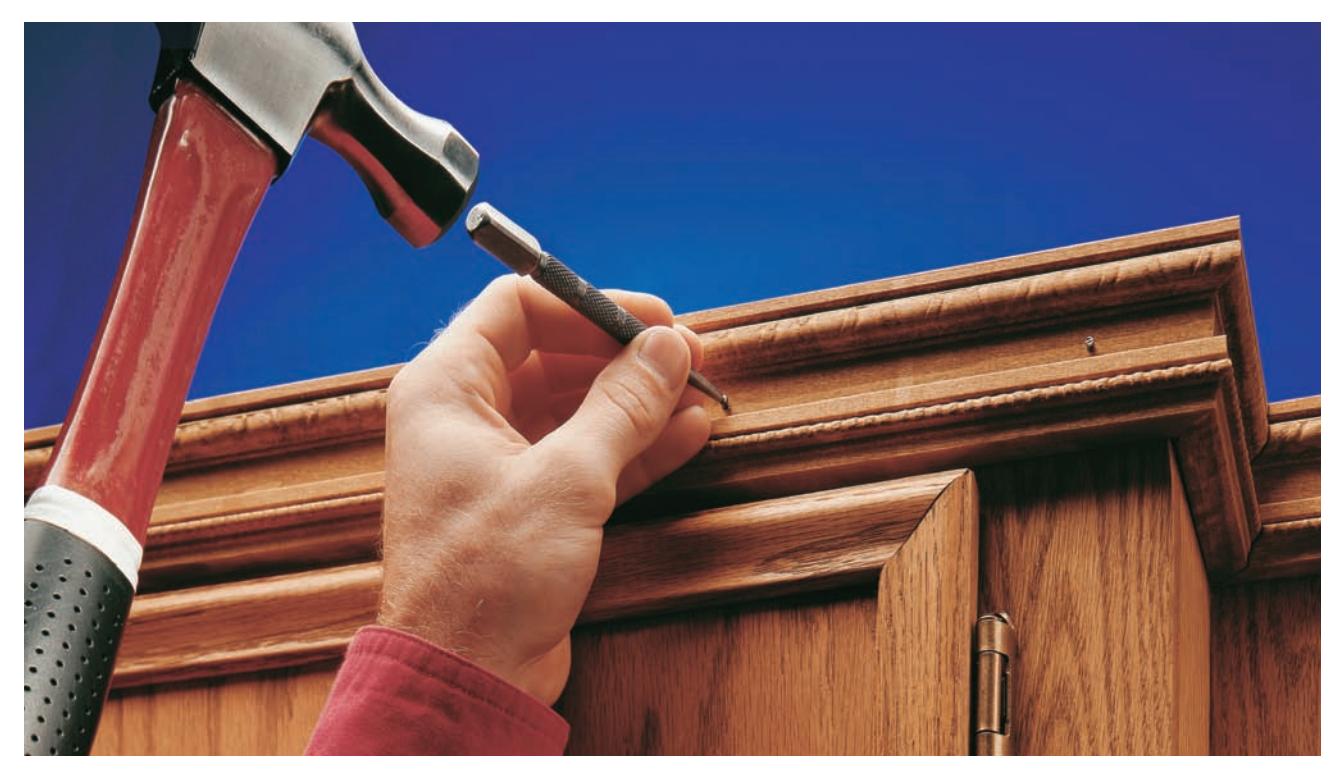
It's important to measure and cut moldings precisely so that when installed, they fit together snugly without gaps. Predrilling moldings is recommended, especially when hardwoods such as oak are used. Predrilling makes hand nailing easier, reduces splitting during installation, and makes it easier to set nails cleanly. There's no need to predrill when using a pneumatic nail gun.
Most moldings should be painted or stained before installation. Cove moldings and wainscoting can be purchased with a factory coat of white paint. Care must be taken to ensure that paint or stain does not interfere with installation (see "Installing Wainscoting," page 168). Pine and poplar are good choices if you plan to paint. For stained surfaces, use a hardwood with a pleasing grain, such as oak.
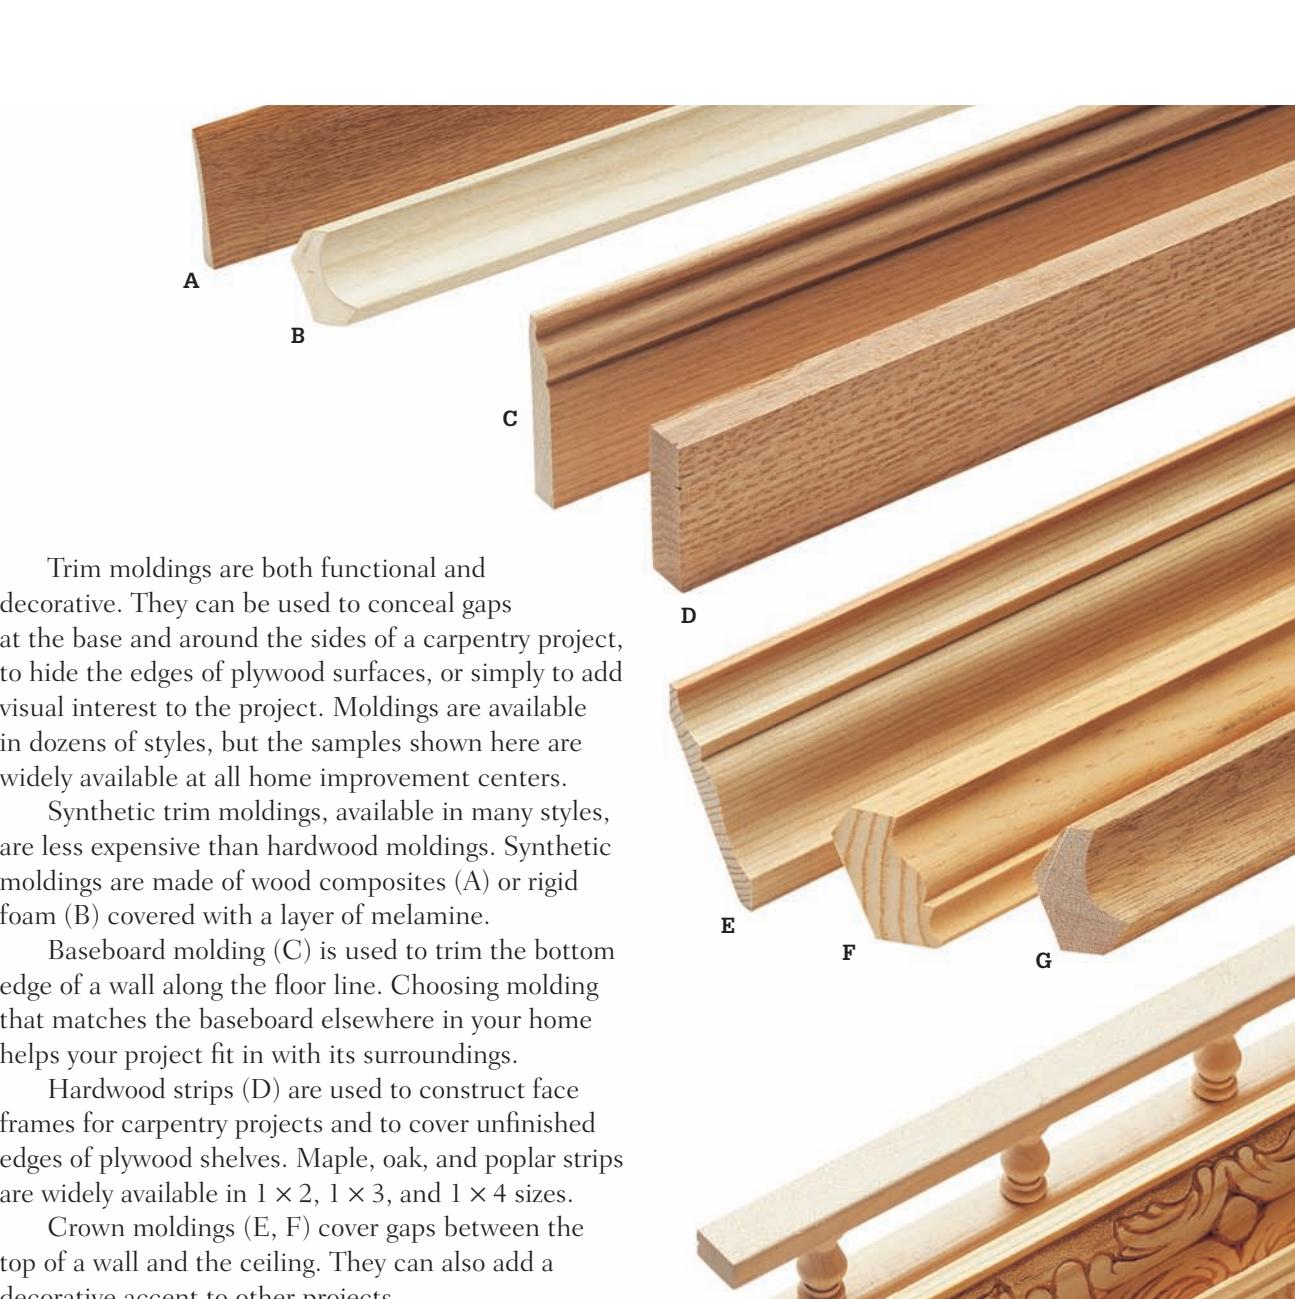
{alt="Various wood trim moldings displayed."}
Use the same wood species whenever possible in selecting trim materials for walls, doors, and windows. Similar materials will provide visual consistency throughout a room.
{alt="Decorative moldings on a wall."}
{alt="Diagram illustrating various types of hardwood strips and moldings."}
Hardwood strips (D) are used to construct face frames for carpentry projects and to cover unfinished edges of plywood shelves. Maple, oak, and poplar strips are widely available in 1 × 2, 1 × 3, and 1 × 4 sizes.
Crown moldings (E, F) cover gaps between the top of a wall and the ceiling. They can also add a decorative accent to other projects.
Cove molding (G) is a simple, unobtrusive trim for covering gaps.
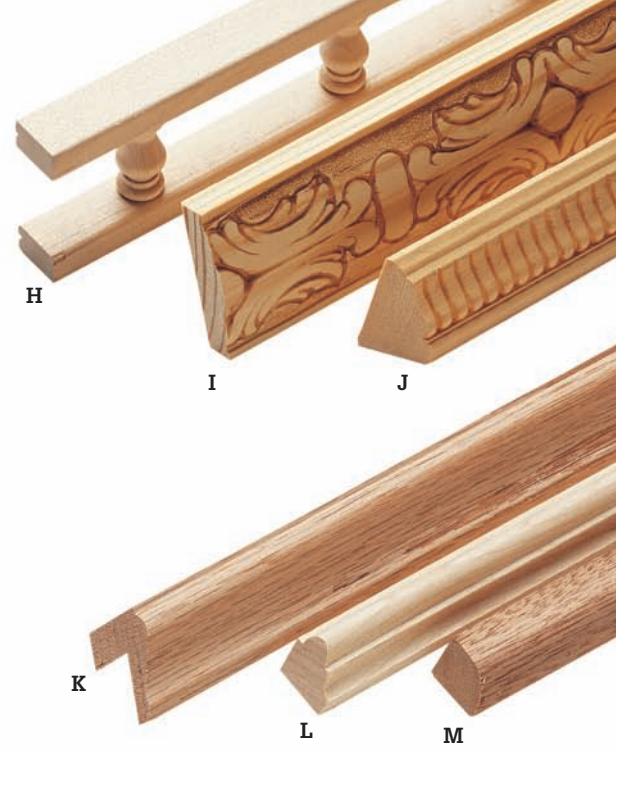
Ornamental moldings, including spindle and rail (H) and embossed moldings (I, J), give a distinctive look to many projects.
Door-edge molding (K), also called cap molding, is only available in specialty stores in some areas. It is used with finish-grade plywood to create panel-style doors and drawer faces.
Shelf-edge molding (L), also called base cap molding, provides a decorative edge to plywood shelves or can be used to create a wider baseboard molding.
Base-shoe molding (M) covers gaps around the top, bottom, and sides of a wall. Because it bends easily, base-shoe molding works well to cover irregular gaps caused by uneven walls and loose floors.
## Nails
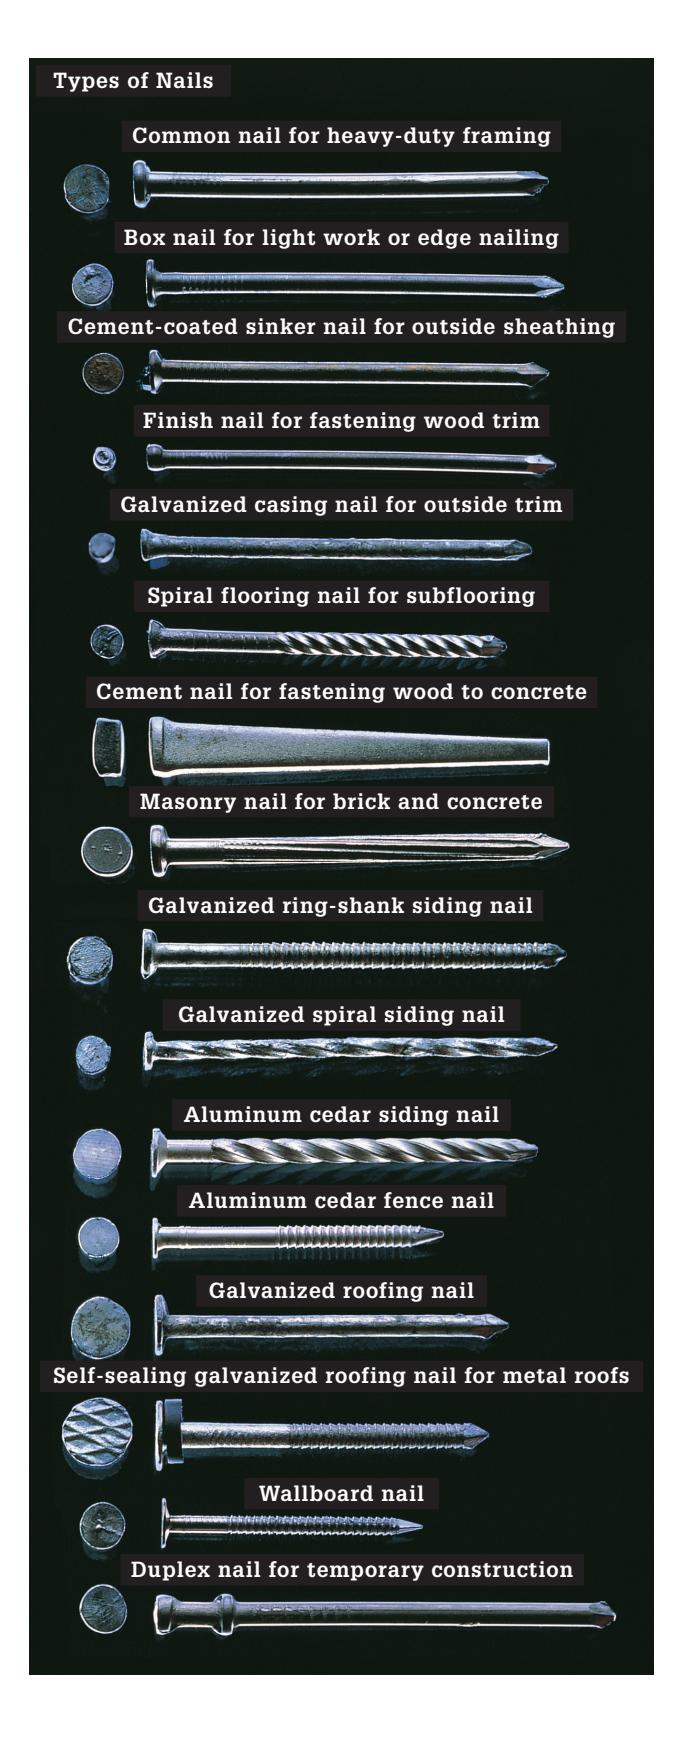
The wide variety of nail styles and sizes makes it possible to choose exactly the right fastener for each job. Nails are identified by their typical purpose, such as casing, flooring, or roofing nails; or by a physical feature, such as galvanized, coated, or spiral. Some nails come in both a galvanized and nongalvanized version. Use galvanized nails for outdoor projects and non-galvanized indoors. Nail lengths may be specified in inches or by numbers from 4 to 60 followed by the letter "d," which stands for "penny" (see "Nail Sizes," opposite page).
Some of the most popular nails for carpentry projects include:
- Common and box nails for general framing work. Box nails are smaller in diameter, which makes them less likely to split wood. Box nails were designed for constructing boxes and crates, but they can be used in any application where thin, dry wood will be nailed close to the edge of the piece. Most common and box nails have a cement or vinyl coating that improves their holding power.
- Finish and casing nails, which have small heads and are driven just below the work surface with a nail set. Finish nails are used for attaching moldings and other trim to walls. Casing nails are used for nailing window and door casings. They have a slightly larger head than finish nails for better holding power.
- Brads, small wire nails sometimes referred to as finish nails. They are used primarily in cabinetry, where very small nail holes are preferred.
- Flooring nails, which are often spiral-shanked for extra holding power to prevent floorboards from separating or squeaking. Spiral flooring nails are sometimes used in other applications, such as installing tongue-and-groove paneling on ceilings.
- Galvanized nails, which have a zinc coating that resists rusting. They are used for outdoor projects.
- Wallboard nails, once the standard fastener for wallboard, are less common today because of the development of Phillips-head wallboard screws that drive quickly with a screw gun or drill and offer superior holding power (page 32).
### Nail Sizes
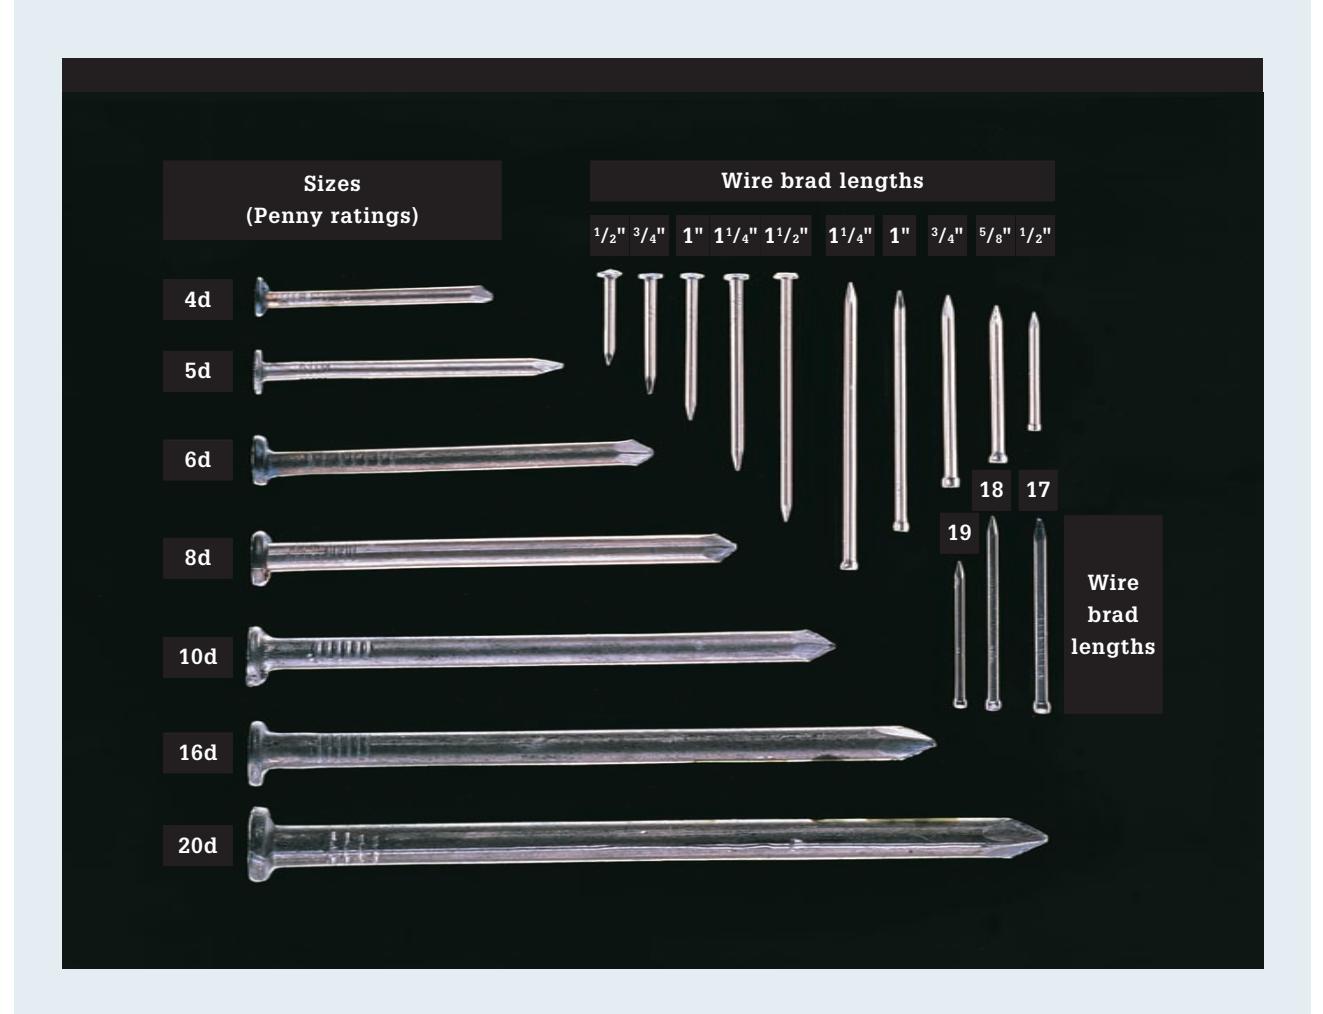
The pennyweight scale that manufacturers use to size nails was developed centuries ago as an approximation of the number of pennies it would take to buy 100 nails of that size. The range of nail types available today (and what they cost) is much wider, but the scale is still in use. Each pennyweight refers to a specific length (see chart, below), although you will find slight variations in length from one nail type to the next. For example, box nails of a given pennyweight are roughly 1 ⁄8" shorter than common nails of the same weight.
### Estimating Nail Quantities
Estimate the number of nails you'll need for a project, then use the chart to determine approximately how many pounds of nails to purchase.
*Note: Sizes and quantities not listed are less common, although they may be available through some manufacturers.*
| | Pennyweight | 2d | 3d | 4d | 5d | 6d | 7d | 8d | 10d | 12d | 16d | 20d |
|---------------|---------------|------|-----|-----|-----|-----|-----|-----|-----|-----|-----|-----|
| | Length (in.) | 1 | 1¼ | 1½ | 1⅝ | 2 | 2⅛ | 2½ | 3 | 3¾ | 3½ | 4 |
| Nails per lb. | Common | 870 | 543 | 294 | 254 | 167 | | 101 | 66 | 61 | 47 | 29 |
| | Box | 635 | 473 | 406 | 236 | 210 | 145 | 94 | 88 | 71 | 39 | |
| | Cement-coated | | | 527 | 387 | 293 | 223 | 153 | 111 | 81 | 64 | 52 |
| | Finish | 1350 | 880 | 630 | 535 | 288 | | 196 | 124 | 113 | 93 | 39 |
| | Masonry | | | 155 | 138 | 100 | 78 | 64 | 48 | 43 | 34 | |
## Screws & Other Hardware
The advent of the screw gun and numerous types of driver bits for drills have made screws a mainstay of the carpentry trade. With literally hundreds of different screws and types of fastening hardware available, there is a specific screw for almost every job. But, for most carpentry jobs you will only need to consider a few general-purpose types. Although nails are still preferred for framing jobs, screws have replaced nails for hanging wallboard, installing blocking between studs, and attaching sheathing and flooring. Screws are also used to attach a workpiece to plaster, brick, or concrete, which requires an anchoring device (opposite page, top).
Screws are categorized according to length, slot style, head shape, and gauge. The thickness of the screw body is indicated by the gauge number. The larger the number, the larger the screw. Large screws provide extra holding power; small screws are less likely to split a workpiece. There are various styles of screw slot, including Phillips, slotted, and square. Square-drive screwdrivers are increasing in popularity because they grip the screw head tightly, but Phillips head screws are still the most popular.
### Wallboard Screws & Deck Screws
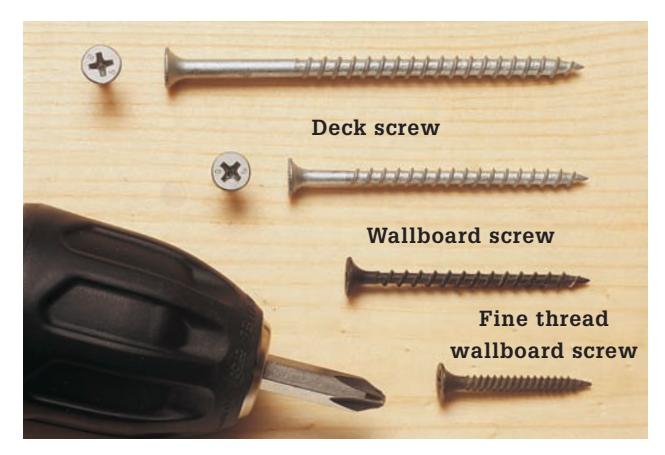
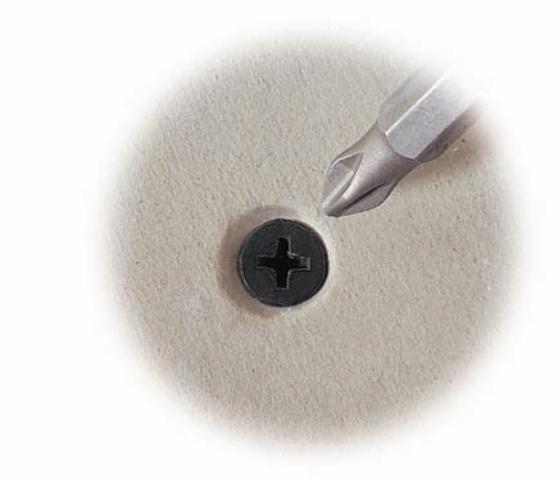
**Use wallboard screws** for general-purpose, convenient fastening. Easily recognizable by their bugle-shaped heads, wallboard screws are designed to dimple the surface of the wallboard without ripping the facing paper (see photo, right). However, they are often used for non-wallboard projects because they drive easily with a drill or screw gun, don't require pilot holes, and seldom pop up as wood dries. In soft wood, the bugle-shaped heads allow the screws to countersink themselves. Deck screws are corrosion-resistant wallboard screws made specifically for outdoor use.
### Using Masonry & Wall Anchors
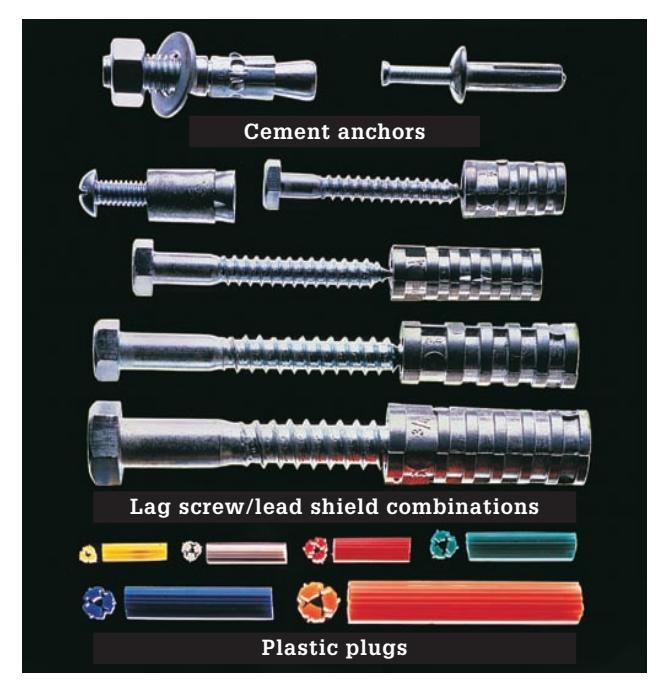
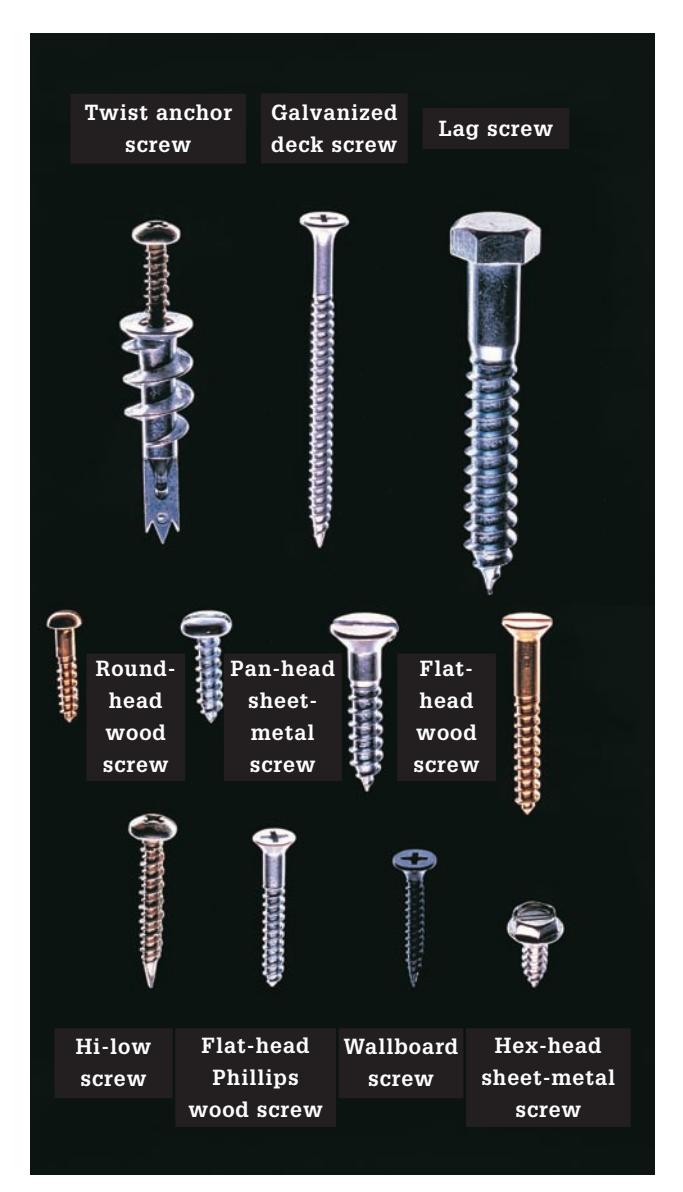
**Use wall anchors** to attach hardware or lumber to plaster, concrete, or brick. Choose an anchor that is equal in length to the thickness of the wall's surface material. Plastic plugs are used for anchoring in hollow walls.
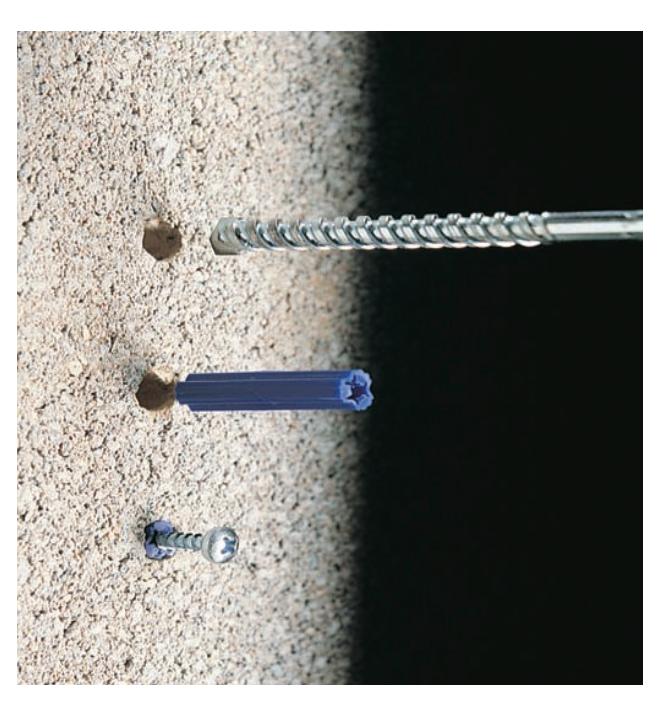
**To install a wall anchor,** drill a pilot hole equal in diameter to the plastic anchor. Insert the anchor in the hole and drive it flush with the wall surface. Insert the screw and tighten it; as the anchor expands, it will create a tight grip.
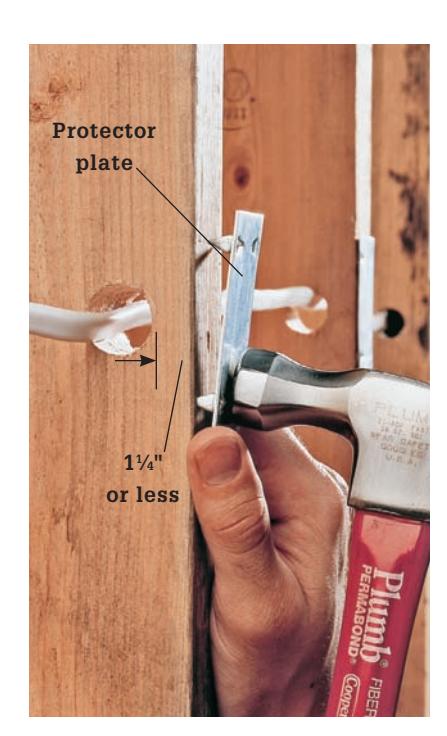
**Use protector plates** where wires or pipes pass through framing members and are less than 11 ⁄4" from the edge. The plates prevent wallboard screws or nails from puncturing wires or pipes.
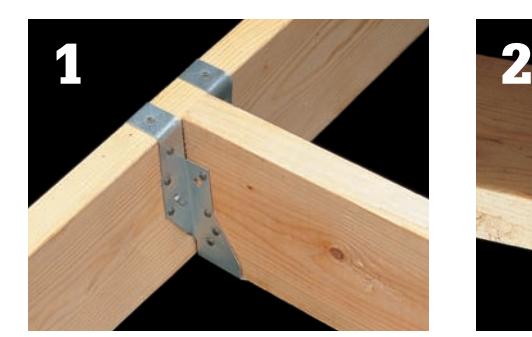
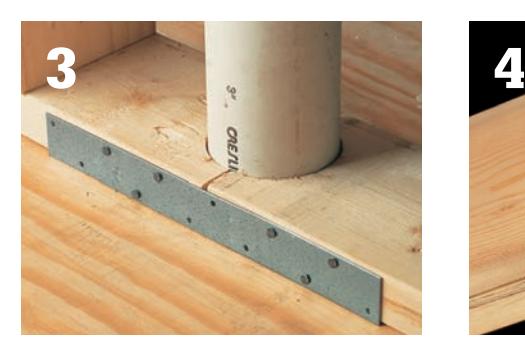
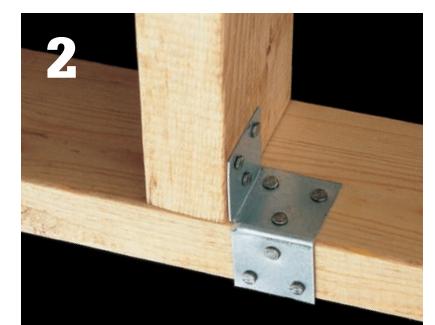
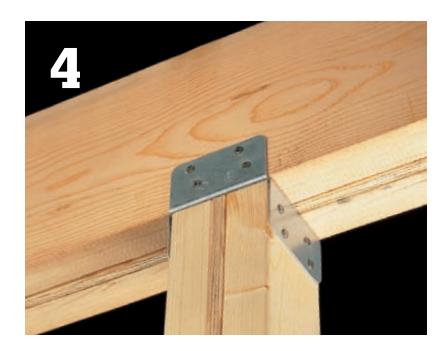
**Metal framing connectors** may be required in some communities, especially in areas prone to high winds or earthquakes. Metal joist hangers (1), stud ties (2), connector straps (3), and post-and-beam saddles (4) all provide extra reinforcement to structural joints. Wood joints made with metal connectors are stronger than toenailed joints.
## Glues & Adhesives
When used properly, glues and adhesives can be stronger than the materials they hold together. Use hot glue in lightweight woodworking projects, carpenter's glue for wood joints, and carpentry adhesive for preliminary installation of thin panels and lumber. Panel adhesive, a thinner formula that can be applied from a tube or with a brush, is used to install paneling, wainscoting, and other lightweight tongue-and-groove materials. Most caulk is applied with a caulk gun, but some types are available in squeeze tubes for smaller applications. Caulks are designed to permanently close joints, fill gaps in woodwork, and hide subtle imperfections. Different caulks are made of different compounds and vary greatly in durability and workability. While silicone caulks last longer, they are not paintable and are difficult to smooth out. Latex caulks are less durable than silicone, but are much easier to work with, especially when used to hide gaps. Many caulks are rated on scales of 1 to 4 to indicate how well they bond to masonry, glass, tile, metals, wood, fiberglass, and plastic. Read the label carefully to choose the right caulk for the job.
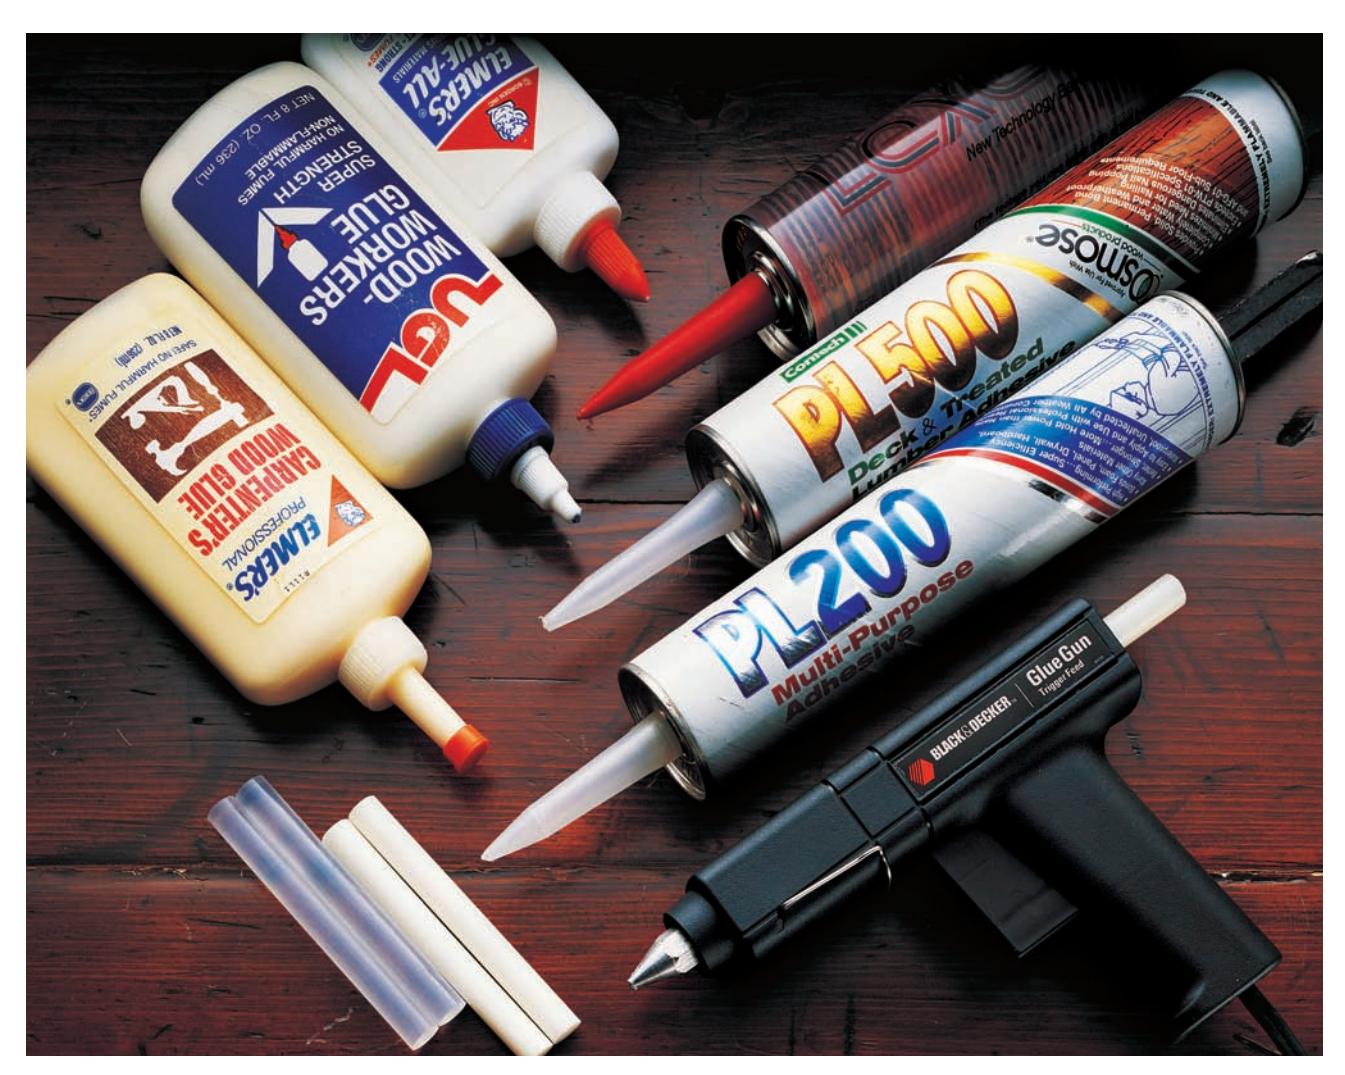
Carpentry adhesives include (clockwise from top right): clear adhesive caulk, for sealing gaps in damp areas; waterproof construction adhesive, for bonding lumber for outdoor projects; multi-purpose adhesive, for attaching paneling and forming strong bonds between lumber pieces; electric hot glue gun and glue sticks, for bonding small decorative trim pieces on built-ins; wood glues and all-purpose glue, for many woodworking projects.
### Using Adhesives & Glues
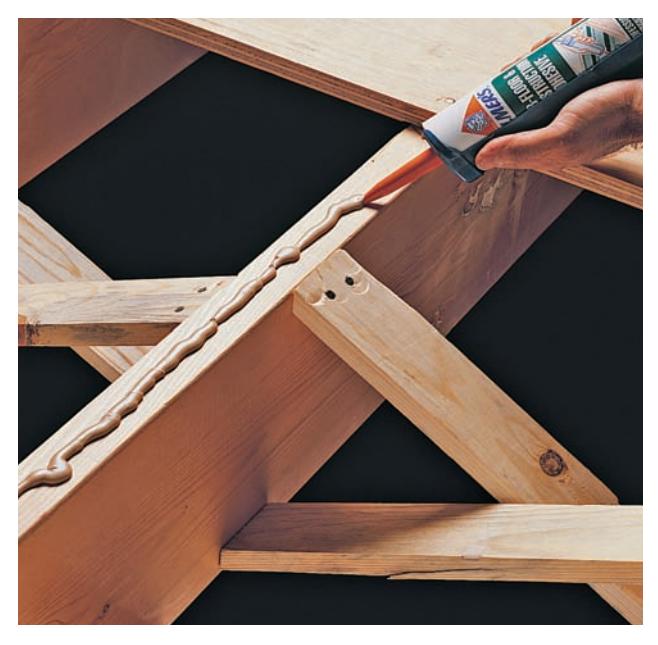
**Strengthen floors and decks** and reduce squeaks with joist and deck adhesive. For outdoor applications, make sure you choose a waterproof adhesive.
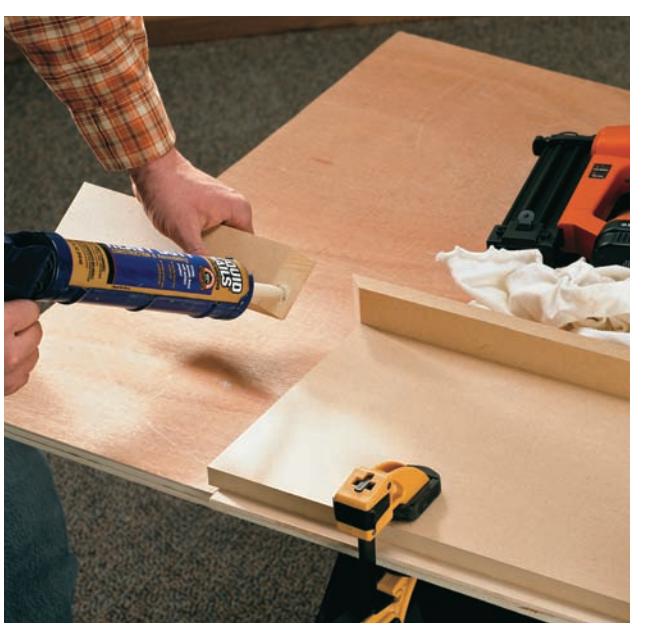
**Construction adhesive** adds strength to carpentry and woodworking joints. It also has two advantages over glue. It has high initial tack, so parts don't slide apart, and it retains some flexibility after drying.
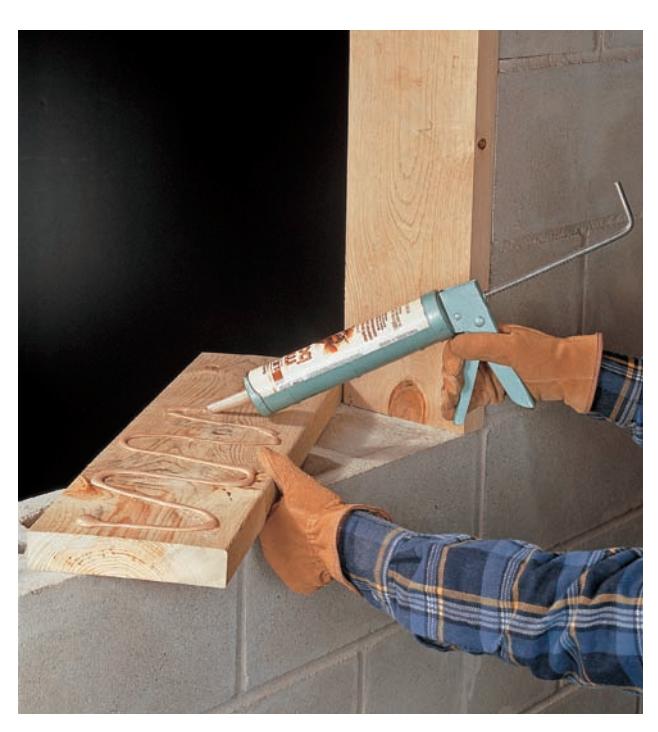
**Exterior-grade construction adhesive** fortifies the bond between wood structural members and the masonry house foundation. Additional fasteners, such as powder-actuated nails, are still needed.
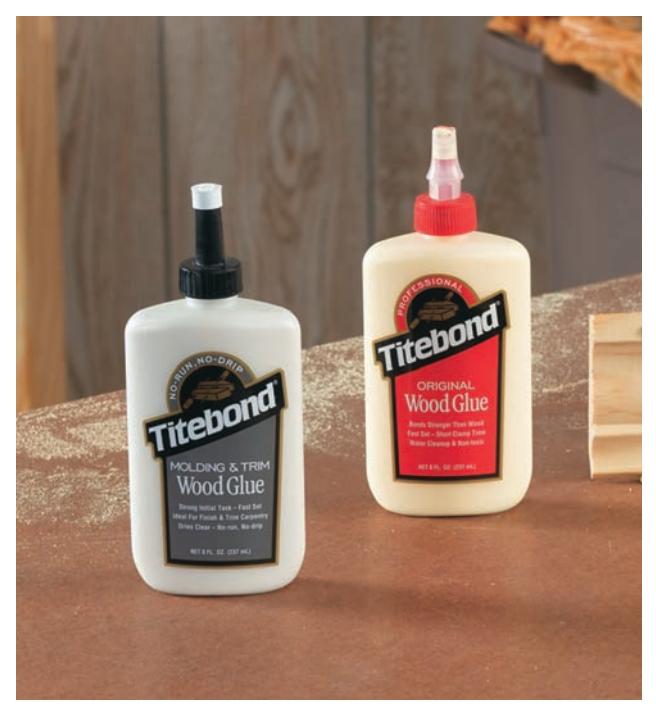
**Specialty molding and trim** glue has a thicker formulation than standard wood glue to resist running and dripping on vertical surfaces. It is tackier than regular glue, which helps hold ceiling trims in place when they are positioned, creating a small amount of time for you to fasten them with nails.
## Tools & Skills
Whether you are framing a wall, removing a window, or planing a new door to fit its jambs, carpentry projects require an assortment of different tools. This chapter will familiarize you with those tools, offering helpful information regarding techniques, blade or bit options, and tool maintenance.
### In This Chapter:
- Prying Tools
- Measuring & Marking Tools
- Handsaws
- Hammers
- Screwdrivers
- Clamps & Vises
- Chisels
- Planes & Surface Forming Rasps
- Extension Cords
- Jigsaws
- Circular Saws
- Straightedge Guides
- Power Miter Saws
- Table Saws
- Drills & Bits
- Sanders
- Pneumatic Nailers
- Powder-Actuated Tools
- Specialty Tools
### Carrying Your Tools
Carpentry jobs are easier when your tools are organized in a tool belt, because you spend less time searching for the right tool.
Standard features for tool belts include slots for screwdrivers, files, a carpenter's pencil, and a utility knife; at least one hammer loop; and a deep pouch or two for carrying nails and screws. Many belts also have a slot for a tape measure and a hook for hanging a small level.
Think about the tools you most often use, and choose a tool belt that has the right number of slots, pockets, or loops for your tool load. The more varied the tasks you'll be handling, the more elaborate your belt should be. If you'll only be framing, a simple canvas nailing apron with a hammer loop may be all you need.
If you carry a lot of tools on your belt, a pair of suspenders can be useful. Suspenders reduce some of the weight on your hips. Several companies offer suspenders designed to attach to your tool belt.
For projects that require tools you can't fit into your belt, consider using a bucket apron (page opposite).
If you plan to carry a drill, you may want to purchase a separate drill holster with slots for commonly used bits.
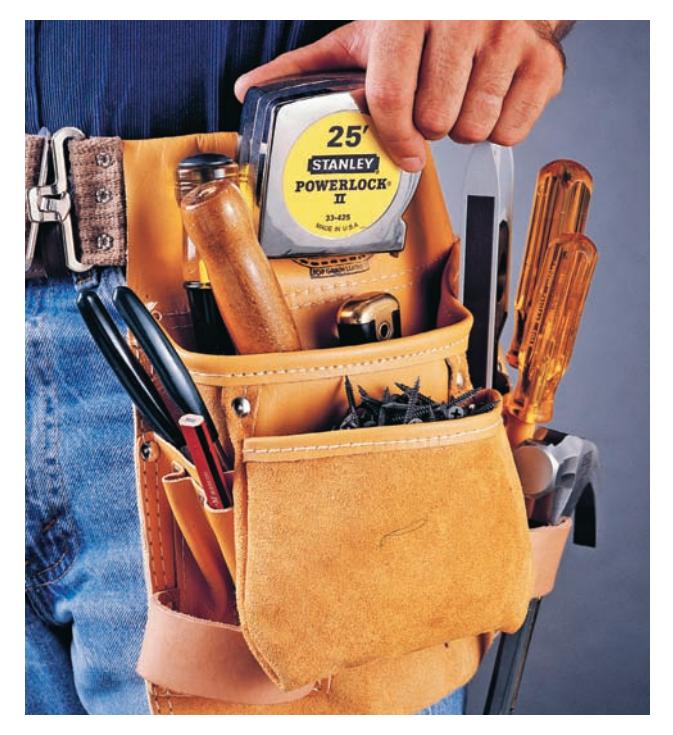
**There are two basic types** of tool belts: apron-style and side-mounted bags (shown here). Side bags don't get in your way when you crouch, and make the tools easier to reach. However, it is easier to squeeze between wall studs while wearing an apron-style belt.
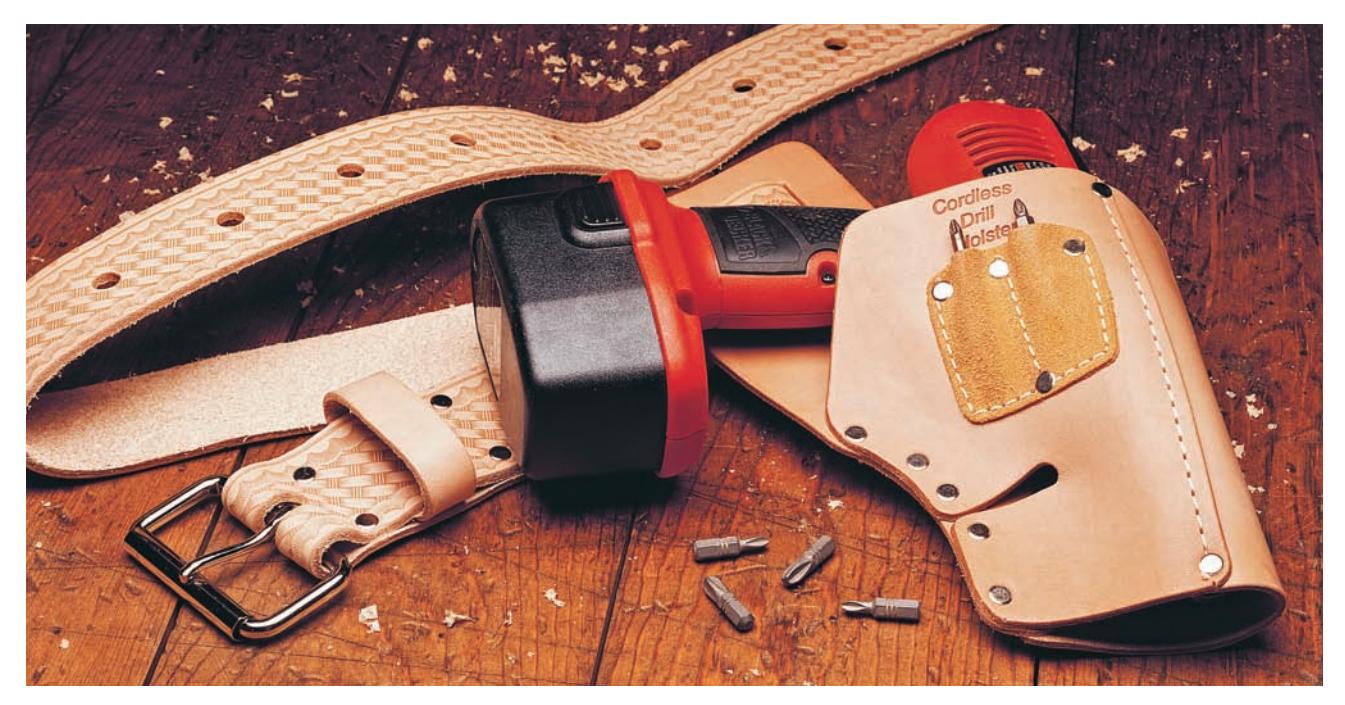
**Optional belt attachments,** such as holsters for drills, help organize your tool load. They can be worn alone or with other tool bags.
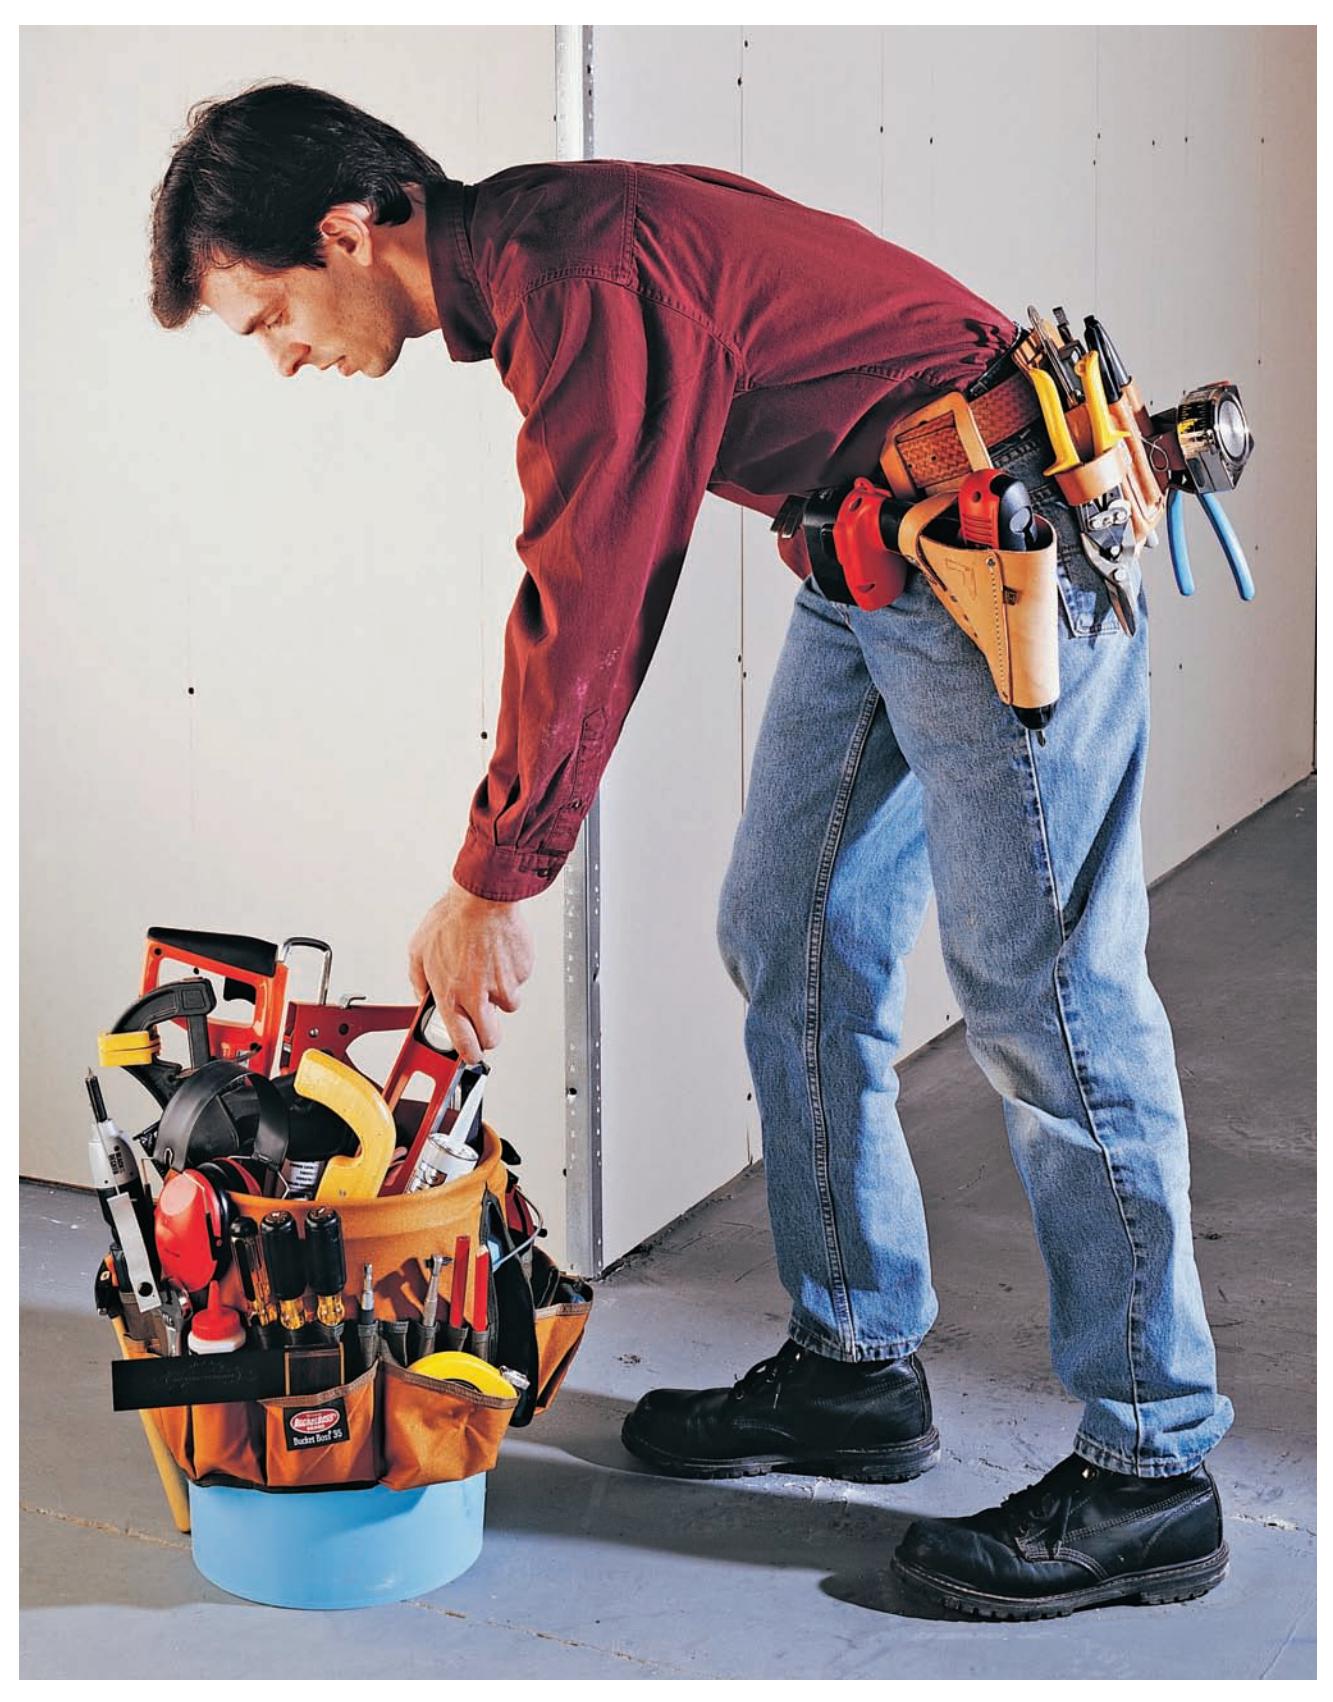
**Use a tool bucket** for larger or less frequently needed tools and a tool belt for quick access to small tools. The bucket apron is a convenient way to carry specialty tools that will not fit into your tool belt, such as a long level or a caulk gun. The tool bucket also allows several people to share tools.
## Prying Tools
Prying tools are an essential part of any carpenter's tool arsenal, because many carpentry projects start with the removal of existing materials. With the right tools, you can often remove nails without damaging the lumber, so that it can be used again.
Pry bars are available in many sizes. Choose quality pry bars forged from high-carbon steel in a single piece. Forged tools are stronger than those made from welded parts.
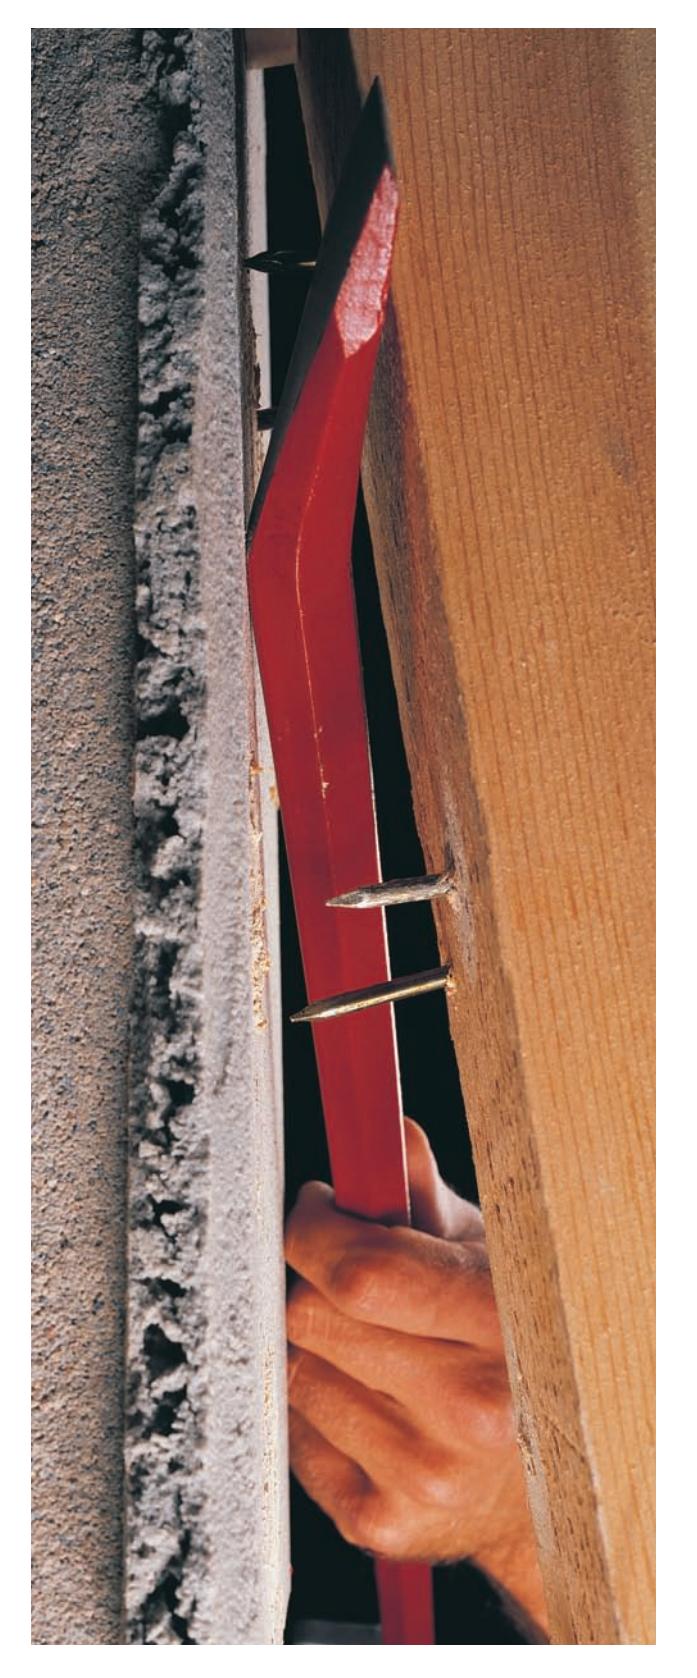
Most pry bars have a curved claw at one end for pulling nails and a chisel-shaped tip at the opposite end for other prying jobs. You can improve leverage by placing a wood block an inch or two away from the material you're trying to pry loose.
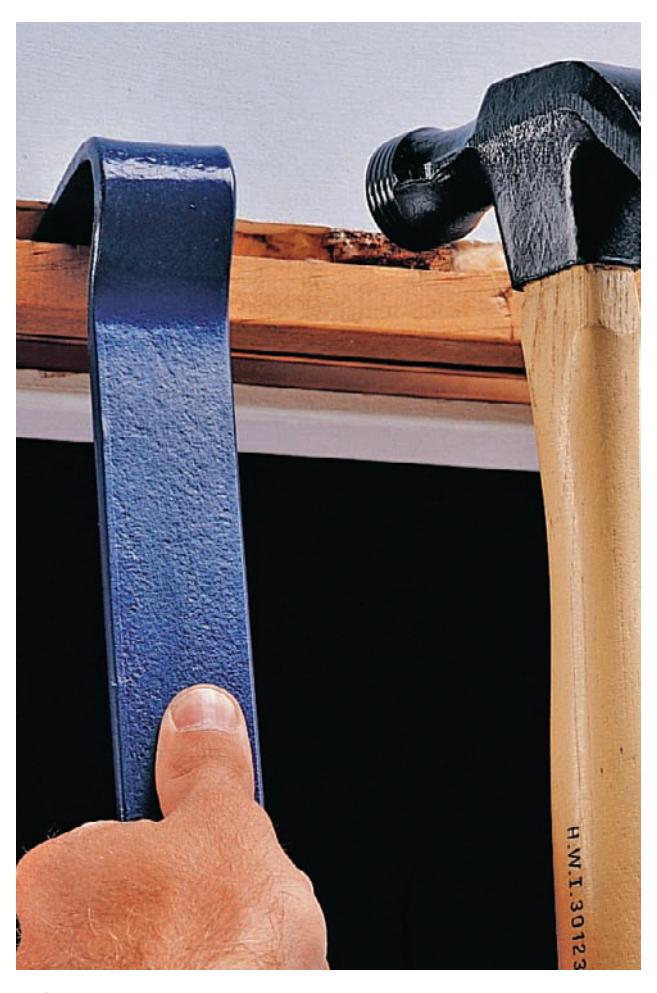
A flat bar is made of flattened, slightly flexible steel. This tool is useful for a variety of prying and demolition jobs. Both ends can be used for pulling nails.
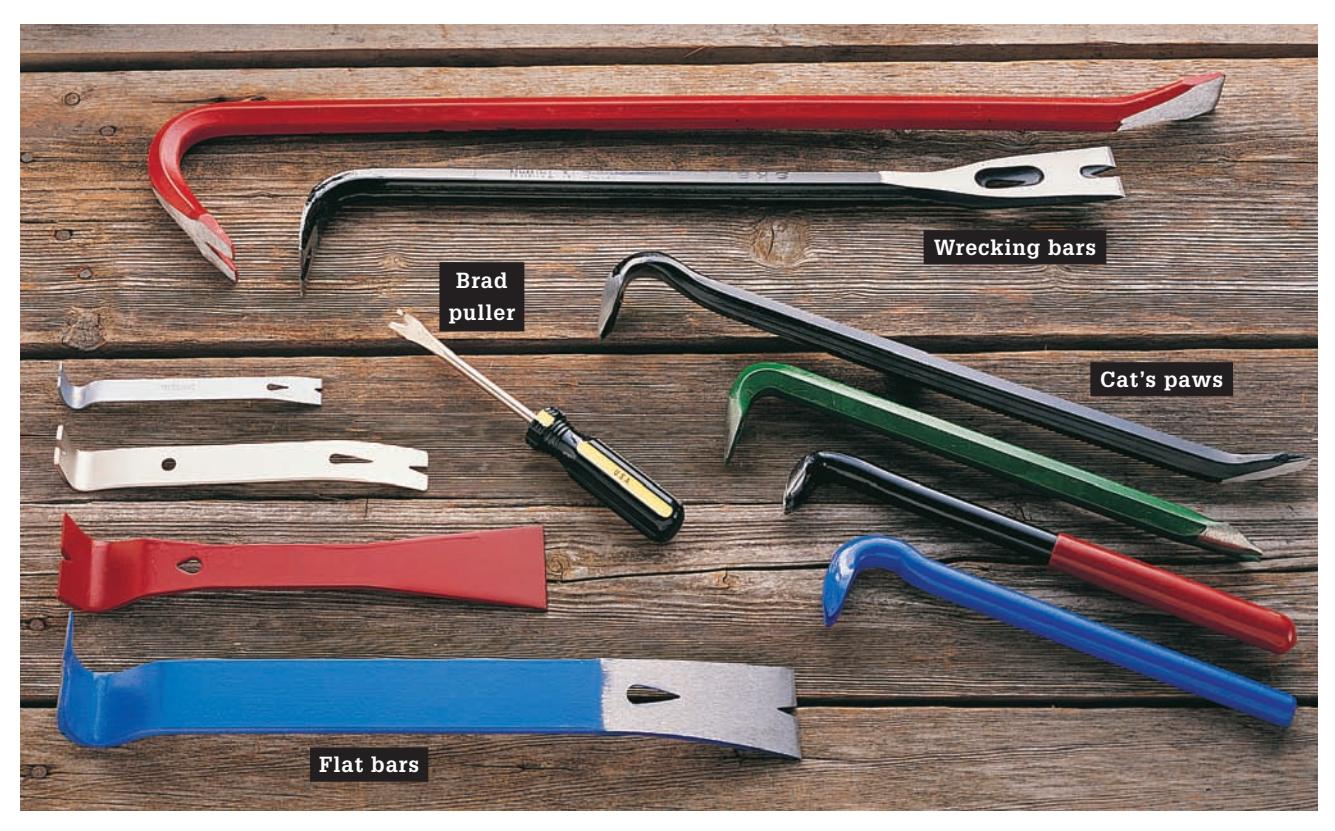
**Prying tools include** wrecking bars for heavy demolition work, cat's paws for removing nails, and a brad puller. Flat bars are made of flattened steel and come in a variety of sizes for light- and heavy-duty use.
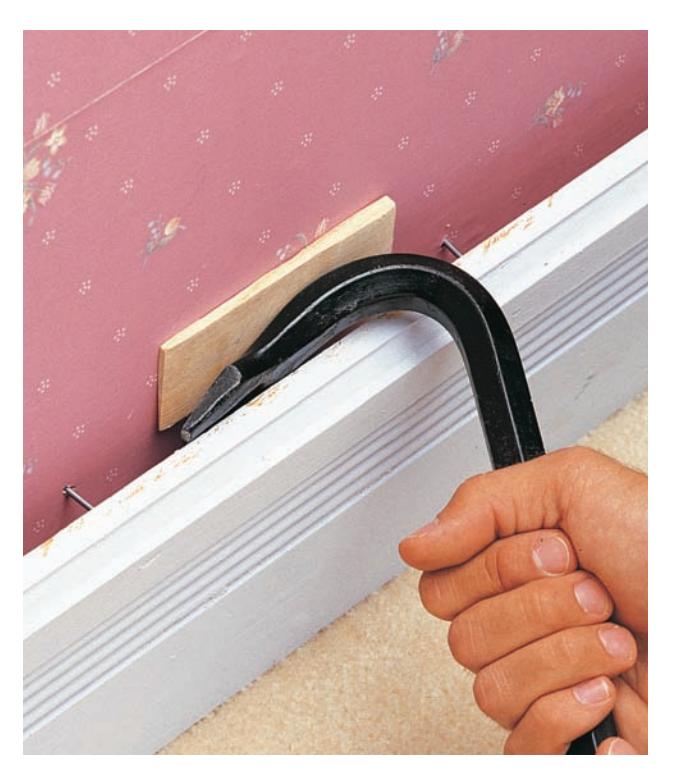
**A wrecking bar,** sometimes called a crowbar, is a rigid tool for demolition and heavy prying jobs. Use scrap wood under the bar to protect surfaces.
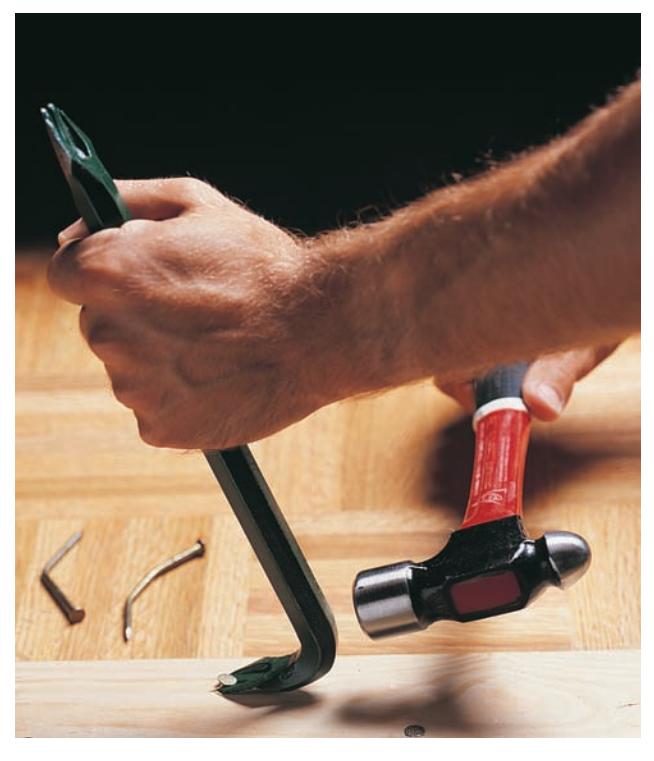
**A cat's paw** has a sharpened claw for removing stubborn nails. Use a hammer to drive the claw into the wood under the nail head, then lever the tool to pull up the nail.