GREENHOUSES
Build Your Own Greenhouses, Hoophouses, Cold Frames + Greenhouse Accessories
 {alt=”Greenhouse exterior with plants”}
Contents
| Introduction | 7 |
|---|---|
| Greenhouses | 9 |
| Choosing a Greenhouse | 10 |
| Siting Your Greenhouse | 16 |
| Greenhouse Elements | 18 |
| Greenhouse Styles | 46 |
| Gallery of Greenhouses | 52 |
| Greenhouse Projects | 67 |
| Custom Victorian Greenhouse | 68 |
| DIY Gabled Greenhouse | 88 |
| Freestanding Kit Greenhouse | 94 |
| PVC Hoophouse | 102 |
| Shed-Style Greenhouse | 108 |
| Sunrooms | 122 |
| Low-Maintenance Sunroom | 126 |
| Upcycled Greenhouses + Cold Frames | 135 |
| Where to Start | 136 |
| The Materials | 137 |
| Upcycled Projects | 140 |
| 5-Gallon Bucket Cold Frame | 142 |
| Old-Window Greenhouse | 148 |
| Old-Window Portable Cold Frame | 156 |
| Tree Branch Hoophouse | 160 |
| Pallet-Wood Cold Frame | 164 |
| Greenhouse Companion Projects | 169 |
| Cold Frame Box | 170 |
| Jumbo Cold Frame | 174 |
| Freestanding Cold Frame | 180 |
| Raised Planting Bed | 186 |
| Raised Planting Bed + Cover | 188 |
| Tent Cold Frame | 194 |
| Seed Starter Rack | 198 |
| Greenhouse Workbench | 202 |
| Built-In Potting Bench | 206 |
| Simple Potting Bench | 210 |
| High-Low Potting Bench | 214 |
| Lettuce Table | 218 |
| Trellis Planter | 222 |
| Planter with Hanging Trellis | 226 |
| Solar Produce Dryer | 232 |
| Resources/Photo Credits | 235 |
| Metric Conversion Charts | 236 |
| Index | 238 |
Introduction
Home greenhouse gardening could not be better suited to our tumultuous times. Never has there been a greater assortment of greenhouse and cold frame options available to the home gardener, and never has home gardening been more important on both the personal and global levels.
Start with the personal. A global pandemic has taught us that the food chain is a fragile thing. Food prices climb ever higher and eating organic and healthy is harder day by day. But not if you grow what you eat. A greenhouse can be your way to have a bumper crop of your favorite edibles, even in the depths of winter.
It’s not all about food, though. You can just as easily grow work-of-art flowers like orchids that might not otherwise survive in your garden. There is a place in every life and every home for beautiful blooms and foliage. Those, too, enrich our lives. The right greenhouse can help you cultivate your favorite flowers, regardless of how exotic they may be.
Beyond the practical, greenhouse gardening is just plain relaxing and rejuvenating. It’s an enjoyable way to get outside, get a little exercise, do something entirely productive and positive, and unplug for awhile from our hectic, fast-paced, techdriven world. There is also that incredibly rewarding satisfaction of eating something you grew with your own two hands and the sweat of your effort. There is no price tag for that particular feeling.
That’s a lot of upside, but the many benefits of home-based greenhouse gardening do not stop at the boundaries of your backyard. As climate change accelerates and wreaks havoc across the country and around the globe, individuals often feel powerless to have any kind of impact. They are not. Growing food in a greenhouse is something any homeowner can do to help the environment. That’s food that won’t use fossil fuels to find its way to your kitchen table. Greenhouse gardeners can also turn kitchen scraps into precious compost, keeping that waste out of landfills.
The biggest challenge? Simply getting started. Fortunately, that’s where this book shines. You’ll find all the information you need to decide on a size and type of greenhouse that will be best for you, your yard, and your life. The chapters that follow sort out whether you should choose plastic or glass, the frame material that will serve your situation and needs, and the type of tech that will best accommodate your particular style of gardening.
Sifting through the choices is key, and you’ll find a wealth of advice here to help you do just that. As fun and rewarding as greenhouse gardening can be, it has to fit into your household budget. So, while we cover the amazing new tech in greenhouse gardening—such as smart phone–connected hygrometers, thermometers, and heaters—we’ll also help you make the hard decisions about which are most affordable and useful for your needs.
Greenhouses
It’s the golden age of hobby greenhouse gardening. The good news? You’ll enjoy an incredible diversity of structural, equipment, and add-on options. The bad news? You’re faced with an incredible diversity of structural, equipment, and add-on options. Sifting through all the variables can be daunting. For what is in theory a fairly simple structure, the reality is anything but.
You can have a heated glass greenhouse, a plasticdraped three-season hoophouse, or something completely different. You might go with a concrete foundation, a brick floor, no foundation at all, or something else entirely. Perhaps you need to create a humid environment to coddle exotic flowers or are better served with diffused light and UV protection to create an ideal growing environment for seedlings and young tender plants.
It’s an awful lot to consider, but there is no need to feel overwhelmed. This detailed chapter is meant to set you up with all the basic knowledge any home gardener needs to purchase, erect, and make the most of a hobby greenhouse. You’ll find guidance on what equipment you need, and what you don’t. You’ll learn all about proper positioning of a backyard greenhouse to take advantage of the growing day. There’s in-depth information about how local climate can affect the choices you make in setting up your greenhouse. All in all, it’s safe to say that this chapter provides just about all the information you could need or want to ensure gardening success.
In this chapter:
- Choosing a Greenhouse
- Your Greenhouse
- Greenhouse Elements
- Greenhouse Styles
- Gallery of Greenhouses
Choosing a Greenhouse
There are so many hobby (or “starter”) greenhouse options, even beyond the available selection of sizes and shape, that it is quite easy to feel daunted at the prospect of starting to shop for your own backyard grow structure. Take a step back, breathe, and consider a few key questions. The answers will give you clear direction on your final selection.
- 1. Plants. What will you grow in your greenhouse? Will you just harden off seedlings or extend the season for a few vegetables? A small, unheated PVC structure might serve your needs. Starts and seedlings require different lighting and conditions than established, mature plants. Are you hoping to create a cornucopia of blooms by growing flowers? Or do you want to save some money by growing your own produce. How big will the plants get? What are their special needs? All of those factors may lead you to a more permanent structure with a sturdier frame and glass panels.
- 2. Budget. How much are you ready to invest—in both money and time—into your greenhouse gardening adventure? Keep in mind that some types of greenhouse plants, like fruits and vegetables, can pay you back handsomely in savings on your grocery bill. Ultimately, the money you’re willing to spend will narrow the size and type options from which you can select.
- 3. Local climate. This factor, in combination with the plants you hope to grow, will have the most significant impact on your final choice of greenhouse. If you’re simply looking to extend the growing season at both ends, and your local climate is relatively mild, a basic unit will serve your needs. If, however, you want to do more extensive four-season gardening, or your local area is subject to temperature extremes, expect to pay more for the structure and equipment that works best under those conditions.
- 4. Style, size, and shape. The actual size of greenhouse that suits you best and the type that appeals to you will lead you to particular units. Are you okay with the informal look of a hoophouse, or would you prefer a more fully featured Victorian? That decision may also be driven to some degree by the look you want for your landscaping. Are you hoping the greenhouse will be a stunning decorative feature in its own right, or are you focused on practicality and function?
The majority of greenhouses are simple rectangles (except for the rare octagonal model or geodesic dome), but they come in a long list of widths and lengths. Measure the space you have available and note the sun exposure. Consider how tall your plants will be and how much room you want to move around inside. Understand that most hobby greenhouse gardeners regret buying too small, not too large. You’ll likely put any extra space in the greenhouse to good use.
5. Heat, water, and ventilation. Unheated greenhouses are usually used just to extend the growing season for hardy and half-hardy plants. The greenhouse may offer some frost protection, but will be used only in spring, summer, and fall. A heater makes any greenhouse more versatile, increasing the growing period to four seasons and expanding the variety of plants you can grow. You’ll also need to determine if you want water run to the greenhouse by way of a hose, or if you want to actually plumb the structure. Misters and grow lights are additional features that can increase greenhouse usability.

The Cost Question
Greenhouse prices vary to extremes. You can spend around $100 for a simple, portable zip-up greenhouse, or splurge on a full-size, well-outfitted, custom glass Victorian with bespoke foundation, as a package running as much as $25,000. Your budget, however, is particular to you. Here are what you can expect to find at different levels of expense:
$ ($60-$500)
- 5-foot-square mini “pop-up” greenhouse.
- 6 × 8 basic greenhouse with polycarbonate panels.
- 6½ × 6½ prefab hoophouse with flap or roll-up door.
$$ ($500-$2,500)
- 8 × 4 attached aluminum-frame lean-to with polystyrene panels and an operable door.
- 16 × 20 hoophouse kit with PVC tubing and frame door.
- 8 × 12 basic aluminum frame hobby greenhouse with polycarbonate panels and a framed door.
$$$ ($2,500+)
- 8 × 10 Victorian greenhouse with tempered glass, aluminum frame, automatic openers, and multilevel adjustable shelves.
- 8 × 12 farmhouse style greenhouse with louvered windows, auto-opening vents and double doors.
- 10 × 26 bell-shaped tunnel, with two doors and vents.
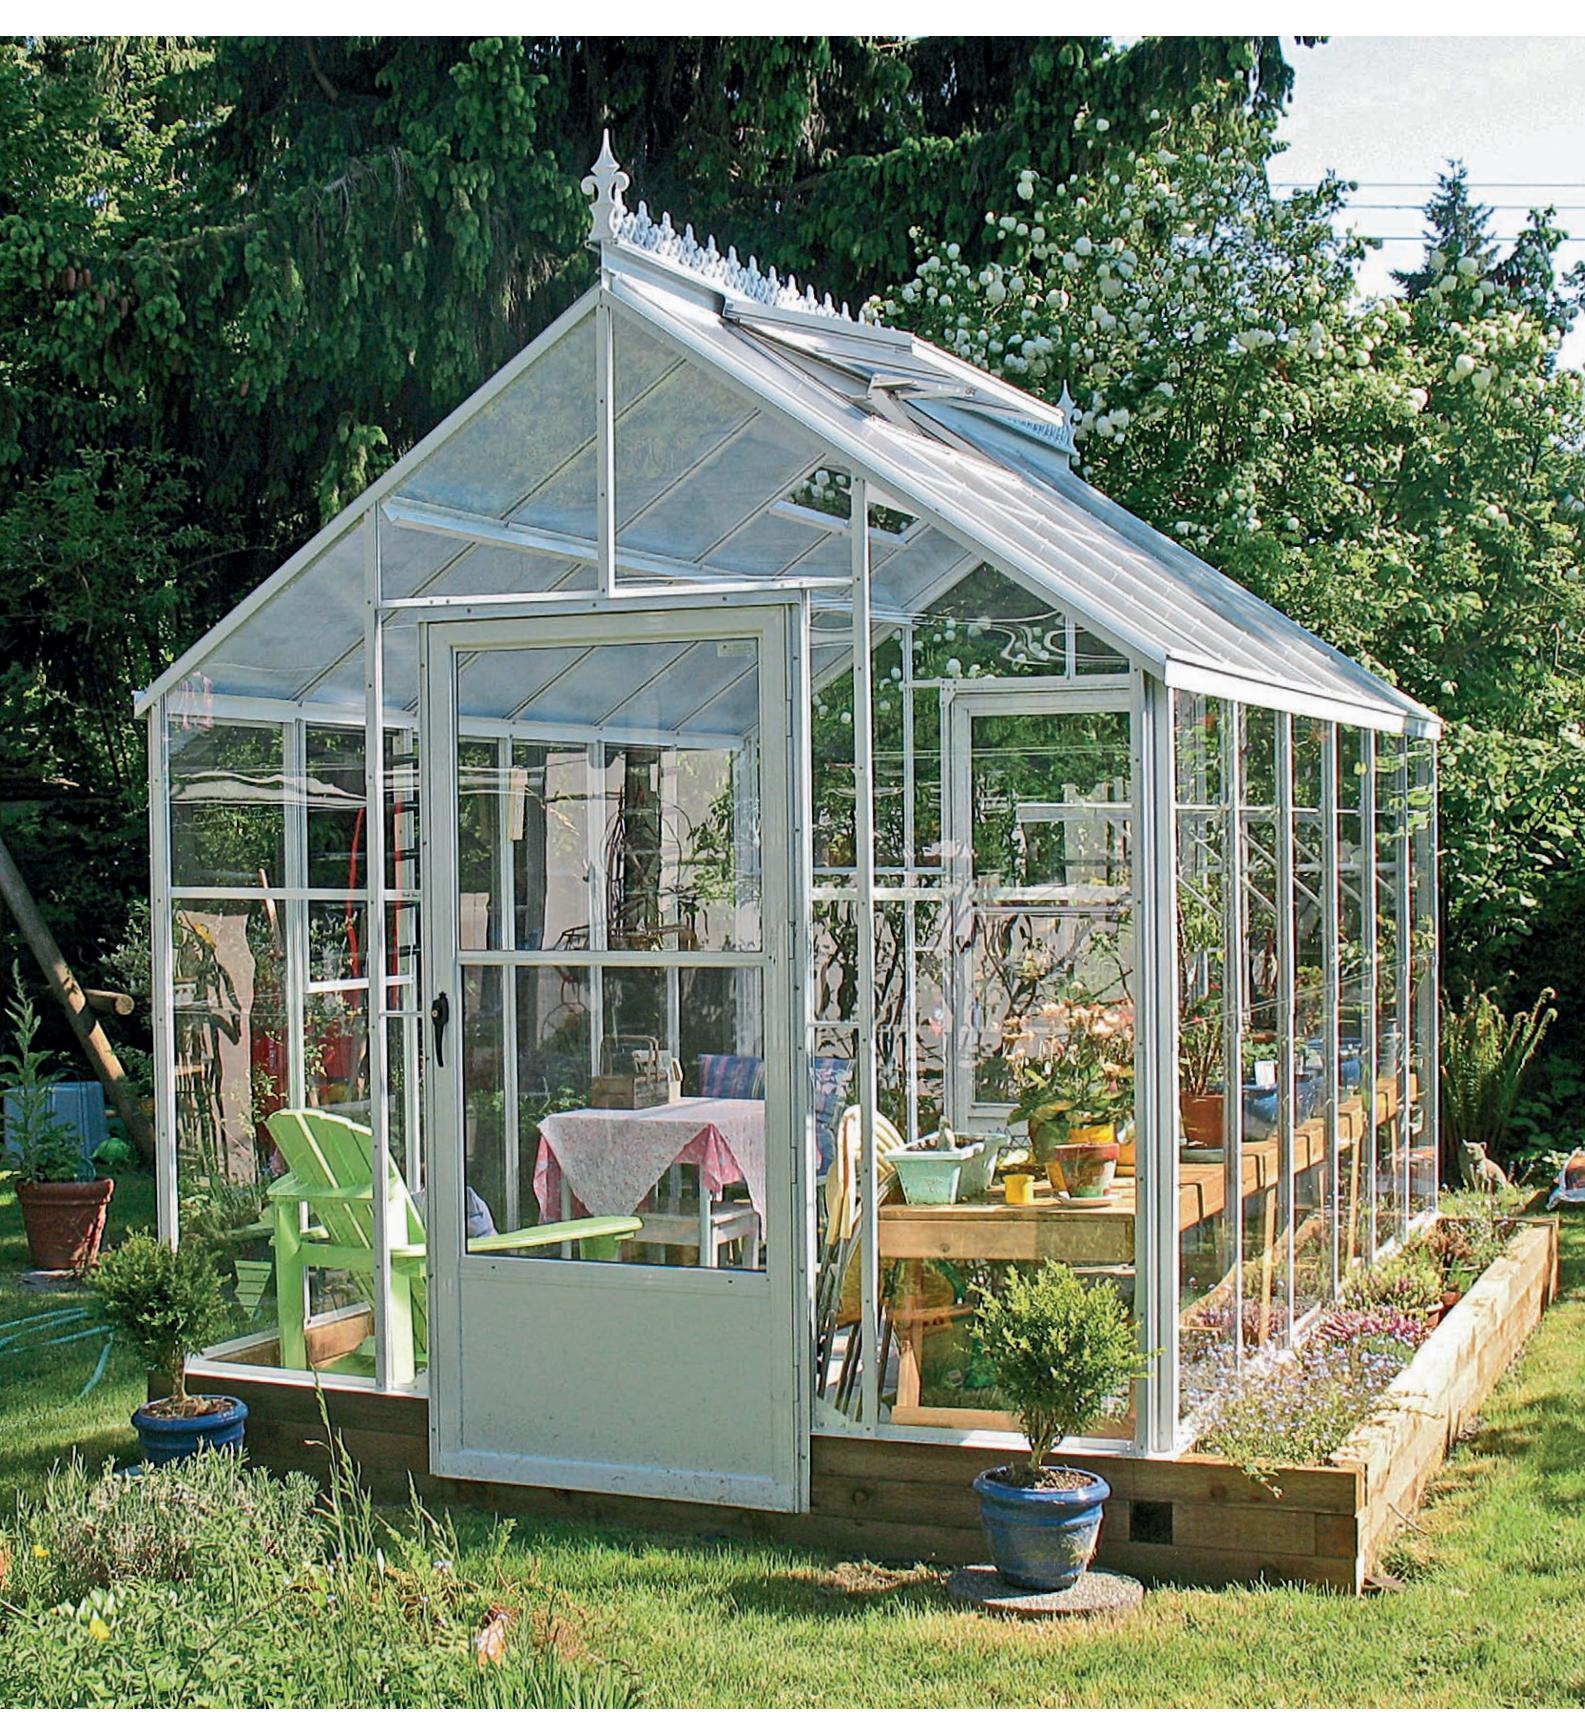
This large Victorian-style glass greenhouse features a “drop” door—a door that extends down below the original threshold of the greenhouse to accommodate the height of a foundation wall. The steep roof pitch and distinctive top crest create an eye-catching formal visual with plenty of space inside for growing a variety of plants or just relaxing in the warmth of the sun.
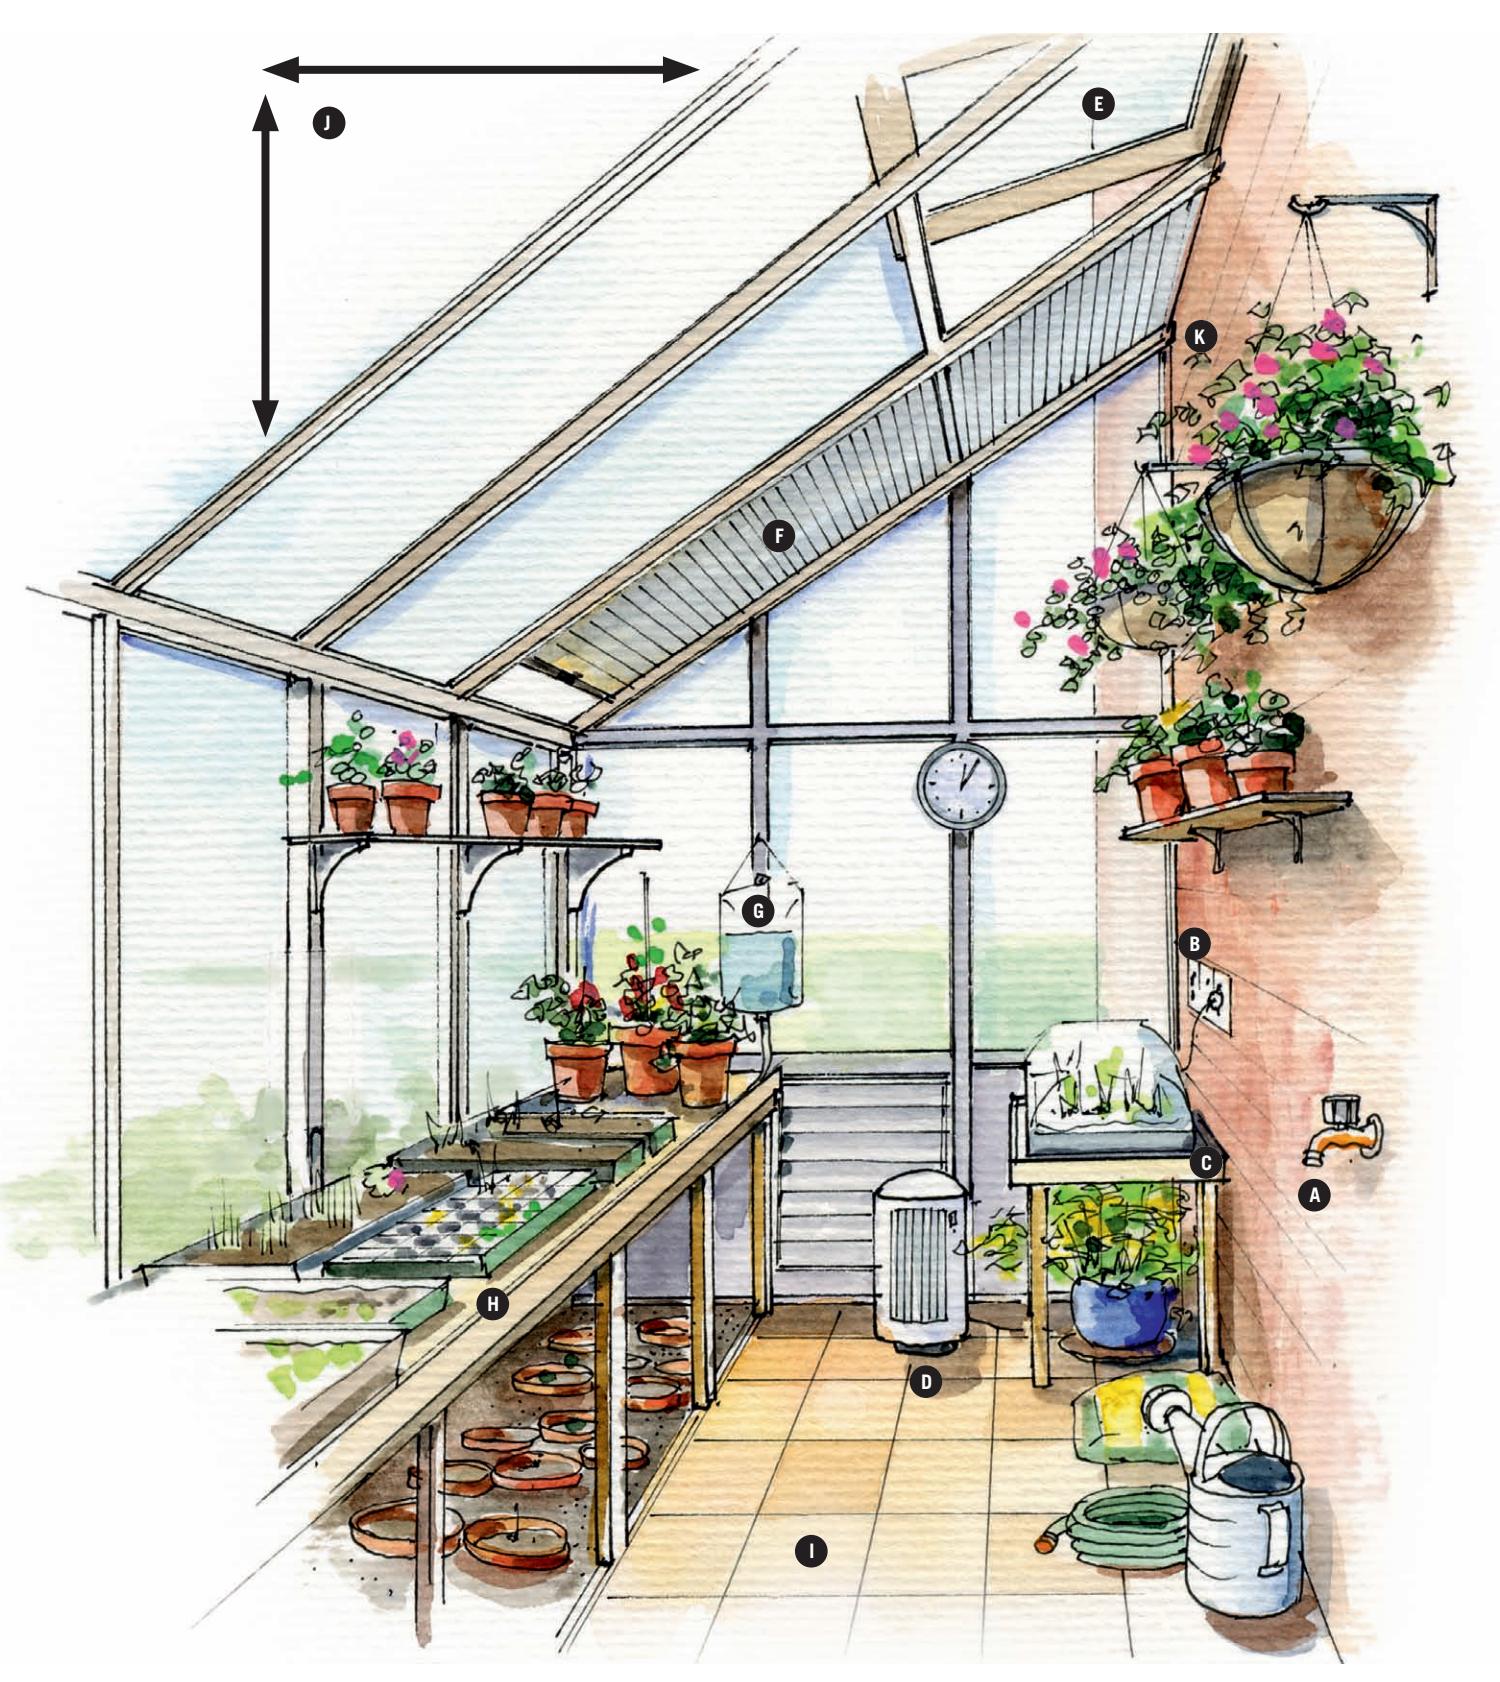
Attached to the exterior wall of the house, this lean-to-style greenhouse has all the features for complete growing success: running water (A); electrical service (B); a heated plant-propagation table (C); a heater (D) for maintaining temperatures on cold nights; ventilating windows (E) and sunshades (F) for reducing temperatures on hot days; drip irrigation system (G) for maintaining potted plants; a full-length potting bench (H) with storage space beneath; paved flooring (I) to retain solar heat. It also has the steep roof pitch (J) (expressed as the drop per foot, or 5/12 in this case), and permanent wall attachment (K).
Lean-to or Freestanding?
Hobby greenhouses can be divided into two basic categories: lean-tos and freestanding. Lean-to greenhouses are attached or butted to a wall of the house, while freestanding models can be placed anywhere in the yard that receives the appropriate sun exposure.
-
Lean-tos. Inexpensive lean-tos are simply butted against a flat, plumb wall surface. Slightly more expensive attached versions are physically fastened to the wall and the seams sealed to prevent heat loss. Both are normally positioned on an unshaded south-facing wall. The wall can be part of a shed, an outbuilding, or the main house.
Although they typically have less floor space inside and less headroom because of a sharply pitched roof, lean-tos can take advantage of close proximity to the home’s plumbing and electrical connections. The lean-to can also benefit from the home’s heating. This type of greenhouse comes in several variations to suit location. Most are specifically meant to be connected to a side wall, while some are designed for gable-end wall placement. They can be simple plastic-covered, three-season enclosures, or can come equipped with glass or polycarbonate panels, vents, misters, fans, heaters and other accessories.
Lean-tos are dependent on the construction and siting of the host building. Highly textured or irregular walls do not provide a good seal for lean-to mating surfaces. In cold climates, they must be protected from heavy snow sliding from the house roof. The space inside a lean-to is by nature smaller than the potential space inside a freestanding greenhouse. Lean-tos are also prone to overheating when not properly vented.
-
Freestanding. Freestanding greenhouses can be portable or permanent, and come in a much wider range of sizes than lean-tos do. Portable freestanding greenhouses offer the potential to move when the homeowner does, or to be positioned differently if plants are not doing as well as they should. The more important advantage of this type over lean-tos is that four sides of glazing translates to much greater sun exposure.
However, a freestanding greenhouse is usually more expensive to build, and certainly more expensive to heat or plumb. Depending on the size, a freestanding unit may require a foundation be laid. These are also more exposed to the elements and subject to wind damage.

Heated Greenhouse Environments
Heated greenhouses are cool, warm, or hot. Each of these environments supports different plants and gardening activities.
Cool: Minimum Nighttime Temperature 45°F (7°C)
In a cool environment, you can start seeds and propagate cuttings early in the year so they will be ready for planting in garden beds at the beginning of summer. Unless your climate is mild, however, you’ll probably need a propagator to provide a little extra warmth for starting seeds. Vegetables and hardy and half-hardy plants do well in this type of greenhouse. Although the temperature in a cool greenhouse is suitable for protecting frost-tender plants, their growth during winter is minimal.
Warm: Minimum Nighttime Temperature 55°F (13°C)
A warm greenhouse is suitable for propagating plants, raising seedlings, and growing a wide range of plants, including flowers, fruits, houseplants, and vegetables, even during the coldest months. You can sow tomato seeds in January and harvest the ripe fruits in June. Though this type of greenhouse provides a highly desirable environment for plants, heating it can be extremely costly, especially if you live in an area with long, cold winters.
Hot: Minimum Nighttime Temperature 65°F (18°C)
Only a few serious gardeners will invest in a hot greenhouse because it is prohibitively expensive to heat. This type of environment is ideal for growing exotic tropical plants, such as orchids, bromeliads, and ferns.
How Big?
In all likelihood, you’ll shop for a greenhouse that fits the “hobby” category. Larger, estate greenhouses are categorized as “conservatories,” while much smaller greenhouses, which are usually portable, are labeled “mini.”
Some experts recommend buying the largest greenhouse you can afford, but this isn’t always the best advice. You don’t want to invest in a large greenhouse only to discover that you’re not up to the work it involves.
Of course, buying a greenhouse that is too small can lead to frustration if your plant collection outgrows the space. It is also much more difficult to control the temperature. One compromise is to buy a greenhouse that’s one size larger than you originally planned, or better yet, to invest in an expandable structure. Many models are available as modules that allow additions as your enthusiasm grows.
When choosing a greenhouse, take into account the size of your property. How much space will the structure consume? Most of the expense comes from operating the greenhouse, especially during winter. The larger the structure, the more expensive it is to heat.
Be sure the greenhouse has enough room for you to work. Allow space for benches, shelves, tools, pots, watering cans, soil, hoses, sinks, and a pathway through the plants. If you want benches on both sides, choose a greenhouse that is at least 8 feet wide by 10 feet long. Give yourself enough headroom, and allow extra height if you are growing tall plants or plan to hang baskets.
How Much Can I Afford to Spend?
Your budget will influence the type of structure you choose. A simple hoop greenhouse with a plastic cover is inexpensive and easy to build. If you’re handy with tools, you can save money by buying a kit, but if the greenhouse is large, requires a concrete foundation, or is built from scratch, you may need to hire a contractor, which will add to the cost.
Location is important. If you live in a windy area, you’ll need a sturdy structure. Buying a cheaply made greenhouse will not save you money if it fails to protect your plants or blows away in a storm. And cutting costs by using inefficient glazing will backfire because you’ll wind up paying more for heating.

Building Department Questions
Local building codes vary from region to region, but many dictate the type, size, and location of any greenhouse that may be placed on your property. Codes may also require a certain type of glazing—for instance, they may mandate that in a structure with glass panes, only tempered glass be used. That’s why it’s essential to do a little homework before you commit to buying or building your dream greenhouse. Here are a few basic questions every homeowner should ask the local building department:
- What type of foundation is required for a freestanding greenhouse? If compacted gravel is allowed as a foundation, how deep must the foundation go?
- Is there a minimum wind load required? Are anchors required? (Anchors are necessary for lighter greenhouses in areas that are commonly affected by high winds or extreme weather events.)
- What is the snow load per square foot or dead load required on the greenhouse?
- Does the structure need to be code compliant with the International Building Code (IBC) or Universal Building Code (UBC)? Which year?
- Do the building plans have to be site specific?
- Does the greenhouse have to be Americans with Disabilities Act (ADA) compliant?
How Much Time am I Prepared to Invest?
You may have big dreams, but do you have the commitment to match? Maintaining a successful greenhouse requires work. It’s not hard labor, but your plants depend on you for survival. Although technology offers many time savers, such as automated watering and ventilation systems, there’s no point in owning a greenhouse if you don’t have time to spend there. Carefully assess your time and energy before you build.
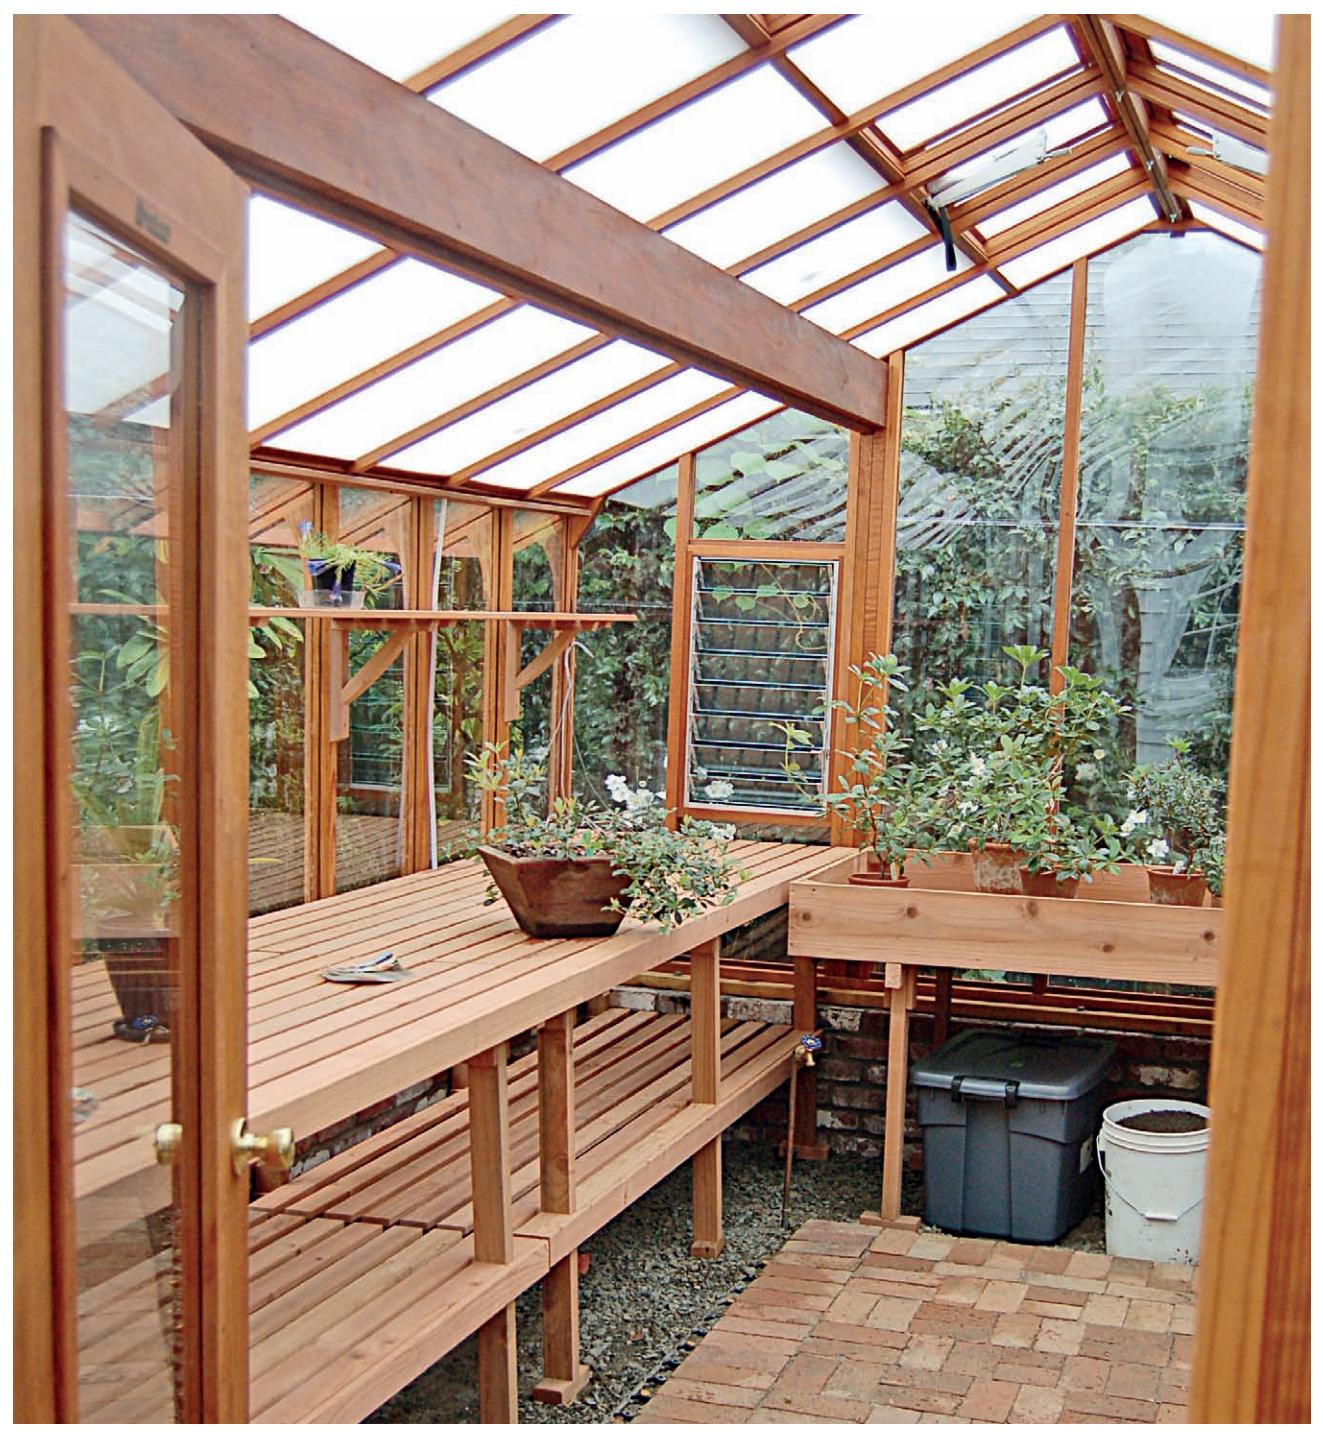 {alt=”A beautiful redwood-framed, prefab greenhouse with abundant counter, shelf, and work-surface space.”}
You might save money by choosing a smaller greenhouse, but if you don’t have usable room to grow everything you want to grow, you aren’t getting real value out of the structure. This beautiful redwood-framed, prefab unit may be a little pricey, but it offers abundant counter, shelf, and work-surface space as well as quality construction and glazing meant to last decades.
Siting Your Greenhouse
When the first orangeries were built, heat was thought to be the most important element for successfully growing plants indoors. Most orangeries had solid roofs and walls with large windows. Once designers realized that light was more important than heat for plant growth, they began to build greenhouses from glass.
All plants need at least 6 (and preferably 12) hours of light a day year-round, so when choosing a site for a greenhouse, you need to consider a number of variables. Be sure that it is clear of shadows cast by trees, hedges, fences, your house, and other buildings. Don’t forget that the shade cast by obstacles changes throughout the year. Take note of the sun’s position at various times of the year: A site that receives full sun in the spring and summer can be shaded by nearby trees when the sun is low in winter. Winter shadows are longer than those cast by the high summer sun, and during winter, sunlight is particularly important for keeping the greenhouse warm. If you are not familiar with the year-round sunlight patterns on your property, you may have to do a little geometry to figure out where shadows will fall. Your latitude will also have a bearing on the amount of sunlight available; greenhouses at northern latitudes receive fewer hours of winter sunlight than those located farther south. You may have to supplement natural light with interior lighting. For an easier, quicker, and more exacting solution, you can turn to one of the many sun-mapping apps available for smart phones and tablets. Simply plug in your latitude and longitude, or other location indicators, and the app calculates sun exposure for your property, over time and through the seasons.
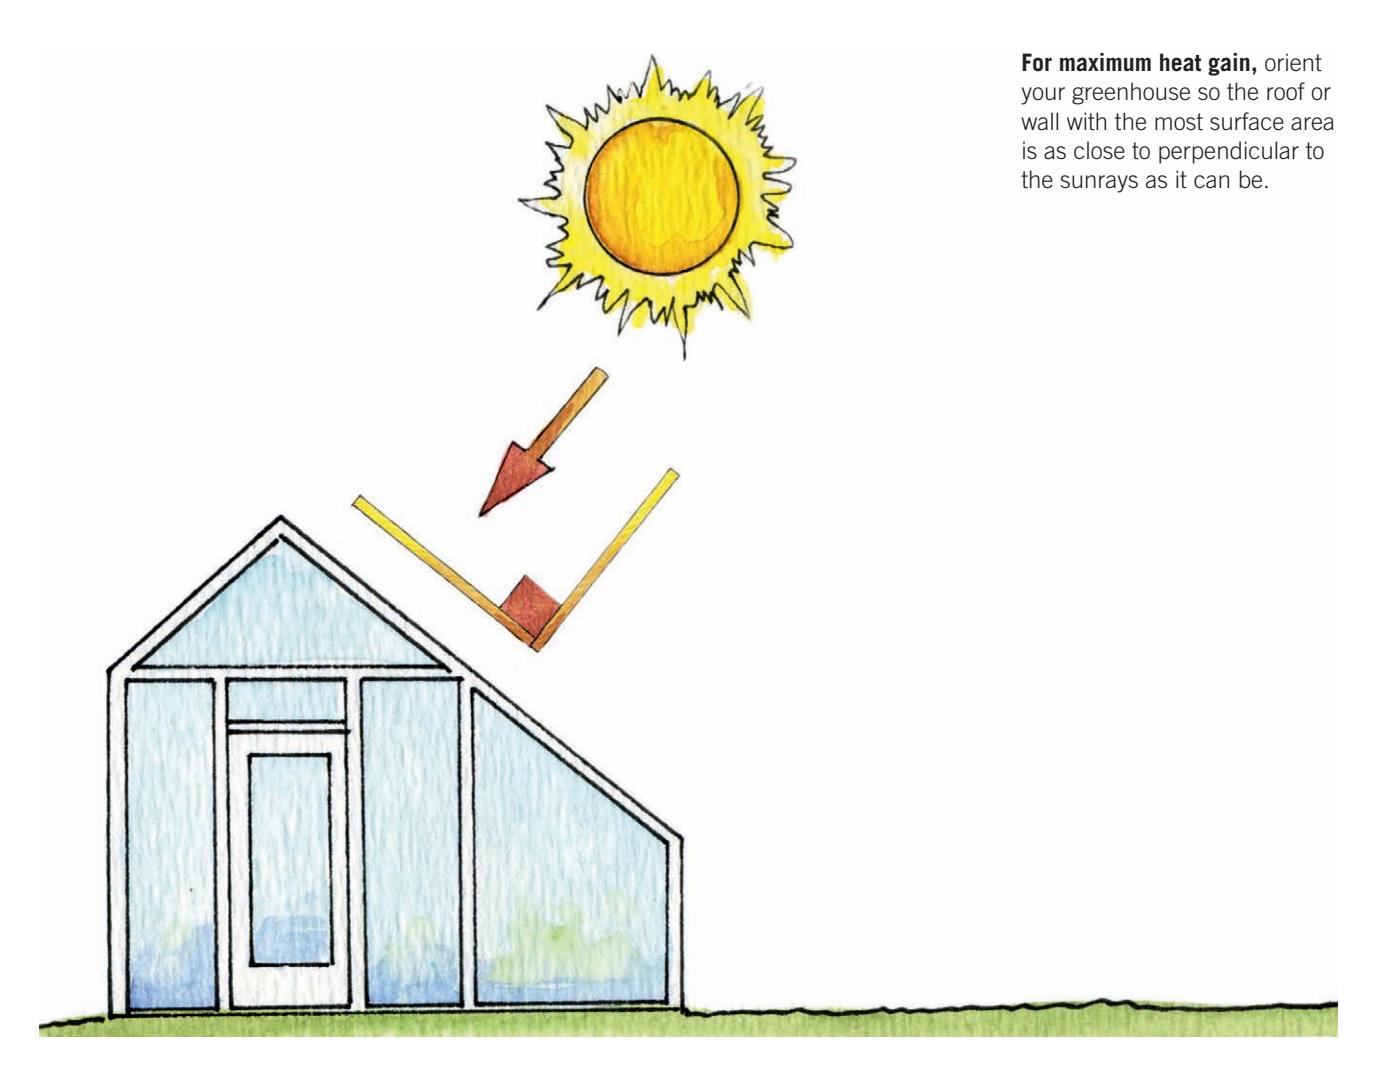
To gain the most sun exposure, the greenhouse should be oriented so that its ridge runs east to west (see illustration, below), with the long sides facing north and south. A slightly southwest or southeast exposure is also acceptable, but avoid a northern exposure if you’re planning an attached greenhouse; only shade-lovers will grow there.
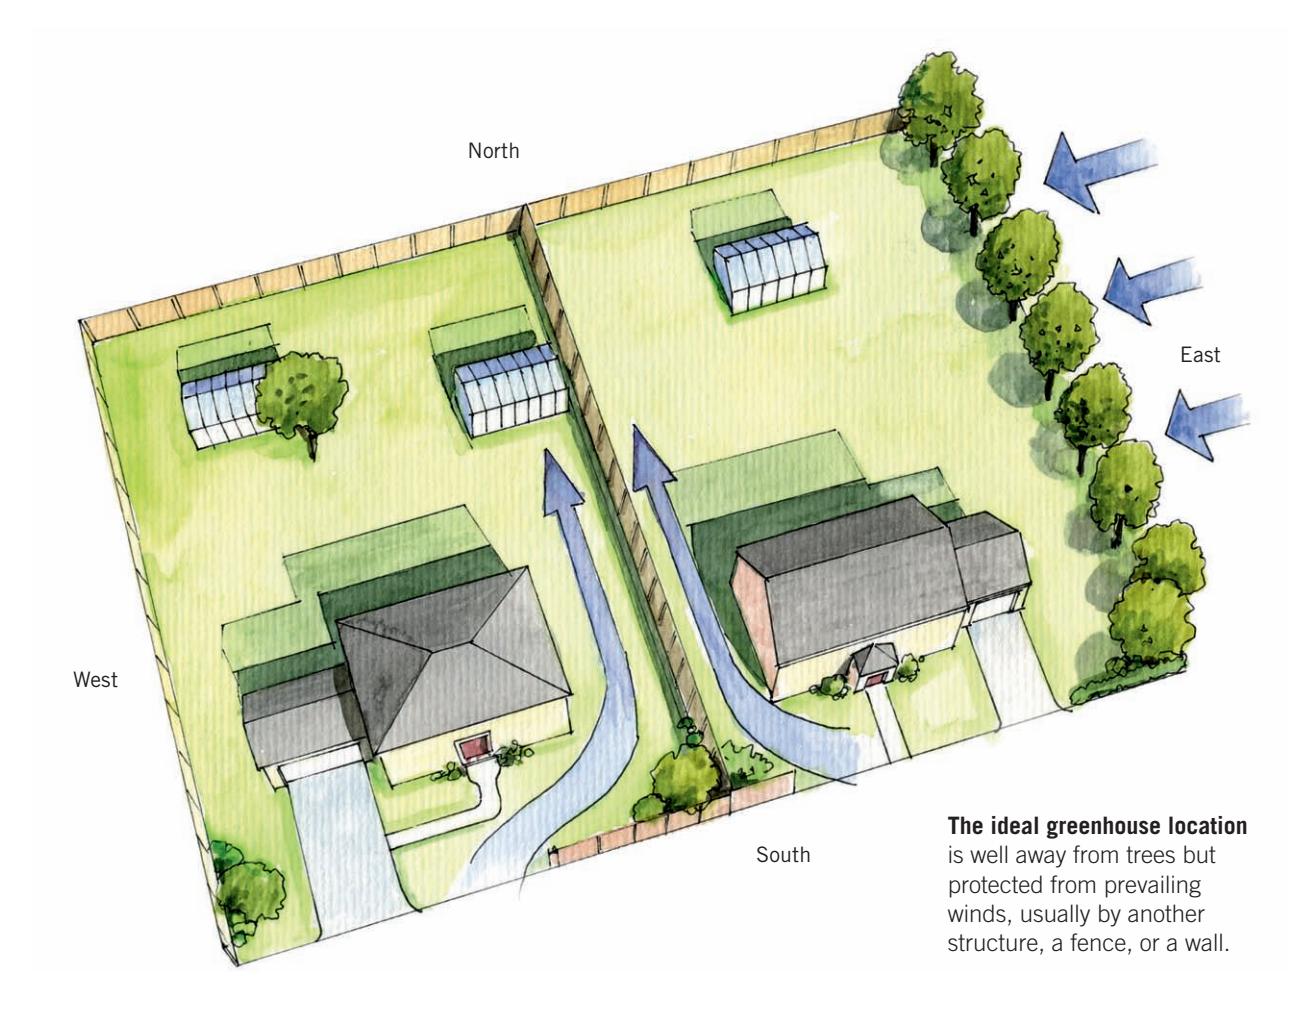 {alt=”Diagram showing optimal greenhouse orientation with its ridge running east to west for maximum sun exposure.”}
Siting Factors
Several factors influence the decision of where to build your greenhouse. Some pertain to your property, some to the structure, and some to your tastes.
Climate, Shelter + Soil Stability
Your local climate and geography have an impact on the location of your greenhouse. Choose a site that is sheltered from high winds and far enough away from trees that roots and falling branches are not a threat. (Try to position the greenhouse away from areas in which children play, too.) If you live in a windy area, consider planting a hedge or building a fence to provide a windbreak, but be careful that it doesn’t cast shade on the greenhouse. Avoid low-lying areas, which are prone to trapping cold, humid air.
The site should be level and the soil stable, with good drainage. This is especially important if heavy rains are common in your climate. You might need to hire a contractor to grade your site.
Access
Try to locate your greenhouse as close to the house as possible. Connecting to utilities will be easier, and you’ll be glad when you’re carrying bags of soil and supplies from the car. Furthermore, a shorter walk will make checking on plants less of a chore when the weather turns ugly.
Aesthetics
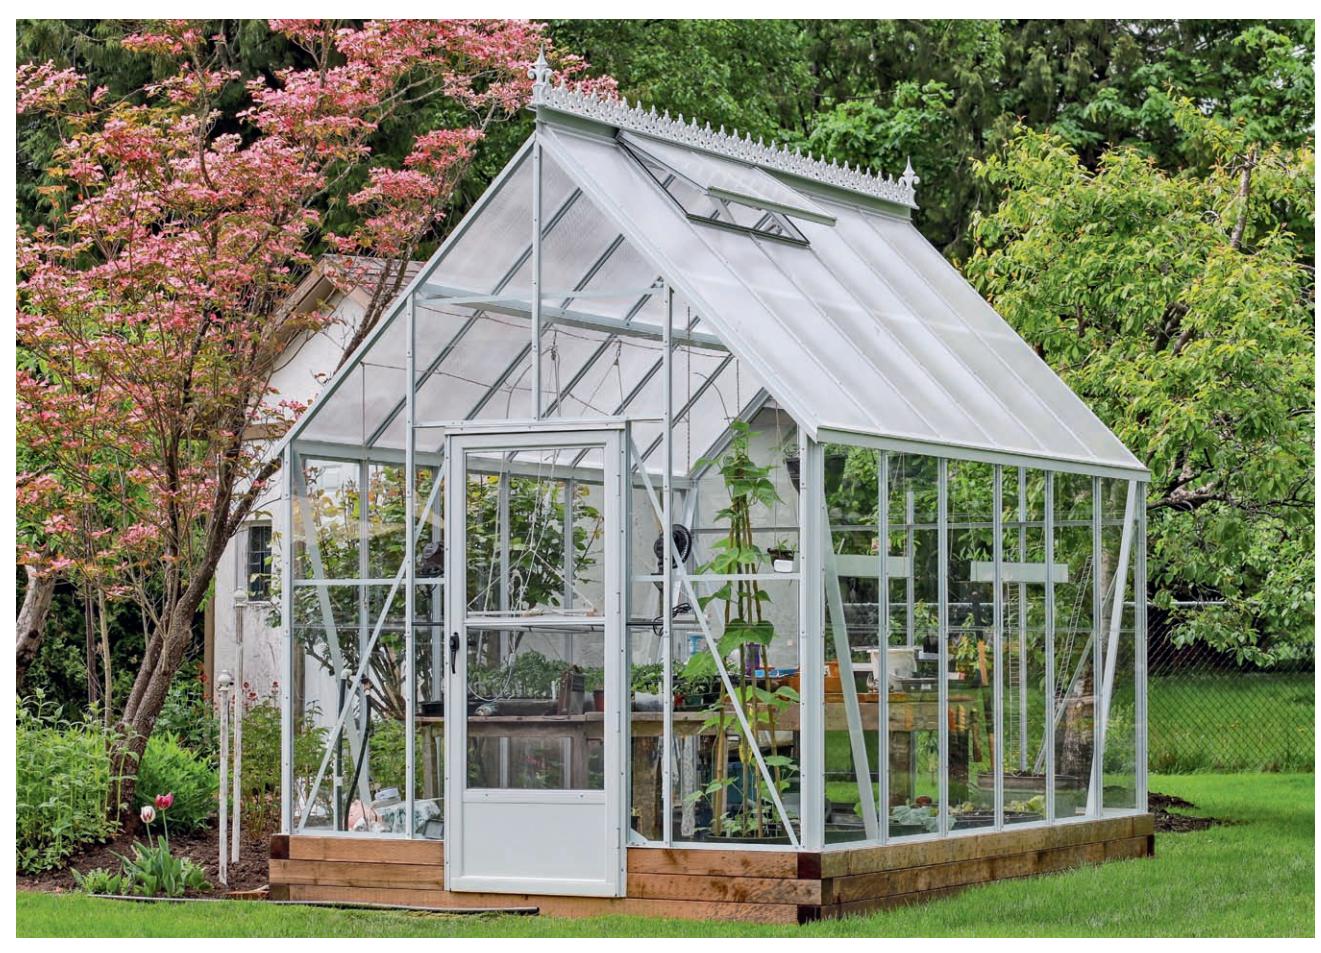
Although you want to ensure that plants have the perfect growing environment, don’t ignore aesthetics. The greenhouse should look good in your yard. Ask yourself whether you want it to be a focal point—to draw the eye and make a statement—or to blend in with the garden. Either way, try to suit the design and the materials to your home. Keep space in mind, too, if you think you might eventually expand the greenhouse.
 {alt=”A well-integrated greenhouse blending into a garden setting, demonstrating aesthetic considerations.”}
Greenhouse Elements
At first glance, a greenhouse seems like a very simple structure: some basic framing, a good amount of glass or plastic, and voilà—a greenhouse. But actually, there is much more to this garden addition than meets the eye.
In addition to being thoughtfully situated to take advantage of the sun throughout the day and the seasons, any greenhouse must be carefully built to last while still providing an optimal environment for the plants you want to grow. That starts with choosing the right foundation and making sure the greenhouse has an appropriate floor. Not only is the base of a greenhouse important for its support, but the right floor can also serve as a heat sink, absorbing heat during the day and releasing it at night.
In addition, you’ll need to put a lot of thought into your greenhouse’s covering. Glass is traditional, but fragile and expensive. Plastic panels and sheeting are easier to work with, but you must choose the right type to create the ideal microclimate for your plants.
Any plant needs water, and depending on how large your greenhouse is, you may decide to automate the watering of your plants or to use misters to create the proper humidity. You’ll also need to figure out how to moderate the heat inside, because the temperature in a greenhouse can swing by as much as 50 degrees Fahrenheit over the course of any given day. Ventilation goes hand in glove with heat, and, of course, you’ll probably want some form of lighting so that you can check on or work with your plants after dark.
These are just some of the factors any greenhouse owner needs to consider and resolve. The purpose of this section is to help you make informed choices from among the great many options available in order to create the ideal space for whatever it is you hope to grow—not to mention yourself.
 {alt=”Illustration depicting the various major systems and elements of a greenhouse, such as foundation, frame, glazing, and ventilation.”}
A greenhouse is composed of several major systems that perform important functions. When planning your greenhouse, you’ll need to make choices about each system, which include the foundation, floor, frame, glazing, ventilation, watering, heat, storage, and more.
Foundations
Some portable starter freestanding greenhouses, and a few inexpensive lean-tos, require no foundation whatsoever. They can just be staked in place or, where there is little wind, simply stood on a flat, level area of ground. In most cases, however, a greenhouse benefits from some sort of foundation, whether it be a compacted soil or gravel base, or something more substantial. Larger, heavier structures will most likely require a more significant foundation to prevent movement in the underlying soil from damaging the framing or glazing. A foundation should also keep any wood or metal parts off the ground to prevent premature rot or corrosion.
If you’ve purchased a kit greenhouse, the manufacturer will likely recommend appropriate foundation options. Regardless of what you’re building, you should consult your local building department to determine the codes that dictate the foundation you need to use and whether you need a permit for the foundation, the whole greenhouse, or both.
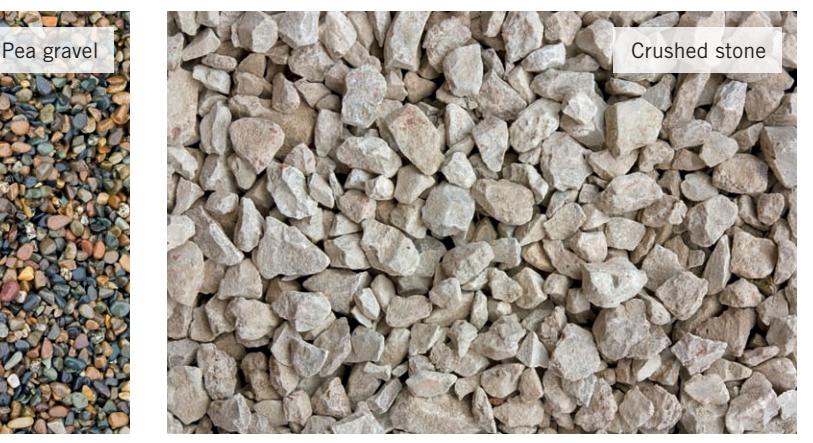
Whether you’re working from codes or simply following best building practices, the foundation needs to match the greenhouse. A kit greenhouse may come with its own metal or fabric base. For many types of prefab structures, a crushed gravel base 4 inches deep or more will serve the purpose. Other cases may call for a base of landscape timbers, concrete footings or piers, or a concrete slab. More traditional, substantial, and permanent greenhouses are often built on a kneewall of wood, brick, or stone. This is an option for most types of greenhouses, but the work and expense mean that kneewalls are rarely used with hobby greenhouses.
 {alt=”A kneewall foundation made of stone or brick, providing a raised base for a greenhouse.”}
Kneewalls, sometimes called pony walls, are low walls to which a greenhouse frame can be attached. They can raise a greenhouse to maximize headroom and can help to retain heat. However, they also eliminate growing space behind the walls and below the benches. If you only plan to grow potted plants on the benches, this may not be a problem—you can use the area underneath the benches for storage.
Kneewalls can be built with concrete blocks on a concrete footing, but a more attractive option is to use stone or brick and mortar. To help integrate the greenhouse with your home, build the kneewall from materials that complement the exterior of the house.
 {alt=”An earth anchor, or anchor stake, used to secure lightweight structures to the ground.”}
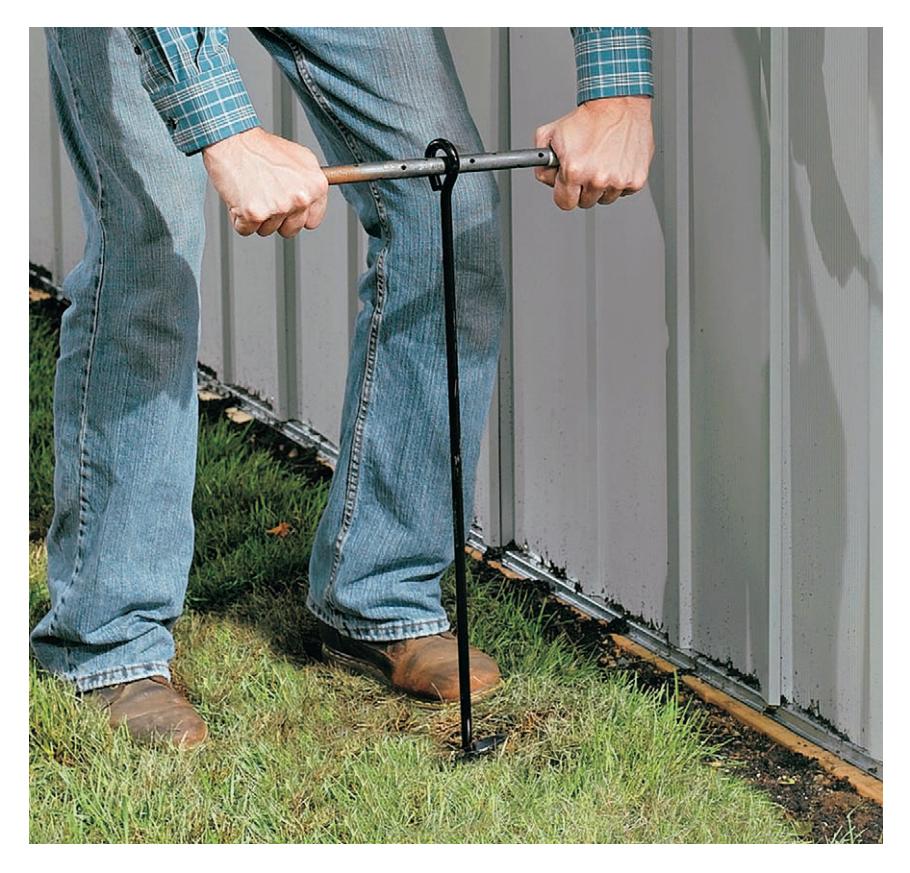
Earth anchors, or anchor stakes, are often used to tie down very lightweight greenhouses and crop covers to prevent them from blowing away. A typical anchor is a long metal rod with a screw-like auger end that is driven into the ground. An eye at the top end is used for securing a cable or other type of tether attached to the greenhouse.
 {alt=”A timber foundation frame made from landscape timbers laid on a gravel base.”}
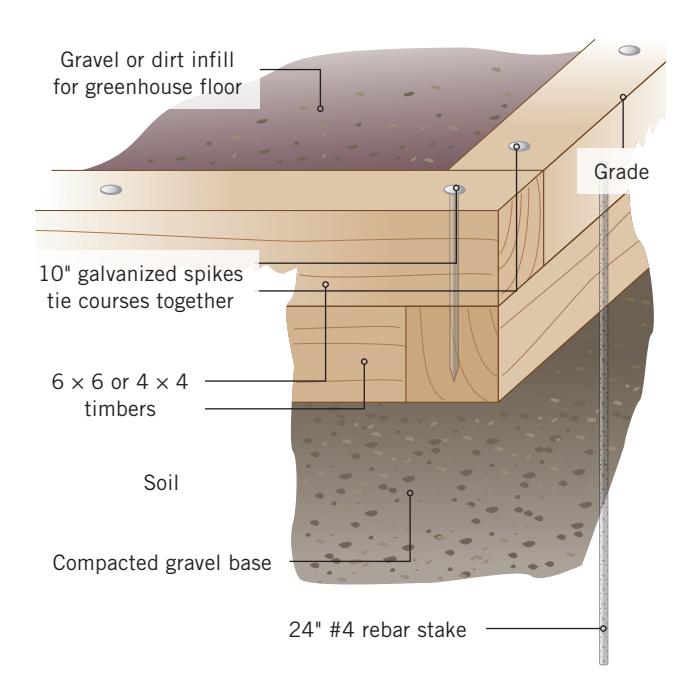
Timber foundations are simple frames made with 4 × 4, 6 × 6, or larger landscape timbers. The timber frame is laid over a leveled and compacted gravel base (which can also double as the floor or floor subbase for the greenhouse interior) and pinned to the ground with rebar stakes. One level, or course, of timbers is suitable for small greenhouses, while two courses or more are recommended for larger structures.
 {alt=”Detail of a greenhouse foundation or construction element.”}
Concrete Footing
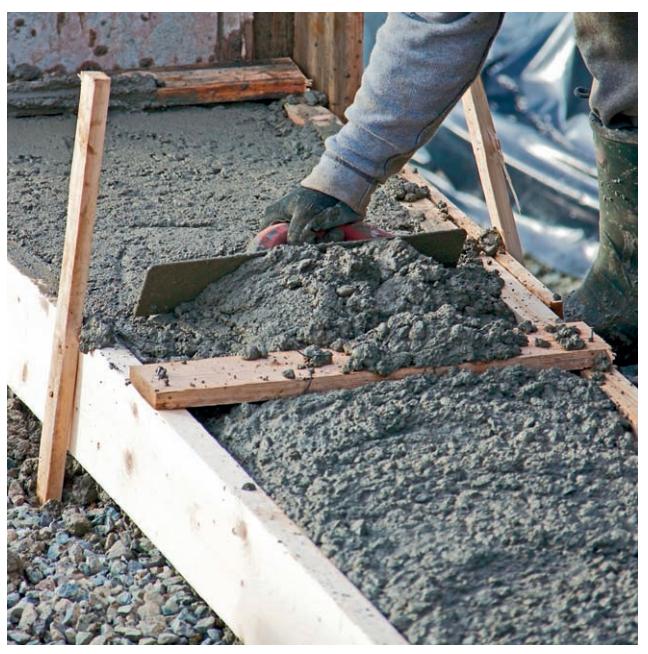
A concrete footing provides a structural base for a large greenhouse or a masonry kneewall. Standard footings are continuous and run along the perimeter of the structure. They must extend below the frost line (the depth to which the ground can freeze in winter; varies by climate) to prevent frost heave and should be at least twice as wide as the greenhouse walls they support.
Pier Footings
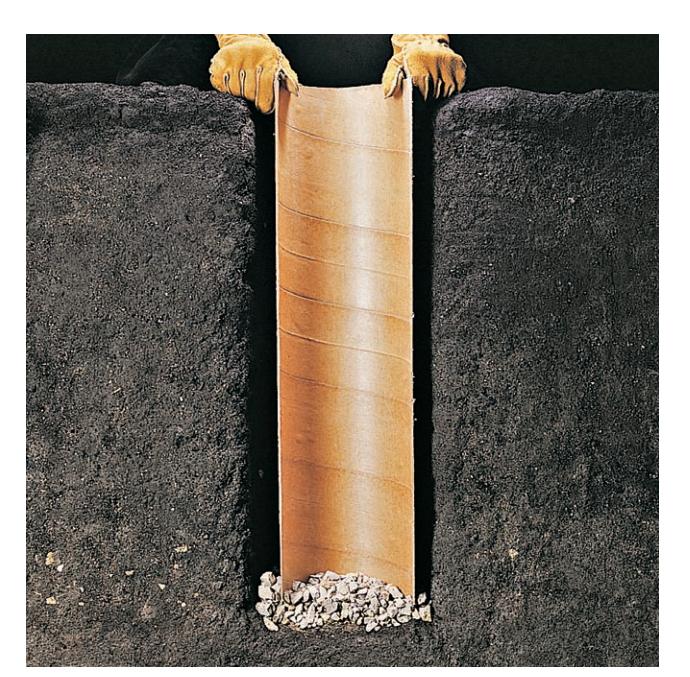
Pier footings are structural concrete columns poured in tube forms set below the frost line—the same foundation used to support deck posts. Pier foundations are appropriate for some kit and custom greenhouses and are often used on large commercial hoop-style houses. Anchor bolts embedded in the wet concrete provide fastening points for the greenhouse base or wall members.
Concrete Slabs
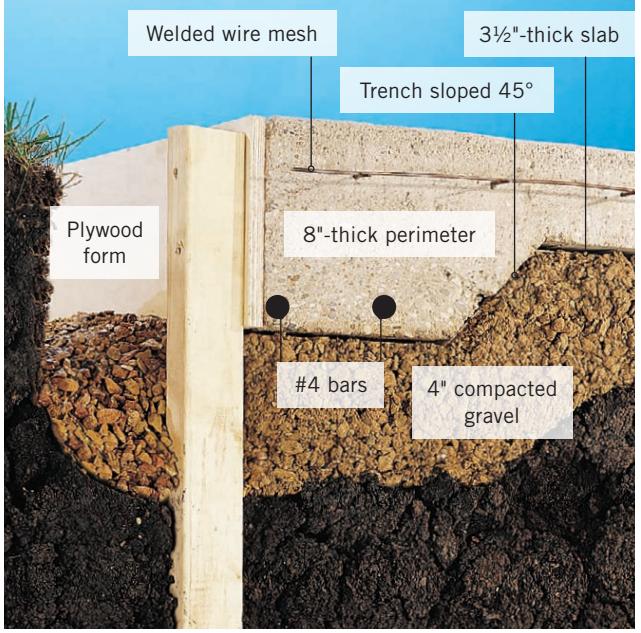
Concrete slabs make great foundations and a nice, cleanable floor surface but are overkill for most hobby greenhouses. In some areas, it may be permissible to use a “floating” footing that combines a floor slab with a deep footing edge (shown here). Otherwise, slabs must be poured inside of a perimeter frost footing, as with garage or basement construction. To prevent water from pooling inside the greenhouse, concrete slabs must slope toward a central floor drain—a job for a concrete pro, not to mention a plumber to install the drain and underground piping.
Floors
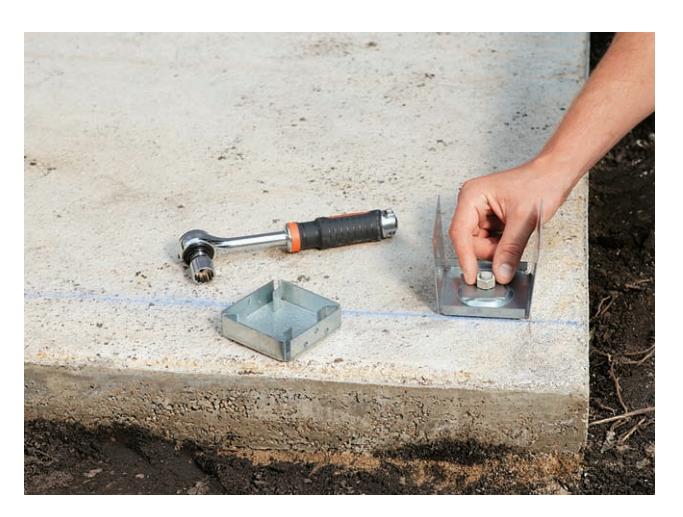
Even if your greenhouse is small or temporary, a dirt floor is often a bad idea. Watering of plants and even condensation can lead to a muddy mess that invites weeds, disease, and pests. There are plenty of inexpensive options for greenhouse floors, all of which are easy to install yourself. In general, any water-permeable surface that works for a patio or walkway will make a good floor for a greenhouse.
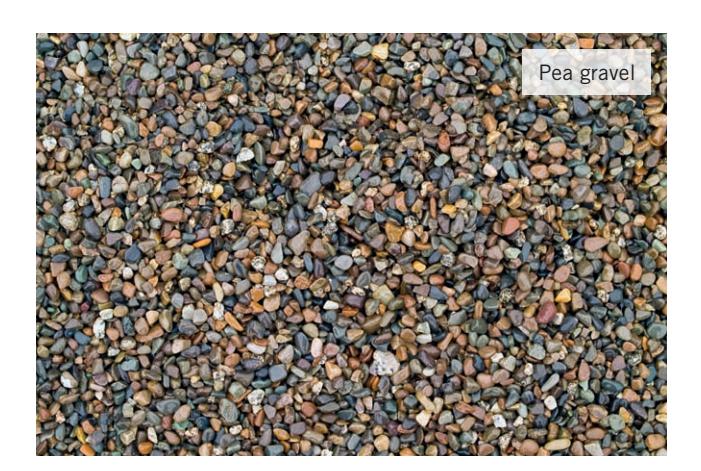
For long-term stability, improved drainage, and a level floor surface, it’s wise to support any greenhouse floor with a 4- to 6-inch subbase of compacted gravel. Cover the subbase with commercial-quality landscape fabric (not plastic; the fabric must be water-permeable) to inhibit weed growth and to separate the gravel base from the upper layers. From there, the simplest floors can be made with any type of suitable gravel, such as pea gravel or trap rock.
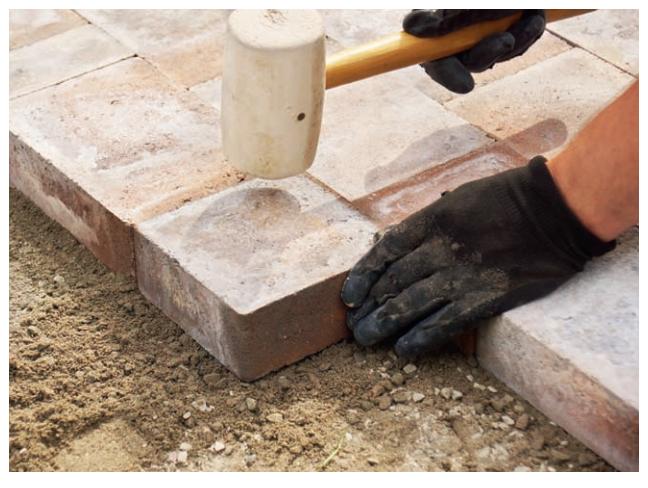
Brick and concrete patio pavers are other great options and offer a more finished look and feel over gravel floors. Pavers are laid over a 1- to 2-inch layer of sand and should be surrounded by a border (foundation timbers or patio edging will suffice) to keep them from drifting. Once the pavers are set, you can sweep sand over the surface to fill the cracks and lock the units in place. Another floor option—flagstone—is installed in much the same way. Keep in mind that any stone or concrete surface will also serve as a heat sink. This, alone, can be a good reason to add a stone floor to your greenhouse.
Framing Materials
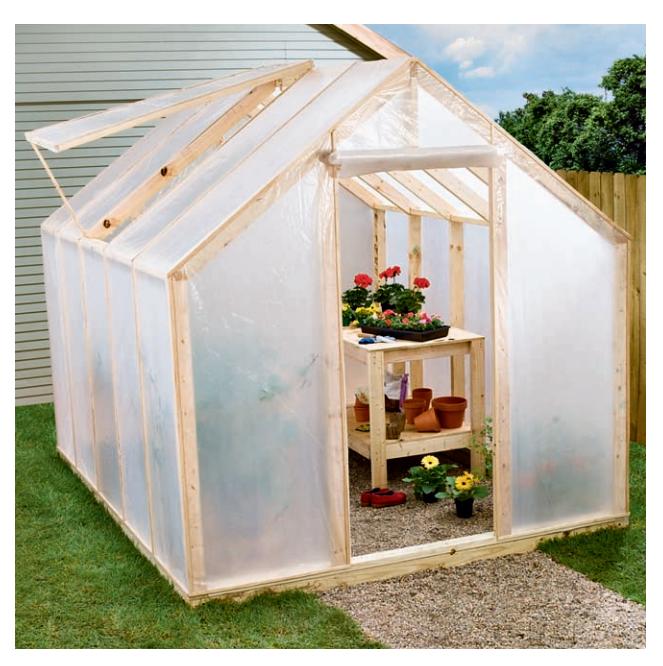
Wood and aluminum remain the most popular framing materials for hobby greenhouses, but they are far from the only options. Steel is popular for larger, more complex structures, and PVC is commonly used for more simple and portable greenhouses and hoophouses.
Every framing option has advantages and disadvantages, which is why it’s essential that you choose the best framing material for your needs both now and in the future. The key is to balance durability, weight, expense, and, of course, appearance to find just the right framing. Looking at the tradeoffs entails considering local weather conditions (do you need a high snow or wind load tolerance?), the gardening you intend on doing (do you want to hang baskets in the greenhouse?), and the look that most appeals to you (do you want the greenhouse to blend in or stand out?).
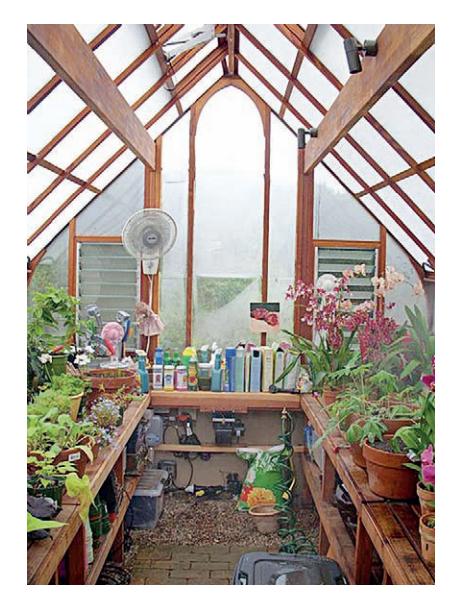
Wood
Advantages: Wood is often selected for custom greenhouse framing because of the many beautiful species available. The bonus with a wood frame is that it won’t conduct heat as quickly as metal or plastic and will be less likely to shed potentially harmful condensation. It is also long lasting and durable. These qualities come at a higher cost than that of other materials, but the price tag also buys an extremely beautiful greenhouse structure. Some of the best woods for greenhouses are cedar and redwood, because both are naturally resistant to rot and insects and age well, whether finished or unfinished. Hardwoods also offer these benefits, but the cost is usually prohibitive for a hobby greenhouse. The practical choice for a utilitarian greenhouse is pressure-treated wood. In either case, wood is a wise choice if you are planning on hanging baskets or accessories from the framing, or if you intend to put up shelving.
Disadvantages: Wood framing is heavy and usually requires regular maintenance. Because it’s necessarily bulkier than other options, wood also casts more of a shadow on greenhouse plants. Rot is a potential problem, especially as the wood ages, and many types of woods will ultimately be attacked by insects—something that is never a problem with plastic or metal. You’ll also pay a higher cost for the frame than you would if you had used other materials, especially if you choose the beauty of redwood.
Aluminum
Advantages: The foremost advantage of aluminum is that it is low maintenance. It is also strong and lightweight, lasts longer than wood, and can easily accommodate different glazing systems and connectors. Aluminum is used in many greenhouse kits and can be powder-coated or anodized in various colors (although the most common are white, black, and green). Aluminum greenhouse kits are typically easy to assemble and come with predrilled holes
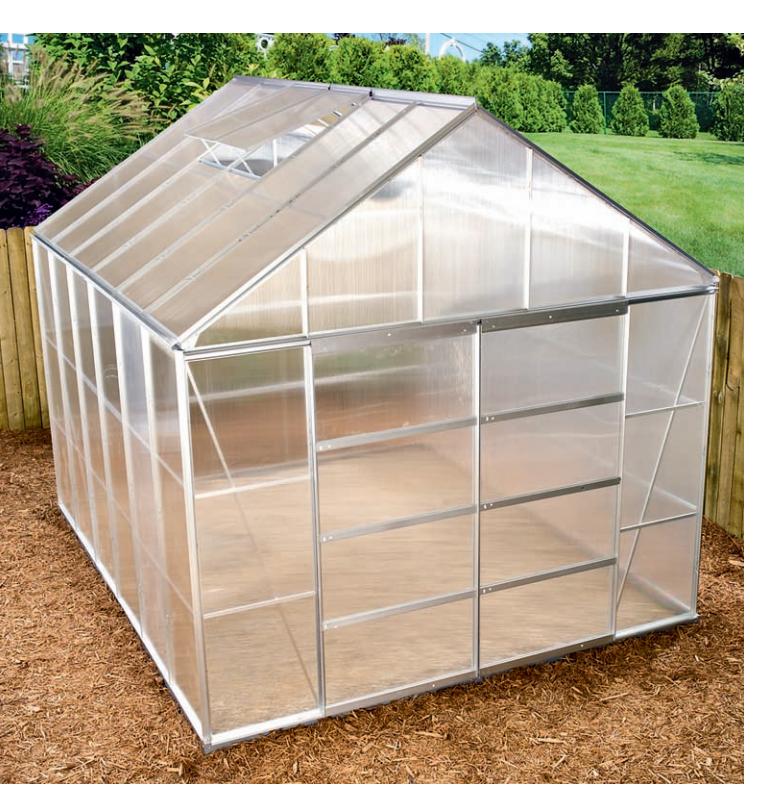
for attachments, connections, and fixtures. Some manufacturers offer “thermally broken” aluminum frames, which are made by sandwiching a thermal barrier between two layers of extruded aluminum to decrease heat loss through the frame.
Disadvantages: Because aluminum loses heat more rapidly than wood does, this type of greenhouse is more expensive to heat. In addition, cheaper aluminum frames can be too flimsy to withstand high winds or heavy snow loads. The material can also exacerbate condensation problems inside the greenhouse.
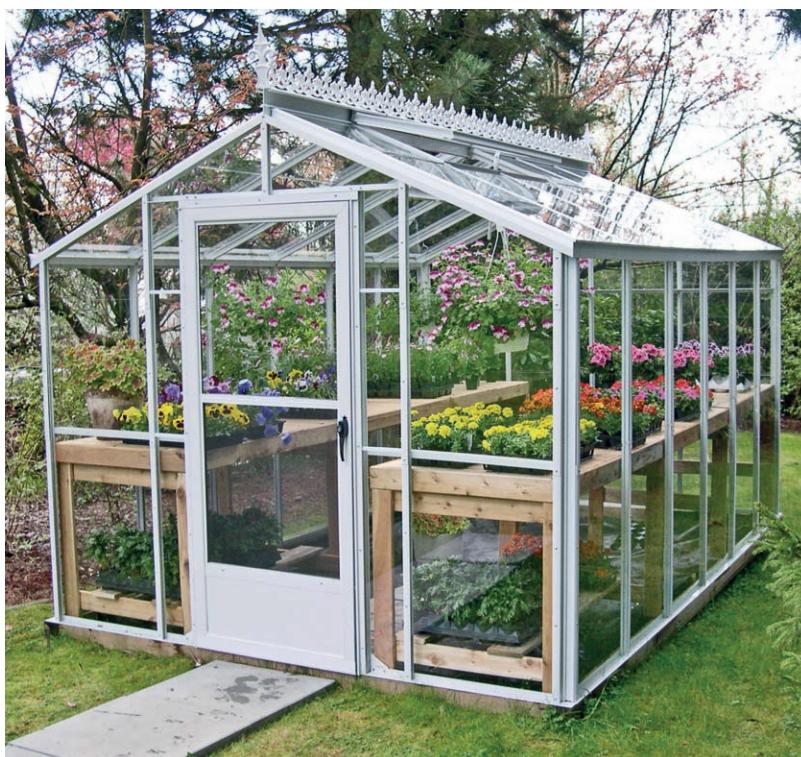
PVC (Polyvinyl Chloride)
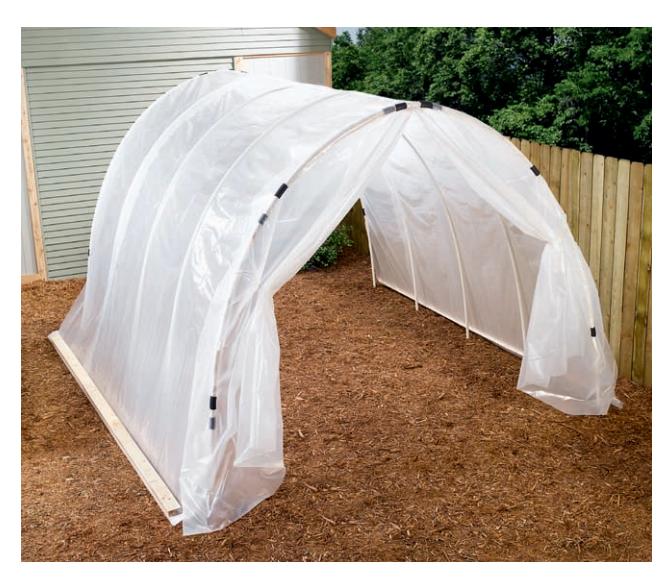
Advantages: PVC tubes are used in less expensive kits for hoophouses and greenhouses. The tubes make for a very low-cost frame that is durable and lightweight. The material does not rot and is entirely resistant to insects. It is also easy to clean, and although not distinctive in appearance, it looks neat and tidy. PVC frames are usually used in greenhouses meant to be portable and for beginner or intermediate gardeners.
Disadvantages: High winds, heavy snow loads, and other extreme weather can damage PVC frames. Bright sun also takes its toll, making PVC framing brittle over time. It cannot be used with glass—the frames are restricted to bendable polycarbonate panels or plastic sheeting.
Greenhouse Glazing Materials
There are two types of greenhouse glazing: glass and plastic. Ideally, whatever glazing you choose should let in maximum light, and let out minimum heat. The other distinctions are between opaque and translucent glazing. Tender plants may burn with overexposure and will benefit from opaque panels. Mature plants do better in the stronger light through clear glazing. Different glazing materials have different lifespans. The warranty is an excellent indicator of how long the glazing will last.
Glass
Advantages: Glass is the traditional glazing material and remains popular today. Undamaged, the material will last forever. It offers some of the best light transmission among glazing materials, doesn’t degrade under long exposure to UV radiation, and is easy to clean. It boasts surprising tensile strength in a frame, it can hold up to a lot of stress and wind load. Although single-pane glazing has poor insulating properties, the R-value can easily be raised by purchasing double- or even triple-pane glazing.
Disadvantages: Uninsulated single-pane glass is inefficient at retaining heat. Glass is also extremely breakable—children, tree branches, and hail are all threats. For safety, tempered glass should be used for greenhouses because it shatters when broken, creating small, rounded fragments, rather sharp, jagged shards. Glass is also heavy, requiring a strong supporting framework. Direct sunlight passing through glass is so strong it may burn some plants. Lastly, unlike some synthetic materials, glass panes cannot bend to accommodate curved shapes.
Fiberglass
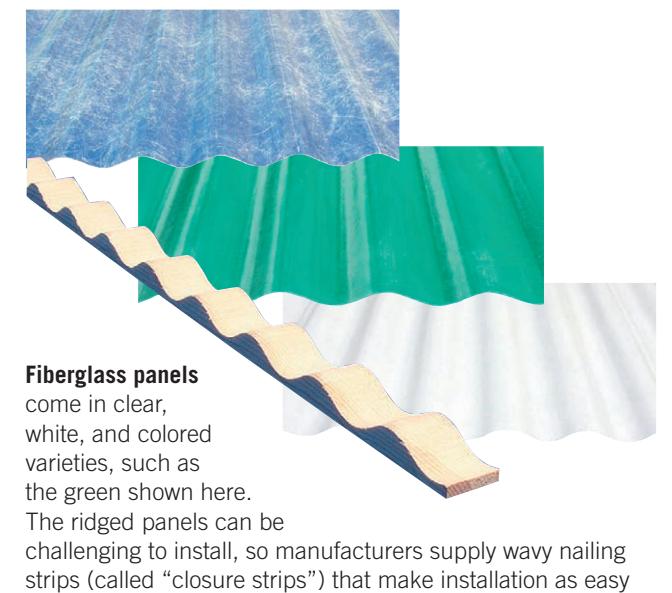
Advantages: Modern fiberglass panels are UV resistant and formulated to resist yellowing under prolonged sun exposure—a key problem in early panels. This material transmits almost as much light as glass does, but also diffuses that light. Fiberglass also provides much better heat retention than glass. The best panels now come with 15- or 20-year warranties.
Disadvantages: The surface of fiberglass panels is rough and captures dirt, requiring more frequent cleanings than other types of glazing. Fiberglass panels can also, under certain circumstances, experience excess condensation that can lead to plant disease and overwatering. Dirt and debris can collect in the valleys of panel ridges. Inexpensive fiberglass panels will degrade and deteriorate much more quickly than high-quality versions do.
Polycarbonate
Advantages: Polycarbonate panels are light, strong, and shatter resistant. Multiwall versions retain heat
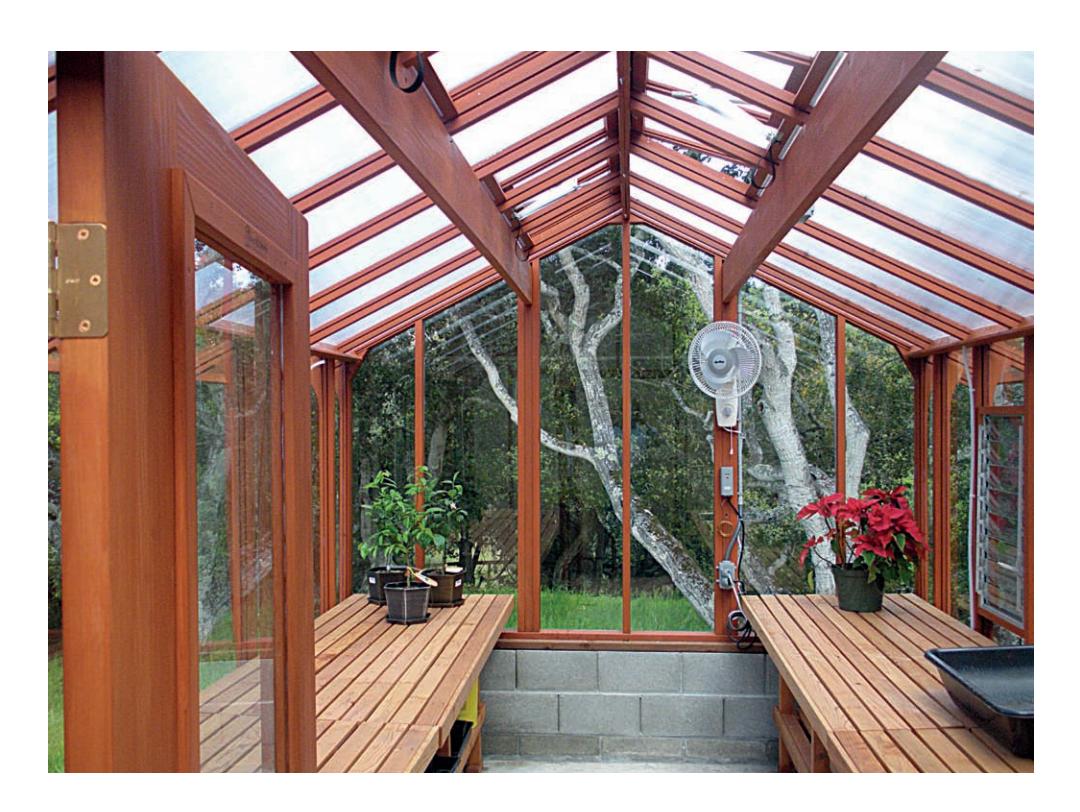
This stunning redwood greenhouse combines the best of both worlds—the beauty and view through clear glass windows on all walls and frosted polycarbonate panels on the roof to diffuse light.
Greenhouse Glazing
Polycarbonate
Double-wall clear polycarbonate. Triple-wall Double-wall white polycarbonate.
far better than glass does. Corrugated panels are the least expensive, but most used today are multiwalled. Manufacturers offer panels with between two and five walls. The more walls, the greater the heat retention and the lower the light transmission. Panels can be clear or white, to diffuse light. Warranties typically run 10 to 15 years.
Disadvantages: Although polycarbonate scratches easily, the main drawback is the high price. They are hard to clean, because mass-market glass cleaners may damage the material.
Polyethylene + PVC
as nailing flat panels.
Advantages: Greenhouse sheet coverings—primarily polyethylene plastic, but also including some PVC products—are inexpensive, easy to work with, incredibly lightweight, and adaptable to unusual shapes. They come in different thicknesses. Thicker sheet products retain heat better without much loss in light transmission. These products usually come in white (although you can buy clear), which ensures that transmitted light is diffused and won’t burn plant leaves. The sheeting can be doubled up, which cuts down significantly on light transmission, or layers can be attached to both the outside and the inside of a structure, for improved heat retention.
Disadvantages: Polyethylene sheeting does not retain heat well and will deteriorate under prolonged sun exposure. The material is prone to rips during installation and can become brittle and yellowed in as little as two years.
UV protection is a consideration in any greenhouse glazing. Panels can be treated or formulated to filter UV rays, which can protect tender plants, and the skin of a gardener spending significant time in the greenhouse. However, growth won’t be as robust when UV rays are filtered out.
polycarbonate.
Lastly, be aware that although plexiglass panels are available in some places, they are rarely used for hobby greenhouses because polycarbonate and PVC products are superior for the application.
Greenhouse Glazing Characteristics
| GLAZING | LIGHT TRANSMISSION** |
R-VALUE | STRUCTURAL STRENGTH |
|---|---|---|---|
| Single-Pane Glass | ±95% | .9 | High |
| Double-Pane Glass | ±90% | 2 | High |
| Double Pane Low E Glass | ±70% | 3.3 | High |
| Polyethylene Film (6-mil) | ±85% | .87 | Low |
| Fiberglass panel | ±92% | .9 | Medium |
| Polycarbonate 2-wall (6-mil) | ±82% | 1.6 | Medium |
| Polycarbonate 3-wall (8-mil) | ±76% | 2 | Medium |
| Polycarbonate 4-wall (6-mil) | ±76% | 1.8 | Medium |
| Polycarbonate 5-wall | ±62% | 3 | Medium |
It’s important to note that between different manufacturers the same products will vary in light transmission and R-value. The numbers here should be considered for comparison purposes.
Light transmission will be lower in colored or white panels or film. The variation can be from 90% for clear down to 60% for green in the same material.
Water
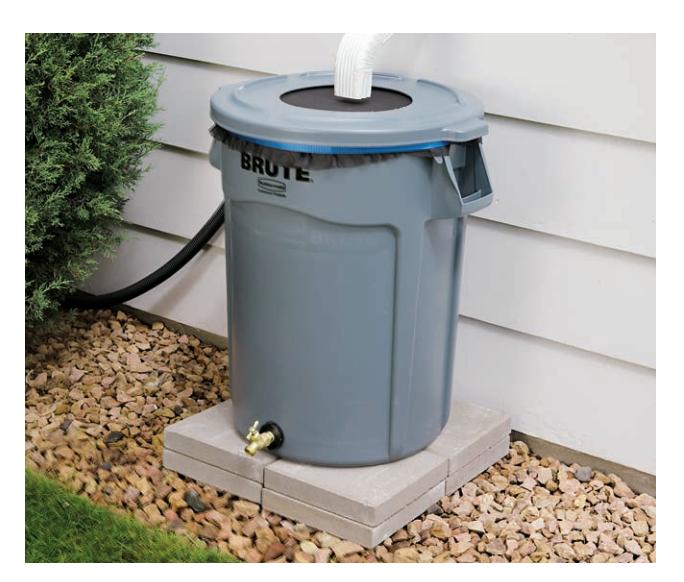
All greenhouses need some kind of water supply system. This can be as simple as a hose connected to the nearest outdoor spigot or as complex as a frost-proof underground line extending from your basement to a special spigot in the greenhouse. The latter is obviously more convenient, and the system can operate year-round. It’s also a big job that usually requires a plumber to make the final connections. A somewhat easier alternative is to install a shallow underground water line that you drain at the end of the growing season, similar to the supply line for a sprinkler system. Or, if your water demands are not too great and your greenhouse is located near your
 {alt=”A rain barrel collecting water from a downspout next to a greenhouse.”}
house, maintain a rain barrel nearby. A rain barrel can provide a ready supply of water for your greenhouse. It’s an easy water supply option, but it lacks the convenience of linking the greenhouse to your house’s water supply system.
 {alt=”A close-up of a rain barrel spigot.”}
An All-Season Water Supply
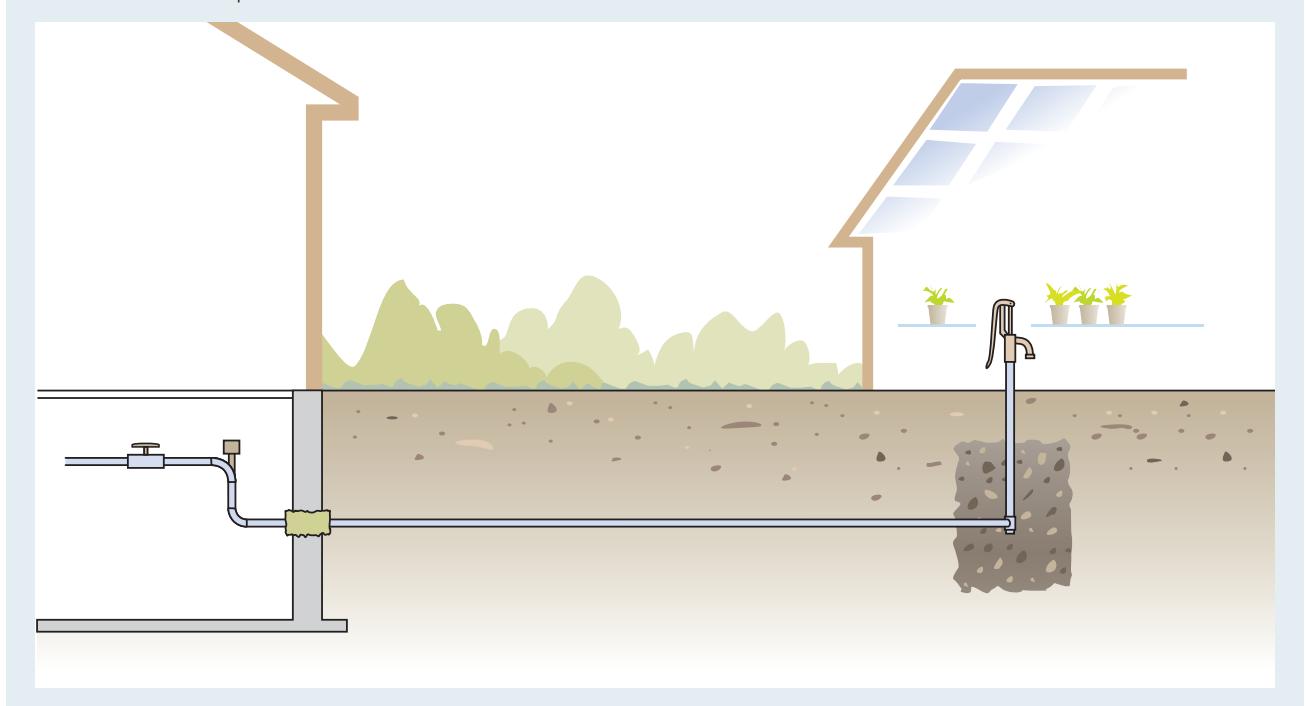
A dedicated all-season water line is the ultimate setup for any freestanding greenhouse. To prevent the line from freezing during winter, the entire buried portion of the water line must be laid 6” below the frost line in your area. In the greenhouse, the water comes up through a freeze-proof yard hydrant (commonly used on farms), which drains itself of residual water each time it is shut off. The water drains into a gravel pit (installed per local code and the hydrant manufacturer).
In a typical installation, the supply line connects to a cold-water pipe in the house and includes a shutoff valve and backflow preventer (vacuum breaker). The line passes through the foundation wall (where it’s protected by a sleeve of rigid pipe) at the burial depth, then runs underground to the hydrant. For most applications, flexible PE (polyethylene) tubing is the best all-around option for the buried portion of the supply line. As always, all connections and devices must follow local code requirements.
 {alt=”Diagram showing an all-season water supply line installation with a freeze-proof yard hydrant.”}
A Seasonal Water Supply Line
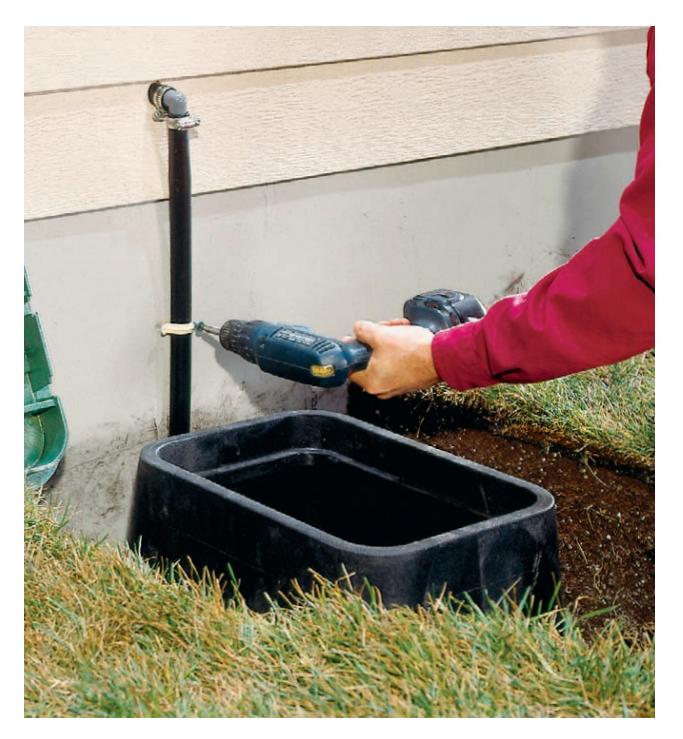 {alt=”Photo of a trench being dug for a water supply line, with a pipe coming out of a house wall.”}
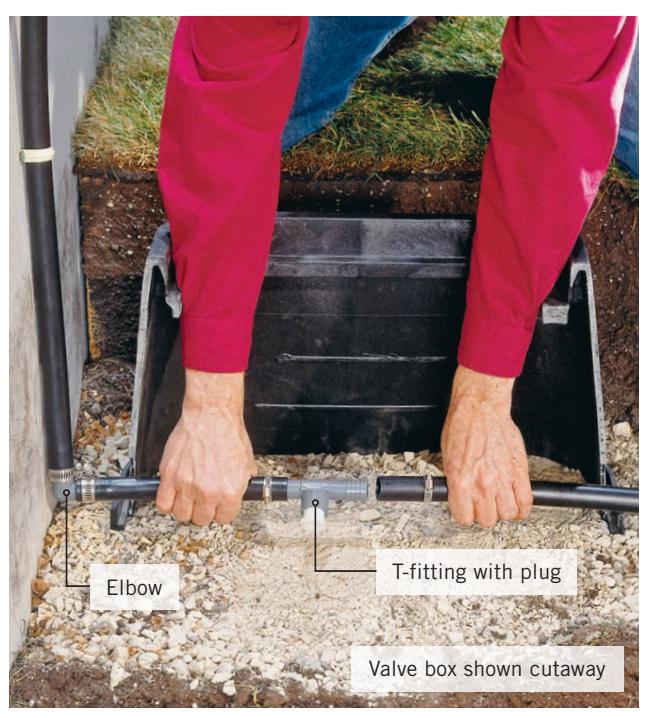 {alt=”Photo of a valve box with a T-fitting for a seasonal water supply line.”}
A seasonal water supply line is similar to an all-season setup but somewhat easier to install and is just as convenient for everyday use. The supply line connects to a cold-water pipe inside the house and runs through an exterior wall above the foundation, then down into a trench (left photo). At the house-end of the trench, the initial supply run connects to the underground line (typically PE tubing) inside a valve box. The box provides easy access to a T-fitting necessary for freezeproofing the line each fall. The supply run is buried in a 10”-deep trench (or per local code) and connects to copper tubing and a standard garden spigot inside the greenhouse.
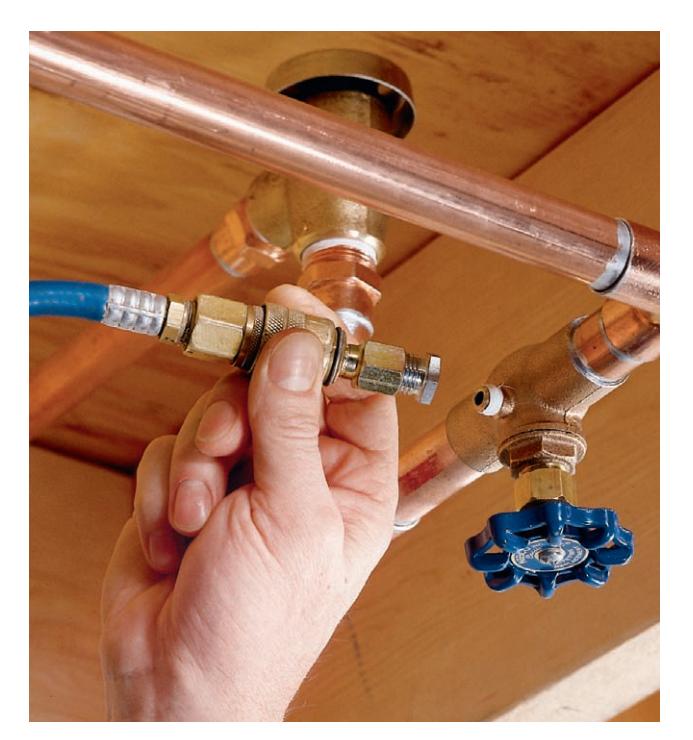 {alt=”Diagram showing a seasonal water supply line installation with a valve box and a spigot inside the greenhouse.”}
Winterize a seasonal supply line using a shutoff valve with an air nipple. With the valve closed and the greenhouse spigot open, blow compressed air (50 psi max.) into the line to remove any water in the tubing. Then, remove the plug from the T-fitting inside the valve box (photo top right) and store it for the winter.
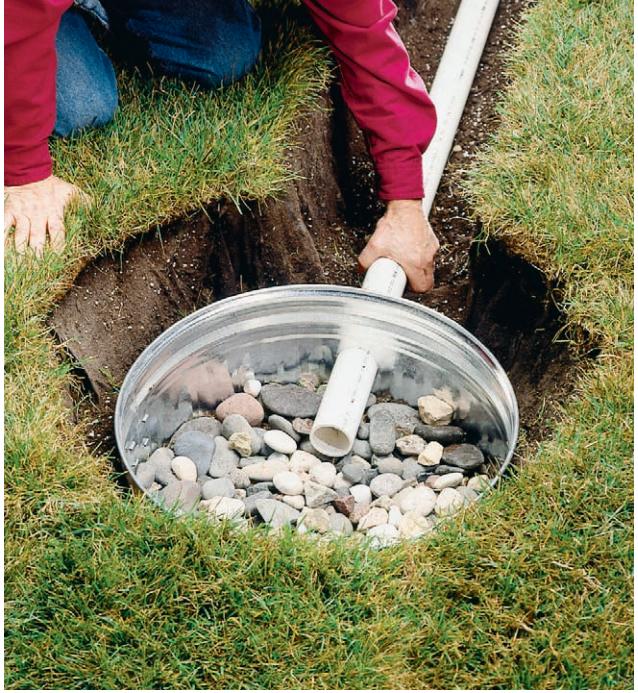 {alt=”Close-up of a shutoff valve with an air nipple for winterizing a water line.”}
Greenhouse Drain
A greenhouse with a water supply of any sort should also have a drain. A dry well can be made with an old trash can or other container perforated with holes and filled with coarse rock. The well sits in a pit about 2’ in diameter by about 3’ deep and is covered with landscape fabric and soil. Dry wells are for draining graywater only—no animal waste, food scraps, or hazardous materials.
Watering + Misting Systems
If your greenhouse is fairly small and you enjoy tending plants daily, you might enjoy watering by hand, either with a watering can or with a wand attachment on a hose. Hand-watering helps you to pay close attention to plants and cater to their individual needs. You’ll quickly notice signs of over- or under-watering and can adjust accordingly.
However, hand-watering isn’t always practical. That’s why many greenhouse gardeners use an automatic system such as overhead sprinkling and drip irrigation. This approach is convenient, especially when you’re not at home. Greenhouse suppliers sell kits as well as individual parts for automated watering systems. Be sure your system includes a timer that can be set to deliver water at specific times of the day, for a set duration, and on specific days of the week. You can also incorporate water heaters and fertilizer injectors into your system.
Overhead Sprinkler Systems
Overhead-sprinkler systems are attached to the main water supply and use sprinkler nozzles connected to PVC pipes installed above the benches. The system usually includes a water filter, which prevents the nozzles from clogging, and a pressure regulator. Set the system to water in the morning and during the hottest part of the day. Avoid watering late in the day so the plants will be dry before nightfall, when the temperature drops and dampness can cause disease.
Drip Irrigation Systems
Drip-irrigation systems use drip emitters to water plants a drop at a time, when moisture is needed. Each plant has an emitter attached to feeder lines that connect to a drip line of PVC tubing or pipe. Unlike overhead sprinklers, drip irrigation ensures that the plant leaves stay dry. It also helps to conserve water.
Capillary Mats
If you prefer to water plants from underneath, consider capillary mats. These feltlike mats are placed on top of the bench (which is first lined with plastic) and under the plants, with one end of the mat set into a reservoir attached to the bench. The reservoir ensures that the mat is constantly moist. Moisture from the mat is drawn up into the soil and to the plant roots when the soil is drying out. Unlike drip irrigation and overhead sprinkling, capillary-mat watering systems do not require electricity, pipes, or tubing. However, unless they are treated, the mats will
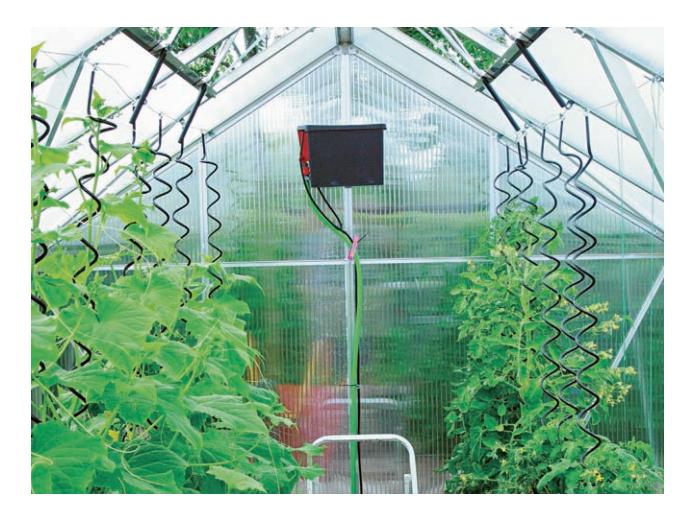 {alt=”An automatic drip-watering system with a mixing tank, hoses, and drip pins watering plants.”}
need regular cleaning to prevent mildew and bacteria buildup. To ensure that the system works properly, it’s important that the bench be level.
This automatic drip-watering system is fed by a garden hose that connects to the mixing tank. In the tank, water and fertilizer are blended to a custom ratio and then distributed to plants at an adjustable rate via a network of hoses, drip pins, and Y-connectors.
NOTE: The spiral trellis supports hanging from the greenhouse roof are not part of the watering system.
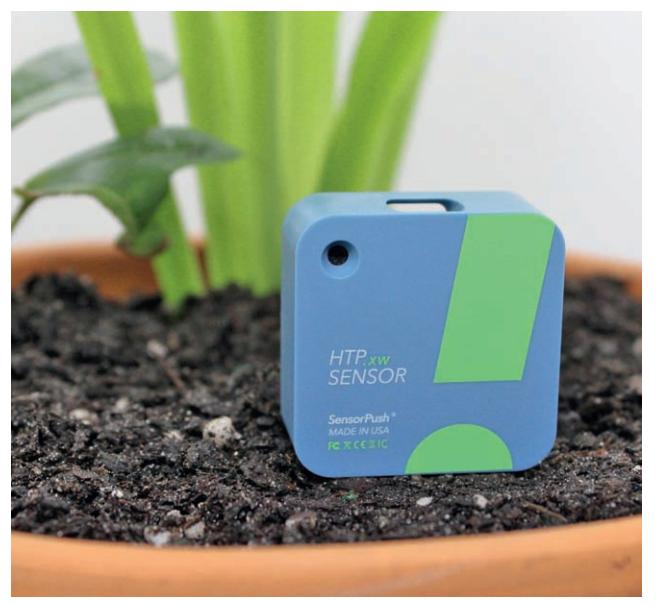 {alt=”A smart sensor device hanging in a greenhouse, monitoring humidity and temperature.”}
You can simplify greenhouse maintenance and monitoring and your life—with a smart sensor like this one. Humidity levels, temperature, and more are available to check any time through a smart phone app connected to the sensor.
Regardless of the watering system you choose, use lukewarm water. Cold water can shock the roots, especially if the soil is warm. If you’re hand-watering, let the water sit in the greenhouse so it warms up to ambient temperature. (Keep it out of the sun, though—you don’t want it to get too hot). Wand watering and automatic systems can benefit from an installed water heater.
Misting
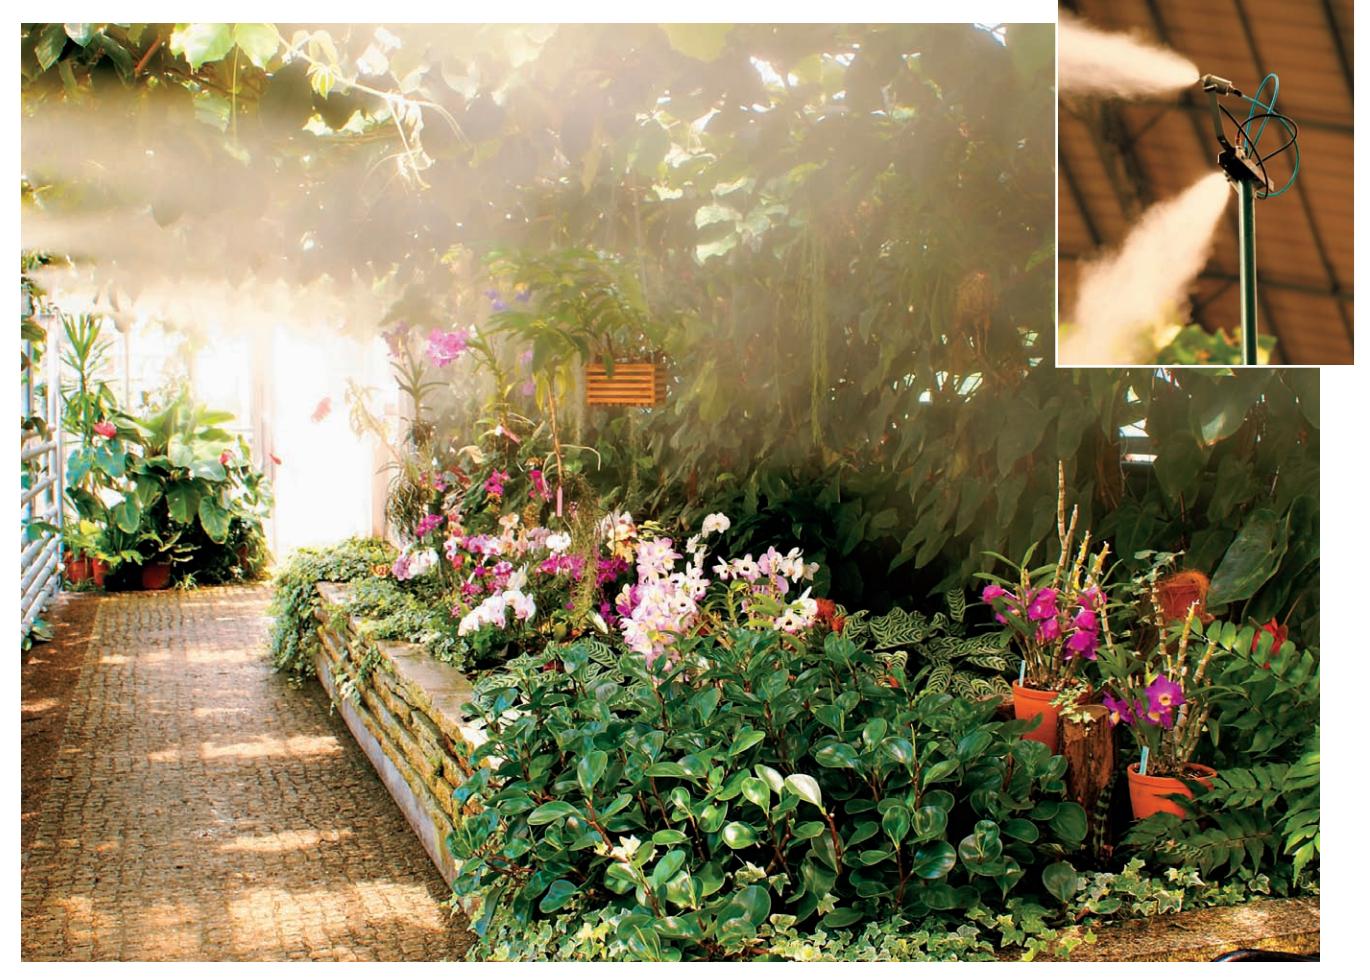 {alt=”Misting heads providing a fine spray of water over plants in a greenhouse, with an inset showing a close-up of a misting head on a spray pole.”}
Misting is a very gentle method of providing moisture to plants and maintaining greenhouse humidity. Misting heads mounted on spray poles (inset) can be controlled manually or automatically. In addition to maintaining a constant state of moistness for plants, a misting system will give your greenhouse a tropical environment that many gardeners enjoy.
When the temperature inside the greenhouse rises and the vents open, they release humidity. Misting increases humidity, which most plants love—levels of about 50 percent to 65 percent are ideal—and dramatically decreases the temperature by as much as 20ºF. Misting systems are available through greenhouse suppliers. You can buy a complete system, which may include nozzles, tubing, PVC pipe, a humidistat, and sometimes a hard-water filter and a pressure gauge. Or you can buy the parts separately to create a customized system. The size of the greenhouse will determine the size of the system. Larger greenhouses need more nozzles and in turn more tubing and pipe.
Humidistats can automatically turn on misters and humidifiers when the humidity drops below a set level. You might also want to invest in a device to boost the water pressure. Higher pressure produces a finer mist, which cools more quickly. Suppliers recommend placing the nozzles about 2 feet apart around the perimeter of the greenhouse, between the wall and the benches. Place the nozzles underneath the benches so the mist doesn’t drench the plants. As with watering, avoid misting late in the day. Wet leaves and cold, humid air can encourage disease.
Lighting
The most basic greenhouses use only the sunlight nature provides to grow plants in a warmer environment than the plants would experience outdoors, but a greenhouse can be much more than that. If you’re willing and able to run power to the structure—or if it’s connected to your home—you can add lights that will not only extend growing days and growing seasons but will also allow you to care for your plants after dark. In fact, supplemental artificial lighting is key to turning a two- or three-season greenhouse into a four-season garden structure.
Supplementing natural light with artificial light can be tricky. Natural light is made up of a spectrum of colors that you can see (the red, orange, yellow, green, blue, indigo, and violet colors of the rainbow) and those you can’t see (infrared and ultraviolet). Plants absorb light from the red and blue ends of the spectrum—blue light promotes plant growth; light from the red end of the spectrum encourages flowering and budding. The red-blue light combination is easily achieved when the source is the sun but a little more difficult when you’re using artificial lighting. Intensity is also important: Lights that are set too far away or that don’t provide enough brightness (measured in lumens or foot-candles) will produce weak, spindly plants.
The three types of light bulbs used in greenhouses are incandescent bulbs, fluorescent tubes, and high-intensity discharge (HID) lights, which include metal halide (MH) or high-pressure sodium (HPS). Each has advantages and disadvantages, which is why greenhouse gardeners often use a combination of two or more types to achieve light that is as close to natural as possible.
Incandescent
Ordinary tungsten incandescent bulbs are inexpensive, readily available, and a good source of red rays, but they are deficient in blue light. They can be useful for extending daylight for some plants and for supplementing low light levels, but they are not an efficient primary source of light. Incandescent lights produce a lot of heat—hanging them too close to plants can burn foliage, but if you hang them at a safe distance, they don’t provide enough intensity for plant growth. The average life span of an incandescent bulb is about 1,000 hours.
Fluorescent
Fluorescent tubes are more expensive than incandescent bulbs, but the higher cost is amply offset by their longevity and efficiency: bulb life for fluorescents is about 10,000 hours, and they provide the same amount of light as incandescents with only one-quarter to one-third the amount of energy. They also produce much less heat than incandescent bulbs.
The right lighting in a greenhouse increases the number of hours you can work in the structure each day and expands the growing season and growing hours of plants.
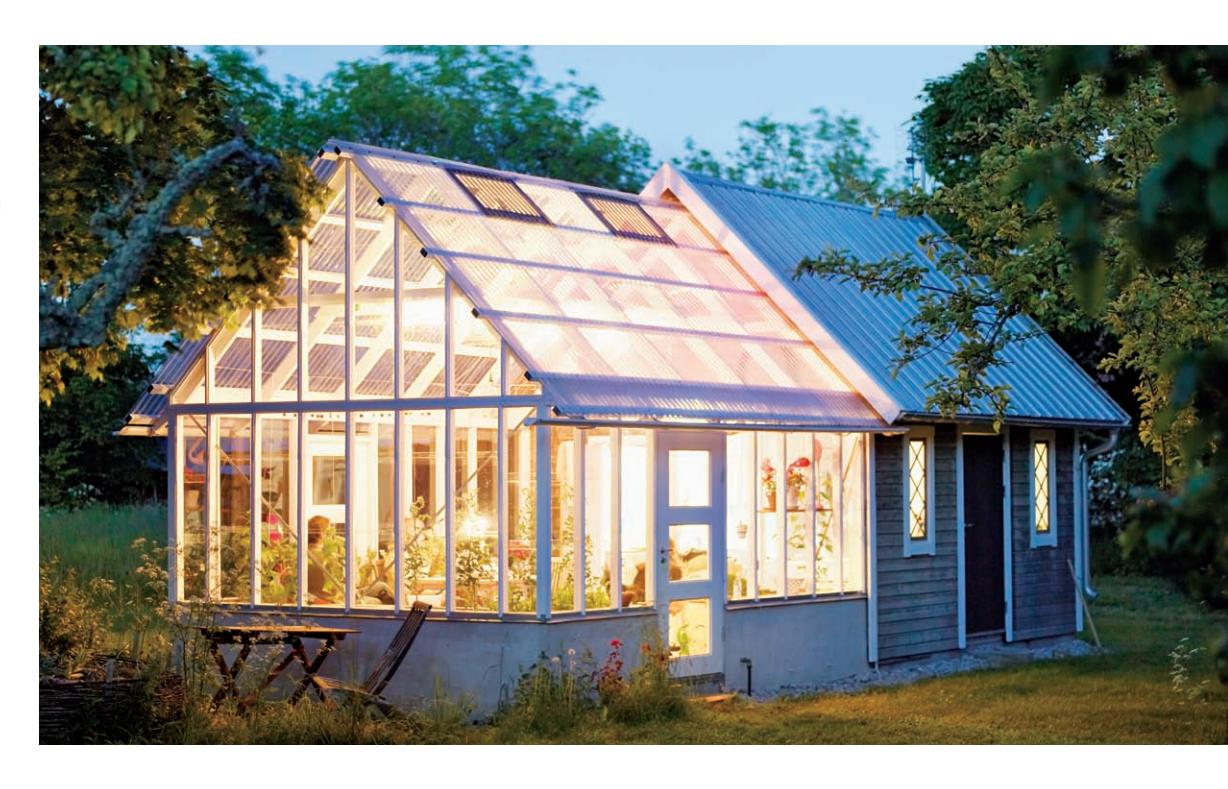
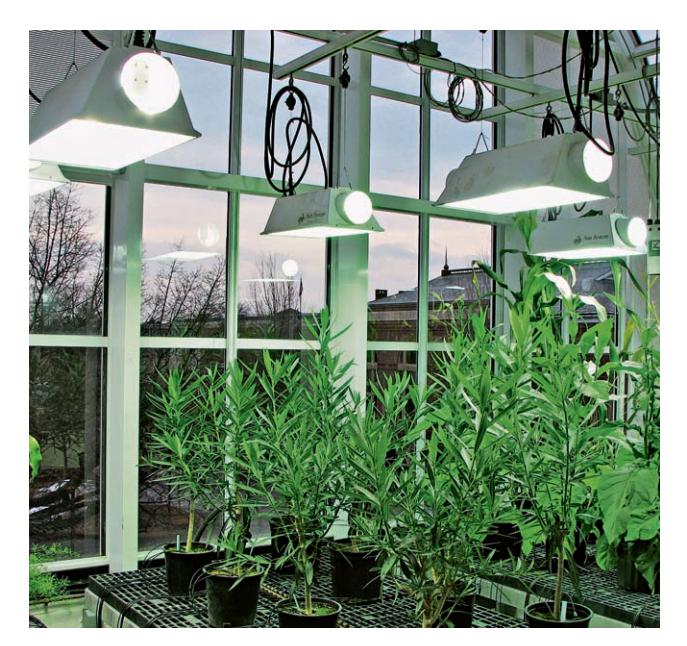
Fluorescent is a better source of growth-stimulating light for your greenhouse. It must, however, be hung relatively close to plants in order to spur growth.
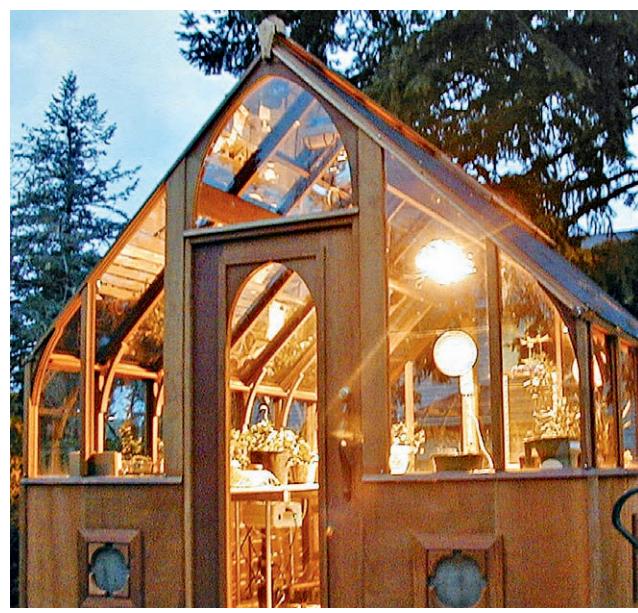
Ordinary incandescent lights aren’t particularly good sources of growth-promoting light, but they can help heat a greenhouse. And their attractive warm light also turns a greenhouse into a nighttime landscape design feature.
Fluorescent bulbs (or “lamps,” as they’re called by the lighting industry) come in a variety of colors and temperature ranges, including full-spectrum light. Cool white lamps, which produce orange, yellow-green, blue, and a little red light, are the most popular choice. To provide seedlings and plants with a nearly full spectrum of light, many growers combine one cool white lamp and one soft (or warm) white lamp in the same fixture.
Due to their energy efficiency and low heat output, fluorescent-tube fixtures are a great all-around choice for starting seedlings and growing small plants.
The downside to using fluorescents as grow lights is that they must be hung very close to the plant—from 2 to 8 inches, depending on the plant to be effective. This makes them most useful for propagation and low-growing plants.
HID
High-intensity discharge (HID) lights work by sending an electrical charge through a pressurized gas tube. There are two types: high-pressure sodium (HPS), which produces light in a narrow yellow-orange-red band, and metal halide (MH), which produces a broader range of light waves but tends to be more toward the white-blue-violet end of the spectrum.
Novice growers tend to use metal halide lights if they’re using grow lights at all. But more experienced greenhouse gardeners, and those who grow throughout the year, may use a combination: MH lights to start plants off and encourage early growth and bushiness, then switching to HPS as the plants mature, because HPS light encourages flowering and fruiting.
In fact, although most fixtures do not allow for bulbs to be interchanged, convertible fixtures are available that do allow the gardener to switch between bulbs.
HID lights of both types are very expensive, but they last a long, long time. A standard 400-watt HID bulb can provide 20,000 hours of lighting. These bulbs also light a large area: that single bulb will provide enough light for 16 square feet of plants. HID lights do, however, produce a significant amount of heat. Hang them high in the greenhouse, and provide plenty of ventilation in warmer months.
LED Grow Lights
As lighting technology continues to evolve, light-emitting diodes (LEDs) are growing in popularity and use. Manufacturers have developed special LED grow lights that include both blue and red light waves, effectively serving all the needs of plants—from initial growth through mature budding, flowering, and fruiting. The big bonus of these bulbs is that they last almost as long as HID lights do but cost a fraction of the price. The lights can be used with conventional fixtures and provide wide, diffuse illumination that prevents the light from ever burning plant leaves.
Heating
Novice greenhouse gardeners can gain knowledge and extend their growing season with a basic lean-to or tiny kit greenhouse. But if you’re going to take advantage of the full potential inherent in greenhouse gardening, you’ll need to heat the greenhouse. There are several ways to do that. Some techniques, such as using a heat sink, are usually meant as a complement to a main heat source. In any case, the most common and simplest way to heat your greenhouse is with a heater. The two main types are electric and fuel-fired (gas, propane, kerosene, or oil).
Electric heaters are inexpensive and easy to install. They provide adequate heat for a small greenhouse in a temperate climate and are useful for three-season greenhouses. However, they are expensive to operate (although relative costs are constantly changing). Electric units can also distribute heat unevenly, making it too warm in some areas of the greenhouse and too cold in others. Placing a heater at each end of the greenhouse can help. If you use an electric heater, be sure the fan doesn’t blow warm air directly on the plant leaves; they may scorch.
Gas heaters usually cost more than electric and most areas require that a licensed professional hook them up, but heating bills will be lower than if you use an electric heater. Gas heaters operate much like a furnace: a thermostat turns on the heat when the temperature drops below its setting. You can help to distribute the heat by using a fan with the heater. If you plan to use a gas heater, install the gas line when you’re building the foundation. It is also important to ensure that the heater is vented to the outside and that fresh air is available for combustion. Poor ventilation can cause dangerous carbon-monoxide buildup.
Propane, oil, and kerosene heaters also need to be vented, and if you’re using kerosene, be sure it’s high-grade. Another option is hot-water heating, in which the water circulates through pipes set around the perimeter of the greenhouse under the benches. You can also consider overhead infrared heat lamps and soil-heating cables as sources of heat.
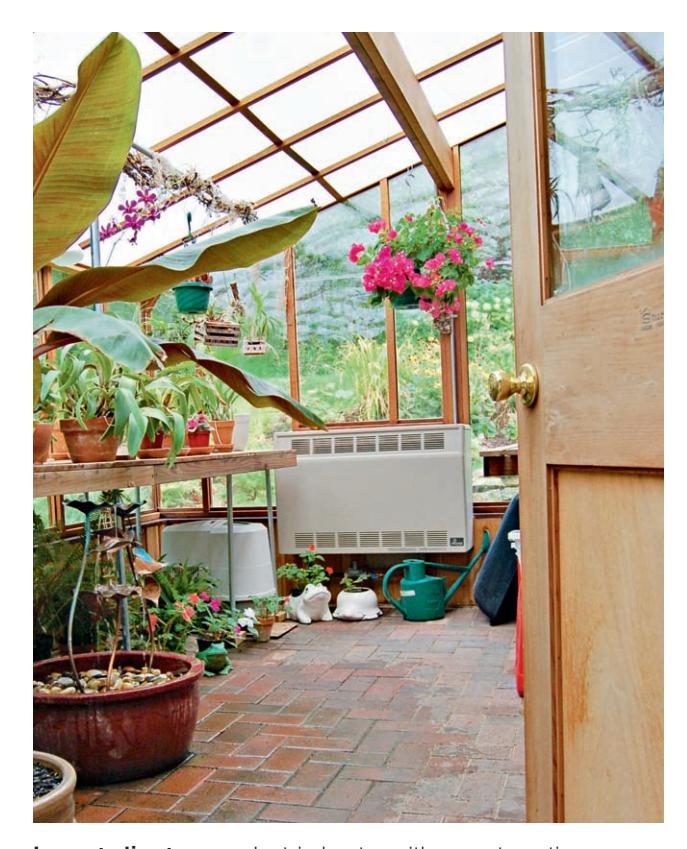
In most climates, an electric heater with an automatic thermostat will be sufficient to protect tender plants on cold nights. Electricity is an expensive heating option, however, so it’s best reserved for moderate heating needs.
Heating Requirements
- Heaters must be equipped with an automatic shut-off switch.
- Position more than one thermometer at bench level throughout the greenhouse so you can check that heat is evenly distributed.
- Do not place thermometers or thermostats in direct sunlight.
- Install an alarm or set a smartphone alert to warn you if the temperature drops dangerously low. Set the temperature warning high enough to give you time to remedy the problem before plants die.
The Radiant Heating Option
Heat rises. That simple fact is the principle behind an in-floor greenhouse radiant heating system. Piping in the floor radiates heat upward. Although home radiant-floor heating systems use electrical mats, those would be impractical in a greenhouse, because they would be expensive to run and prone to shorts. That’s why radiant heating systems in greenhouses are plumbed; hot water flows through pipes, heating the air above. A boiler heats water on demand, as needed.
The system is set with a thermostat that turns it on when the temperature drops below a preset level. The advantage of this type of system is even, uniform heating. It’s also efficient.
However, a radiant greenhouse heating system does require upfront planning and expense. The pipes are run in a gravel bed below the greenhouse floor. They can be run in a concrete slab or beneath a tile or paver surface. The thinner the floor, the more efficient the heating. PEX tubing makes this a much simpler project than was once the case with rigid plumbing lines. However, the major expense remains the boiler that heats the water.
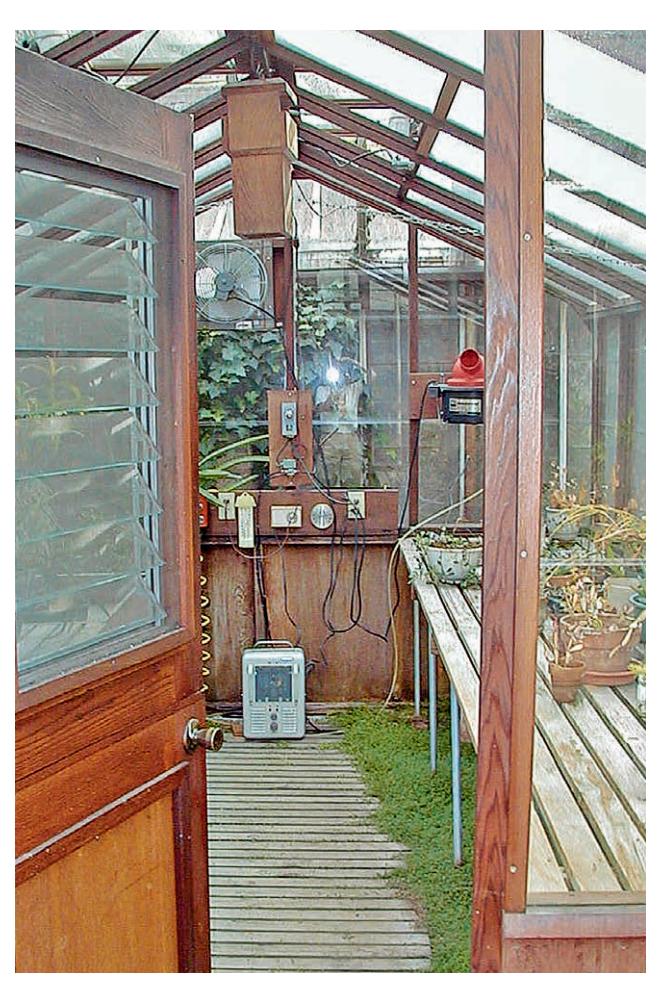
A portable space heater may be all the supplemental heat your greenhouse requires. Use it with caution, and make sure yours shuts off automatically if it overheats or is knocked over.
Calculating Heat Needs
Heat is measured in British thermal units (Btu), the amount of heat required to raise one pound of water 1 degree Fahrenheit. To determine how many Btu of heat output are required for your greenhouse, use the following formula.
Area (the total square footage of the greenhouse panels) × difference (the difference between the coldest nighttime temperature in your area and the minimum nighttime temperature required by your plants) × 1.1 (the heat-loss factor of the glazing; 1.1 is an average) equals Btu.
Calculate the area by multiplying the length by the height of each wall and roof panel in the greenhouse and adding up the totals. Here’s an example, using 380 square feet for the greenhouse area and 45 degrees Fahrenheit as the difference between the coldest nighttime temperature (10 degrees Fahrenheit) and the desired nighttime greenhouse temperature (55 degrees Fahrenheit). 380 square feet × 45 × 1.1 = 18,810 Btu.
If the greenhouse is insulated or uses double-glazed glass or twin-wall polycarbonate, you can deduct 30 percent from the total Btu required; if it’s triple-glazed, deduct 50 percent. You can deduct as much as 60 percent if the greenhouse is double-glazed and attached to a house wall.
Conserving Heat
On cold, cloudy days and at night, solar heat is lost. Even if you have supplemental heating, holding onto that heat is essential to maintaining an optimal climate. Insulating the greenhouse and making use of heat sinks are the most effective means of conserving heat, but don’t overlook heat thieves such as cracks and gaps. Be sure the glazing is tight, and seal any opening that lets in cold air.
If you built a concrete foundation, it may have polystyrene board installed between the concrete and the soil. Concrete rapidly loses heat if the ground around it is cold, and polystyrene insulation helps to reduce this heat loss. You can use polystyrene board or bubble insulation (similar to bubble wrap used for shipping) to temporarily insulate the walls of the greenhouse. Simply attach the material to the greenhouse frame beneath the benches before winter and remove it in the summer. You can also insulate the greenhouse from the outside. Plant low-growing plants around the foundation, or prop hay bales or burlap bags filled with dry leaves against the walls.
Heat Sinks
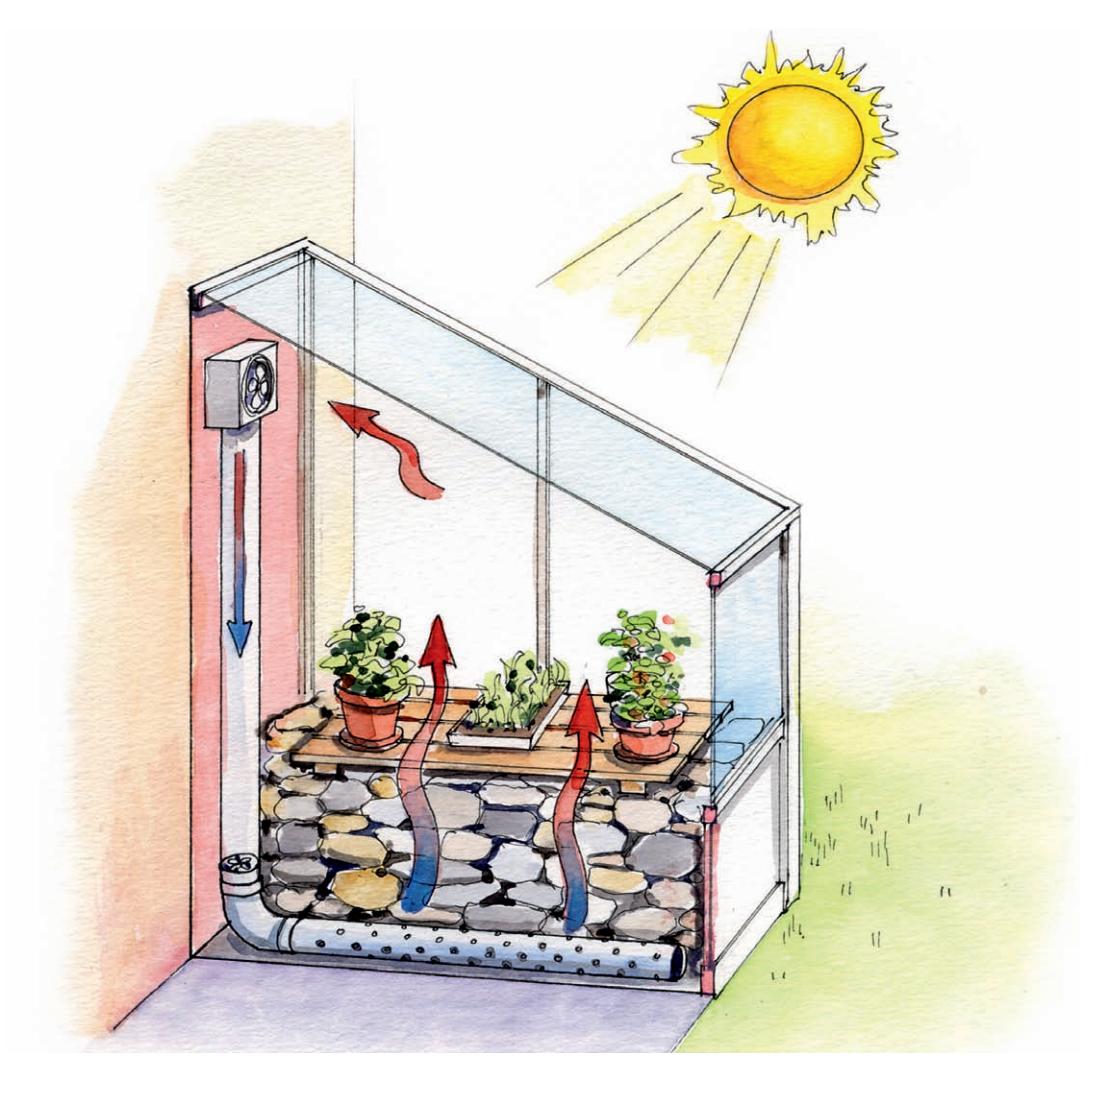
Heat sinks absorb solar energy during the day and radiate it back into the greenhouse at night. Stone, tile, and brick floors and walls are good collectors of heat, but to be really effective, they should be insulated from underneath. Piles of rocks can act as heat sink, but the best option is a blue- or black-painted barrel or drum full of water. Place a few of them around the greenhouse. If you have an attached greenhouse, painting the house wall a dark color can cause it to radiate solar heat back into the greenhouse at night. A light-colored wall, on the other hand, can help reflect heat and light back into the greenhouse during the day.
This heat sink system uses solar energy to heat the greenhouse. Air heated by the sun is drawn in by the fan and blown into the rock pile, which also absorbs solar heat. Heat is radiated back into the greenhouse after the sun goes down.

Smart Heat Conservation
- Reduce the temperature by 5°F. Growth may be slowed, but plants will survive.
- Make sure the greenhouse is as airtight as possible.
- To prevent drafts, add a storm door.
- Mulch the soil in raised benches to insulate it during cool seasons. Consider watering tropical foliage plants and other warm-season plants with water warmed to 65°F.
- Insulate all water- or steam-heating supply lines.
- At night, hang black cloth horizontally from the greenhouse ceiling as close to the plants and benches as possible to prevent the warm air from escaping through the roof.
- If the greenhouse uses automatic vents that are controlled by a separate thermostat, set that thermostat 5° or 10° higher than the heater thermostat to keep the vents from opening when the heat is on.
- Install an alarm system or smart phone alert that will go off when the temperature ranges above or below the safe limits or when there is a power failure.
- Make use of the heat exhausted by your clothes dryer by running the vent into your greenhouse.
- Plant a “shelter belt” of evergreens on the windward side of the greenhouse to reduce heating costs. (But be sure it is far enough away that it doesn’t cast shade on the greenhouse.)

Microclimates
Any yard and garden will most likely have microclimates. A sunny sheltered corner. A cool shady spot beneath old-growth trees. Those vary significantly from the general temperature and conditions of your landscape at large. Your greenhouse, too, has microclimates. For instance, most greenhouses are warmer near the roof and cooler at floor level. Some areas may be shaded for all or part of the day, while others receive strong, direct light. Like the plants in a garden, greenhouse plants have differing light, heat, soil, and moisture requirements. Before you place them in the greenhouse, take stock of the microclimates, and group plants according to their needs.
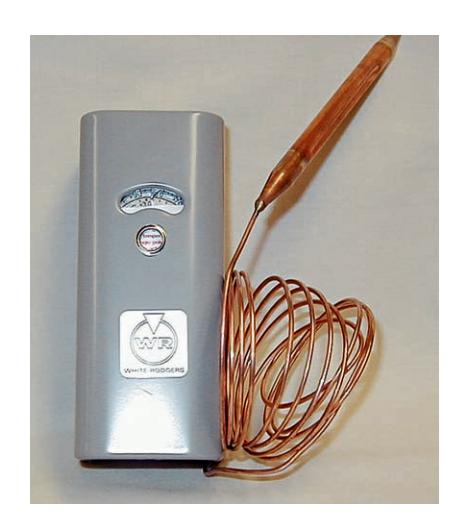
A heating and cooling thermostat is perhaps the most important greenhouse control device. The thermostat will control heat sources and automatic vent controls to cool the greenhouse when temperatures climb into the danger zone for overheating plants.
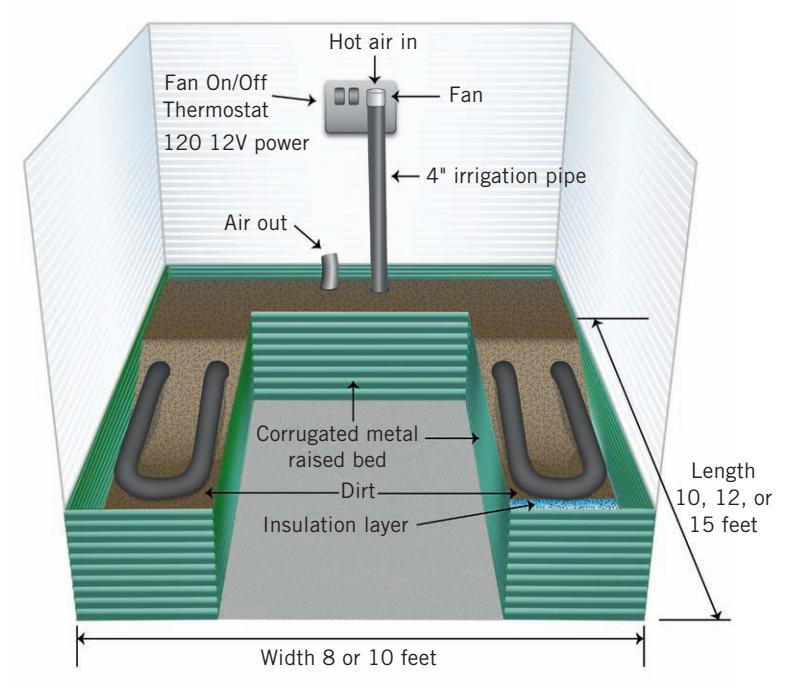
Products like this propriety soil-warming system are helping home gardeners use simple science to conserve heat and lower greenhouse heating bills.
Ventilation
Whether your plants thrive depends on how well you control their environment. Adequate sunlight is a good start, but ventilation is just as important. It expels hot air, reduces humidity, and provides air circulation, which is essential even during winter to move cold, stagnant air around, keep diseases at bay, and avoid condensation problems. You have two main options for greenhouse ventilation: vents and fans.
Because hot air rises, roof vents are the most common choice. They should be staggered on both sides of the ridgeline to allow a gentle, even exchange of air and proper circulation. Roof vents are often used in conjunction with wall vents or louvers. Opening the wall vents results in a more aggressive air exchange and cools the greenhouse much faster than using roof vents alone. On hot days, you can open the greenhouse door to let more air inside. Also consider running small fans to enhance circulation.
Vents can be opened and closed manually, but this requires constant temperature monitoring, which is inconvenient and can leave plants wilting in the heat if you are away. It’s far easier—and safer—to use automatic vent openers. These can be thermostat-controlled and operated by a motor, which turns on at a set temperature, or they can be solar-powered. Unlike thermostat-controlled vent openers, which require electricity, solar-powered openers use a cylinder filled with wax, which expands as the temperature rises and pushes a rod that opens the vent. When the temperature drops, the wax shrinks and the vent closes. How far the vent opens is dictated by temperature: the higher the temperature, the wider the vent opens to let in more air.
A fan ventilator is a good idea if you have a large greenhouse. The fan is installed in the back opposite the greenhouse door, and a louvered vent is set into the door wall. At a set temperature, a thermostat mounted in the middle of the greenhouse activates the fan, and the louvered vent opens. Cool air is drawn in through the vent, and the fan expels the warm air. The fan should be powerful enough to provide a complete air exchange every 1 to 1.5 minutes.
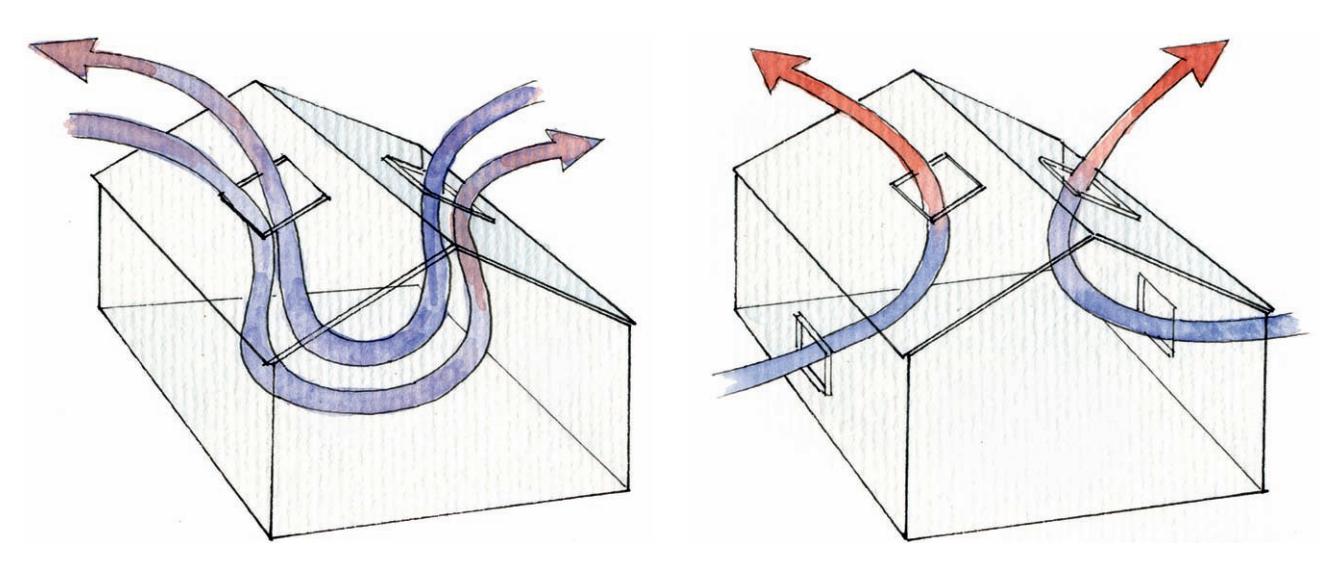
Venting your greenhouse–Installing at least one operable roof vent on each side of the ridgeline creates good air movement within the structure. Adding lower intake vents helps for cooling. Adding fans to the system greatly increases air movement.

Calculating Ventilation Requirements
Greenhouse manufacturers rarely include enough vents in kits, so be sure to buy more. To determine the square footage of venting your greenhouse should have, multiply the square footage of the floor by 0.2.
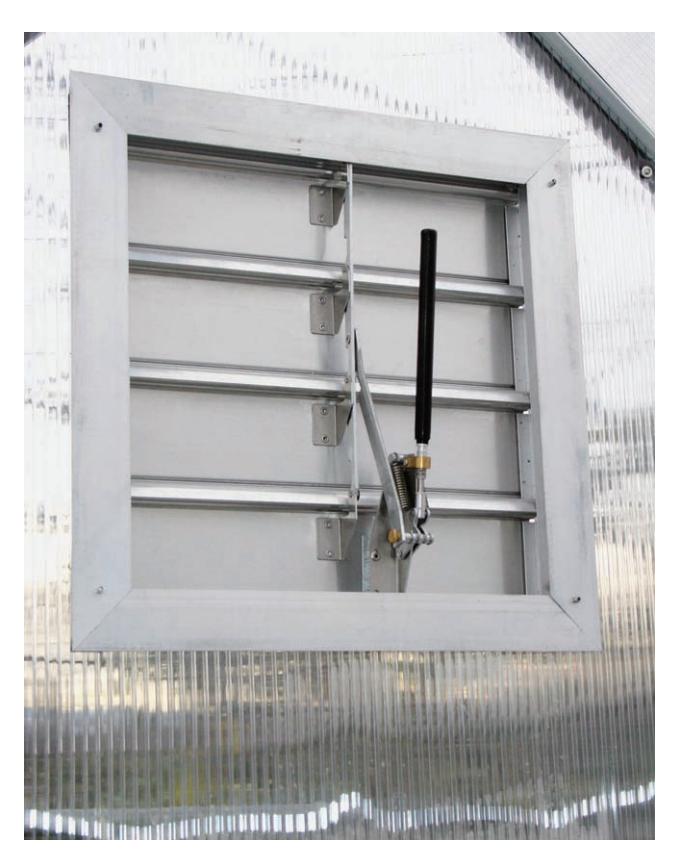
technology, but highly effective. This shutter assembly comes as a kit; the probe automatically opens the shutter when the heat inside the greenhouse reaches a preset level.
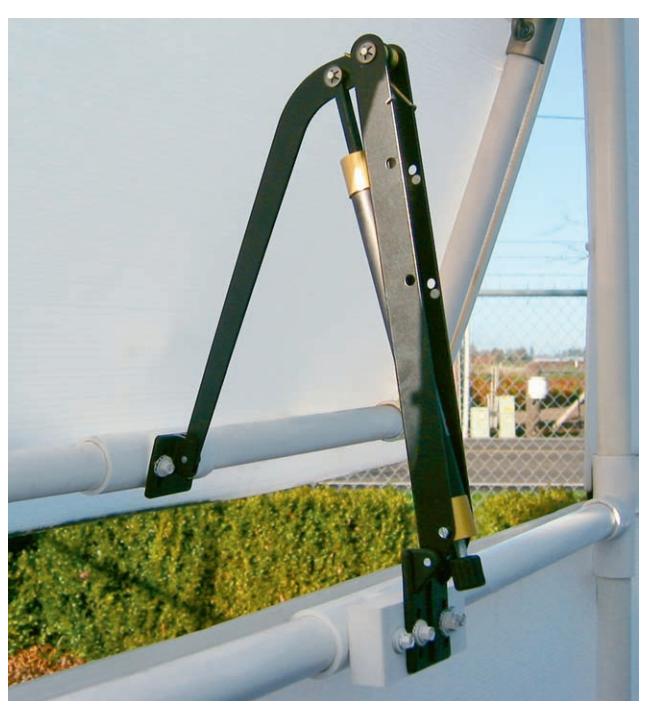
A simple solar opener like this can be retrofitted to a greenhouse vent window to open it whenever the heat increases on the inside of the greenhouse. A paraffin core expands, causing the opener to open the vent. Simple
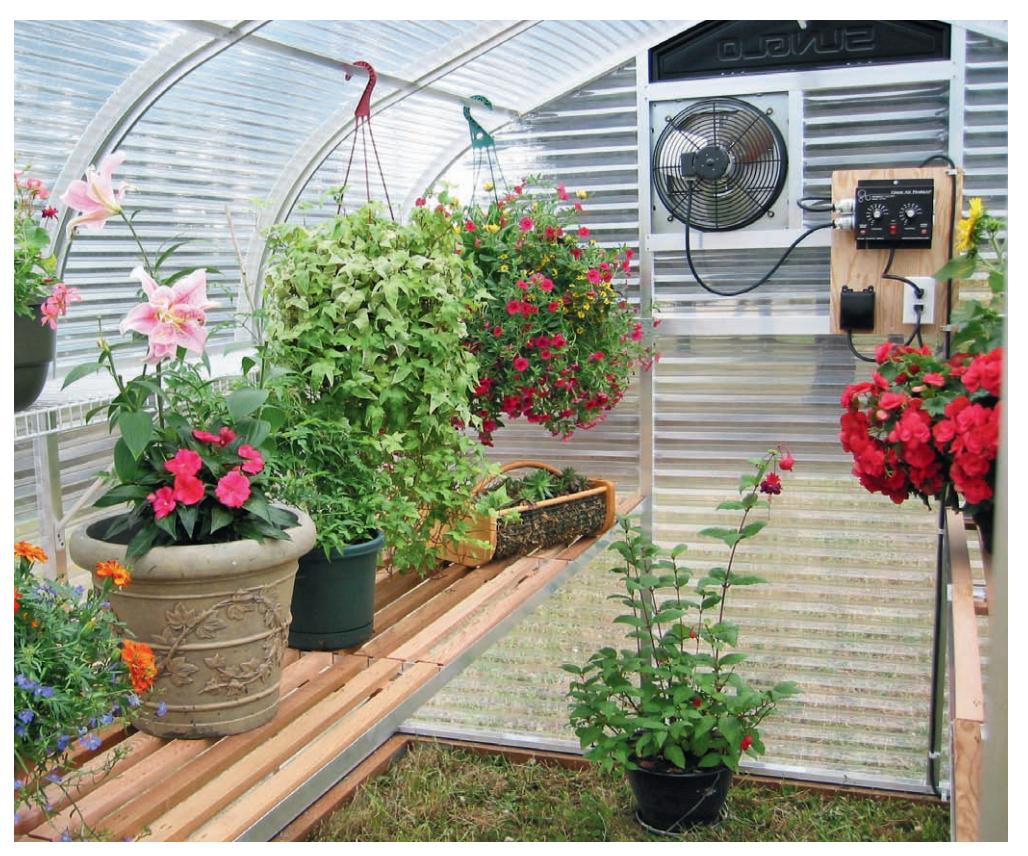
A vent fan like this one can be attached to a controller that opens the shutters and turns on the fan at precise levels of humidity or temperature, or on a timer. This actively ventilates the greenhouse, as opposed to the passive ventilation of a roof vent.
Cooling
Although vents and fans are the first line of defense when the temperature inside the greenhouse starts to climb, other cooling methods such as misting, humidifying, evaporative cooling, and shading can also help to maintain the ideal growing environment. Cooling is crucial during summer, but it can be just as important on a sunny winter day.
Shades
Two types of shades are available: cloth and roll-up. Shade cloth is usually woven or knitted from fiberglass or polyethylene and is available in many colors, although green, black, gray, and white are most common. You can also find shade cloth in silver, which, like white, reflects heat and sunlight and keeps the greenhouse cooler than darker colors. Shade cloth also varies in density, usually from 20 percent to 80 percent. The higher the density of the cloth, the more light it blocks (60 percent density blocks 60 percent of the light). Be careful when choosing shade density; too little light will slow plants’ growth.
Shade cloth can be simply thrown over the greenhouse and tied down when shading is needed, but this hampers airflow through the vents (unless you cut the cloth to size and install it in sections). Better ventilation is achieved by suspending the cloth 4 to 9 inches above the exterior glazing. Be sure the vents are open when you do this. Greenhouse shade suppliers can provide framework kits.

Greenhouse Shading Compound
Professional greenhouse growers with large operations typically apply greenhouse shading compound to the glazing of their structures so they can control heat entry and protect their plants. Similar to paint, shading compound contains ground pigments that reflect the sun’s rays. The compound is sprayed onto the glazing with an airless sprayer (you can use a hand-sprayer for a small greenhouse). Sold in 5-gallon buckets, it is diluted with water 8 to 1 for plenty of coverage. Some types are designed to be easily removed with water and a fine nylon broom so you can make adjustments as needed. Other formulations are intended to be permanent. For more information, ask about the product at your greenhouse supply store or do an online search for Greenhouse Shading Compound.
Roof shades, along with vents, help prevent a greenhouse from overheating in direct sunlight. Here, a combination of circulating fans and cloth shades mounted on the interior of the south-facing glass helps protect plants.
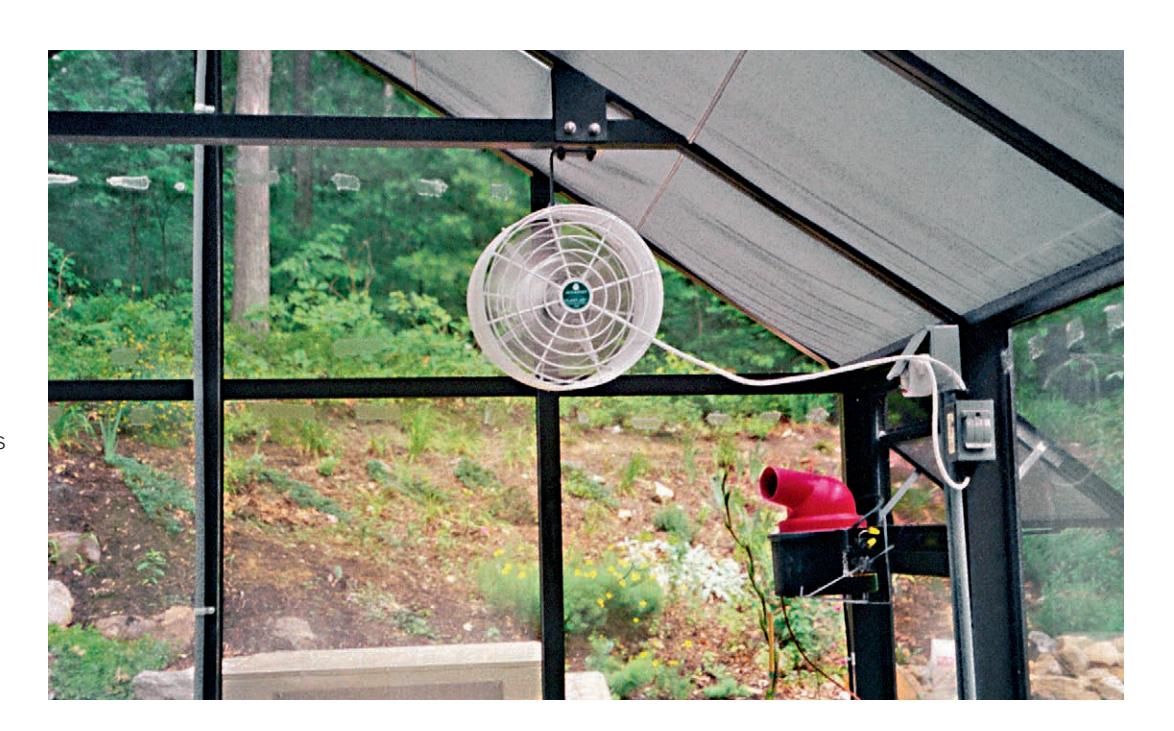
Cooling
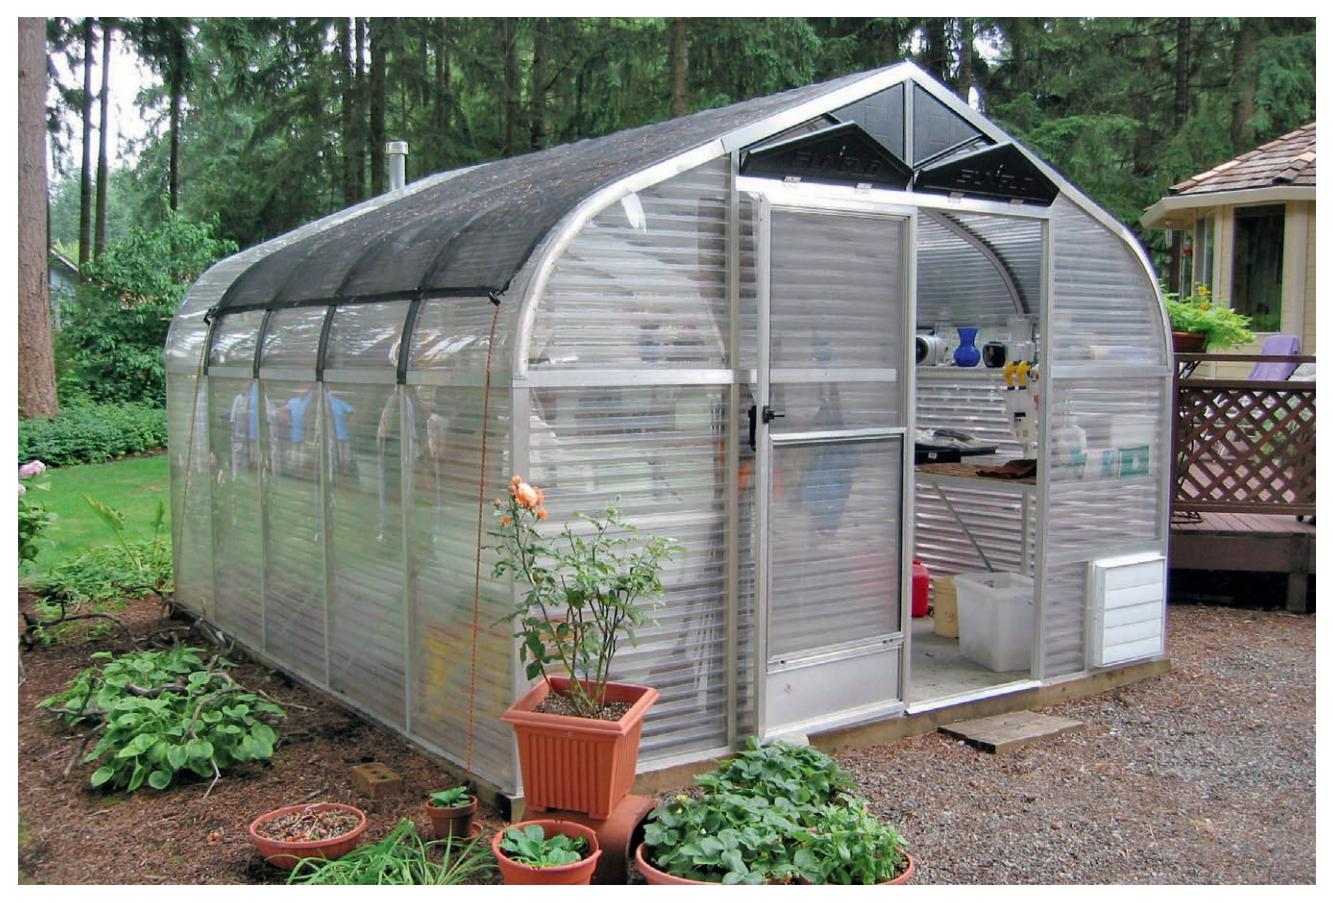
A removable shade cloth on a flower-garden hobby greenhouse, easily applied and removed, effectively blocks UV rays.
In addition to cloth, roll-up greenhouse shades may be constructed from aluminum, bamboo, or wood. They are convenient because you roll them up when they’re not needed, and they last longer than shade cloth, but they are more expensive.
Evaporative Coolers
Evaporative coolers (also called swamp coolers) cool the air by using a fan to push or pull air through a water-saturated pad. A portable cooler might be sufficient for a small greenhouse; larger greenhouses will benefit from a unit cooler placed outside. Used when the humidity outside is less than 40 percent, these units draw dry outside air through the saturated pad, where it is cooled. The air travels through the greenhouse and exits via a vent on the opposite side. It’s a good idea to use an algaecide with these coolers.
Liquid Shading
Some greenhouse gardeners choose to paint liquid-shading compounds (sometimes called whitewashing) over the outside glazing. These compounds are inexpensive and easy to apply, but they can be unattractive and tend to wash off in the rain. Liquid shading can be thinned or layered to the level desired, and the residue can be brushed off at the end of summer. (It is often almost worn off by that point anyway.) Some liquid-shading compounds become transparent during rainy weather to let in more light and then turn white when they dry.
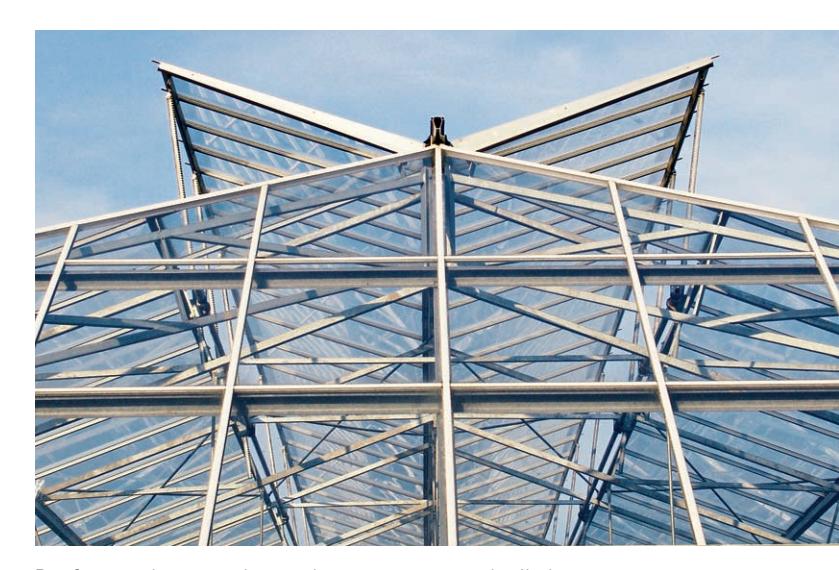
Sensor-triggered automatic roof vents are crucial for greenhouse cooling, though additional devices may be needed.
Workbenches + Storage
Workbenches are deceivingly important greenhouse additions that can create an efficient, pleasant work environment—or not. Misplaced, overlarge, or the wrong work surfaces will not only make it harder to move around, they can also block plant growth. That’s why it’s well worth your while to carefully plan exactly what work surfaces to use where.
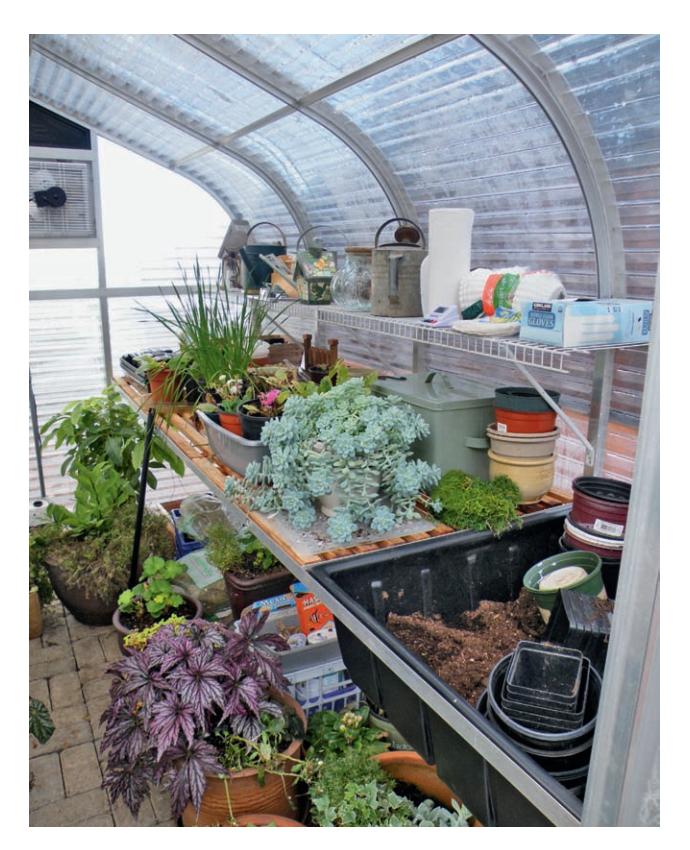
A slatted workbench provides ample workspace in a greenhouse, with a sink for collecting debris. A small, reflective wire shelf offers additional storage without blocking light.
One of the most important considerations is the space below the workbench. Left open over soil, this can be one more spot to grow young plants. However, use that area as storage and you curtail any chance of expanding the growing areas inside the greenhouse. Of course, if you’ve built your greenhouse with a knee wall, that area may already be shaded and prime territory for storing equipment or supplies.
Size + Shape
Some greenhouses come with workbenches and even shelves. Those may be adjustable, but often aren’t. In either case, you can customize supplied work surfaces to better serve your needs and preferences. Less expensive greenhouses are basic shells. If you’ve purchased one of those, measure the interior space carefully, especially the width (never rely on the outside measurements; they don’t include the width of the frame and glazing materials).
Before you decide on workbenches, plan for an aisle that facilitates easy movement; any greenhouse aisle should be at least 3 feet wide. Wider will always be better, because you’ll be moving heavy pots, cumbersome flats of plants, and unwieldy bags of soil. The most common configuration of workbenches used in greenhouses is one on either side, with a central aisle. A U-shape configuration allows you to incorporate even more work surfaces, but sacrifices a bit of growing area.
In the standard configuration, an 8-foot-wide greenhouse would work best with 2-foot-deep workbenches on either side. Wider greenhouses can comfortably accommodate wider workbenches, but never use a workbench that you can’t reach across. Although the average bench is between 28 to 32 inches high, choose a height that suits how tall or short you are.

Potting Materials
Greenhouse gardeners generally use either terra-cotta or plastic pots. Terra-cotta is more attractive and heavier than plastic, so those pots are less likely to be knocked over. They are also porous—water evaporates through the clay, so there is less risk of overwatering. However, you’ll have to water plants more often. Glazed terra-cotta holds moisture better than unglazed pots, and any terra-cotta pot is more expensive than plastic. Plastic pots hold moisture better than terra-cotta does. Gardeners who plan to start seeds and propagate plants often use plastic trays, flats, and cell packs, although peat pots, cubes, and plugs are also available for starting seeds.
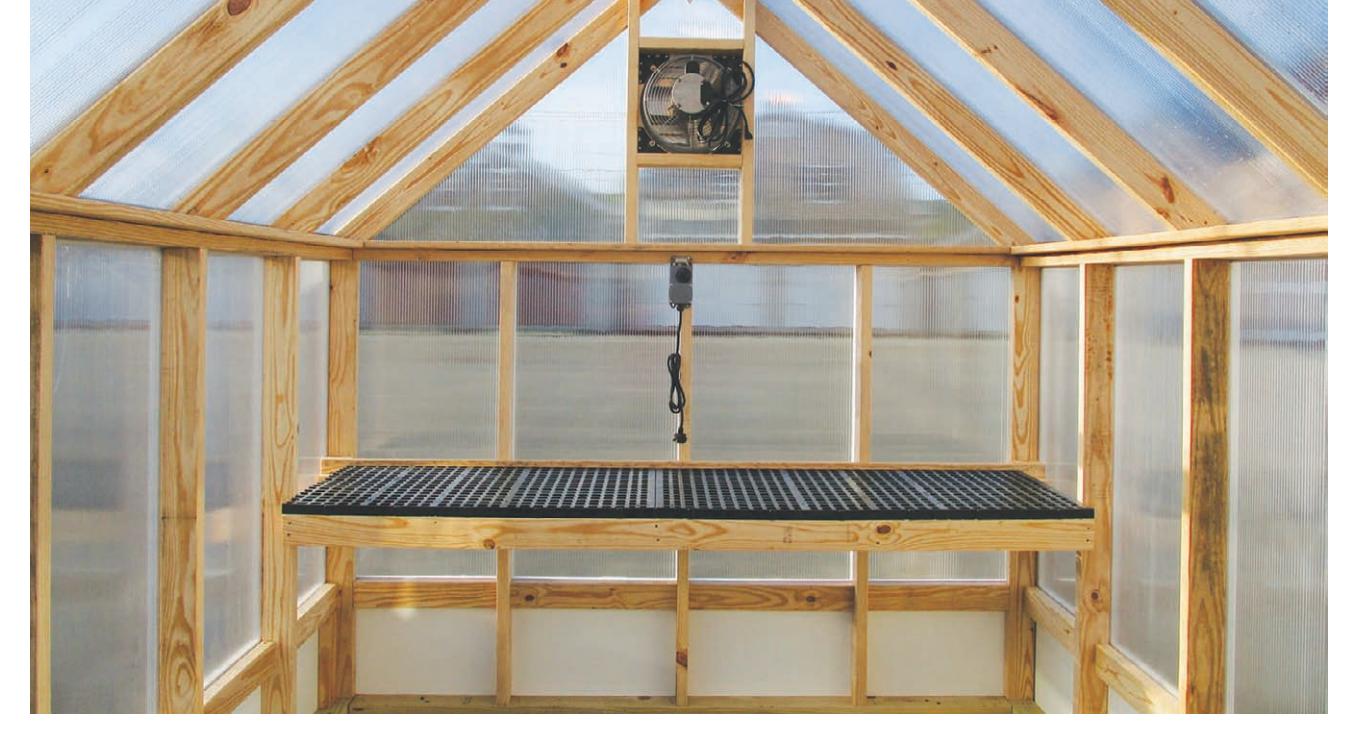
A built-in gable-end workbench with a durable, low-maintenance rubber surface offers ample workspace and storage underneath.

A hydroponic growing setup, illustrating the concept of growing plants without soil.
Hydroponics is the science of growing plants without soil, and works well for home greenhouse gardeners. A hydroponic growing medium holds plants in place. The medium can be polystyrene balls, expanded clay pellets, gravel, pea stone, perlite, vermiculite, rock wool, or coconut fibers. The simplest method is to place growing medium into a pot and add a nutrient solution once or twice a day. A more complex system involves using computer-controlled pumps to automatically flush plants’ roots with nutrient solution as necessary for maximum growth.
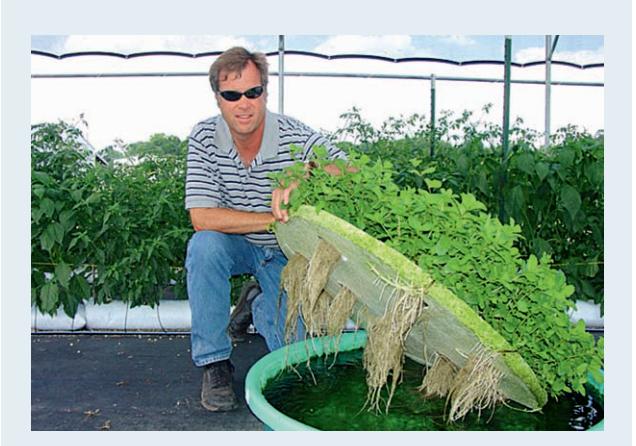
Lettuce roots growing through a medium into nutrient-rich water in a hydroponic system, using a child’s pool.
HYDROPONIC SYSTEMS Slatted counters are the most common, because they facilitate drainage and airflow. Some workbenches come with solid sinks, where you can collect soil during transplanting or contain water as you soak roots. Wire mesh is a less-expensive, low-maintenance work-surface option, but the mesh needs to be strong enough to support a full load of plants in newly moistened soil—considerable weight. Plastic-coated wire mesh is more cleanable and is excellent for shallow shelves mounted above a workbench. Solid workbench countertops can support capillary mats and should be stone, metal, or pressure-treated wood to prevent rot.
Placement
Regardless of layout, it’s wisest to run workbenches east to west, so that any plants receive even sunlight throughout the day. Leave an inch or two between the back edge of any workbench and the wall, to ensure efficient air circulation. Greenhouse frame material determines whether you can install shelves. Shelves can be added to a wood-framed greenhouse, and many aluminum greenhouse kits include predrilled framing, with hardware for shelves. Just remember that shelves and whatever is kept on them can shade the surface and plants below.
Easy-to-Build DIY Greenhouses
Some greenhouse designs are so simple that construction requires only a weekend. These can be built inexpensively, and may even be constructed of found materials or those leftover from other yard, garden, or home improvement projects. The foundation can be an anchored wooden frame or, for a more permanent structure, a concrete base.
Hoophouse
Economical and versatile, a hoop-style greenhouse (also called a hoophouse or a Quonset house) is constructed of PVC or metal pipes that are bent into an inverted U shape, attached to a base, and connected at the top by a ridgepole. A hoophouse is usually covered with plastic sheeting. A door can be set at one end, and there may be an exhaust fan or flap vent that can be rolled up for ventilation. Because the hoop greenhouse is lightweight, it is not a good choice in areas with strong winds. (For instructions on building your own inexpensive hoophouse, see pages 102 to 107.) DIY hoophouses are incredibly easy to construct and are scalable; you can make one as tall as you need and as long as the available space allows. Craft a base of the same tubing or materials used in the hoops, and the hoophouse will be portable as well. Most use an end flap for a simple door, but you can easily frame out an opening at one end of the structure.
A-frame Greenhouse
The industry often uses this term for any greenhouse with a peaked roof. Strictly speaking, though, an A-frame greenhouse has two walls running from the foundation, up at severe angles, meeting at the peak (forming the legs of an “A”). This simpler structure is a good DIY option that requires little framing expertise. An A-frame greenhouse is small and lightweight and can be made of wood or PVC. A series of A-frames is attached to a wood base and covered with plastic sheeting or rigid plastic panels, such as polycarbonate or fiberglass. Because of the steep pitch of the roof, this type of greenhouse easily sheds rain, snow, and leaves. It can also be portable.
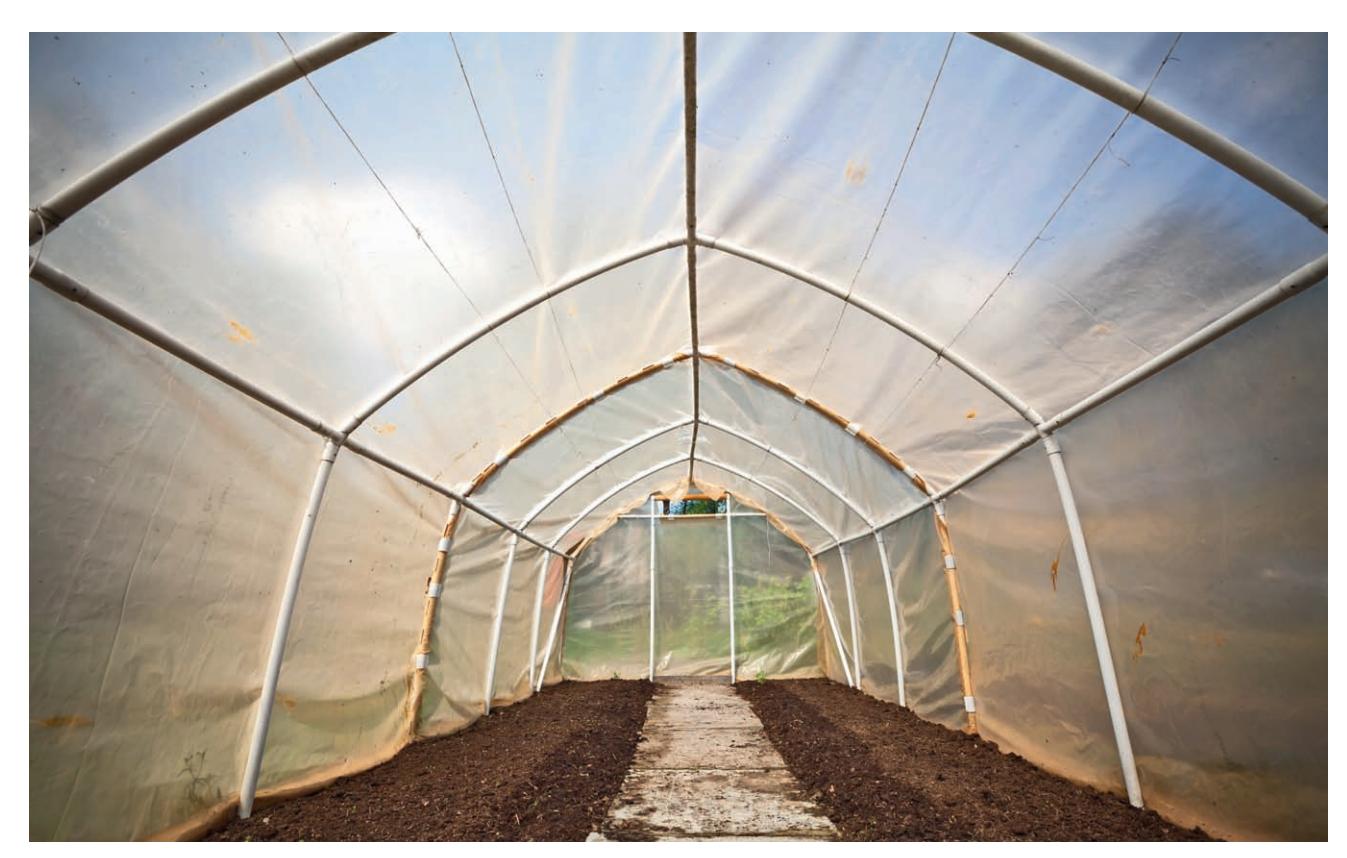
A homemade hoophouse constructed from PVC pipe and fittings, demonstrating a common DIY greenhouse variation.