Wood
Advantages: Often the first choice for custom greenhouses, wood framing is attractive, does not transfer heat as readily as aluminum, and has fewer condensation problems. It is also sturdy and, if you use cedar or redwood, rot-resistant and fragrant. You can easily fasten shelves, hooks, and other items to a wood frame. Western red cedar and redwood are recommended, but you can also use pressure-treated wood.
Disadvantages: Wood framing requires regular maintenance, and because it is bulkier than aluminum, it casts more shadow on greenhouse plants. This type of greenhouse is also difficult to add onto as a garden expands.
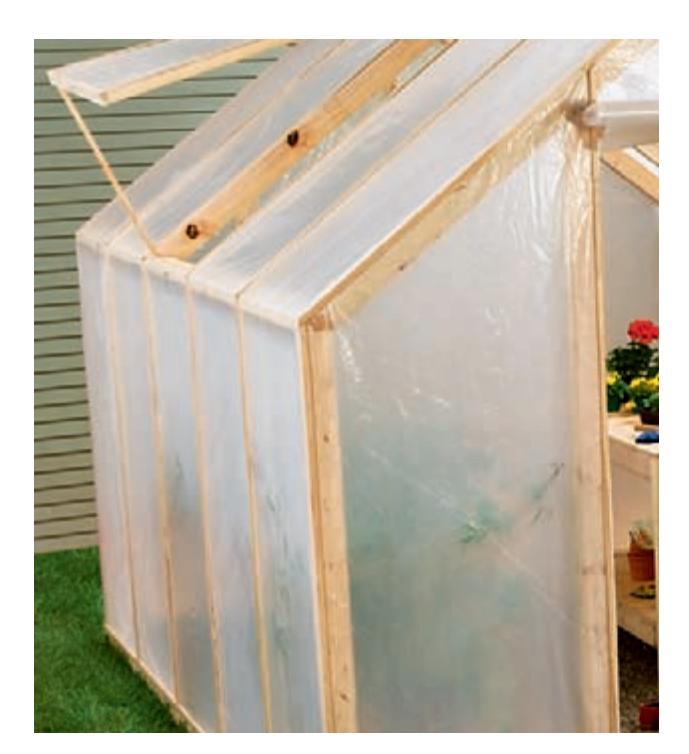
A wood frame with plastic glazing
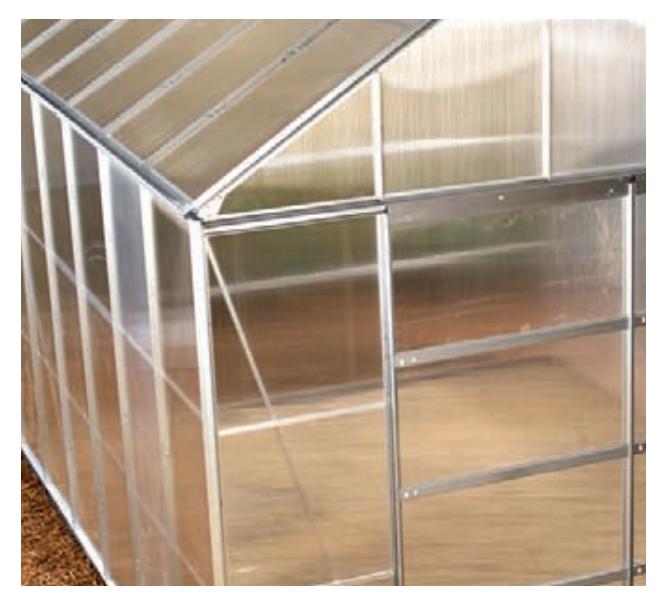
An aluminum frame with polycarbonate glazing
Aluminum
Advantages: The foremost advantage of aluminum framing is that it is low-maintenance. It is strong and lightweight, lasts longer than wood, and can easily accommodate different glazing systems and connectors. Aluminum is used for most greenhouse kits (see page 78) and can be powder-coated or anodized in various colors, usually brown, green, or white. Kits are typically easy to assemble and come with predrilled holes for attachments. Some manufacturers offer thermally broken aluminum framing, which sandwiches a thermal barrier between two layers of extruded aluminum to decrease heat loss.
Disadvantages: Because aluminum loses heat at a faster rate than wood, this type of greenhouse is more expensive to heat. In addition, a cheaply made frame can be too flimsy to withstand high winds or heavy snow. Aluminum framing can also present condensation problems.
Galvanized Steel
Advantages: Galvanized steel framing, mostly used for commercial greenhouses, is extremely sturdy, strong, and durable.
Disadvantages: Steel greenhouses are very heavy and expensive, not just to build but also to ship. Galvanized steel is subject to rusting if it is scratched, and the rust-resistant coating can eventually wear off.
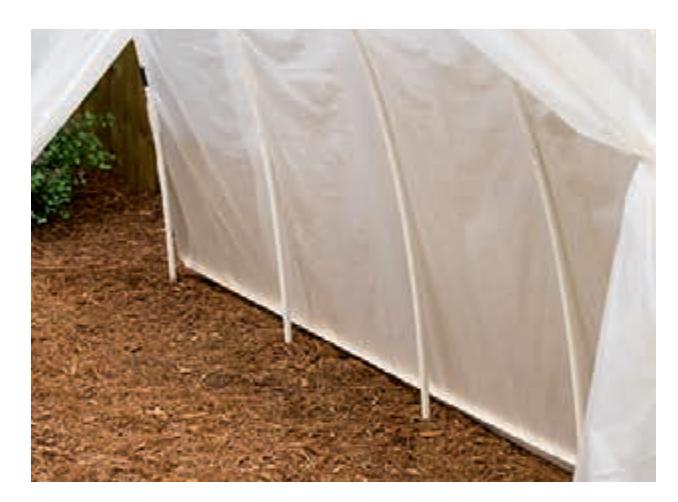
A PVC plastic tube frame with plastic sheeting
PVC (Polyvinyl Chloride)
Advantages: Inexpensive and easy to assemble from a kit, PVC framing is a good choice if you are just trying your hand at greenhouse gardening. It is lightweight, does not rust, and is ideal for portable or temporary greenhouses.
Disadvantages: High winds can easily damage PVC, so it’s suitable only for small greenhouses, and glazing choices are restricted to plastic sheeting.
Glazing & Covers
Greenhouse glazing falls into two categories: glass and plastic, each with strengths and weaknesses. The ideal covering lets in maximum light and deters heat loss. It should also be durable and require minimal maintenance.
Glass
Advantages: Glass is the material traditionally used for greenhouse glazing, and it remains popular today. It offers excellent light transmission, resists degradation due to ultraviolet (UV) light, and has a long lifespan. It is also nonflammable and, when layered, retains heat well. Double- and even triple-pane glass is available.
Disadvantages: Uninsulated single-pane glass offers very little heat retention. Glass is also breakable—playing children, tree branches, and hail are all threats to a glass greenhouse. For safety, tempered glass is recommended because it shatters into small, rounded “pebbles” rather than sharp, jagged pieces. Glass is heavy and requires a strong, square frame and foundation or the glass can crack. Although glass offers excellent light transmission, the light is harsh and direct, not diffused, and can easily burn plants. Insulated glass can be costly.
Polycarbonate
Advantages: Polycarbonate glazing is light, strong, and shatter-resistant, and when layered, it retains heat better than glass. It is available in corrugated, double-, and triple-wall panels. Corrugated polycarbonate provides excellent light transmission—equal to that of glass—but poor heat retention. Triple-wall polycarbonate (16 mm) offers excellent insulation but reduced light transmission. Polycarbonate is impact-resistant and long-lasting (15 years or longer). Unlike glass, it transmits diffused light, which eliminates shadows on plants and protects them from burns. Using twin- or triple-wall polycarbonate roof panels can increase heat retention while still allowing good light transmission.
Disadvantages: Polycarbonate scratches easily, and double- and triple-wall panels reduce light transmission. As with other plastic coverings, polycarbonate is subject to condensation, although it can be coated to reduce this problem. Like glass, it can also be costly, especially layered panels.
Acrylic
Advantages: Acrylic offers clarity and light transmission similar to glass but is lightweight and more impact-resistant. Acrylic panels are UV-resistant and can easily be molded. The material is less expensive than polycarbonate and can be layered for extra strength and heat retention. It is easy to cut and can be shaped with ordinary hand tools. Like polycarbonate, it can be coated to reduce condensation.
Disadvantages: Acrylic is not commonly used in home greenhouses. Less expensive types of acrylic can yellow, and even UV-coated acrylic will eventually need replacement. Unless it’s coated, it suffers from condensation problems.
Fiberglass
Advantages: Fiberglass has improved since its debut as a replacement for glass. It is now more UV-resistant and resists yellowing. Its light transmission is almost equal to that of glass, but unlike glass, fiberglass diffuses light. It also offers better heat retention than glass and is much more durable. Good-quality fiberglass can last 20 years.
Disadvantages: Like other plastics, fiberglass tends to have condensation problems. If corrugated fiberglass is used, dirt can accumulate in the valleys, which detracts from its appearance. Inexpensive fiberglass may have a lifespan of no more than five years.
Water
All greenhouses need some kind of water supply system. This can be as simple as a hose connected to the nearest outdoor spigot or as complex as a frost-proof underground line extending from your basement to a special hydrant in the greenhouse. The latter is obviously more convenient, and the system can operate year-round. It’s also a pretty big job that usually requires a plumber to make the final connections. A somewhat easier alternative is to install a shallow underground water line that you drain at the end of the growing season, similar to the supply line for a sprinkler system. Or, if your water demands are not too great and your greenhouse is located near your house, maintain a rainbarrel nearby.
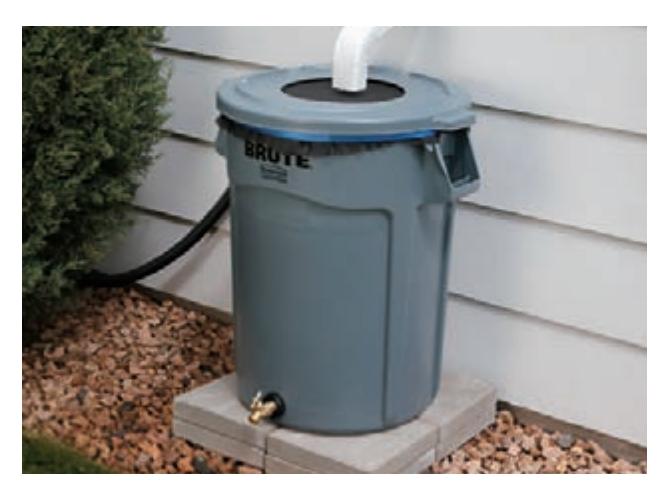
A nearby rainbarrel provides a ready supply of water for your greenhouse. It’s an easy water supply option but it lacks the convenience of linking the greenhouse to your house’s water supply system.
An All-season Water Supply
A dedicated all-season water line is certainly the ultimate setup for any freestanding greenhouse. To prevent the line from freezing during winter, the entire buried portion of the water line must be laid 6” below the frost line in your area. In the greenhouse, the water comes up through a freeze-proof yard hydrant (commonly used on farms), which drains itself of residual water each time it is shut off. The water drains into a gravel pit (installed per local code and the hydrant manufacturer).
In a typical installation, the supply line connects to a cold-water pipe in the house and includes a shutoff valve and backflow preventer (vacuum breaker). The line passes through the foundation wall (where it’s protected by a sleeve of rigid pipe) at the burial depth then runs underground to the hydrant. For most applications, flexible PE (polyethylene) tubing is the best all-around option for the buried portion of the supply line. As always, all connections and devices must follow local code requirements.
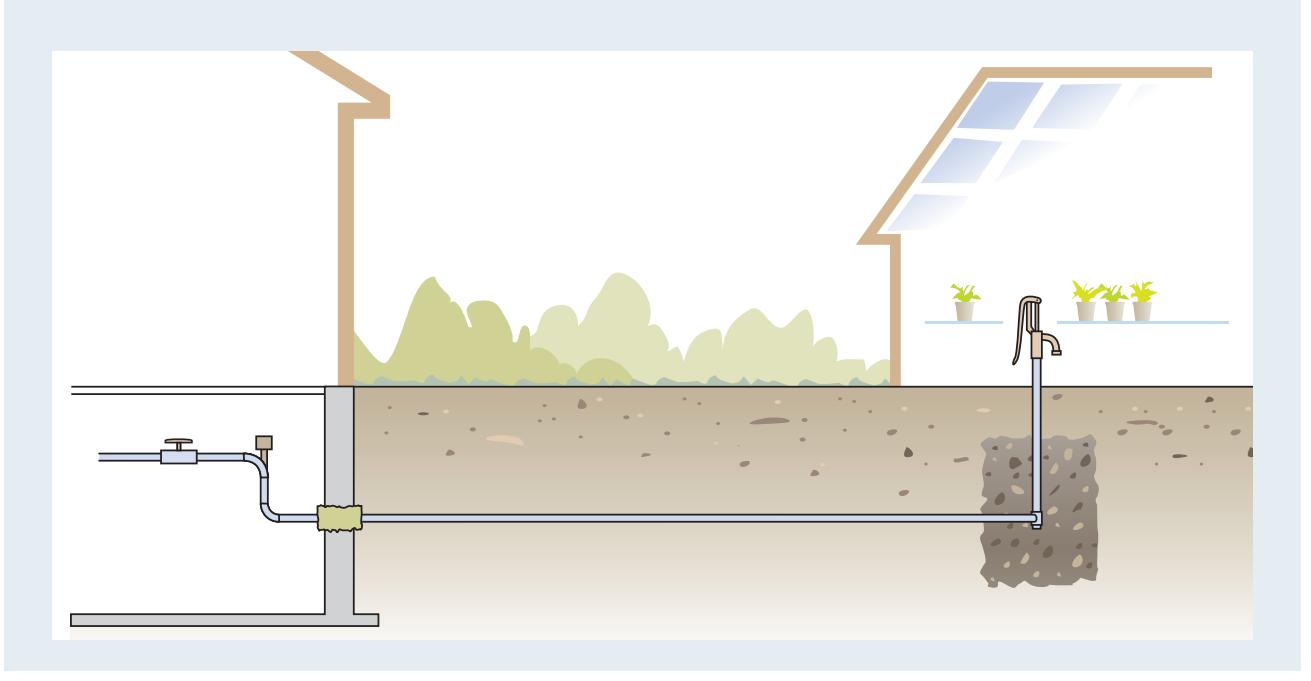
Diagram of an all-season water supply system with a freeze-proof yard hydrant.
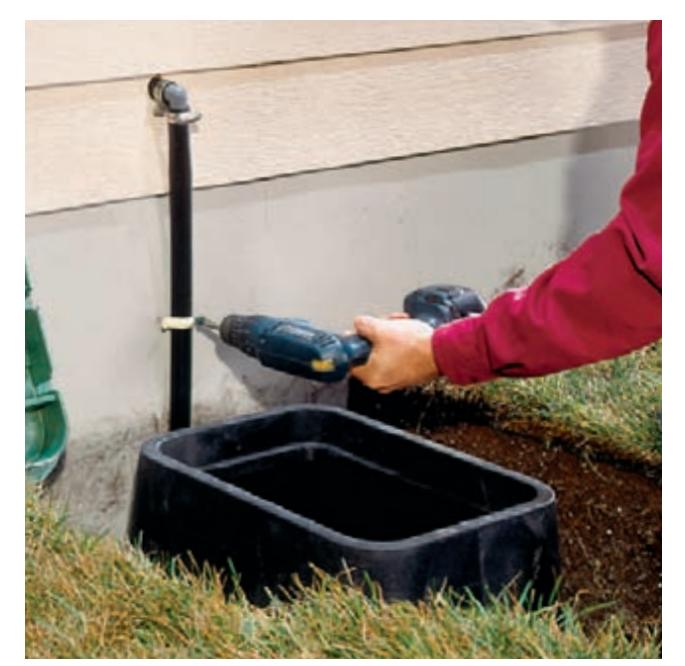
Exterior view of a seasonal water supply line connecting to a house.
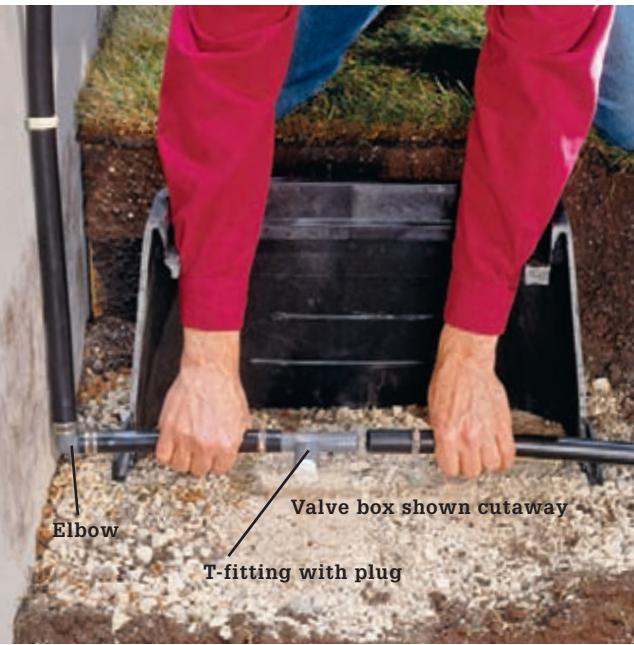
Interior view of a seasonal water supply line connection inside a greenhouse.
A seasonal water supply line is similar to an all-season setup but somewhat easier to install and is just as convenient for everyday use. The supply line connects to a cold-water pipe inside the house and runs through an exterior wall above the foundation, then down into a trench (left photo). At the house-end of the trench, the initial supply run connects to the underground line (typically PE tubing) inside a valve box. The box provides easy access to a T-fitting necessary for freeze-proofing the line each fall. The supply run is buried in a 10”-deep trench (or per local code) and connects to copper tubing and a standard garden spigot inside the greenhouse.
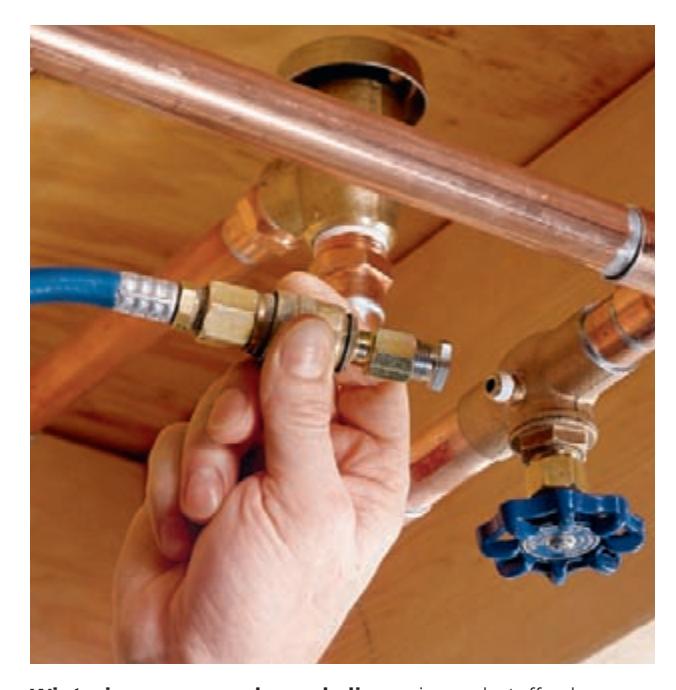
Instructions for winterizing a seasonal supply line with a shutoff valve and air nipple.
Winterize a seasonal supply line using a shutoff valve with an air nipple. With the valve closed and the greenhouse spigot open, blow compressed air (50 psi max.) into the line to remove any water in the tubing. Then, remove the plug from the T-fitting inside the valve box (photo, top right, this page) and store it for the winter.
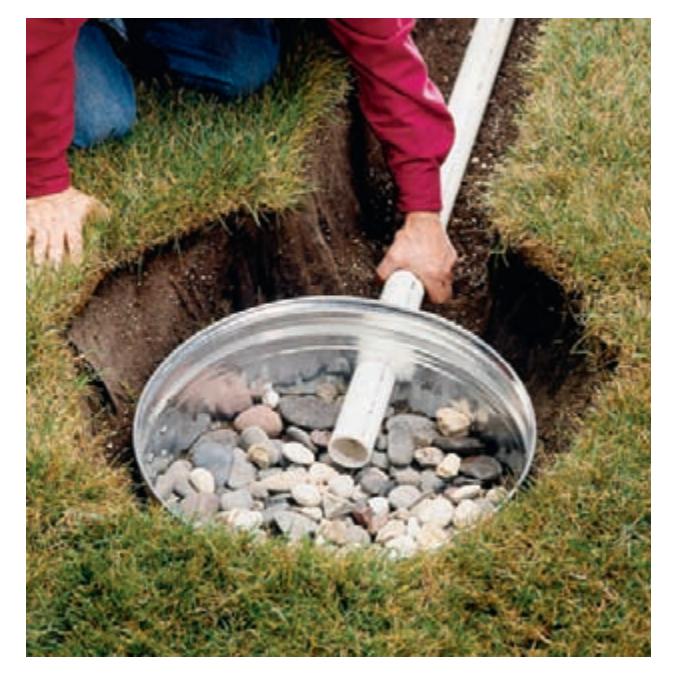
Diagram showing how to add a sink to a greenhouse with a dry well for drainage.
Adding a sink to a greenhouse can be fairly simple, provided it’s for cold water only and drains into a dry well. A dry well can be made with an old trash can or other container perforated with holes and filled with coarse rock. The well sits in a pit about 2 ft. in diameter by about 3 ft. deep and is covered with landscape fabric and soil. Dry wells are for draining gray water only—no animal waste, food scraps, or hazardous materials.
Watering & Misting Systems
If your greenhouse is fairly small and you enjoy tending plants daily—pinching off a spent bloom here, propping up a leaning stem there—you might enjoy watering by hand, either with a watering can (which is laborious, no matter how small the greenhouse) or with a wand. Hand-watering helps you to pay close attention to plants and cater to their individual needs. You’ll quickly notice signs of over- or under-watering and can adjust accordingly.
However, hand-watering isn’t always practical. Many gardeners use an automatic system such as overhead sprinkling and drip irrigation. This approach is convenient, especially when you are out of town, and it lets you meet individual plant-watering needs if you group those with similar requirements together. Greenhouse suppliers sell kits as well as individual parts for automated watering systems. Be sure your system includes a timer that can be set to deliver water at specific times of the day, for a set duration, and on specific days of the week. You can also incorporate water heaters and fertilizer injectors into your system.
Overhead-sprinkler systems are attached to the main water supply and use sprinkler nozzles connected to PVC pipes installed above the benches. The system usually includes a water filter, which prevents the nozzles from clogging, and a pressure regulator. Set the system to water in the morning and during the hottest part of the day. Avoid watering late in the day so the plants will be dry before nightfall, when the temperature drops and dampness can cause disease.
Drip-irrigation systems use drip emitters to water plants slowly, a drop at a time, when moisture is needed. Each plant has an emitter attached to feeder lines that connect to a drip line of PVC tubing or pipe, which runs along the benches and back to the main water supply. Unlike overhead sprinklers, drip irrigation ensures that the plant leaves stay dry. It also helps to conserve water.
If you prefer to water plants from underneath, consider capillary mats. These feltlike mats are placed on top of the bench (which is first lined with plastic)
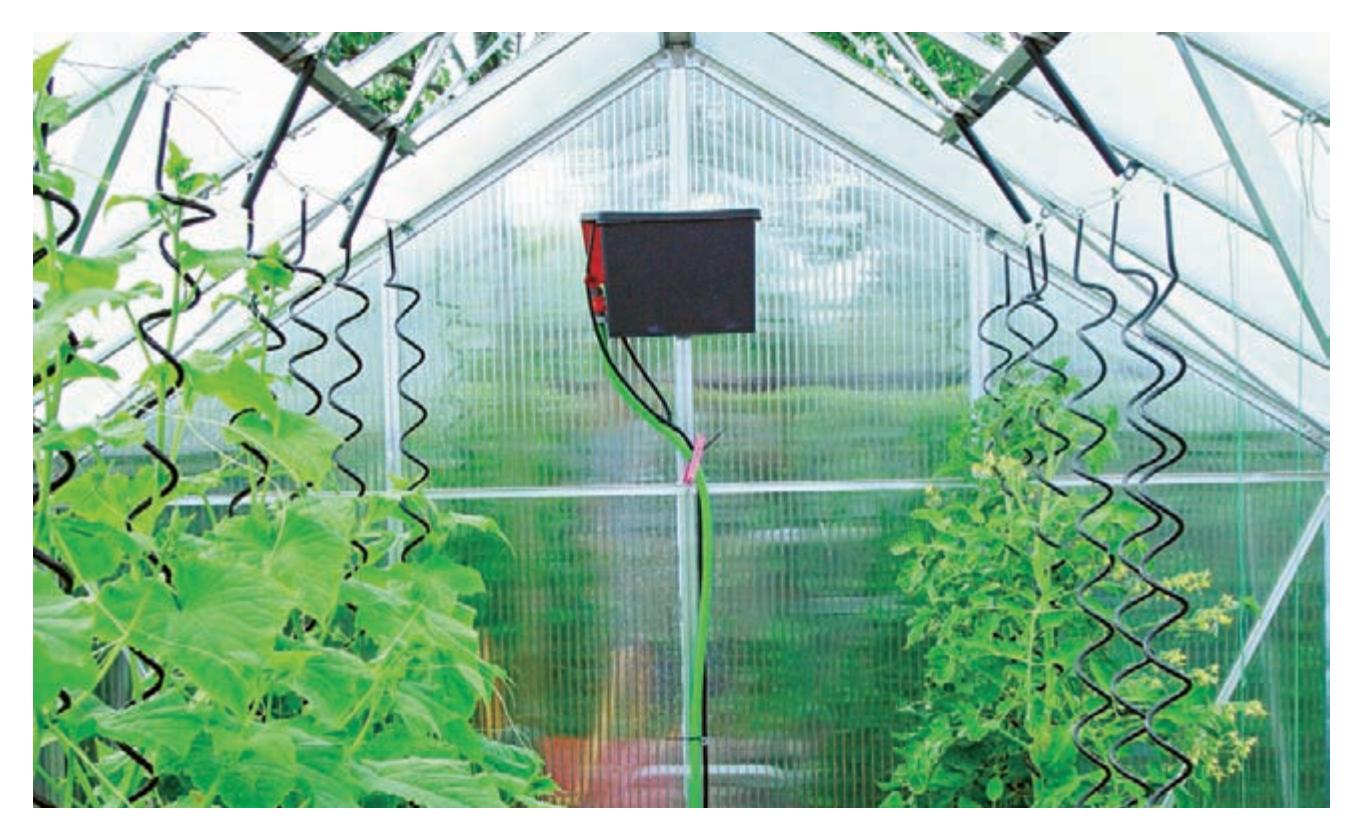
This automatic drip watering system is fed by a garden hose that connects to the mixing tank. In the tank, water and fertilizer are blended to a custom ratio and then distributed to plants at an adjustable rate via a network of hoses, drip pins and Y-connectors (See Resources, page 236). NOTE: The spiral trellis supports hanging from the greenhouse roof are not part of the watering system.
and under the plants, with one end of the mat set into a reservoir attached to the bench. The reservoir ensures that the mat is constantly moist. Moisture from the mat is drawn up into the soil and to the plant roots when water is needed. Unlike drip irrigation and overhead sprinkling, capillary-mat watering systems do not require electricity, pipes, or tubing. However, unless they are treated, the mats will need regular cleaning to prevent mildew and bacteria buildup. To ensure that the system works properly, it’s important that the bench be level.
Regardless of the watering system you choose, use lukewarm water. Cold water can shock the roots, especially if the soil is warm. If you’re hand-watering, let the water sit in the greenhouse so it warms up to ambient temperature. (Keep it out of the sun, though—you don’t want it to get too hot). Wand watering and automatic systems can benefit from an installed water heater.
Misting
When the temperature inside the greenhouse rises and the vents open, they release humidity. Misting increases humidity, which most plants love—levels of about 50 percent to 65 percent are ideal—and dramatically decreases the temperature by as much as 20° F. Misting systems are available through greenhouse suppliers. You can buy a complete system, which might include nozzles, tubing, PVC pipe, a humidistat, and sometimes a hard-water filter and a pressure gauge, or you can buy the parts separately to create a customized system. The size of the greenhouse will determine the size of the system: Larger greenhouses need more nozzles and in turn more tubing and pipe.
Humidistats can automatically turn on misters and humidifiers when the humidity drops below a set level. You might also want to invest in a device to boost the water pressure. Higher pressure produces a finer mist, which cools more quickly. Suppliers recommend placing the nozzles about 2 ft. apart around the perimeter of the greenhouse, between the wall and the benches. Place the nozzles underneath the benches so the mist doesn’t drench the plants. As with watering, avoid misting late in the day. Wet leaves and cold, humid air can encourage disease.
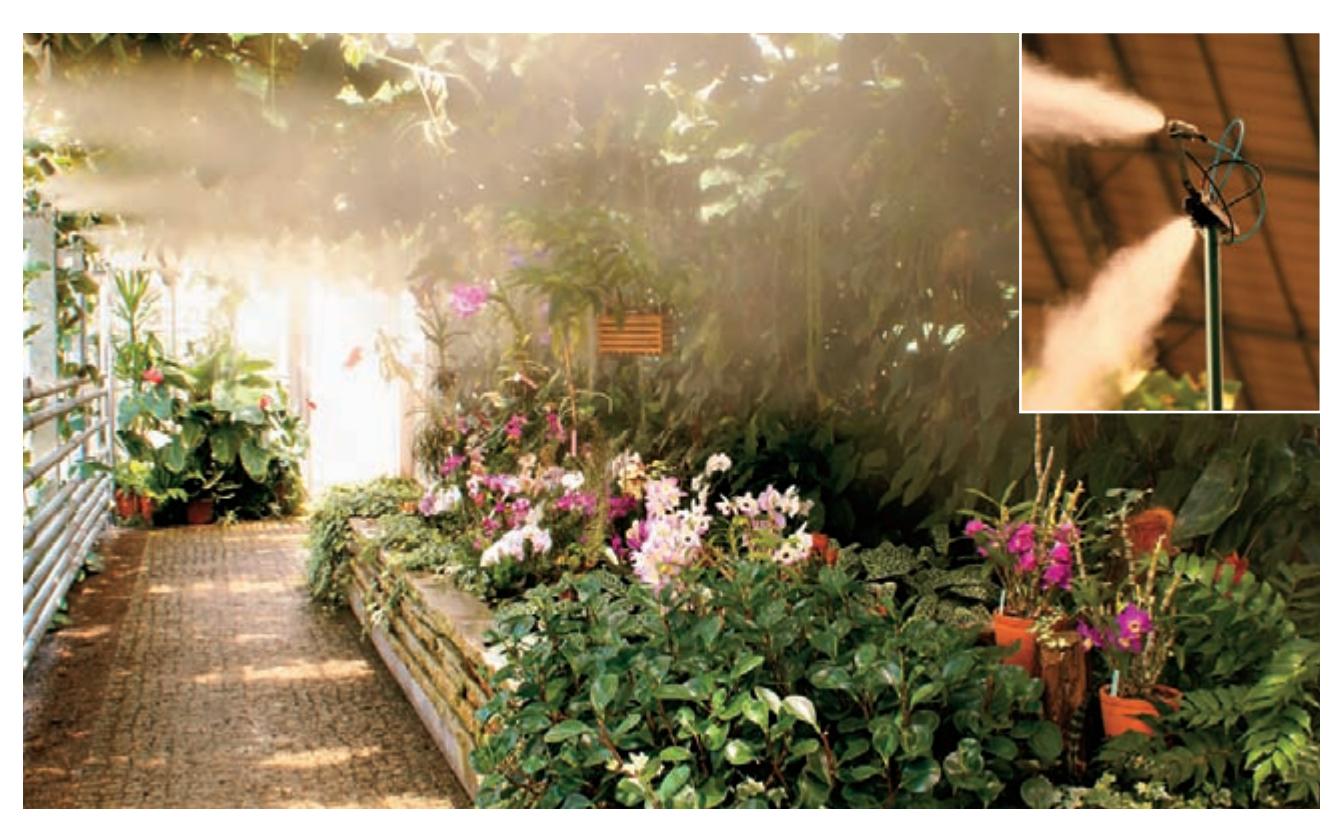
Misting is a very gentle method of providing moisture to plants. Misting heads mounted on spray poles (inset) can be controlled manually or automatically. In addition to maintaining a constant state of moistness for plants, a misting system will give your greenhouse a tropical environment that many gardeners enjoy.
Lighting
If you’ve placed your greenhouse in a sunny, southfacing location, well away from shade, plants should get adequate sunlight during the summer. But if the greenhouse faces north or is shaded during the day, plants may need additional light. And no matter where the greenhouse is located, you’ll likely need to rely on supplemental lighting during winter.
Supplementing natural light with artificial light can be tricky. Natural light is made up of a spectrum of colors that you can see (the red, orange, yellow, green, blue, indigo, and violet colors of the rainbow) and those you can’t see (infrared and ultraviolet). Plants absorb light from the red and blue ends of the spectrum—blue light promotes plant growth; light from the red end of the spectrum encourages plants to flower and bud. The red-blue light combination is easily achieved when the source is the sun but a little more difficult when you’re using artificial lighting. Intensity is also important: Lights that are set too far away or that don’t provide enough brightness (measured in lumens or footcandles) will produce weak, spindly plants.
Three basic types of lights are available: incandescent bulbs, fluorescent tubes, and high-intensity discharge (HID) lights, which include metal halide (mH) or high-pressure sodium (HPS). Each has advantages and disadvantages, which is why greenhouse gardeners often use a combination of two or more types to achieve light that is as close to natural as possible.
Incandescent
Ordinary tungsten incandescent bulbs are inexpensive, readily available, and a good source of red rays, but they are deficient in blue light. They can be useful for extending daylight for some plants and for supplementing low light levels, but they are not an efficient primary source of light. Incandescent lights produce a lot of heat—hanging them too close to plants can burn foliage, but if you hang them at a safe distance, they don’t provide enough intensity for plant growth. The average life span of an incandescent bulb is about 1,000 hours.
Fluorescent
Fluorescent tubes are more expensive than incandescent bulbs, but the higher cost is amply offset by their longevity and efficiency: bulb life for fluorescents is about 10,000 hours, and they provide the same amount of light as incandescents with only ¼ to 1 ⁄3 the amount of energy. They also produce much less heat than incandescent bulbs.
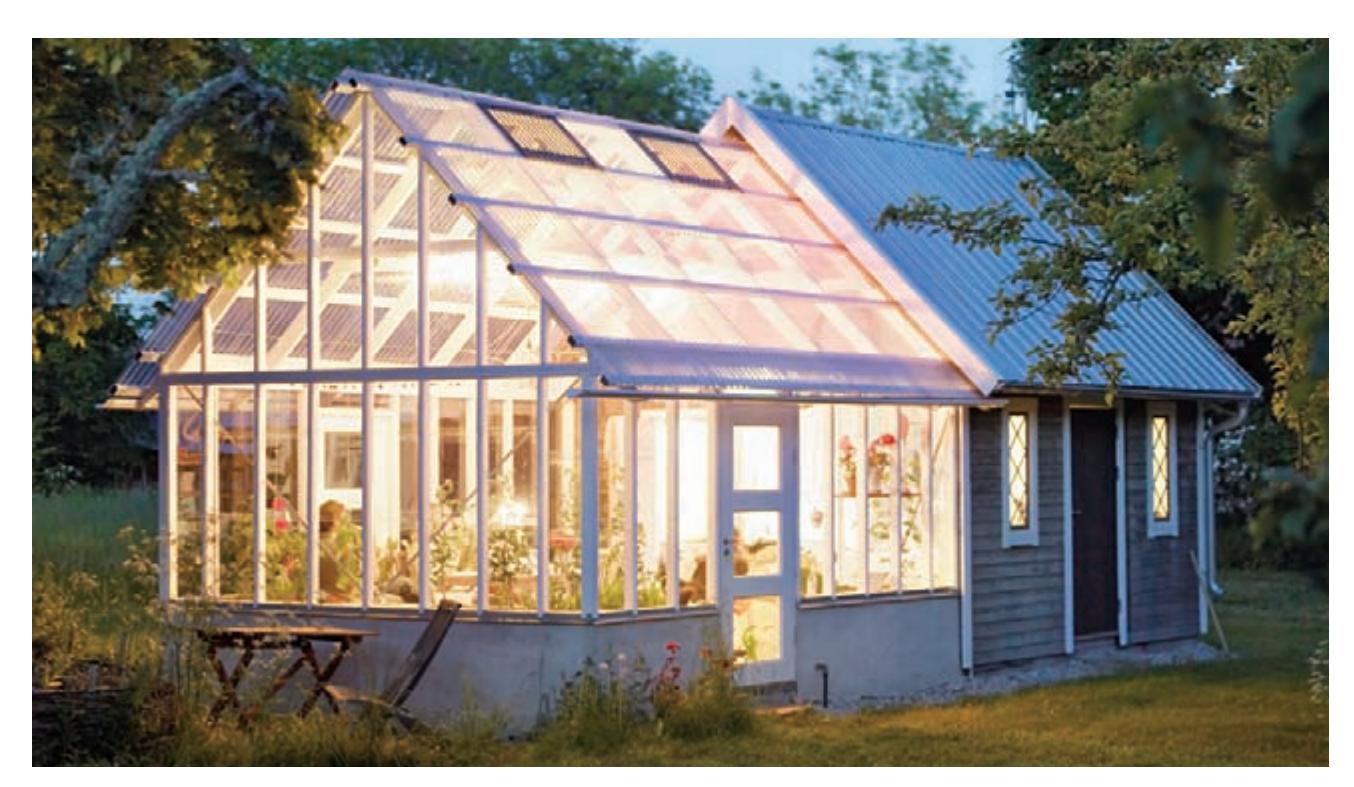
Adding lighting fixtures allows you to extend the growing hours during the early days of the growing season.
Fluorescent bulbs (or “lamps,” as they’re called by the lighting industry) come in a variety of colors and temperature ranges, including full-spectrum light. Cool white lamps, which produce orange, yellow-green, blue, and a little red light, are the most popular choice. To provide seedlings and plants with a nearly full spectrum of light, many growers combine one cool white lamp and one soft (or warm) white lamp in the same fixture.
Due to their energy efficiency and low heat output, fluorescent-tube fixtures are great for ambient lights that you might leave running for long periods, as well as for task lighting. They’re also the best all-around choice for starting seedlings and growing small plants. The downside to using fluorescents as grow lights is that they must be hung very close to the plant—from 2 to 8”, depending on the plant—to be effective. This makes them most useful for propagation and low-growing plants.
HID
High-intensity discharge (HID) lights work by sending an electrical charge through a pressurized-gas tube. There are two types: high-pressure sodium (HPS), which casts light in the yellow, orange, and red end of the spectrum, and metal halide (mH), which leans more toward the blue end, casting blue/violet light. mH lamps are often recommended as the primary light source for greenhouse growing, with HPS lights as a secondary light source. mH light mimics spring light and encourages early plant growth; HPS light resembles the type cast by the sun during fall and promotes fruiting and flowering. Greenhouse gardeners often start plants out under mH lamps and then switch to HPS. This requires switching fixtures during the growing season, which can be a nuisance. Convertible fixtures house both types of bulbs so that they can be used in tandem or succession.
HID lights are very expensive, but their lifespan is long: A standard 400-watt bulb can last 20,000 hours. They also cover a large area: a 400-watt lamp lights 16 sq. ft. of space. HID lights produce heat, so they should be hung higher in the greenhouse. If you use them, be sure to provide plenty of ventilation during summer.
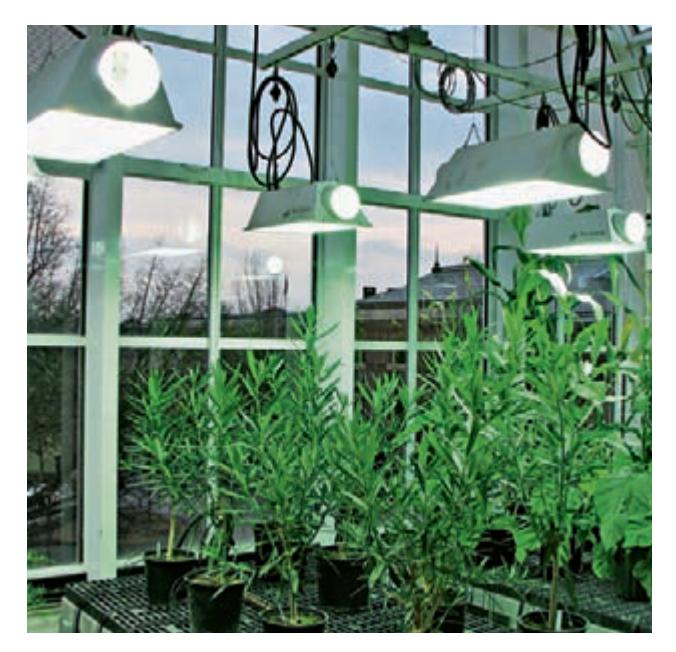
Fluorescent is a better source of growth-stimulating light for your greenhouse. It must, however, be hung relatively close to plants in order to benefit their growth.
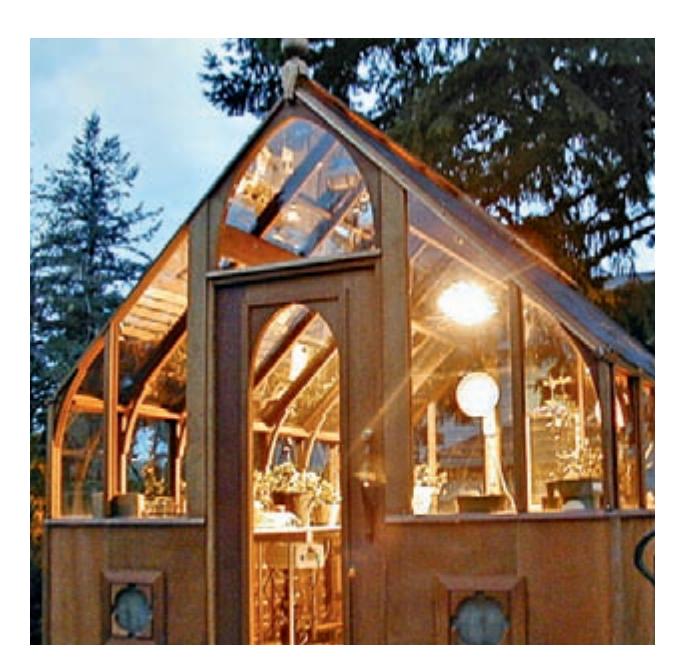
Ordinary incandescent lights aren’t particularly good sources of growth-promoting light, but they can help heat a greenhouse. And their attractive warm light also turns a greenhouse into a nighttime landscape design feature.
Lighting Considerations
The best lighting for growing greenhouse plants mimics natural light. Invest in lamps that resemble natural light in intensity and color (or combine lamps to provide a broad spectrum, as described above). Use lights when days are short and cloudy.
Heating
Once you understand your greenhouse heating requirements (see Calculating Heat Needs, opposite), you’ll need to determine what type of heater to use and whether you’ll need to run a gas line and power to the greenhouse. The two main types of greenhouse heaters are electric and fuel-fired (gas, propane, kerosene, or oil).
Electric heaters are inexpensive and easy to install. They provide adequate heat for a small greenhouse in a temperate climate and are useful for three-season greenhouses. However, they are expensive to operate (although relative costs are constantly changing) and do not provide sufficient heat for use in cold regions. Electric units can also distribute heat unevenly, making it too warm in some areas of the greenhouse and too cold in others. Placing a heater at each end of the greenhouse can help. If you use an electric heater, be sure the fan doesn’t blow warm air directly on the plant leaves; they will scorch.
Gas heaters usually cost more than electric and most areas require that a licensed professional hook them up, but heating bills will be lower than if you use an electric heater. Gas heaters operate much like a furnace: a thermostat turns on the heat when the temperature drops below its setting. You can help to distribute the heat by using a fan with the heater. If you plan to use a gas heater, install the gas line when you’re building the foundation. It is also important to ensure that the heater is vented to the outside and that fresh air is available for combustion. Poor ventilation can cause dangerous carbon-monoxide buildup.
Propane, oil, and kerosene heaters also need to be vented, and if you’re using kerosene, be sure it’s high-grade. Another option is hot-water heating, in which the water circulates through pipes set around the perimeter of the greenhouse under the benches. You can also consider overhead infrared heat lamps and soil-heating cables as sources of heat.
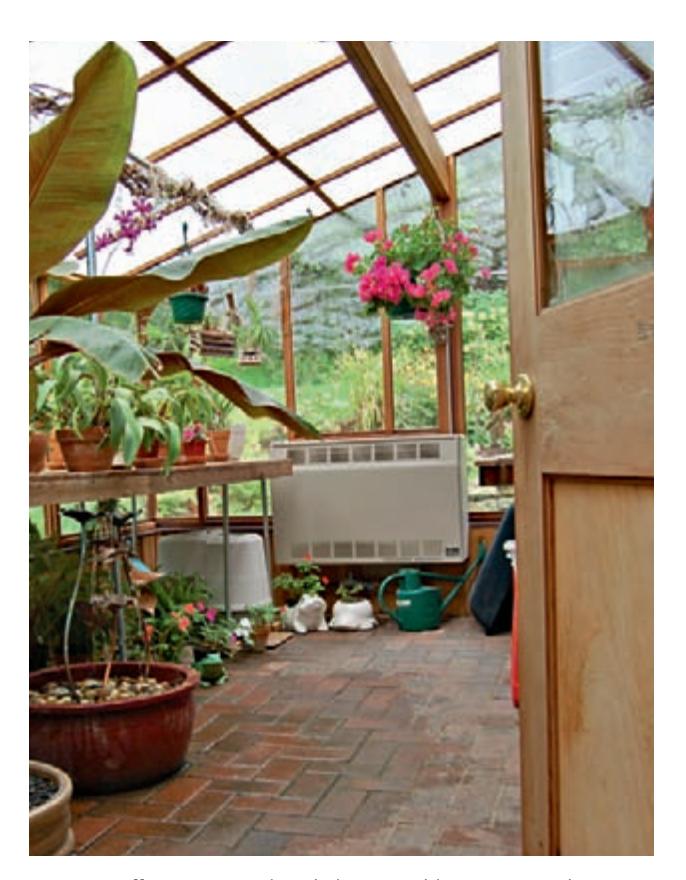
In most climates, an electric heater with an automatic thermostat will be sufficient to protect tender plants on cold nights. Electricity is an expensive heating option, however, so it’s best reserved for moderate heating needs.
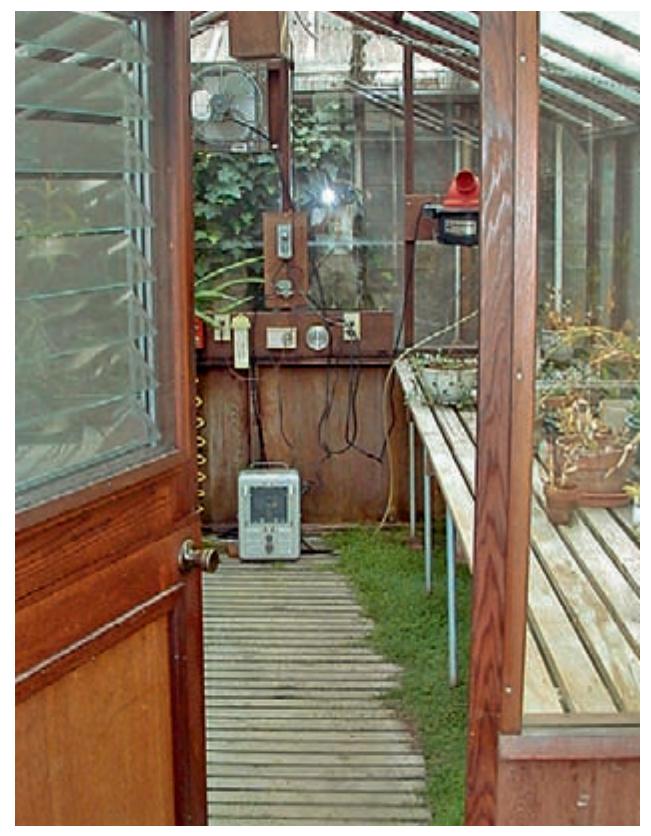
A portable space heater may be all the supplemental heat your greenhouse requires. Use it with caution, and make sure yours shuts off automatically if it overheats or is knocked over.
Calculating Heat Needs
Heat is measured in British thermal units (Btu), the amount of heat required to raise one pound of water one degree Fahrenheit. To determine how many Btu of heat output are required for your greenhouse, use the following formula:
Area (the total square footage of the greenhouse panels) × Difference (the difference between the coldest nighttime temperature in your area and the minimum nighttime temperature required by your plants) × 1.1 (the heat-loss factor of the glazing; 1.1 is an average) equals Btu.
Calculate the area by multiplying the length by the height of each wall and roof panel in the
greenhouse and adding up the totals. Here’s an example, using 380 sq. ft. for the greenhouse area and 45° F as the difference between the coldest nighttime temperature (10° F) and the desired nighttime greenhouse temperature (55° F). 380 sq. ft × 45 × 1.1 = 18,810 Btu.
If the greenhouse is insulated or uses double-glazed glass or twin-wall polycarbonate, you can deduct 30 percent from the total Btu required; if it’s triple-glazed, deduct 50 percent. You can deduct as much as 60 percent if the greenhouse is double-glazed and attached to a house wall.
Heating Requirements
- Oil, gas, kerosene, and other fuel-operated heaters must be vented to the outside and have a source of fresh air for combustion.
- Heaters must be equipped with an automatic shut-off switch.
- Position several thermometers at bench level throughout the greenhouse so you can check that heat is evenly distributed.
- Do not place thermometers or thermostats in direct sunlight.
- Install an alarm to warn you if the temperature drops dangerously low. Set the temperature warning high enough to give you time to remedy the problem before plants die.
- Use a backup generator to supply power to electric heaters during power outages.
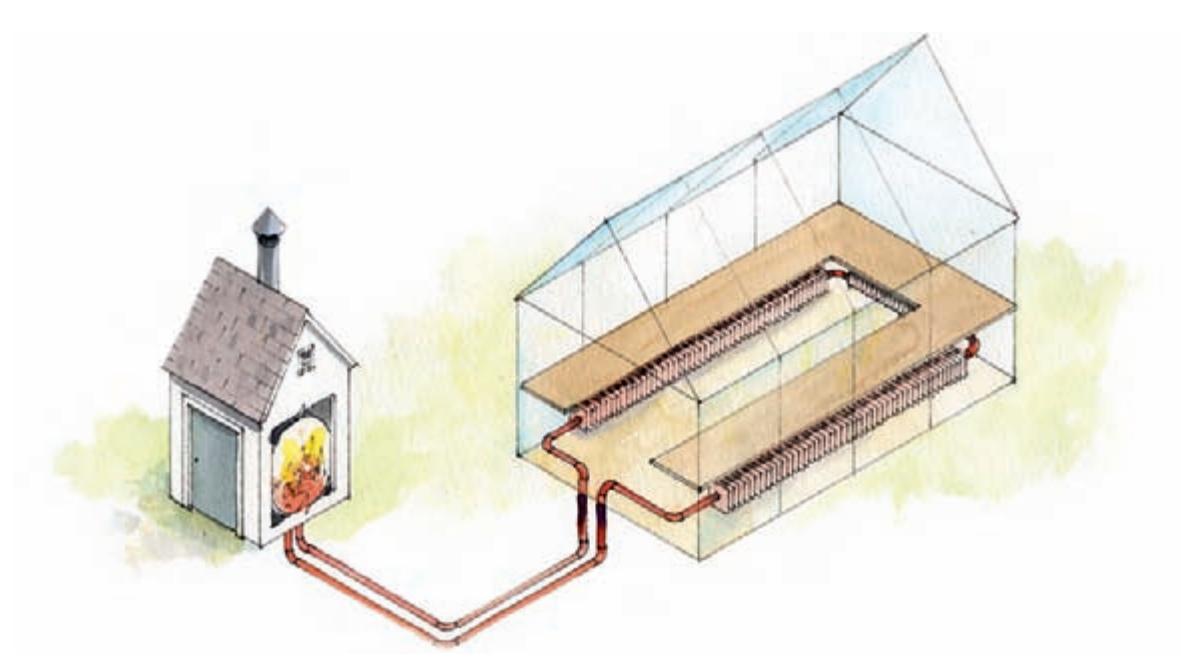
The stove for a wood-fired heating system is normally located in a remote spot near the greenhouse. In a typical set-up, the wood stove heats water that is pumped through a pipe into the greenhouse and distributed through a series of radiators.
Heat Conservation
On cold, cloudy days and at night, solar heat is lost. Even if you have supplemental heating, holding onto that heat is essential to maintaining an optimal climate. Insulating the greenhouse and making use of heat sinks are the most effective means of conserving heat, but don’t overlook heat thieves such as cracks and gaps. Be sure the glazing is tight, and seal any opening that lets in cold air.
If you built a concrete foundation, it may have polystyrene board installed between the concrete and the soil. Concrete rapidly loses heat if the ground around it is cold, and polystyrene insulation helps to reduce this heat loss. You can use polystyrene board or bubble insulation (similar to bubble wrap used for shipping) to temporarily insulate the walls of the greenhouse: Simply attach the material to the greenhouse frame beneath the benches before winter and remove it in the summer. You can also insulate the greenhouse from the outside. Plant low-growing plants around the foundation, or prop hay bales or burlap bags filled with dry leaves against the walls.
Heat Sinks
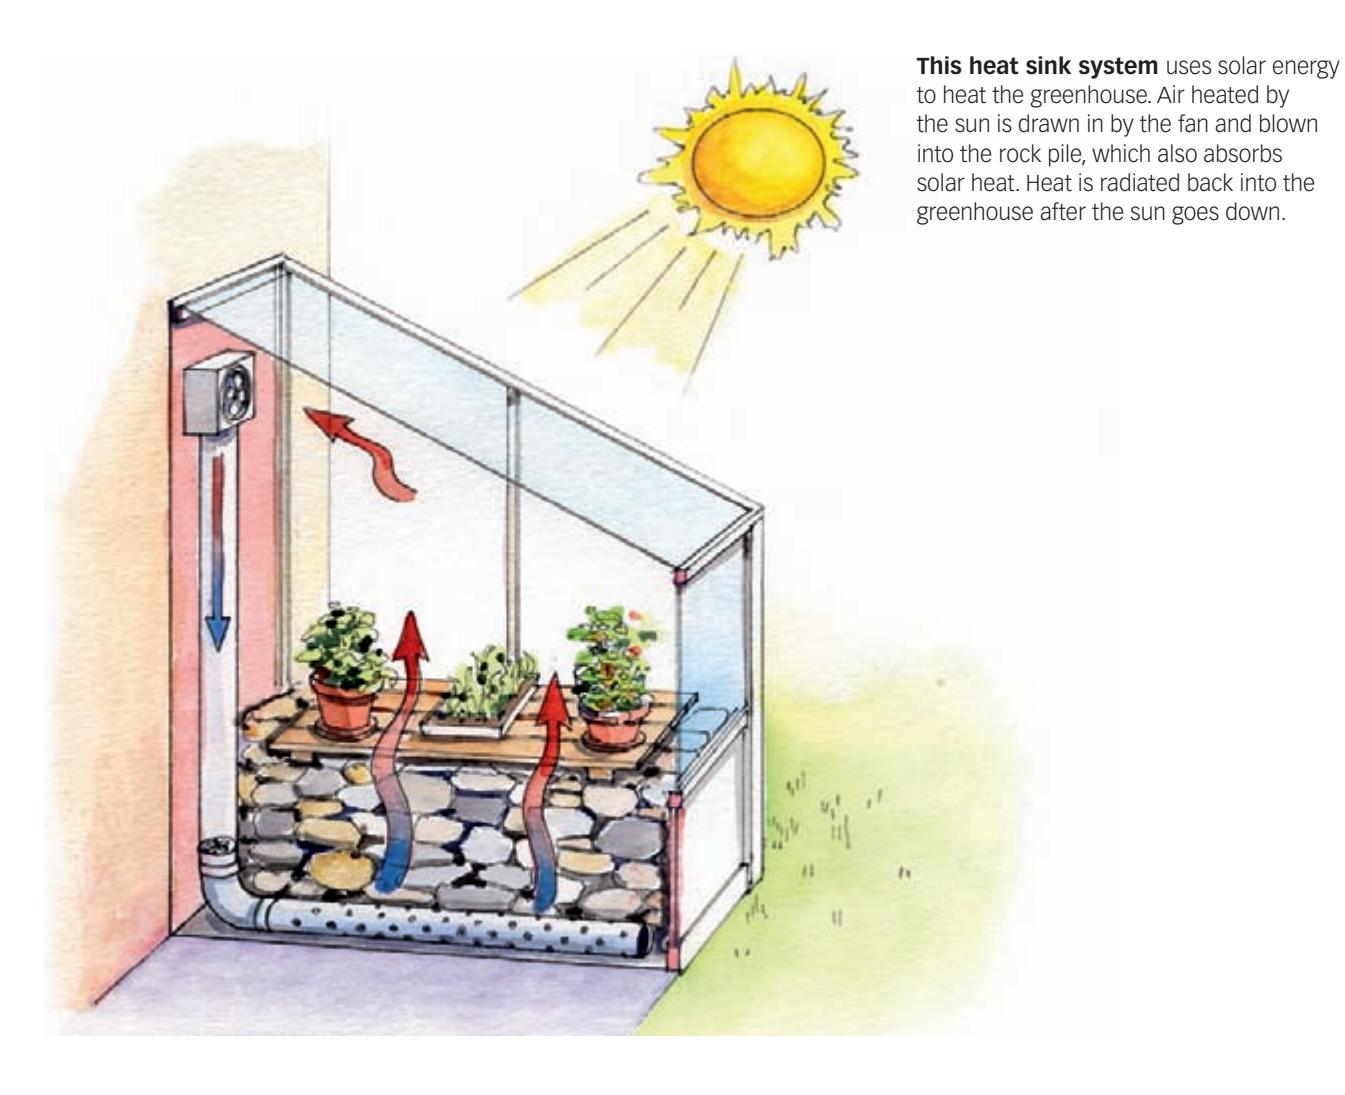
Heat sinks absorb solar energy during the day and radiate it back into the greenhouse at night. Stone, tile, and brick floors and walls are good collectors of heat, but to be really effective, they should be insulated from underneath. Piles of rocks can act as heat sink, but the best option is a blue- or black-painted barrel or drum full of water. Place a few of them around the greenhouse. If you have an attached greenhouse, painting the house wall a dark color can cause it to radiate solar heat back into the greenhouse at night. A light-colored wall, on the other hand, can help reflect heat and light back into the greenhouse during the day.
Smart Heat Conservation
- Reduce the temperature by 5°. Growth may be slowed, but plants will survive.
- Make sure the greenhouse is as airtight as possible.
- To prevent drafts, add a storm door.
- Mulch the soil in raised benches to insulate it during cool seasons, consider watering tropical foliage plants and other warm-season plants with water warmed to 65° F.
- Insulate all water- or steam-heating supply lines.
- At night, hang black cloth horizontally from the greenhouse ceiling as close to the plants and benches as possible to prevent the warm air from escaping through the roof.
- If the greenhouse uses automatic vents that are controlled by a separate thermostat, set that thermostat 5° or 10° higher than the heater thermostat to keep the vents from opening when the heat is on.
- Install an alarm system that will go off when the temperature goes above or below the safe range or when there is a power failure.
- Make use of the heat exhausted by your clothes dryer by running the vent into your greenhouse.
- Plant a “shelter belt” of evergreens on the windward side of the greenhouse to reduce heating costs. (But be sure it is far enough away that it doesn’t cast shade on the greenhouse.)
Microclimates
When you landscape your property, you consider its microclimates: the sunny, sheltered corner; the cool, shady spot beneath the trees; that strip along the back that always catches the breeze. Your greenhouse has microclimates, too: It’s warmer near the roof and cooler at floor level; some spots are shaded and others receive strong, direct light; and down near the wall vents, it’s cool and breezy. Like the plants in a garden, greenhouse plants have differing light, heat, soil, and moisture requirements. Before you place them in the greenhouse, take stock of its microclimates, and group plants according to their needs.
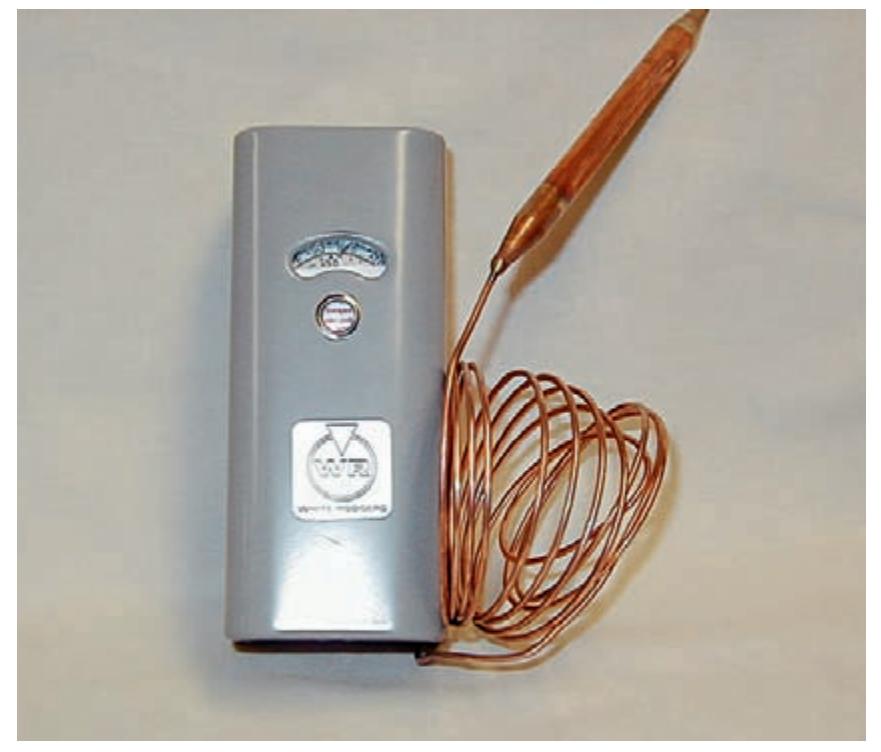
A heating and cooling thermostat is perhaps the most important greenhouse control device. The thermostat will control both heat sources, as well as automatic ventilaters to cool the greenhouse when temperatures climb into the danger zone for overheating plants.
Ventilation
Whether your plants thrive depends on how well you control their environment. Adequate sunlight is a good start, but ventilation is just as important: It expels hot air, reduces humidity, and provides air circulation, which is essential even during winter to move cold, stagnant air around, keep diseases at bay, and avoid condensation problems. You have two main options for greenhouse ventilation: vents and fans.
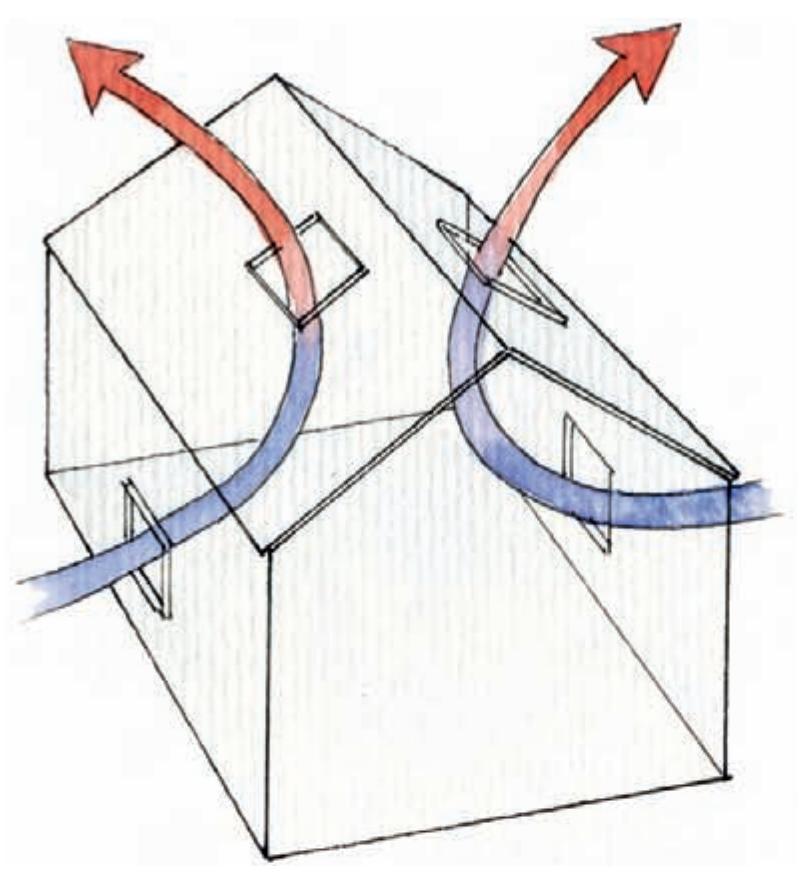
Because hot air rises, roof vents are the most common choice. They should be staggered on both sides of the ridgeline to allow a gentle, even exchange of air and proper circulation. roof vents are often used in conjunction with wall vents or louvers. Opening the wall vents results in a more aggressive air exchange and cools the greenhouse much faster than using roof vents alone. On hot days, you can open the greenhouse door to let more air inside. Also consider running small fans to enhance circulation.
Vents can be opened and closed manually, but this requires constant temperature monitoring, which is inconvenient and can leave plants wilting in the heat if you are away. It’s far easier—and safer—to use automatic vent openers. These can be thermostat-controlled and operated by a motor, which turns on at a set temperature, or they can be solar-powered. Unlike thermostat-controlled vent openers, which require electricity, solar-powered openers use a cylinder filled with wax, which expands as the temperature rises and pushes a rod that opens the vent. When the temperature drops, the wax shrinks and the vent closes. How far the vent opens is dictated by temperature: the higher the temperature, the wider the vent opens to let in more air.
A fan ventilator is a good idea if you have a large greenhouse. The fan is installed in the back opposite the greenhouse door, and a louvered vent is set into the door wall. At a set temperature, a thermostat mounted in the middle of the greenhouse activates the fan, and the louvered vent opens. Cool air is drawn in through the vent, and the fan expels the warm air. The fan should be powerful enough to provide a complete air exchange every 1 to 1.5 minutes.
Calculating Ventilation Requirements
Greenhouse manufacturers rarely include enough vents in kits, so be sure to buy more. To determine the square footage of venting your greenhouse should have, multiply the square footage of the floor by 0.2.
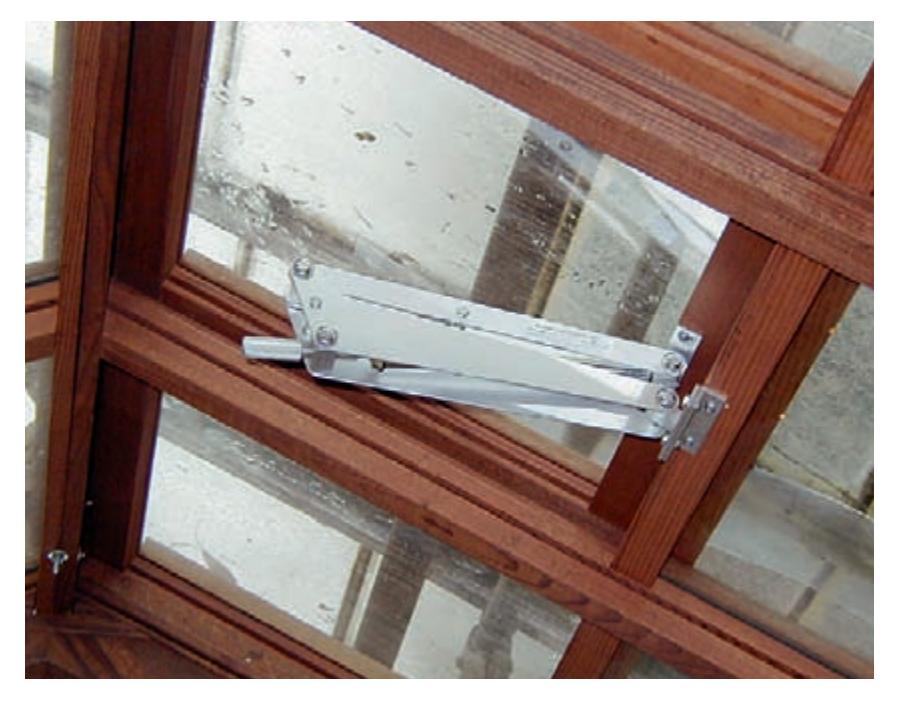
Automatic openers sense heat buildup and open vents. Some openers are controlled by standard thermostats, while others are solar-powered.
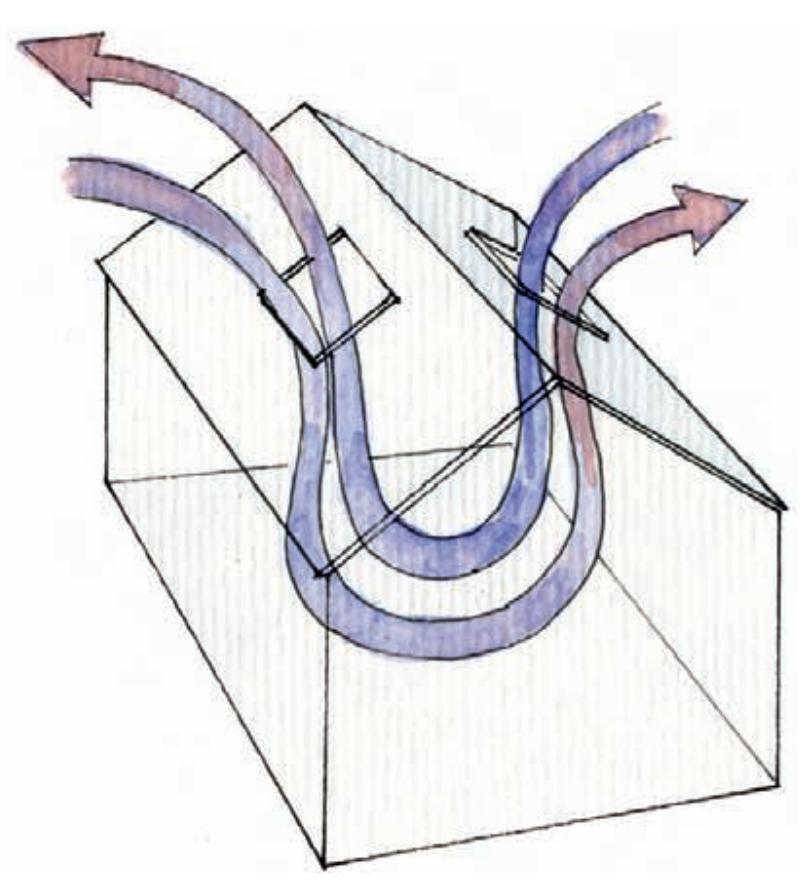
Venting your greenhouse–Installing at least one operable roof vent on each side of the ridgeline creates good air movement within the structure. Adding lower intake vents helps for cooling. Adding fans to the system greatly increases air movement.
Cooling
Although vents and fans are the first line of defense when the temperature inside the greenhouse starts to climb, other cooling methods such as misting, humidifying, evaporative cooling, and shading can also help to maintain the ideal growing environment. Cooling is crucial during summer, but it can be just as important on a sunny winter day.
Shades
When choosing shades, be sure they are UV-stabilized for longevity.
Two types of shades are available: cloth and roll-up. Shade cloth is usually woven or knitted from fiberglass or polyethylene and is available in many colors, although green, black, gray, and white are most common. You can also find shade cloth in silver, which, like white, reflects heat and sunlight and keeps the greenhouse cooler than darker colors. Shade cloth also varies in density, usually from 20 percent to 80 percent. The higher the density of the cloth, the more light it blocks (60 percent density blocks 60 percent of the light). Be careful when choosing shade density; too little light will slow plants’ growth.
Shade cloth can be simply thrown over the greenhouse and tied down when shading is needed, but this hampers airflow through the vents (unless you cut the cloth to size and install it in sections). Better ventilation is achieved by suspending the cloth 4 to 9 in. above the exterior glazing. Be sure the vents are open when you do this. Greenhouse shade suppliers can provide framework kits.
Greenhouse Shading Compound
Professional greenhouse growers with large operations typically apply greenhouse shading compound to the glazing of their structures so they can control heat entry and protect their plants. Similar to paint, shading compound contains ground pigments that reflect the sun’s rays. The compound is sprayed onto the glazing with an airless sprayer (You can use a hand-sprayer for a small greenhouse). Sold in 5-gallon buckets, it is diluted with water at an 8 to 1 ratio for plenty of coverage. Some types are designed to be easily removed with water and a fine nylon broom so you can make adjustments as needed. Other formulations are intended to be permanent. For more information, ask about the product at your greenhouse supply store or do an online search for Greenhouse Shading Compound.
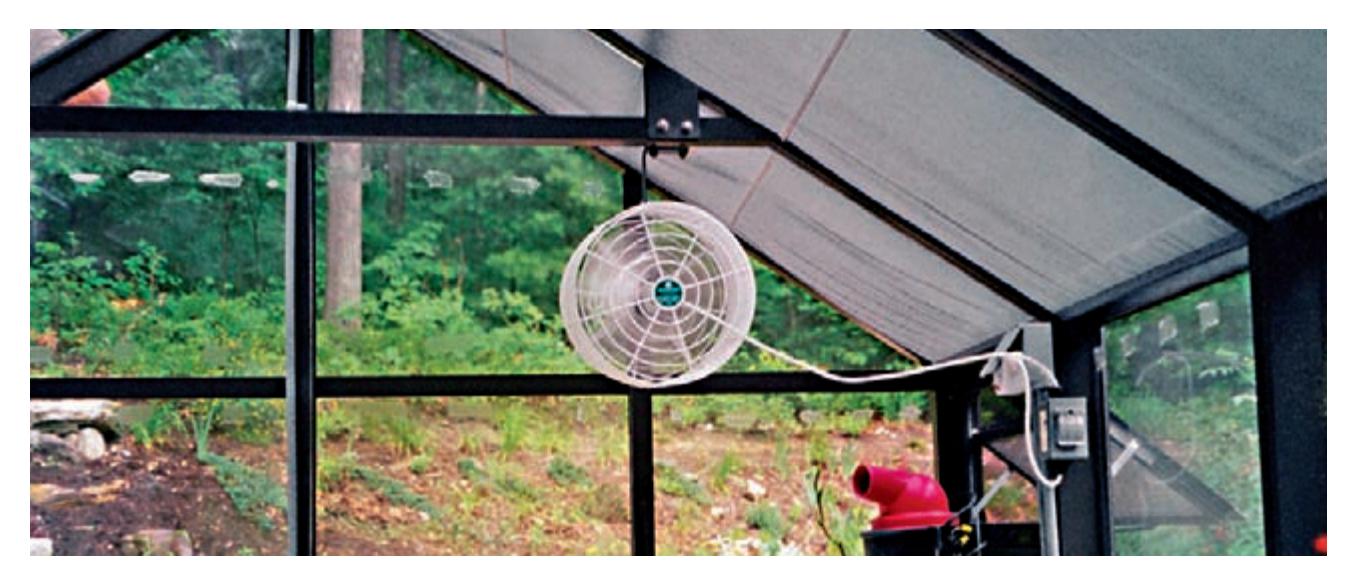
Roof shades, along with vents, help prevent a greenhouse from overheating in direct sunlight. Here, a combination of circulating fans and cloth shades mounted on the interior of the south-facing glass helps protect plants.
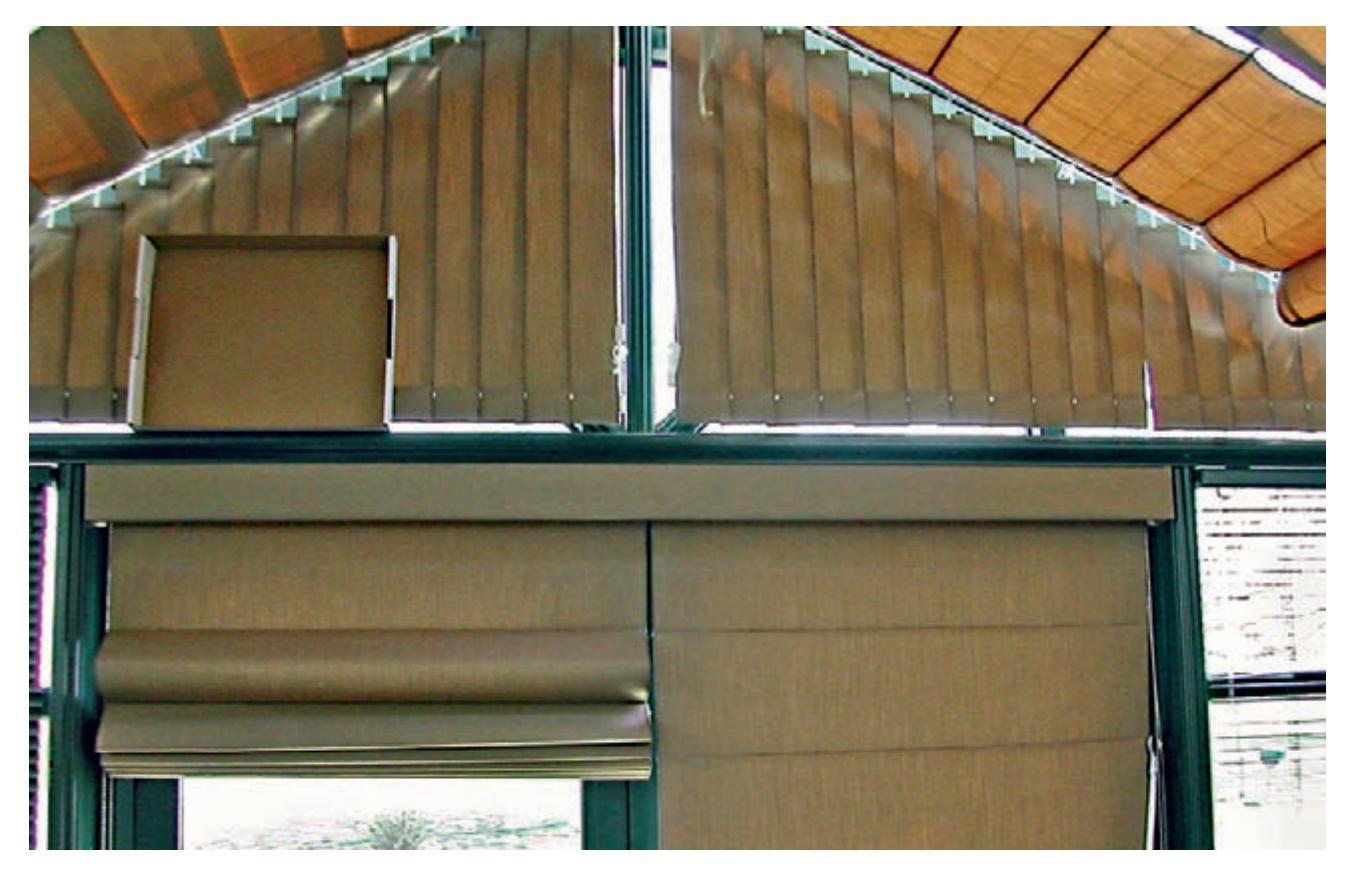
Louvered and roll-up shades help to block the sun in this greenhouse.
In addition to cloth, roll-up greenhouse shades may be constructed from aluminum, bamboo, or wood. They are convenient because you roll them up when they’re not needed, and they last longer than shade cloth, but they are more expensive.
Evaporative Coolers
Evaporative coolers (also called swamp coolers) cool the air by using a fan to push or pull air through a water-saturated pad. A portable cooler might be sufficient for a small greenhouse; larger greenhouses will benefit from a unit cooler placed outside. used when the humidity outside is less than 40 percent, these units draw dry outside air through the saturated pad, where it is cooled. The air travels through the greenhouse and exits via a vent on the opposite side. It’s a good idea to use an algaecide with these coolers.
Liquid Shading
Some greenhouse gardeners choose to paint liquid shading compounds (sometimes called whitewashing) over the outside glazing. These compounds are inexpensive and easy to apply, but they can be unattractive and tend to wash off in the rain. Liquid shading can be thinned or layered to the level desired, and the residue can be brushed off at the end of summer. (It is often almost worn off by that point anyway). Some liquid-shading compounds become transparent during rainy weather to let in more light and then turn white when they dry.
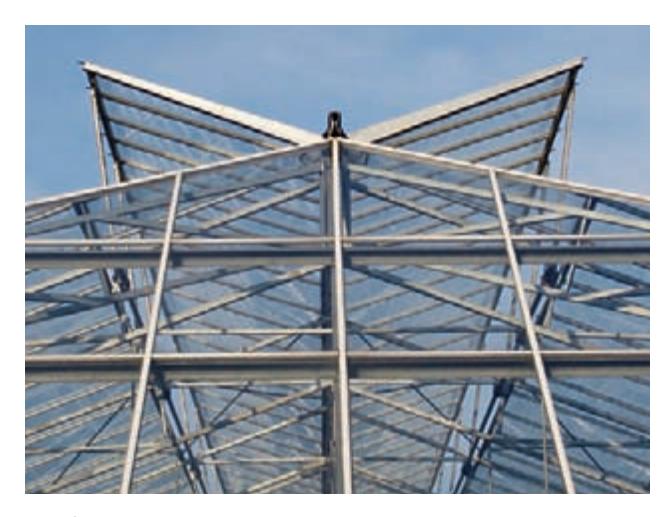
Roof vents that are triggered to open automatically by sensor alerts are far and away the most important component of a greenhouse cooling system. But additional cooling devices may be necessary.
Benches & Storage
Every greenhouse needs benches to support plants and provide space for potting. Because plants can be heavy, it’s important that benches be sturdy.
How you lay out benches depends on your needs and the size of your greenhouse. most average-size greenhouses can accommodate a bench along each wall, with an aisle down the middle for access. If you have enough space along one end wall, you can install more benches to create a u shape. Another option is to arrange the benches in a peninsula pattern. Shorter benches are set at right angles to the outside walls, with narrow aisles in between, leaving space for a wider aisle down the middle. You can also use a single, wider bench along a side wall and leave space for portable benches and taller plants against the other wall. A larger greenhouse can accommodate three benches with two aisles.
regardless of the layout you choose, it’s best to orient benches along a north-south line so plants receive even light distribution throughout the day. use the space as efficiently as possible, and don’t inadvertently block the door. Allow enough room in the aisles to move around comfortably; make them wider if you need to accommodate a garden cart or wheelbarrow. Set benches about 2 in. from the greenhouse walls to provide airflow, and avoid placing benches near any heat source.
Bench width is determined by the length of your reach, so if you are short, you may want benches to be narrow. The same concept applies to height: Although the average bench is about 28 to 32 in., yours can be higher or lower to suit your height and reach. (If they need to be wheelchair-accessible, lower them even more.) If you have access to benches from both sides, you can double their width.
Several options are available for bench tops. Wood slats are sturdy and attractive, and they provide good drainage and airflow. Be sure to use pressure-treated or rot-resistant wood, such as cedar, keeping in mind that cedar benches can be expensive. Wire mesh costs less, is low-maintenance, and also provides good airflow, but be sure that it is strong enough to support heavy plants. Plastic-coated wire-mesh tops are available. These are similar to (if not the same as) the closet shelving found in home stores. usually white, they have the advantage of reflecting light within the greenhouse.
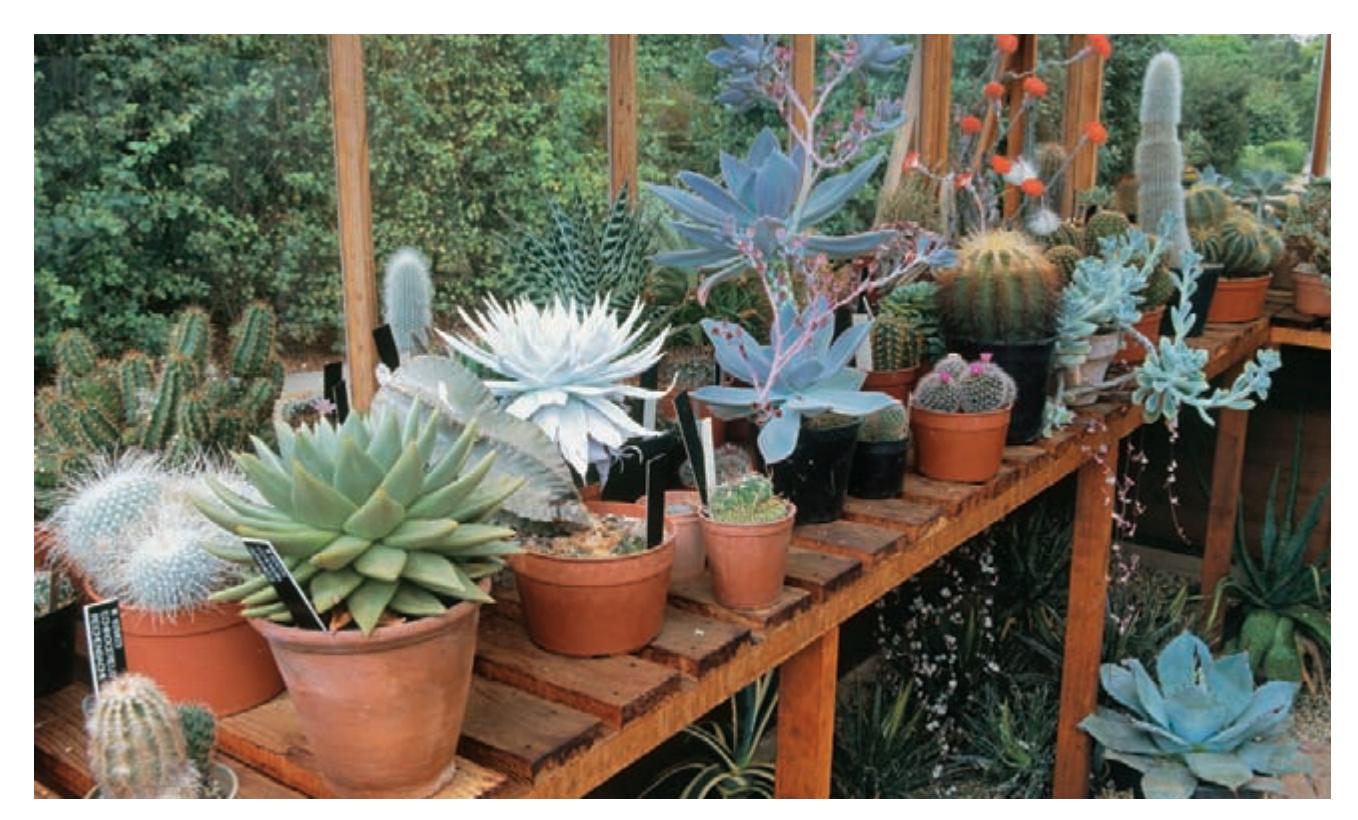
Sturdy benches that are easy to clean and withstand moisture are a critical part of a greenhouse that’s pleasant to work in.
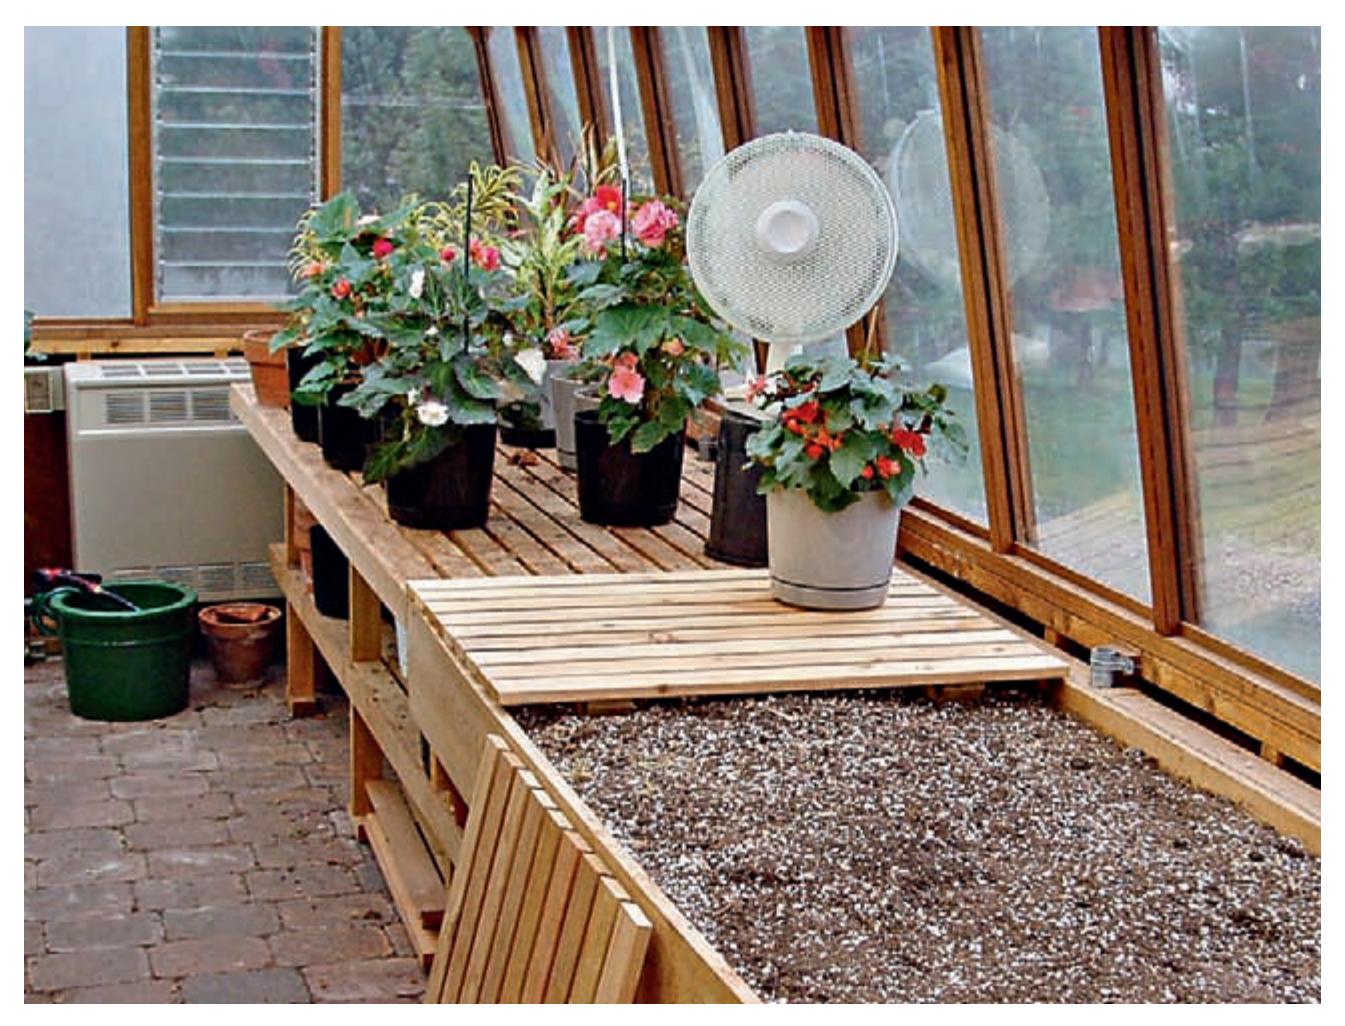
For space efficiency, potting benches can double as storage containers. Here, the potting benches include spaces for mixing and storing soils for potting. Slatted covers make it easy to keep the bench-tops tidy.
You can also choose solid tops made of wood, plastic, or metal. Solid wood tops should be made from pressure-treated wood, and metal tops should be galvanized to prevent rust. Solid tops provide less air circulation than slatted or mesh tops, but they retain heat better in winter and are necessary if you use a capillary-mat watering system.
The greenhouse framing material will determine whether you can install shelves. Shelves can easily be added to a wood-framed greenhouse, and many aluminum greenhouse kit manufacturers provide predrilled framing, along with optional accessories for installing shelves. Keep in mind that even if shelves are wire mesh, they can cast shade onto the plants below.
If you plan on potting inside the greenhouse, you can use part of the benches or dedicate a separate space for a potting bench in a shady corner or along an end wall. For convenience, consider building or buying a potting tray that you can move around and use as needed.
unless you have a separate place to store tools and equipment, you’ll need to find room for them in the greenhouse. To determine how much space you’ll need, first list all of the equipment necessary to operate the greenhouse: everything from labels, string, and gardening gloves to bags of soil, pots, trash cans, and tools. If you will use harmful chemicals, be sure to include a lockable storage area.
just as in your home, finding storage space in the greenhouse can be a challenge. Look first to shady areas. If the greenhouse has a knee wall, the area under the benches can provide a good deal of storage space. Shelves can also provide storage space for lightweight items. Be creative and make efficient use of any area where plants won’t grow to create accessible yet tidy storage for equipment.
Potting Materials
If you’re a container gardener, you are already familiar with the vast array of pots available at garden centers. For greenhouse gardening, however, pot choices are narrowed to two types: terra cotta and plastic.
Terra cotta pots are attractive and heavier than plastic, which means they are less likely to be knocked over. In addition, they are porous—because water evaporates through the clay, the risk of overwatering is lower. However, you will have to water plants more often and clean the pots regularly to remove deposits caused by minerals from water and soil leaching through the sides. Glazed terra cotta pots hold moisture better than unglazed pots and don’t show mineral deposits. Terra cotta pots are more expensive than plastic pots.
Practical and inexpensive, plastic pots hold moisture better than terra cotta pots, so you don’t have to water plants as often. Gardeners who plan to start seeds and propagate plants often use plastic trays, flats, and cell packs, although peat pots, cubes, and plugs are also available for starting seeds.
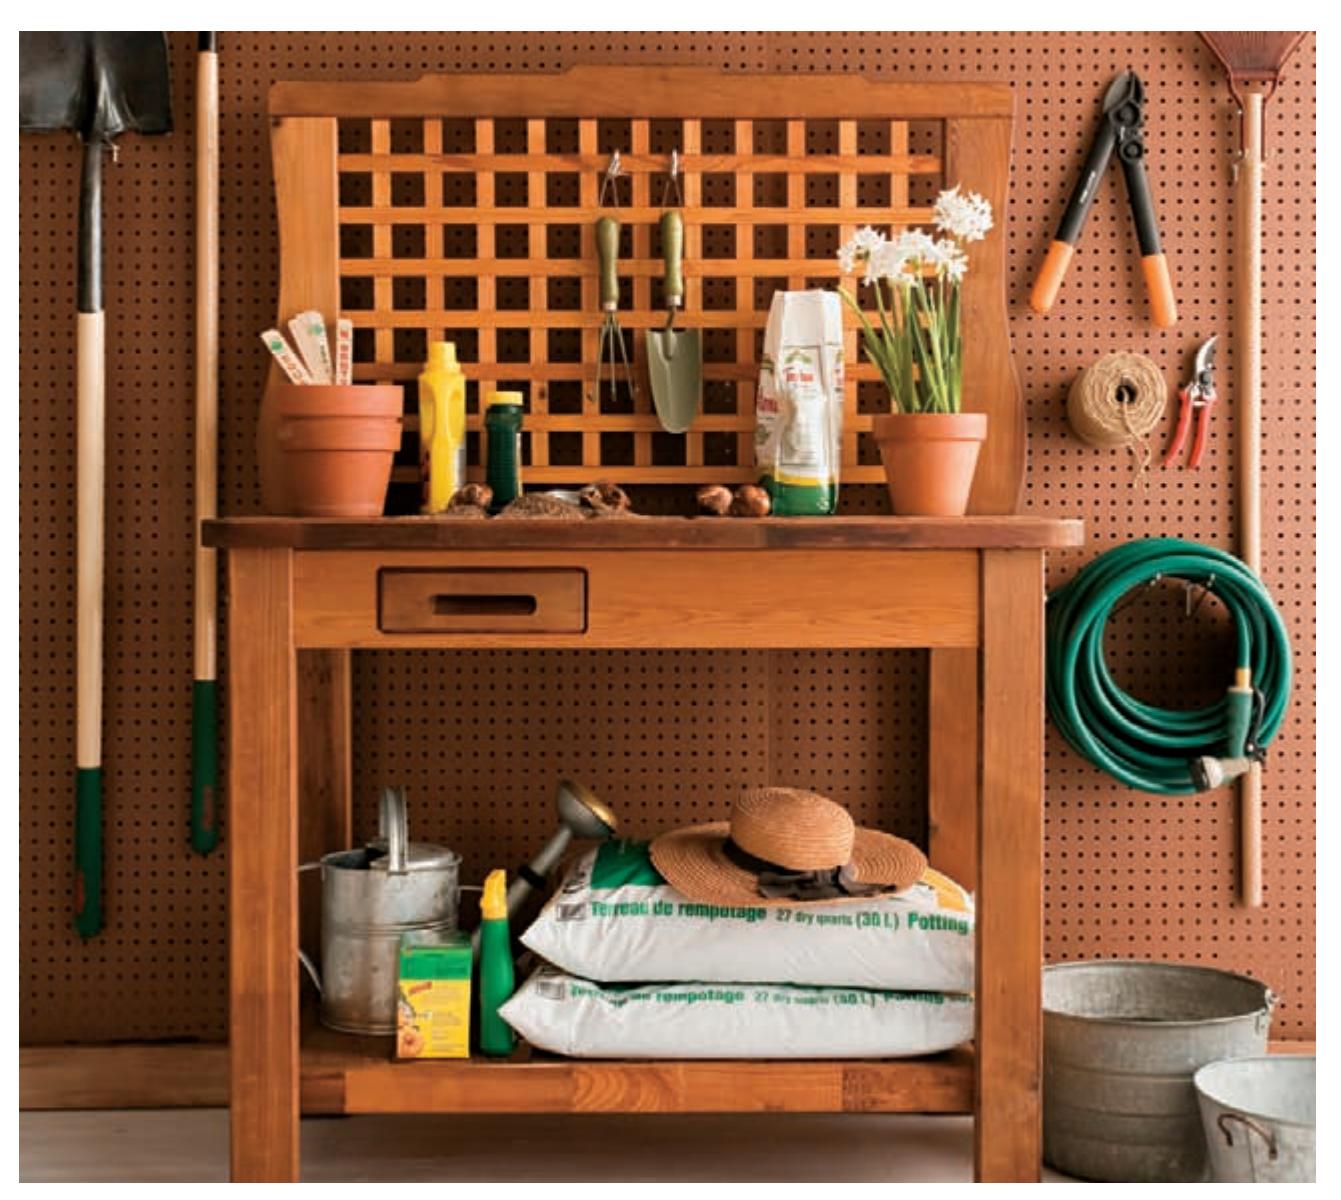
Terra cotta containers are preferable if your plants will live in the pot permanently. If you are only starting plants for transplant, inexpensive plastic pots and trays are a good choice.
Hydroponics
Hydroponics, the process of growing plants without soil, has become popular with greenhouse gardeners, especially for growing vegetables. Hydroponic growing medium, which holds plants in place, can be made of polystyrene balls, expanded clay pellets, gravel, pea stone, perlite, vermiculite, rock wool, or coconut fibers. The simplest method is to place growing medium into a pot and add a nutrient solution once or twice a day. A more complex system involves using computer-controlled pumps to automatically flush plants’ roots with nutrient solution as necessary for maximum growth.
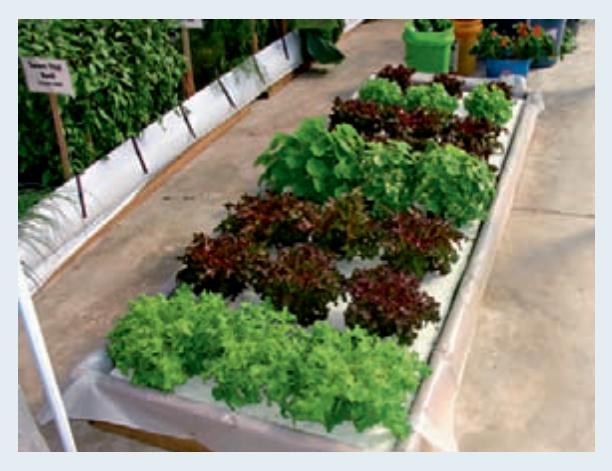
Lettuces are probably the most common hydroponically grown vegetable. They often are shipped with the root system intact for greater longevity.
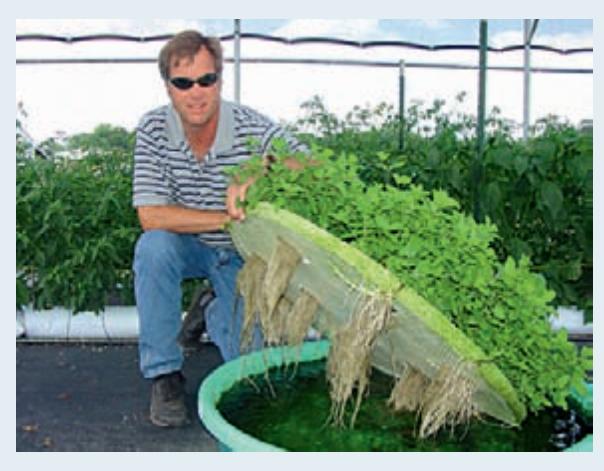
Root systems grow through the plant support medium and down into the water below. Here, the water is contained in a child’s plastic wading pool.
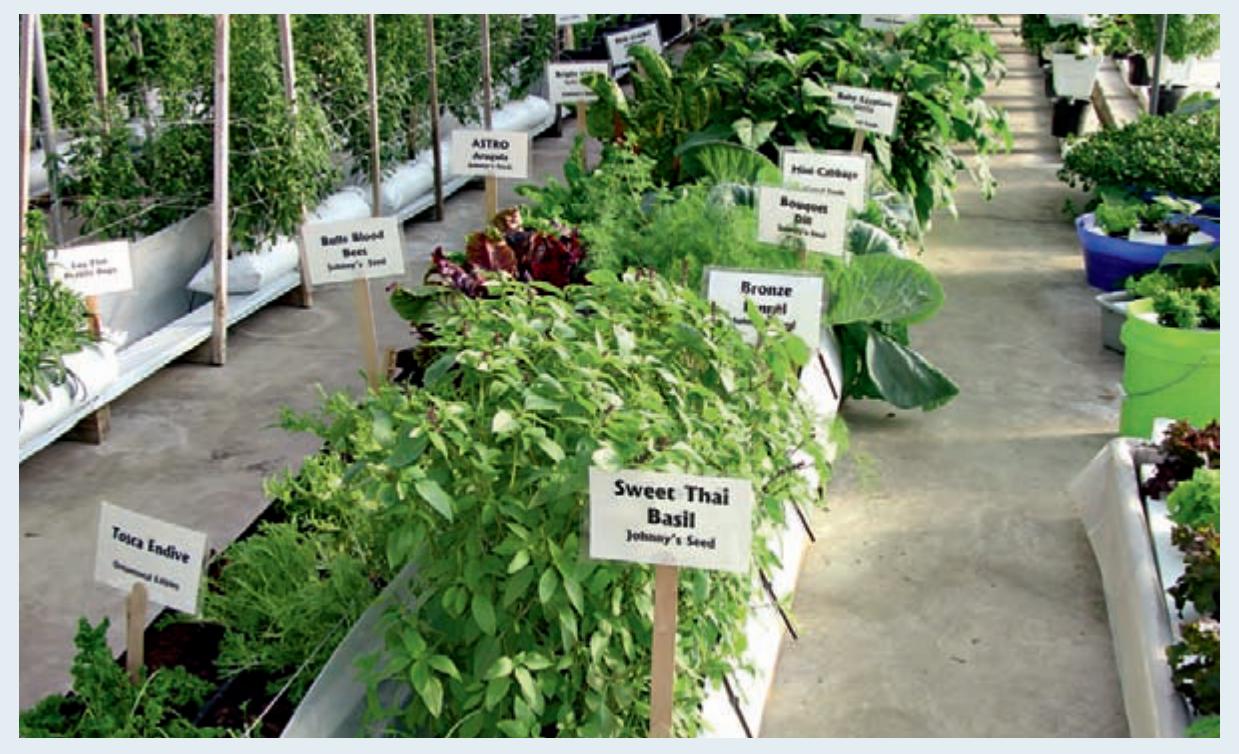
Many vegetables and herbs that are suitable for greenhouse growing are also good candidates for a hydroponic environment. Testing different species and judging their success can be a fun process.