PLUMBING
Updated 8th Edition
Completely Updated to Current Codes


Contents
| Introduction | 7 |
|---|---|
| The Home Plumbing System | 8 |
| Gray Water Systems | 14 |
| PLUMBING TOOLS, MATERIALS + SKILLS | 17 |
| Plumbing Tools | 18 |
| Plumbing Materials | 22 |
| Copper | 24 |
| PEX Pipe | 31 |
| PEX Manifolds | 40 |
| Rigid Plastic Pipe | 42 |
| Working with Cast-Iron Pipe | 46 |
| Working with Outdoor Flexible Plastic Pipe | 50 |
| Pipe Fittings | 52 |
| Shutoff Valves | 58 |
| Valves + Hose Bibs | 60 |
| Compression Fittings | 62 |
| Creating Flared Fittings | 64 |
| INSTALLING PLUMBING LINES | 67 |
| Installation Basics | 68 |
| Planning Plumbing Routes | 72 |
| Building a Wet Wall | 84 |
| PEX Stub Outs | 86 |
| FIXTURES, FAUCETS, DRAINS + APPLIANCES | 91 |
| Toilets | 92 |
| Kitchen Faucets | 98 |
| Kitchen Drains + Traps | 104 |
| Dishwashers | 108 |
| Garbage Disposals | 112 |
| Water Heaters | 118 |
| Lavatory Faucets | 132 |
| Touch-Activated Bathroom Faucets | 137 |
| Lavatory Drains | 140 |
| Shower Kits | 144 |
| Neo-Angle Shower | 152 |
| Custom Shower Bases | 158 |
| Wet Rooms & Curbless Showers | 166 |
| Alcove Bathtubs | 178 |
| Sliding Tub Doors | 184 |
| Jetted Tubs | 188 |
| Water Softeners | 196 |
| Pedestal + Console Sinks | 200 |
| Wall-Mounted Sinks | 202 |
| Traditional Vanity | 206 |
| Kitchen Sinks | 210 |
| Standpipe Drains | 212 |
| Freestanding Bathtubs | 214 |
| Whole-House Water Filters | 218 |
| COMMON PLUMBING REPAIRS | 223 |
| Common Toilet Problems | 224 |
| Dual-Flush Toilets + Valves | 234 |
| Clogged Toilets | 238 |
| Toilet Flanges | 242 |
| Sink Faucets | 246 |
| Kitchen Sprayers | 256 |
| Fixing Leaky Tub + Shower Faucets | 260 |
| Single-Handle Tub + Shower Faucet with Scald Control | 268 |
| Slide-Bar Dual Showerheads | 272 |
| Tubs + Shower Drains | 274 |
| Sink Drains | 278 |
| Branch + Main Drains | 280 |
| Noisy Pipes | 282 |
Introduction
The way water flows doesn’t change, but how water is used once inside a home continues to evolve. Technology advances, and the International Plumbing Code—on which most local codes are based—was revised and updated in 2021. New day, new tech, new rules.
You can think of this as transformation around the edges. PEX is the newest material innovation in home plumbing and, after well more than a decade in the marketplace, it has become a standard with which home do-it-yourselfers are comfortably familiar. So, really, what is the news that merits a revision of this BLACK+DECKER classic?
Beyond updating the information in this book to reflect the revised 2021 codes, the latest in home plumbing has to do with the fixtures themselves. They are all becoming “smart.” Driven by continual technological innovation and homeowners’ desire to be more comfortable, plumbing fixtures and safety features have grown ever more responsive to the user. This is nowhere truer than with new toilets.
No fixture has changed quite so much in the last few years, even as the primary function remains essential and basic. Modern toilet manufacturers are focusing on making a daily process more pleasant, convenient, and even environmentally friendly. Seat warmers are now more common than not. Bidets are incredibly popular options on new toilets and retrofit seats alike. The American consumer has decisively opted for bidet functions incorporated into standard toilets, rather than a separate, standalone fixture (which is why we removed the previous edition’s instructions for installing a stand-alone, side-by-side bidet).
Home plumbing innovation doesn’t stop at the bathroom door. Smart tech is finding its way into plumbing appliances from washing machines to tankless water heaters—which are, themselves, finding their way into an increasing number of homes in place of traditional tanked units.
More crucial are the new innovations in safety. Leak detectors—including wireless units and automatic valve controllers—form an extra layer of insurance against catastrophic home floods. Safety also extends to drinking water. As municipalities across the country wrestle with aging infrastructure and compromised water quality, a brand new project—installing a whole-house water filter couldn’t be timelier.
One thing that hasn’t changed in this edition of The Complete Guide to Plumbing is the userfriendly nature of the information. Although we take great pains to ensure all the guidance here is code-compliant and up to the best standards and practices, we never lose sight that this is a book for homeowners. You don’t need plumbing experience to tackle any of these projects. Start with the basics about materials, tools, and techniques by reading the opening chapters, and then find the project that makes the most sense for you and your home. It may require a new tool or two, but the most important tool is in your hands right now.
Your Home’s Plumbing System
Home plumbing can seem much more mysterious than it actually is, because most of the functional components are concealed by walls and other structures. Understanding how the system works, though, is key to making even small repairs or upgrades. Fortunately, residential plumbing operates on logical and fairly simple principles. In a nutshell, water comes into the house, is routed to and between appliances, and drains out.
Let’s take a look at each of those systems in isolation.
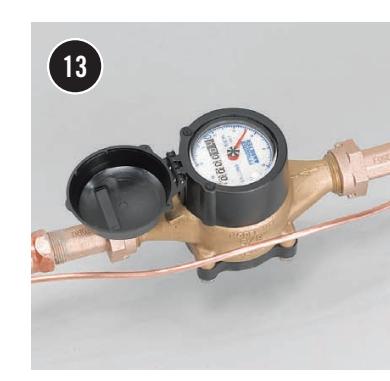
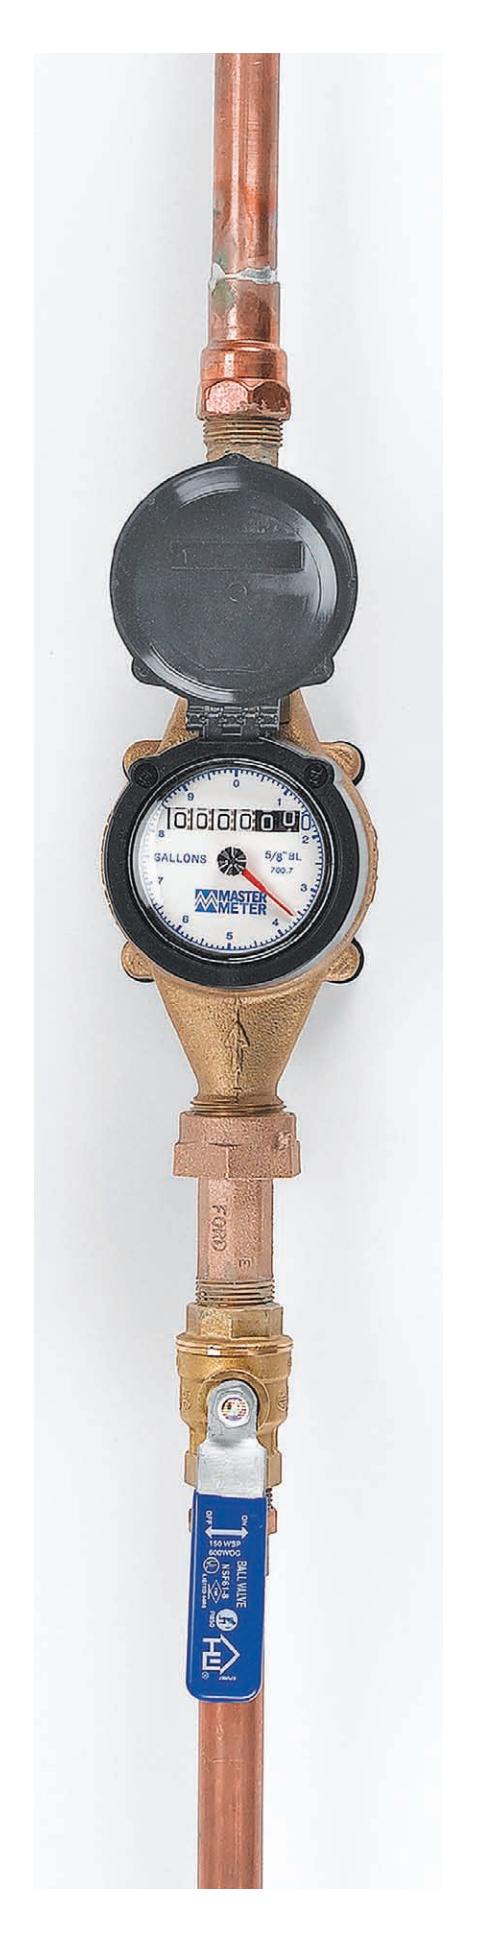
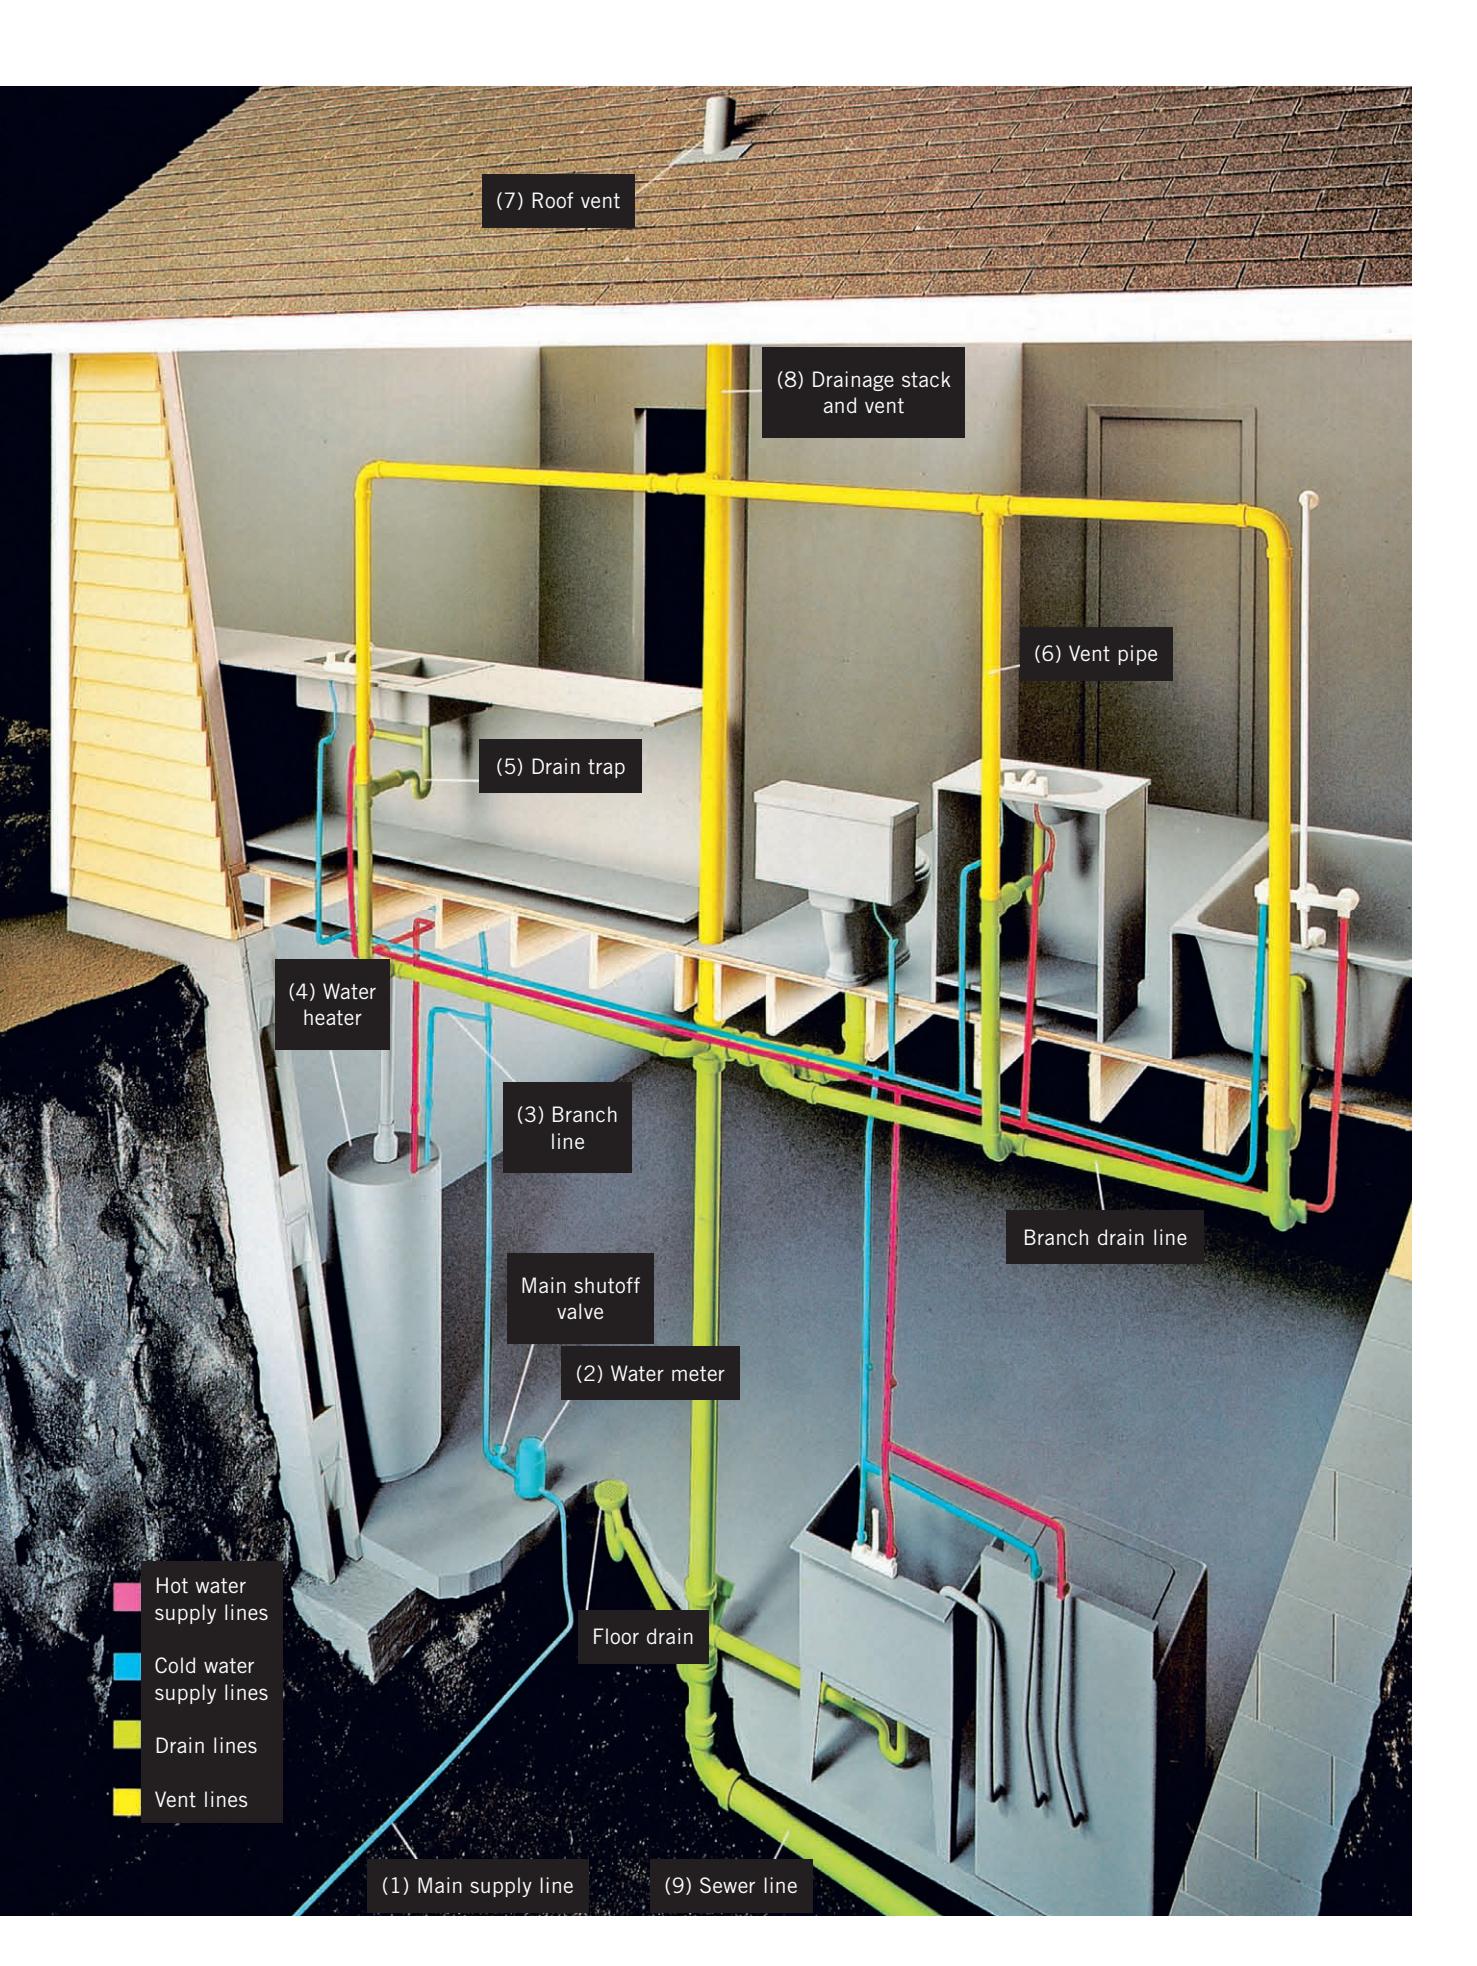
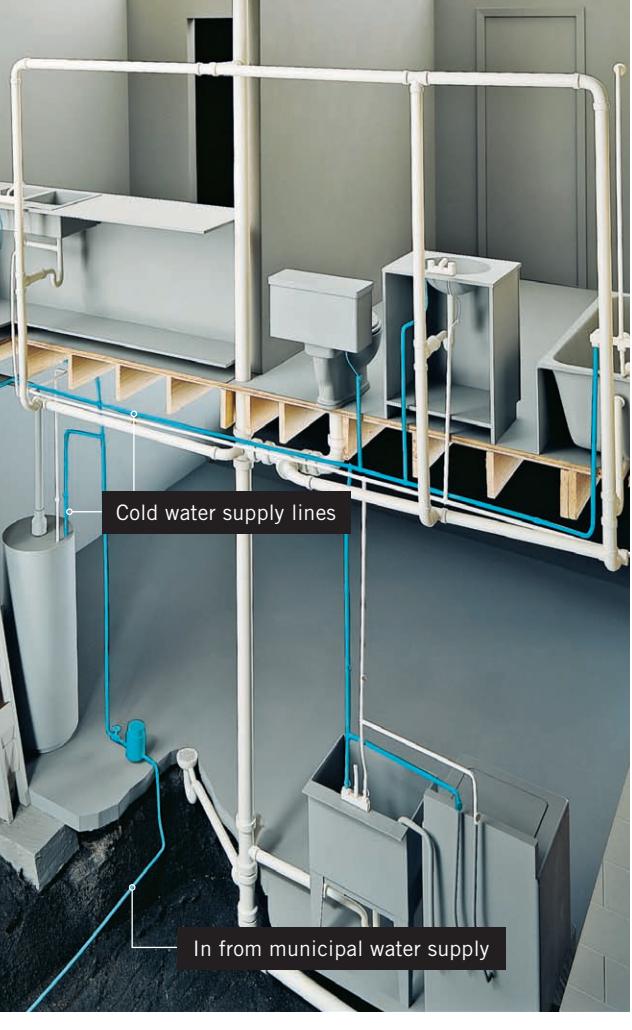
- 1. Water supply. Fresh water enters a home through a main supply line (1) from the municipal water source or a private well. Water supplied from a city or town will first run through a water meter (2 and right) that measures the amount of water used by the residence, so that the water utility can bill for it.
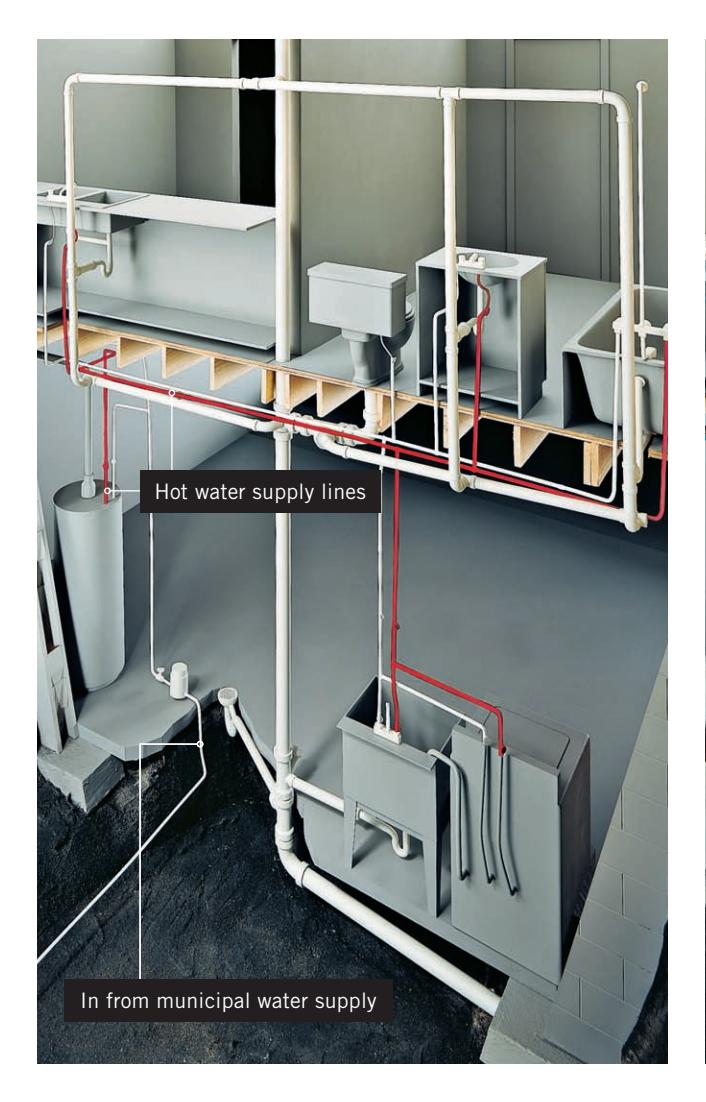
- 2. Appliances and fixtures. A branch line (3) directs some of the incoming water to the home’s first appliance: the water heater (4). A hot water line runs from the water heater, parallel with the cold water supply lines in the house, to fixtures and appliances in each room. These lines serve every plumbing fixture in the house, including sinks, bathtubs, showers, the dishwasher, washing machine, and water softener if there is one. Toilets and exterior sillcocks are served only by the cold water line. Water flowing throughout the system is controlled by valves (sink faucets are actually valves). Any valve can eventually wear out, causing leakage. Most have been designed to be easy to repair.
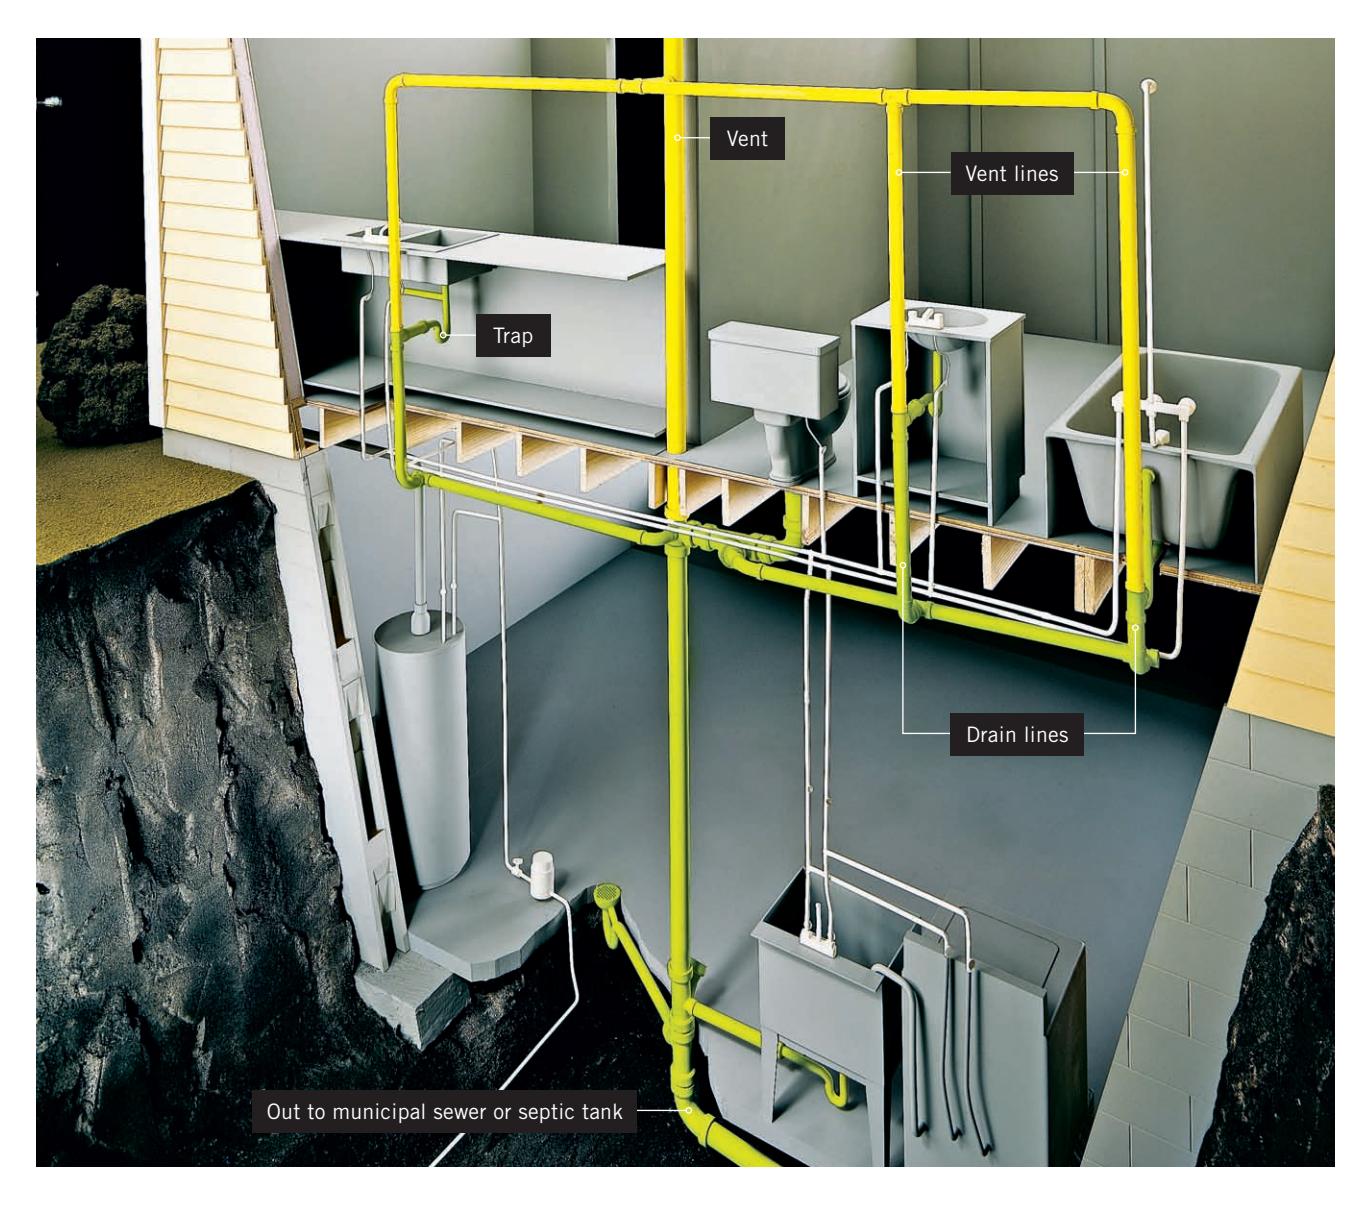
- 3. DWV system. A home’s drain-waste-vent system not only removes waste water out to a sewer or septic system, it maintains health and hygiene inside the house. Waste water produced by fixtures is first routed away from the individual fixture through a branch waste line. Every fixture must have a drain trap (5), a U- or P-shaped piece of pipe that holds standing water that prevents sewer gases from entering the home. The waste then flows by gravity to a vented vertical waste stack (8). Increasingly larger diameters of waste pipes direct waste down to the main drain. Vent pipes (6) equalize the air pressure in the system, ensuring against suction or pressure that might stop waste from draining. Vent pipes are routed up through the roof (7). Waste water and solid waste flows out to a sewer line (9) connected to the sewer main, if that service is provided by the local municipality. If not, it flows out into a local septic system.
A water meter measures the flow of water into the home and is the property of the local municipal water company. There is always a main shut-off valve (blue handle shown here) right before the meter. A private well doesn’t use a water meter because there’s no need to record usage for billing. But even a well system has a main shut-off valve, and it’s essential to know where yours is located.
Water Supply System
Water supply pipes carry hot and cold water throughout a house. In homes built before 1960, the original supply pipes were usually made of galvanized steel. Newer homes have supply pipes made of copper. Beginning in the 1980s, supply pipes made of rigid CPVC plastic became more commonplace, and the more recent plumbing innovations find PEX pipe widely used and accepted.
Water supply pipes are made to withstand the high pressures of the water supply system. They have small diameters, usually ½ to 1 inch, and are joined with strong, watertight fittings. The hot and cold lines run in tandem to all parts of the house. Usually, the supply pipes run inside wall cavities or are strapped to the undersides of floor joists.
Hot and cold water supply pipes are connected to fixtures or appliances. Fixtures include sinks, tubs, and showers. Some fixtures, such as toilets or hose bibs, are supplied only by cold water. Appliances include dishwashers and clothes washers. A refrigerator icemaker uses only cold water. Tradition says that hot water supply pipes and faucet handles are found on the left-hand side of a fixture, with cold water on the right.
Because it is pressurized, the water supply system is occasionally prone to leaks. This is especially true of galvanized iron pipe, which has limited resistance to corrosion.
For some houses in older neighborhoods, the main supply line running from the street to the house is made of lead; this once posed a health hazard. Today, however, municipalities with lead pipes often add a trace amount of phosphate to the water, which coats the inside of the pipes and virtually eliminates leaching of lead into the water. If you are concerned about lead in your water, check with your local water supplier.
Drain-Waste-Vent System
Drain pipes use gravity to carry waste water away from fixtures, appliances, and other drain openings. This waste water is carried out of the house to a municipal sewer system or septic tank.
Newer drain pipes are plastic. In an older home, drain pipes may be cast iron, galvanized steel, copper, or lead. Because they are not part of the supply system, lead drain pipes pose no health hazard. However, lead pipes are no longer manufactured for home plumbing systems.
Drain pipes have diameters ranging from 1¼ to 4 inches. These large diameters allow waste to pass through efficiently.
Traps are an important part of the drain system. These curved sections of drain pipe hold standing water, and they are usually found immediately after the drain tailpiece in the drain opening. The standing water of a trap prevents sewer gases from backing up into the home. Each time a drain is used, the standing trap water is flushed away and replaced by new water.
In order to work properly, the drain system requires air. Air allows waste water to flow freely down drain pipes.
To allow air into the drain system, drain pipes are connected to vent pipes. All drain systems must include vents, and the entire system is called the drain-waste-vent (DWV) system. One or more vents, located on the roof, provide the air needed for the DWV system to work.
 system.”)
Shutting off the Water
In case an emergency requires you to replace or repair a faucet, fixture, or appliance, knowing how to shut off the water is imperative. The photos on this page show the most common types of shutoffs. If you don’t feel completely confident about finding your home’s shutoff points or how to turn them off, contact your local water company for information.
There are two basic types of valves, which shut off in two different ways. To turn off many older valves, rotate the handle clockwise (remember “lefty loosey; righty tighty”) until it stops. To turn off many newer valves, rotate the handle one-quarter turn only.
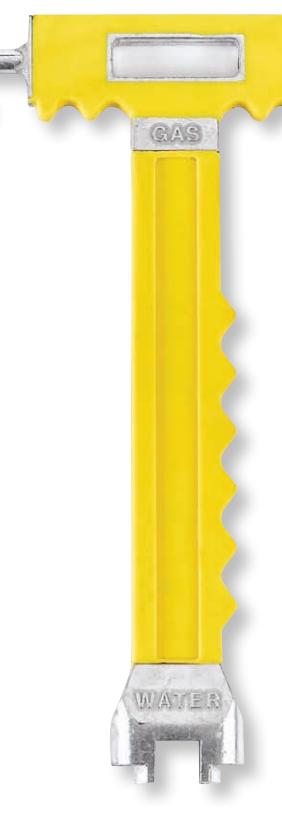
Some outdoor shutoffs
require the use of a special tool, often referred to as a “key.” Keep your key within easy reach in case of an emergency. To turn off, slip the key over the valve and rotate one quarter turn, so the handle is at a right angle to the pipe. The outdoor main shutoff shown below is an example of a shutoff that requires a key. If you lack a key, a meter valve can usually be turned with a wrench or channel-type pliers.
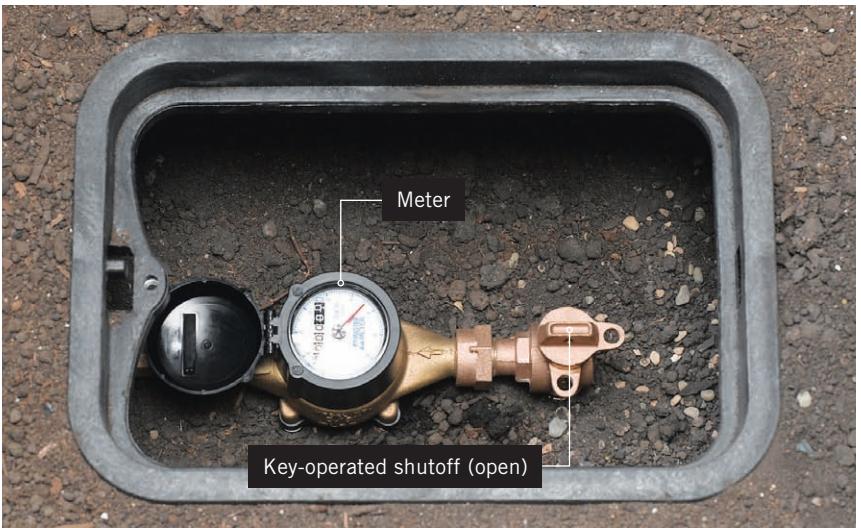
An outdoor main shutoff may be as simple as an exposed valve that you turn by hand. Or it may be buried in a housing that is sometimes called a Buffalo box. In this example, both the meter and the main shutoff are housed in the Buffalo box; in other cases, the meter is located on the house.
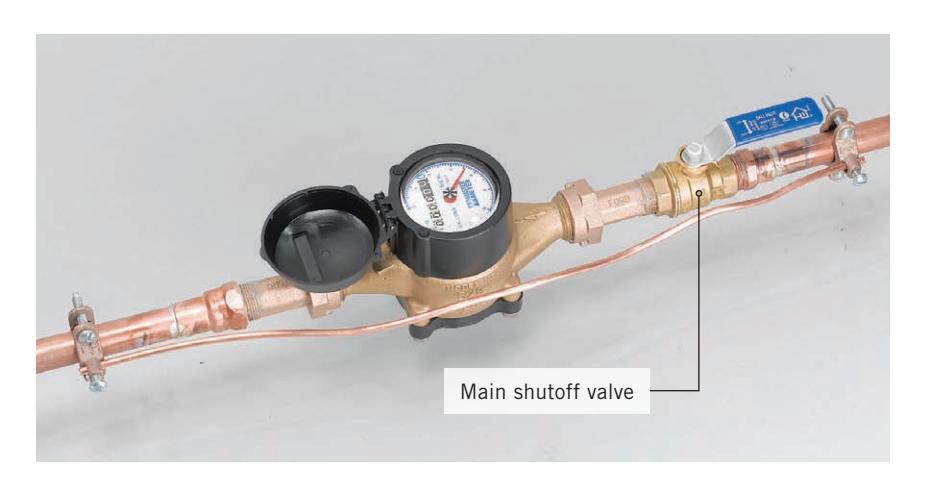
You may have an inside main shutoff,
usually located near the point where the main supply pipe enters the house near the water meter. Many homes have both a Buffalo box and an indoor main shutoff. There may be a valve on each side of the meter; turn off either one of them to shut off water to the house.
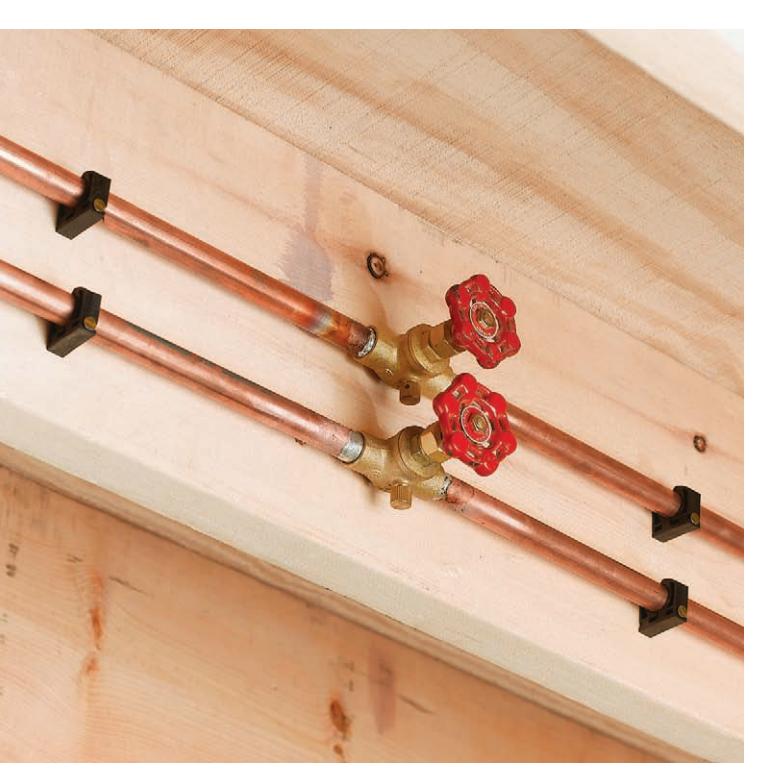
Partial-house shutoffs are often found in medium- to large-size homes. They control water flow to large areas of the house. They are found in pairs, one for hot and one for cold water. Turning off a pair of these may shut off water to a floor or to an entire bathroom or kitchen.
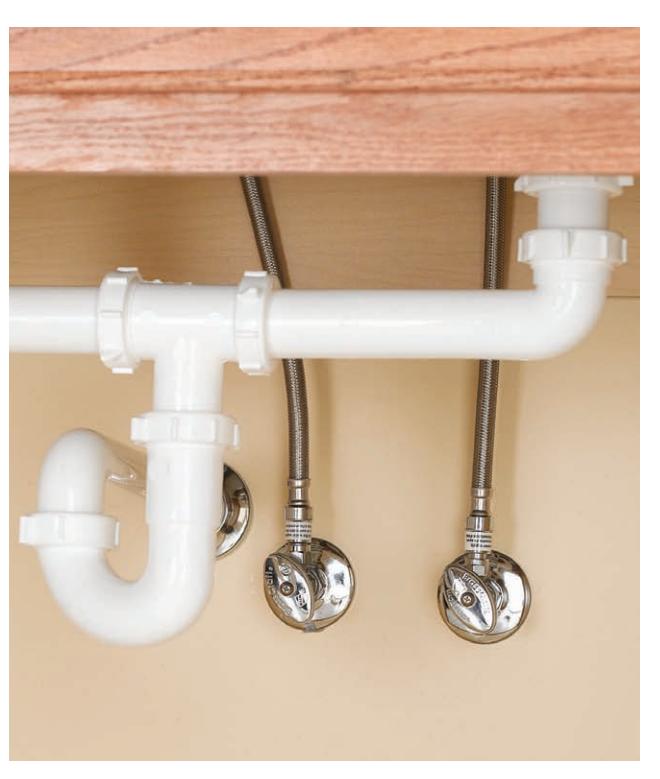
 under a sink.”)
Fixture shutoff valves, also called stop valves, control water to a specific faucet, toilet, or fixture. They are also usually found in pairs, one for hot and one for cold. However, toilets, icemakers, and other cold-water-only fixtures will have only one stop valve. If you live in an older home that lacks stop valves, it’s a good idea to install them.
SMART LEAK DETECTORS AND VALVE CONTROLLERS
Leak detectors are placed in high-risk spots, such as the lowest area of a basement floor, where leak water is likely to show up first. The detector transmits an alert to your smart phone or to a smart valve controller that will automatically shut off the water supply. Less-expensive smart valve controllers are battery operated with simple mechanisms that physically close the valve. These can be installed in less than an hour by anyone with basic tools. Pricier systems are plumbed right into a supply line and act as an internal valve. They usually require a direct power source, and often come with proprietary apps for your smart phone. They should be installed by a professional.
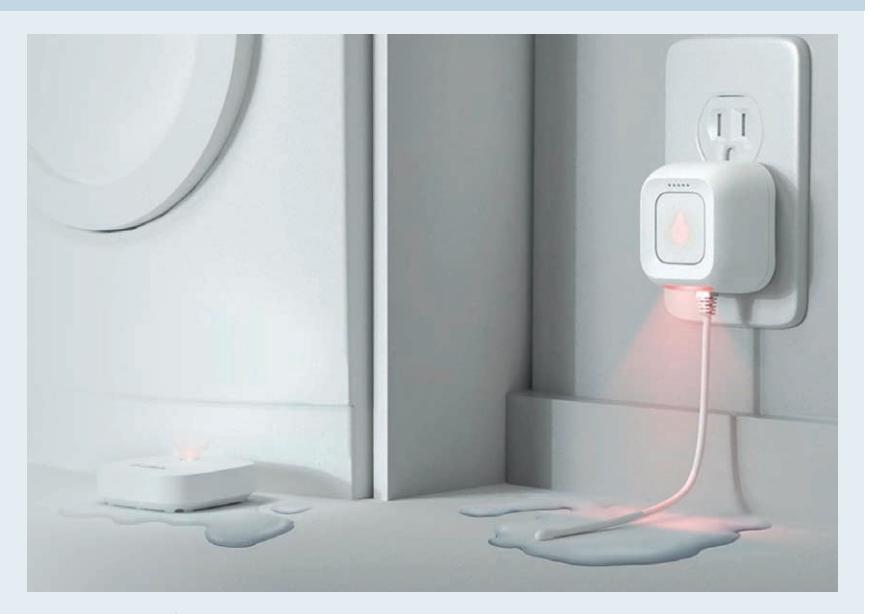
The problem with shut-off valves? They can stop the flow to a leak only after the leak has likely done some (and often a lot of) damage. Smart leak detectors and valve controllers are the latest innovation that promises to get the jump on leaks—even if you’re not around to detect them.
Gray Water Systems
Water is increasingly precious. Drought conditions in several areas of the country have led to increasing water prices, private wells that run dry or no longer reliably produce, and difficulty maintaining even drought-tolerant landscapes.
The answer? Use your water more than once.
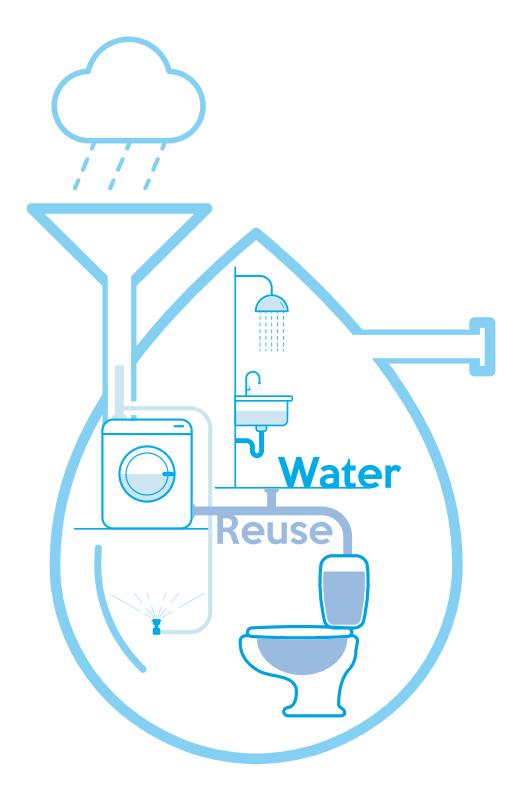
A gray water system reuses water from bathing, laundering clothes, and washing dishes to irrigate nonedible plants or, in some cases, to flush toilets. This type of piped system can be as simple as plumbing a fixture to an exterior outlet that directly waters plants, or as complicated as a self-contained turnkey system that reuses water from multiple fixtures.
The cost of a gray water system varies widely. A single-appliance, direct irrigation line is a doable DIY project that could be installed in a weekend for less than a $100. You could, however, purchase a wholehouse filtration system collecting from multiple fixtures and distributing to both irrigation and toilets, for several thousand dollars.
Those costs will be offset by the fact that recycled water is going to save on your water bill. Depending on where you live, those savings can be significant. In fact, the U.S. Environmental Protection Agency (EPA) estimates that one-third of residential water usage is directed to landscaping irrigation.
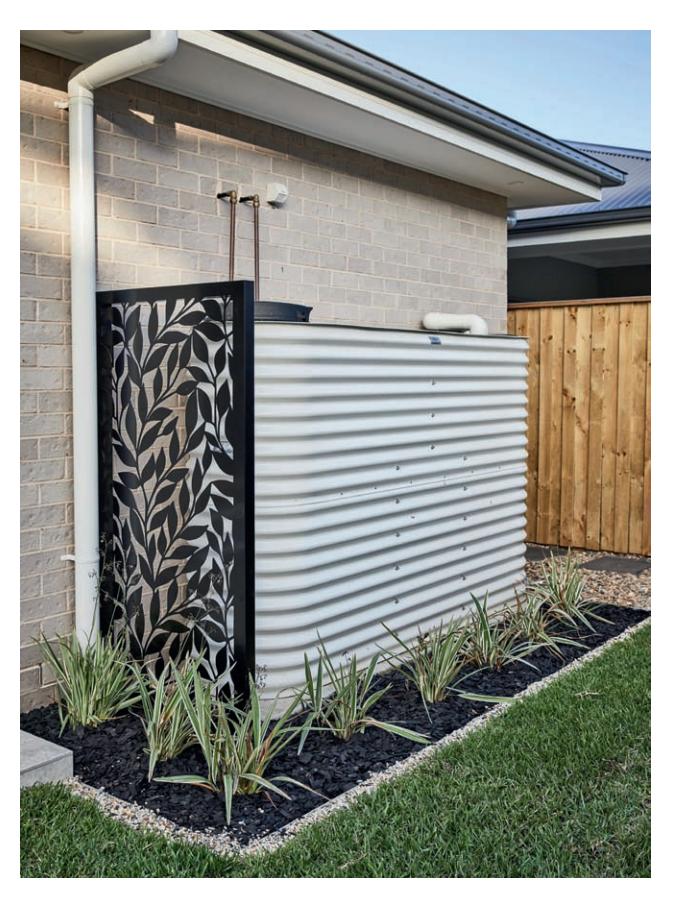
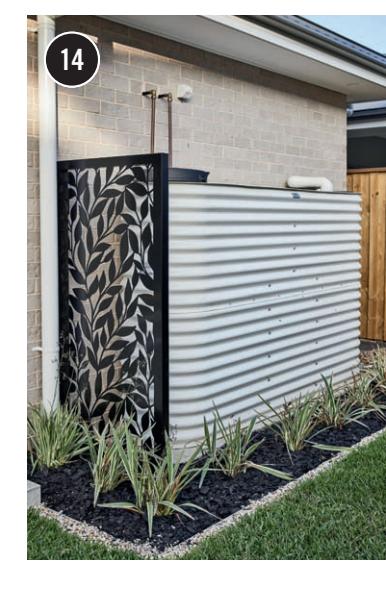
This large gray water reservoir is connected to multiple appliances through the back wall of the home, creating a simple method for irrigating the yard during the dry months.
Plumb It Yourself
The most basic gray water option is to use PVC pipe and fixtures to tap into your clothes washing machine waste outlet, and direct the waste water out through a hole in the wall to gravity-feed lines connected to off-the-shelf drip-irrigation. You can also plumb multiple fixtures this way.
The water is usually only enough for one area of your yard. The plumbing must include a three-way diverter valve at each appliance on the system. This allows you to redirect the flow to the waste line in cases where the water contains bleach or other contaminants (such as when you’re cleaning paint brushes in a sink), or in situations where the ground outside is already saturated from precipitation.
Homeowners who install gray water systems usually change to biodegradable personal hygiene products (if the shower drain feeds into the system), soaps, and detergents. The by-products of many ecologically friendly soaps and cleansers may actually feed certain plants.
Filtering for Convenience
The problem with any direct-feed DIY gray water system is that chemicals and other contaminants from the appliance can potentially still make their way to your landscaping, even when you’re being careful. Not only can this endanger plants, it can also harm wild and domesticated animals, and possibly even children who play in the yard.
That’s where the next step up comes in—a filter plumbed into the line. There are several on the market, and all are meant to remove both particulates and some pollutants. These are rarely if ever used for drinking water; the filter protects plant life and any animals that might come in contact with the irrigation.
A big step up from a simple in-line filter, whole-house recycling systems collect, filter, and distribute water efficiently ensuring that very little is ever wasted. Generally, the more complex the reclamation system is, the more maintenance it will require. Upkeep can entail changing filters on a schedule, or even swapping out UV bulbs in the most sophisticated systems.
Reclaiming Outside Water
It rains even where there is an ongoing drought. The problem is, that rain often runs off before it can do any good, and it’s not there when you need it most, such as during hot, dry summer months. That’s why several manufacturers make rainwater recycling systems that are designed to capture whatever precipitation falls, no matter when it rains.
Making your own is an achievable DIY option. PVC pipe attached to gutter drop outlets on one end and a plastic barrel or barrels on the other, can trap a significant amount of rainwater and is as simple as it is useful.
Gray Water Guidelines
- Always start by checking local building and health departments to determine the codes that dictate gray water use in your locality, and what permits you’ll need for the work. One advantage of hiring a licensed plumber is that a professional will know exactly what rules and regulations govern gray water systems in your area.
- Be careful to match the water produced by the system’s fixtures to the needs of your plants, if you’re using an outside irrigation system. Consult a gardener if you have any doubt about your yard or garden needs.
- Never irrigate edible plants with gray water. This includes fruit trees and bushes, as well as vegetable gardens.
- Don’t store gray water for more than a day, and don’t direct it to any area where it will pool or run off.
- Use only biodegradable products in the water routed to the gray water system (divert it to sewer or septic, as necessary). Be careful not to allow any harsh chemicals to go into the system. Avoid any that contain salts, boron, or chlorine bleach.
- Never route water that has come in contact with feces—from toilets or diaper washing—into a gray water system.
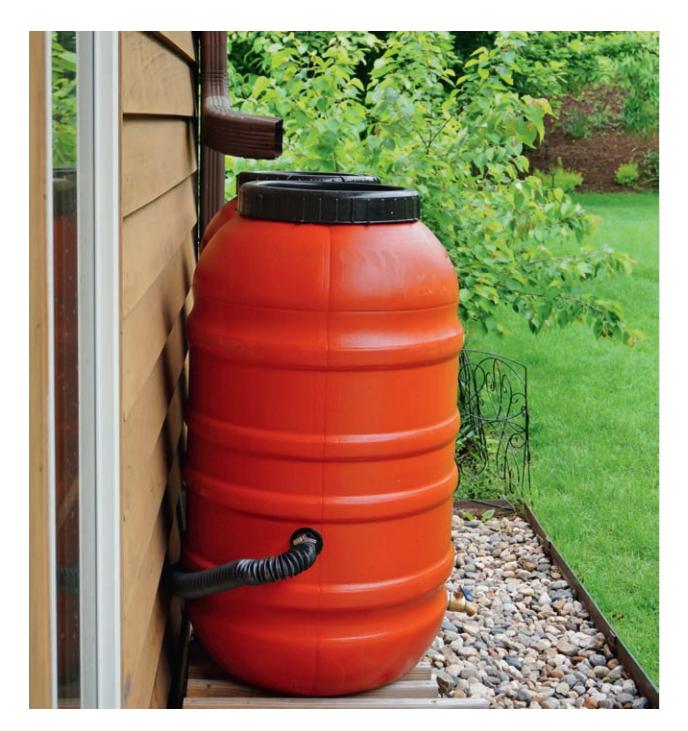
Even if a full-scale gray water is out of the question, you can use a recapture system to collect rainwater and use it for irrigating dry areas of the yard.
BLACK WATER
Any water that comes from a toilet or chemical fixture like a water softener is called “black water” and is not suitable for recycling or reuse. Toilet water could potentially cause disease outbreak and other health problems. Although bathroom showers, sinks, and bathtubs can all be drained into a gray water system, toilets should never be connected to anything but the sewer or septic system.

Plumbing Tools, Materials + Skills
Although most plumbing projects use common tools found in most every homeowner’s toolbox, you’ll also need a few that are particular to the pipes and fixtures that populate home plumbing systems. As with all other tools, plumbing essentials can be broken down into two basic categories: hand tools and power tools. Most importantly of all, though, is the safety equipment that will reduce your risk of injury. Those include a sturdy pair of heavy-duty work gloves (and another pair with rubber finger and palm pads for when things get slippery), safety eyewear meant for construction work, and—occasionally—a mask to avoid inhaling dust and airborne contaminants.
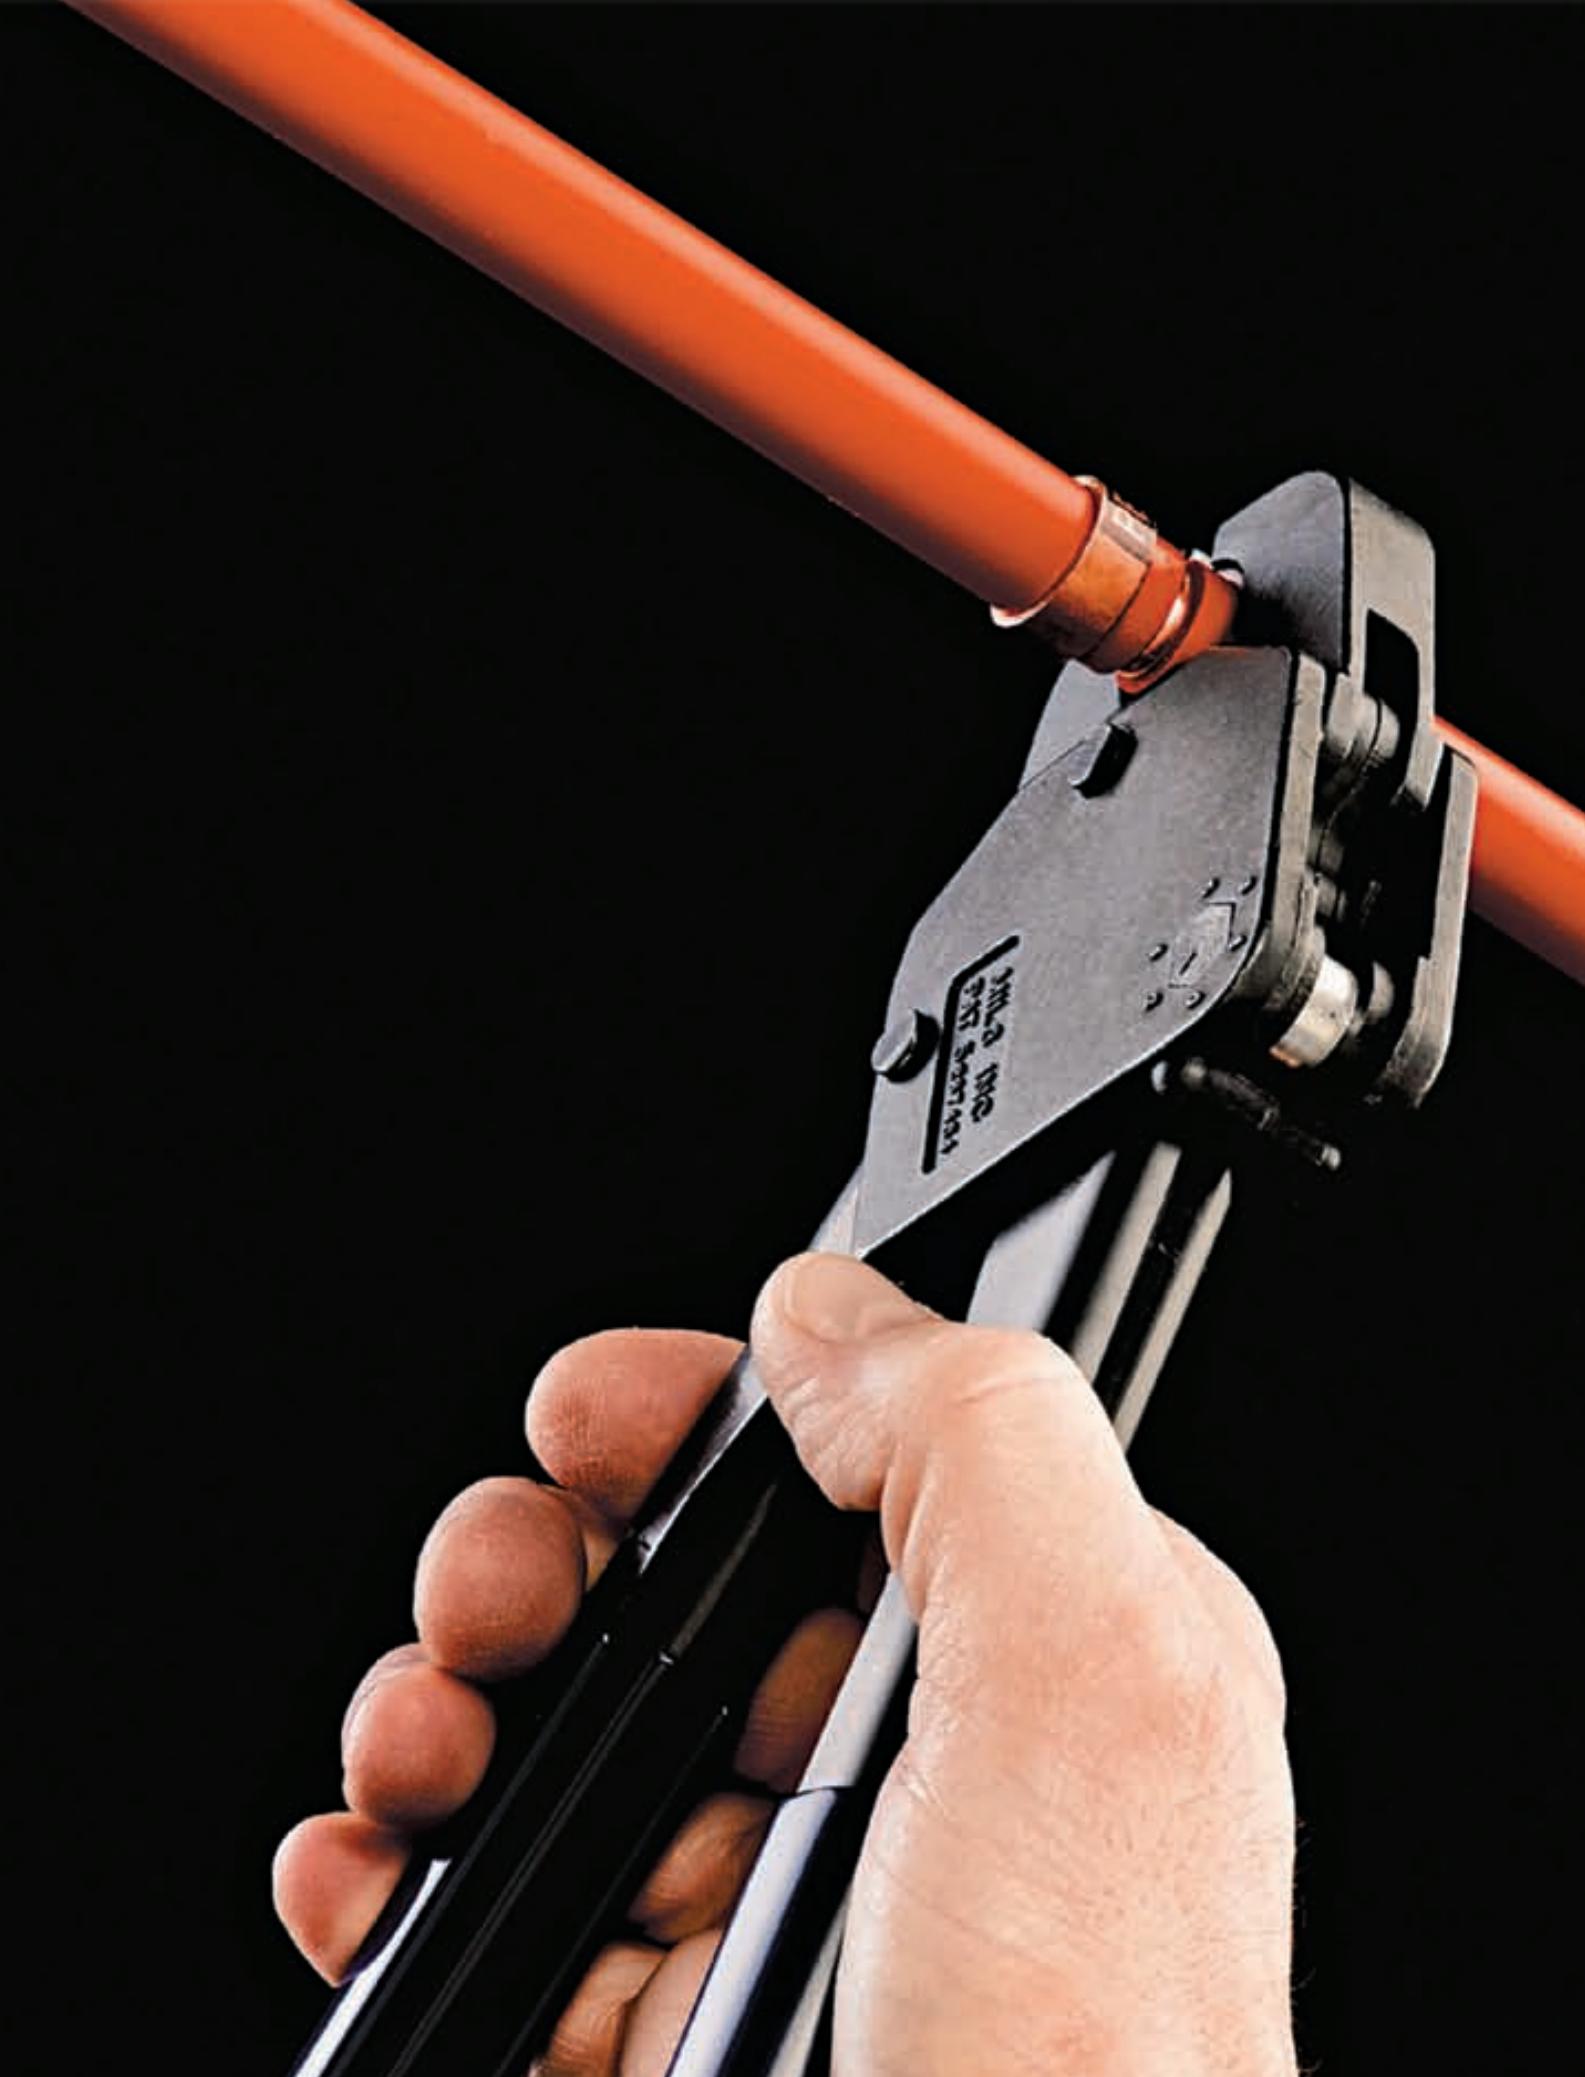
As far as the materials you’ll use, PEX pipe continues to grow in popularity. There are few places plumbers today won’t use this adaptable type of pipe, including to replace or cut into copper or PVC pipe. With that in mind, this edition of The Complete Guide to Plumbing includes an expanded section on PEX, and discusses a device that makes good use of PEX’s unique, easy-to-fabricate nature—the manifold. It allows for simple and quick whole-house and singlearea water supply.
Of course, any home plumber will inevitably have to work with existing pipes that may be PVC, copper, or cast iron (replace any galvanized pipes in your home). All of those have their uses, and all require different tools and skills to modify or fabricate. Fortunately, you’ll discover everything you need to know about those materials and how to work with them, in the pages that follow.
In this chapter:
- Plumbing Tools
- Plumbing Materials
- Copper
- PEX Pipe
- PEX Manifolds
- Rigid Plastic Pipe
- Working with Cast-Iron Pipe
- Working with Outdoor Flexible Plastic Pipe
- Pipe Fittings
- Shutoff Valves
- Valves + Hose Bibs
- Compression Fittings
- Creating Flared Fittings
Plumbing Tools
Depending on the project, home plumbing tasks may require little more than the tools you already own, or they may call for specialized gear that can be used for no other tasks. However, in plumbing even more than in other areas of home repair, the right tool can be the difference between a successful job and one that you come to regret.
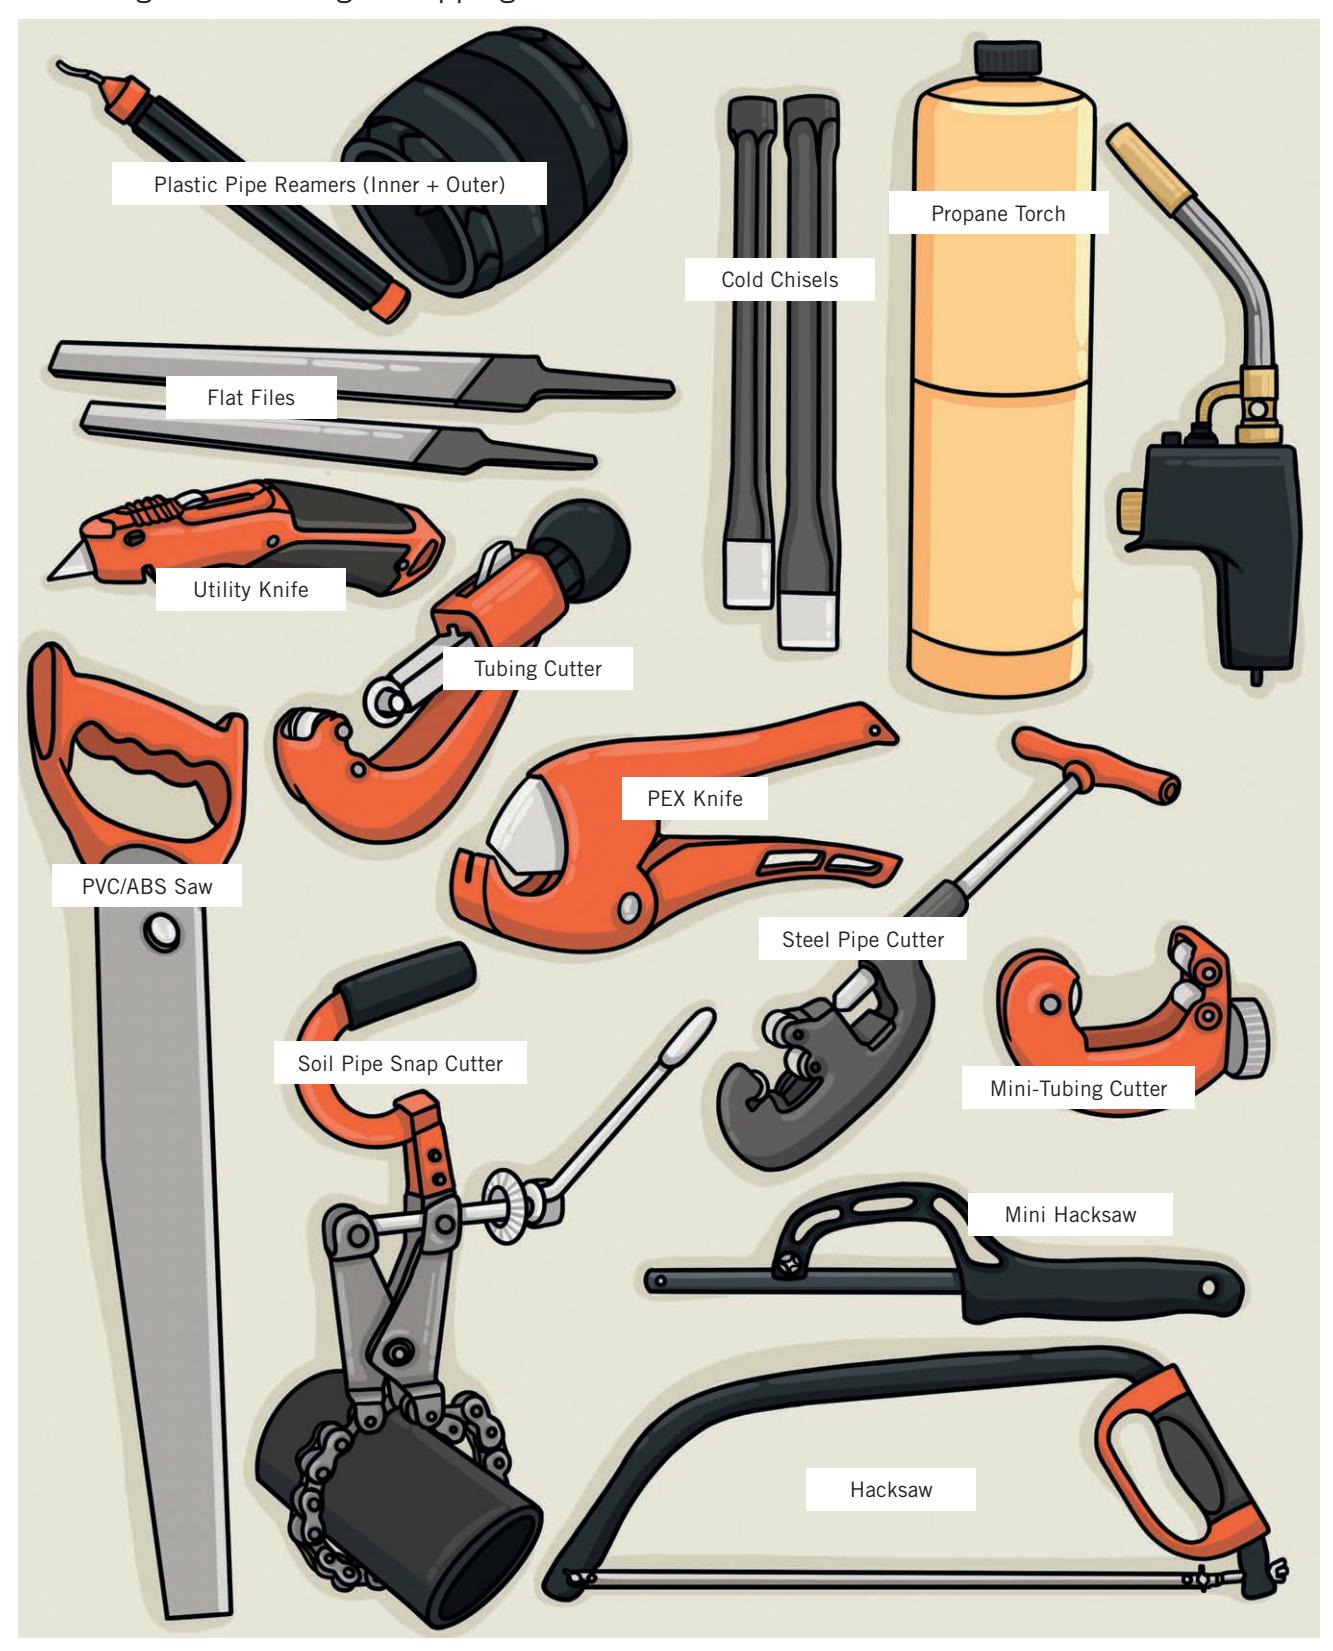
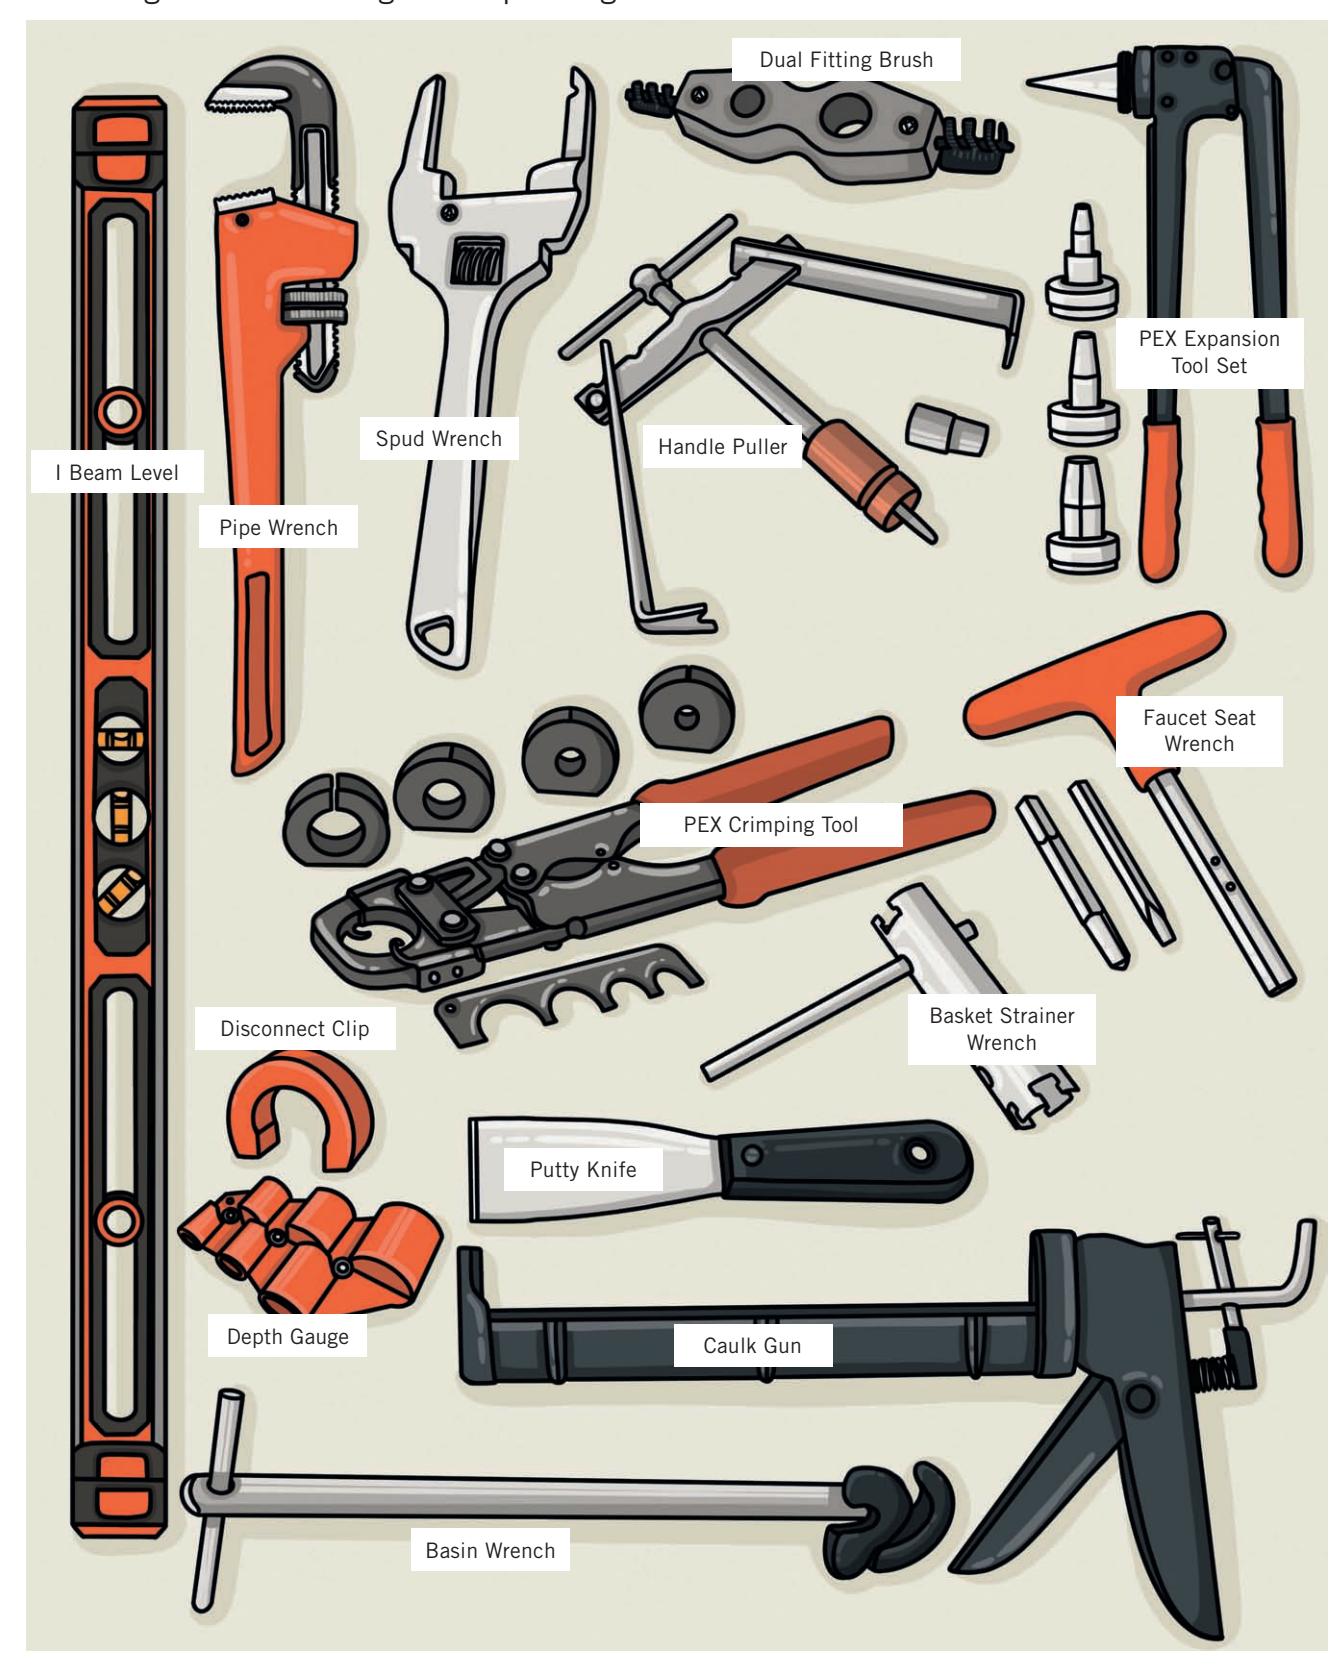
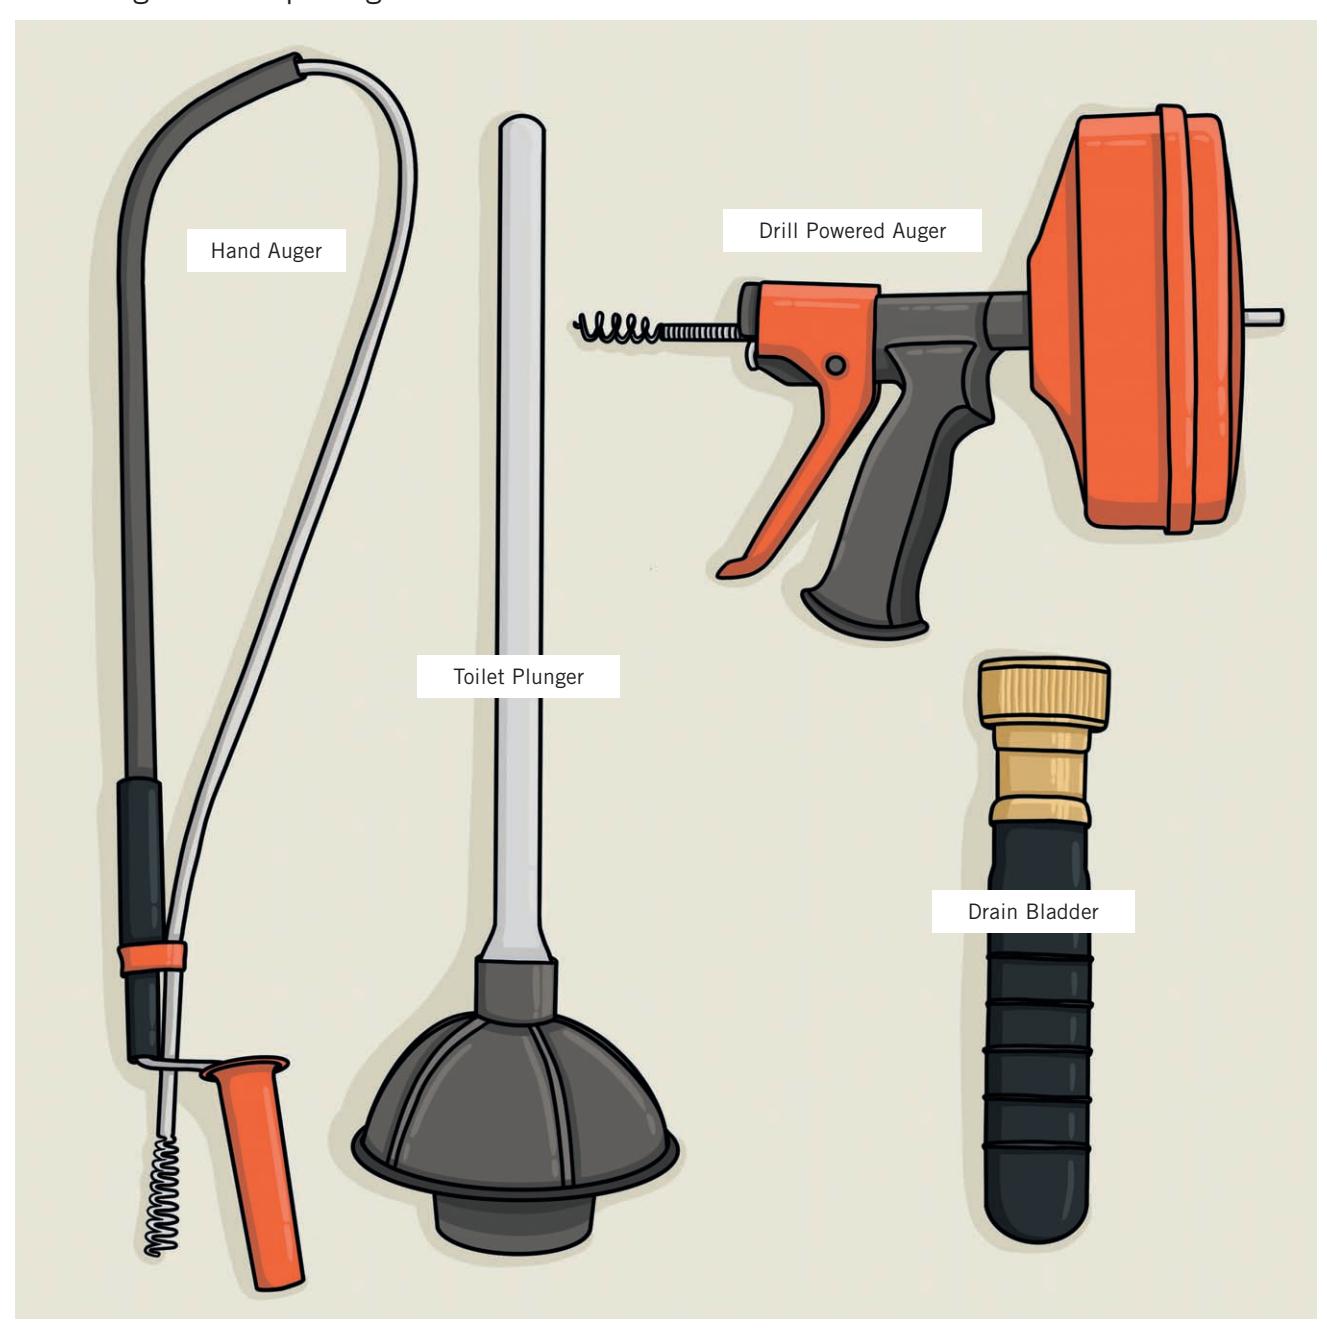
The tools shown here are the most commonly used for plumbing projects small and large. Unless you plan on doing a lot of plumbing work, it’s wise to rent larger, more specialized tools and power tools. In any case, always make sure you have the correct tool for the plumbing job at hand. You’ll thank yourself when it’s done.
Safety First

Plumbing Tools: Cutting + Prepping
Plumbing Tools: Fastening + Manipulating
Plumbing Tools: Repairing
Plumbing Materials

COMMON PIPE + TUBE TYPES
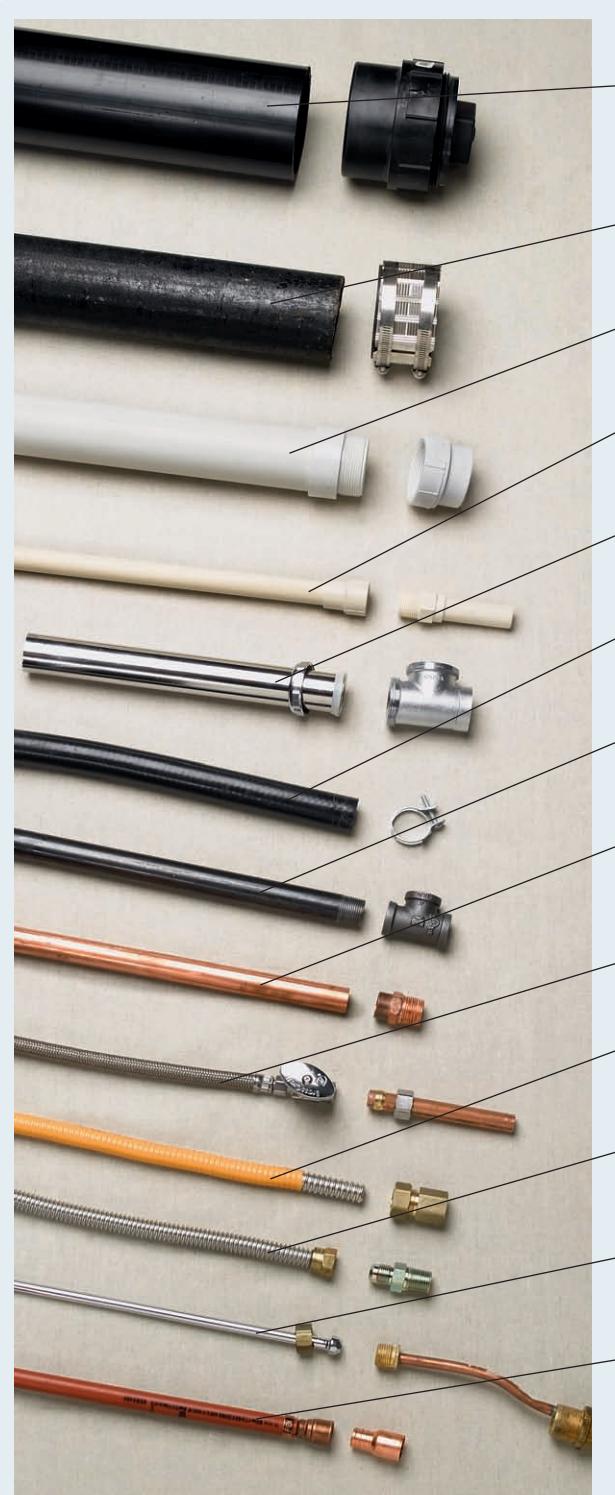
BENEFITS + CHARACTERISTICS
Acrylonitrile butadiene styrene (ABS) is an approved DWV pipe (although it has its detractors) and is commonly used in many markets, especially in the western U.S.
Cast iron is strong but hard to work with. Repairs should be made with plastic pipe.
Polyvinyl chloride (PVC) is rigid plastic that resists heat and chemicals. Schedule 40 is the minimum wall thickness, although Schedule 80 pipe minimizes water noise.
Chlorinated polyvinyl chloride (CPVC) rigid plastic is inexpensive and withstands high temperature and pressure.
Chromed brass has an attractive shiny surface and is used for drain traps where appearance is important.
Polyethylene (PE) plastic is a black or bluish flexible pipe sometimes used for main water service lines as well as irrigation systems.
Black pipe (iron pipe) generally is threaded at the ends to accept female-threaded fittings. Usually used for gas lines; it is not for potable water.
Rigid copper is used for water supply pipes. It resists corrosion and has smooth surfaces for good water flow.
Braided metal is used for water supply tubes that connect shutoff valves to fixtures.
Flexible stainless-steel (protective coated) connectors are used to attach gas appliances to supply stopcocks.
Flexible stainless-steel (uncoated) connectors are used to attach gas appliances to supply stopcocks.
Chromed copper supply tube is used in areas where appearance is important. It is easy to bend and fit.
Cross-linked polyethylene (PEX) is flexible and is approved by major building codes for water supply.
Flexible copper tubing (not shown) bends easily and requires fewer couplings than rigid copper.
| COMMON USES | LENGTHS | DIAMETERS | FITTING METHODS | TOOLS USED FOR CUTTING |
|---|---|---|---|---|
| DWV pipes, sewer pipes, drain traps | 10’ | 1¼, 1½, 2, 3, 4” | Solvent cement, threaded fittings, or mechanical couplings | Tubing cutter, miter box, or hacksaw |
| DWV pipes, sewer pipes | 5’, 10’ | 1½, 2, 3, 4” | Oakum + lead, banded neoprene couplings | Snap cutter or hacksaw |
| DWV pipes, sewer pipes, drain traps | 10’, 20’; or sold by linear feet | 1¼”, 1½”, 2”, 3”, 4” | Solvent cement, threaded fittings, or mechanical couplings | Tubing cutter, miter box, or hacksaw |
| Hot + cold water supply pipes | 10’ | 3/8”, 1/2”, 3/4”, 1” | Solvent cement + plastic fittings, or with compression fittings | Tubing cutter, miter box, or hacksaw |
| Valves + shutoffs; drain traps, supply risers | Lengths vary | 1/4”, 1/2”, 3/4”, 1 1/4”, 1 1/2” | Compression fittings or with metal solder | Tubing cutter, hacksaw, or reciprocating saw |
| Outdoor cold water supply pipes | Sold in coils of 25 to hundreds of feet | 1/4” to 1” | Rigid PVC fittings + stainless steel hose clamps | Ratchet-style plastic pipe cutter or miter saw |
| Gas supply pipe | Sold in lengths up to 10’ | 3/8, 1, 1 1/4, 1 1/2” | Threaded connectors | Hacksaw, power cutoff saw, or reciprocating saw with bi-metal blade |
| Hot + cold water supply pipes | 10’, 20’; or sold by linear feet | 3/8”, 1/2”, 3/4”, 1” | Metal solder, compression fittings, threaded fittings, press connect fittings, push connect fittings, flared fittings | Tubing cutter, hacksaw, or jigsaw |
| Supply tubes | 12”, 20”, 30” | 3/8, 1/2, 3/4” | Attached threaded fittings | Do not cut |
| Gas ranges, dryers, water heaters | 12” to 60” | 5/8”, 1/2” (OD) | Attached threaded fittings | Do not cut |
| Gas ranges, dryers, water heaters | 12” to 60” | 5/8”, 1/2” (OD) | Attached threaded fittings | Do not cut |
| Supply tubing | 12”, 20”, 30” | 3/8” | Brass compression fittings | Tubing cutter or hacksaw |
| Hot + cold water supply; PEX-AL-PEX (usually orange) is used in radiant floors | Sold in coils of 25 feet to hundreds of feet | 1/4” to 1” | Crimp fittings, push fittings, or compression fittings | PEX cutter |
| Gas supply; hot + cold water supply | 30’, 60’ coils; or by linear feet | 1/4”, 3/8”, 1/2”, 3/4”, 1” | Brass flare fittings, solder, compression fittings | Tubing cutter or hacksaw |
Copper
Copper is nearly ideal for water supply pipes. A purely natural (and consequently environmentally friendly) material, it resists corrosion and has a smooth surface that allows efficient water flow. The pipes are available in several diameters, but most home plumbing is done with ½- or ¾-inch pipe. The pipe comes in both rigid and flexible forms, although any copper pipe is going to be somewhat rigid.
The drawbacks to copper pipe are its susceptibility to leaks if it comes in contact with highly acidic well water, as well as its expense—also, traditional soldering or “sweating” of copper fittings is a skill that takes some practice to get right. PEX is an increasingly popular alternative because it is cheaper and the semiflexible tubes can be quickly and easily routed through framing without concern for kinks or the need for meticulous bending.
Rigid copper, sometimes called hard copper, is approved for home water supply systems by all local codes. It comes in three wall-thickness grades: Types M, L, and K. Type M is the thinnest, the least expensive, and a good choice for do-it-yourself home plumbing.
Rigid Type L usually is required by code for commercial plumbing systems. Because it is strong and solders easily, Type L may be preferred by some professional plumbers and do-it-yourselfers for home use. Type K has the heaviest wall thickness and is used most often for underground water service lines.
Flexible copper, also called soft copper, comes in two wall-thickness grades: Types L and K. Both are approved for most home water supply systems, although flexible Type L copper is used primarily for gas service lines. Because it is bendable and will resist a mild frost, Type
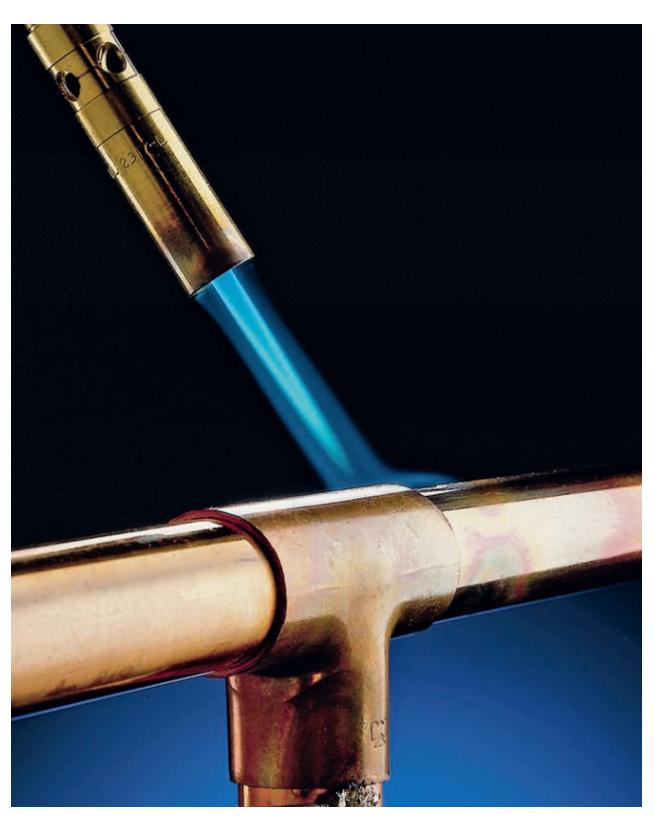
Soldering is a traditional way to join copper pipe and fittings, but it takes some practice to master (lead-free solders, now a requirement, can be a little more finicky). But push-fit fittings and other connection and material options are largely replacing soldered fittings and pipe.
L may be installed as part of a water supply system in unheated indoor areas, such as crawl spaces. Type K is used for underground water service lines.
Copper pipes are connected with soldered, compression, flare, or push-fit fittings (see chart below). Always consult your local code for the correct types of pipes and fittings allowed in your area.
Copper Pipe + Fitting Chart
| FITTING METHOD | RIGID COPPER | FLEXIBLE COPPER | GENERAL COMMENTS | |||
|---|---|---|---|---|---|---|
| TYPE M | TYPE L | TYPE K | TYPE L | TYPE K | ||
| Soldered | yes | yes | yes | yes | yes | Inexpensive, strong, and trouble-free fitting method. Requires some skill. |
| Compression | yes | not applicable | no | no | Makes repairs and replacement easy. More expensive than solder. Best used on flexible copper. |
|
| Flare | no | no | no | yes | yes | Use only with flexible copper pipes. Usually used as a gas-line fitting. Requires some skill. |
| Push-fit fittings | no | yes | yes | no | no | Easy to use. Flexible and inexpensive. |
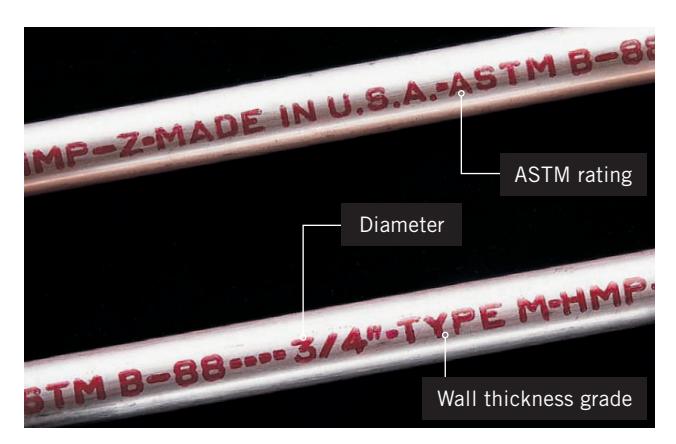
Grade stamp information includes the pipe diameter, the wall-thickness grade, and a stamp of approval from the ASTM (American Society for Testing and Materials). Type M pipe is identified by red lettering, Type L by blue lettering.
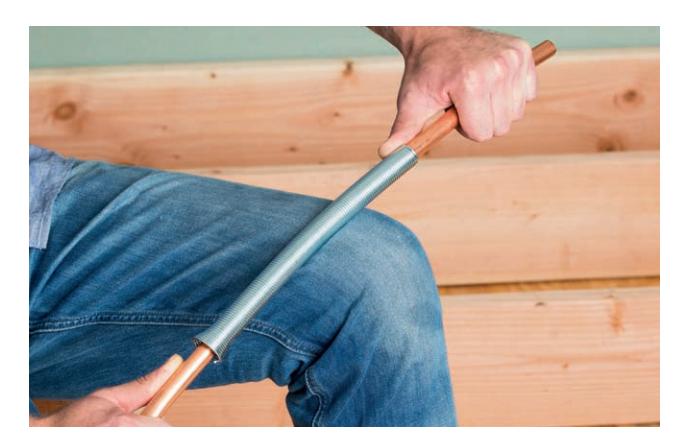
Bend flexible copper pipe with a coil-spring tubing bender to avoid kinks. Select a bender that matches the outside diameter of the pipe. Slip the bender over the pipe using a twisting motion. Bend pipe slowly until it reaches the correct angle, but not more than 90º.
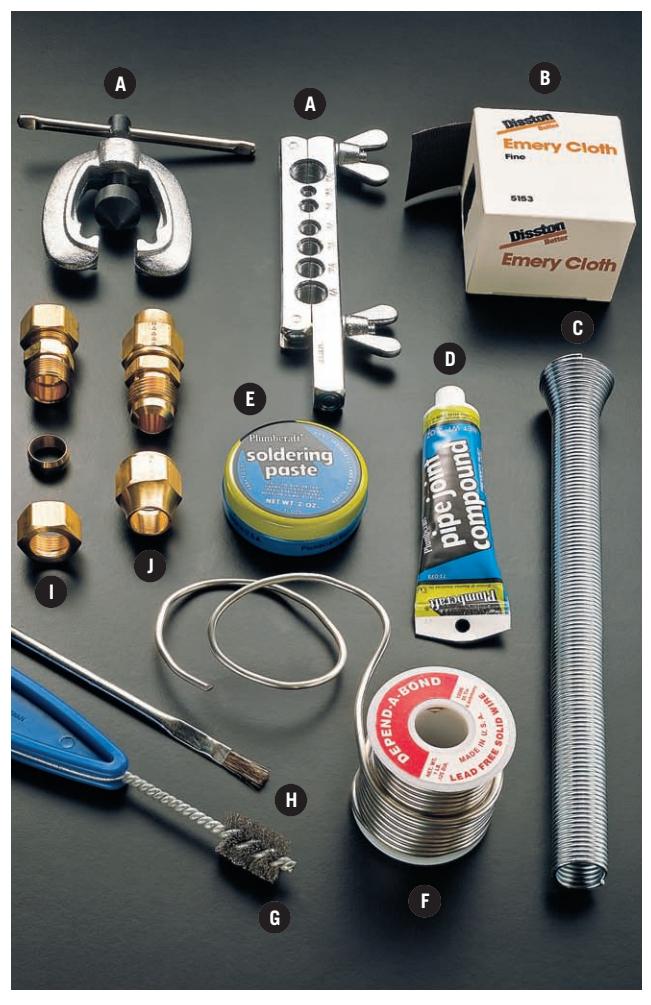
Specialty tools and materials for working with copper include: flaring tools (A), emery cloth (B), coil-spring tubing bender (C), pipe joint compound (D), soldering paste (flux) (E), lead-free solder (F), wire brush (G), flux brush (H), compression fitting (I), flare fitting (J).
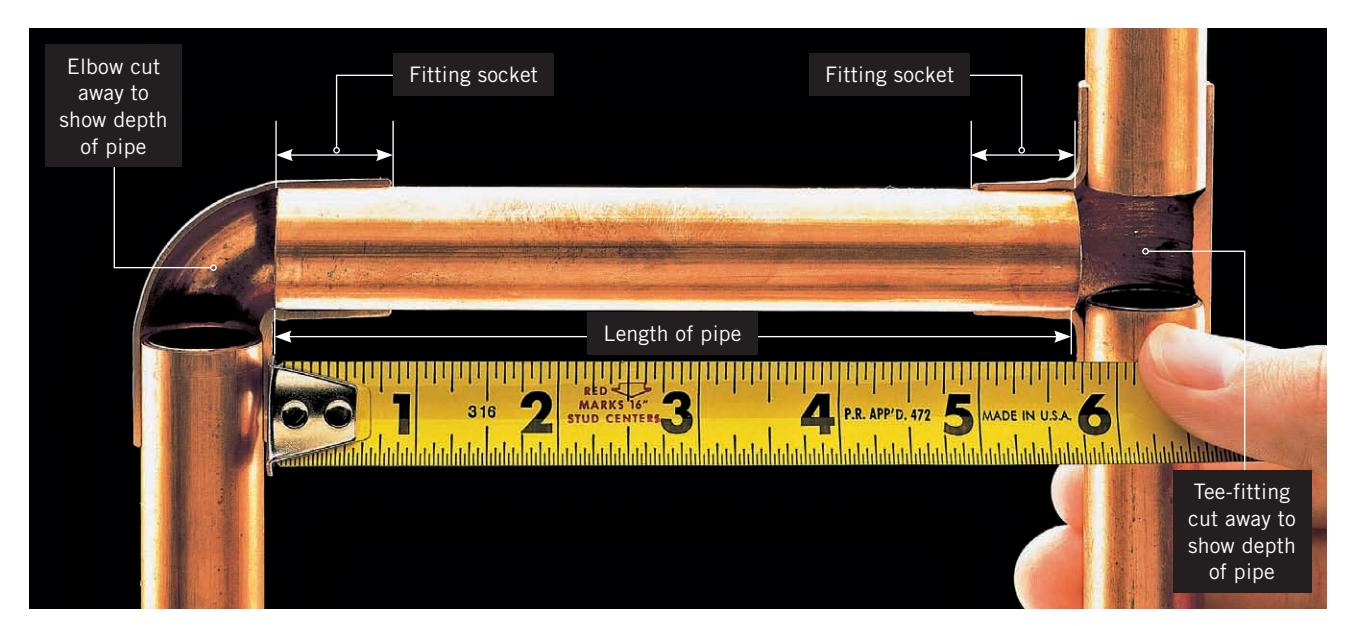
Find the length of copper pipe needed by measuring between the bottom of the copper fitting sockets (fittings shown in cutaway). Mark the length on the pipe with a felt-tipped pen.
Cutting + Soldering Copper
The best way to cut rigid and flexible copper pipe is with a tubing cutter. A tubing cutter makes a smooth, straight cut, an important first step toward making a watertight joint. Remove any metal burrs on the cut edges with a reaming tool or round file.
Copper can be cut with a hacksaw. A hacksaw is useful in tight areas where a tubing cutter will not fit. Take care to make a smooth, straight cut when cutting with a hacksaw.
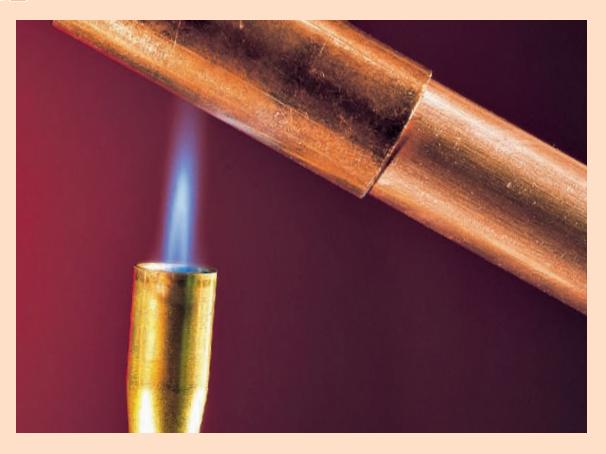
A soldered pipe joint, also called a sweated joint, is made by heating a copper or brass fitting with a propane torch until the fitting is just hot enough to melt the solder. The heat draws the solder into the gap between the fitting and pipe to form a watertight seal. A fitting that is overheated or unevenly heated will not draw in solder. Copper pipes and fittings must be clean and dry to form a watertight seal.
Tools + Materials
Tubing cutter with reaming tip (or hacksaw + round file)
Wire brush
Channel pliers
Copper pipe
Copper fittings
Emery cloth
Flux brush
Propane torch
Soldering paste (flux)
Spark lighter (or matches)
Soldering sheild
Lead-free solder
Round file
Rag
Cloth
Adjustable wrench
Eye protection
Work gloves
Use caution when soldering copper. Pipes and fittings become very hot and must be allowed to cool before handling.

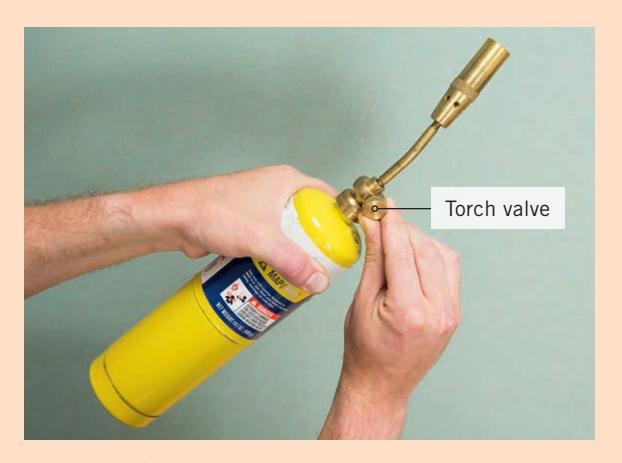
Prevent accidents by shutting off the torch immediately after use. Make sure the valve is closed completely.
Protect wood from the heat of the torch flame while soldering. Use an old cookie sheet, two sheets of 26-gauge metal, or a fiber shield, as shown.
How to Cut Rigid + Flexible Copper Pipe

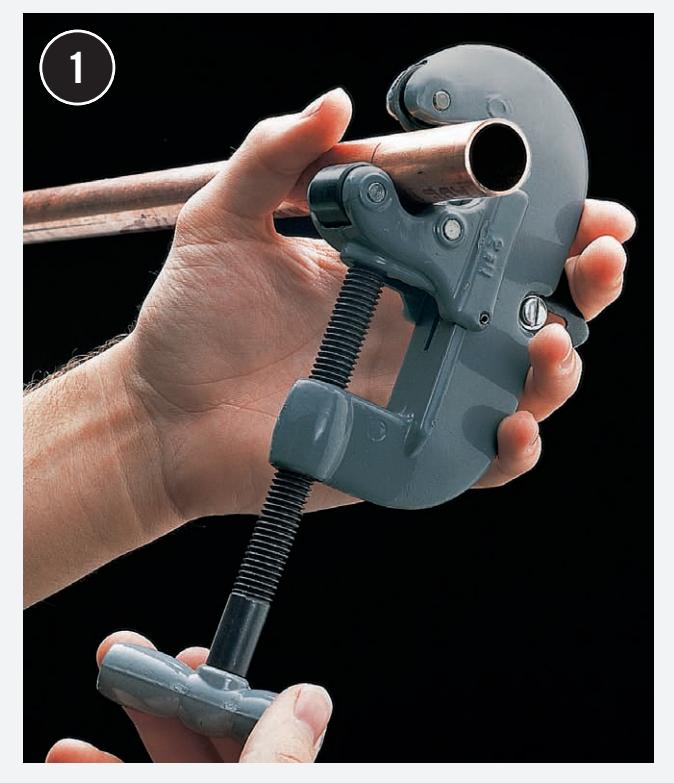
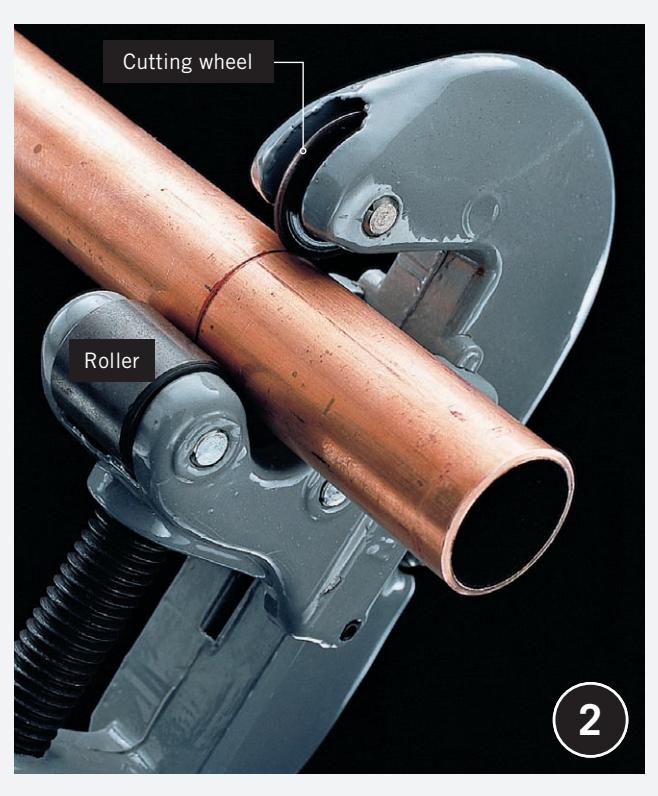
Place the tubing cutter over the pipe and tighten the handle so that the pipe rests on both rollers and the cutting wheel is on the marked line.
Slowly and carefully turn the tubing cutter one rotation so that the cutting wheel scores a continuous straight line around the pipe.
Rotate the cutter in the opposite direction, tightening the handle slightly after every two rotations, until the cut is complete.
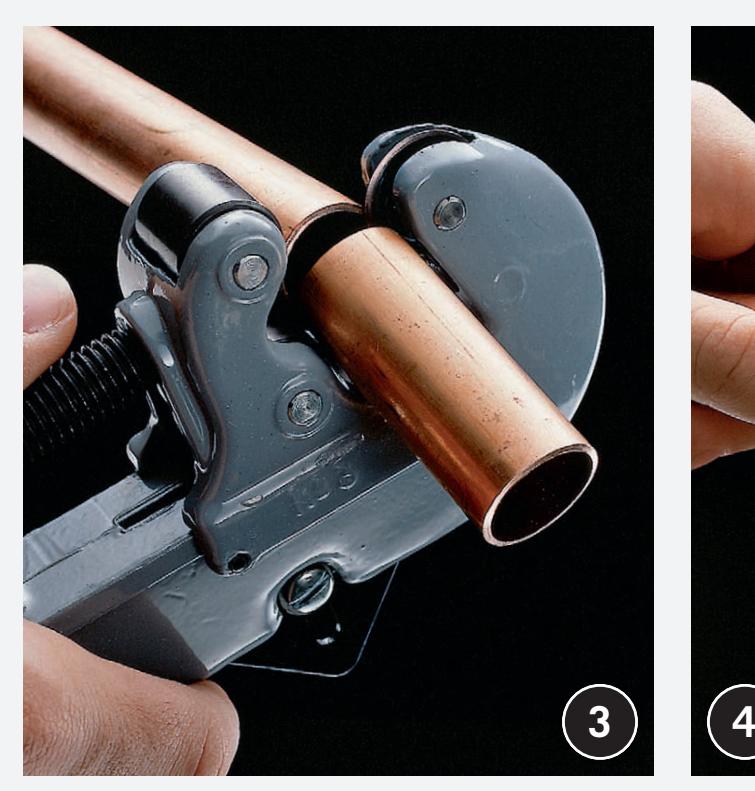
Remove sharp metal burrs from the inside edge of the cut pipe using the reaming point on the tubing cutter.
How to Solder Copper Pipes + Fittings

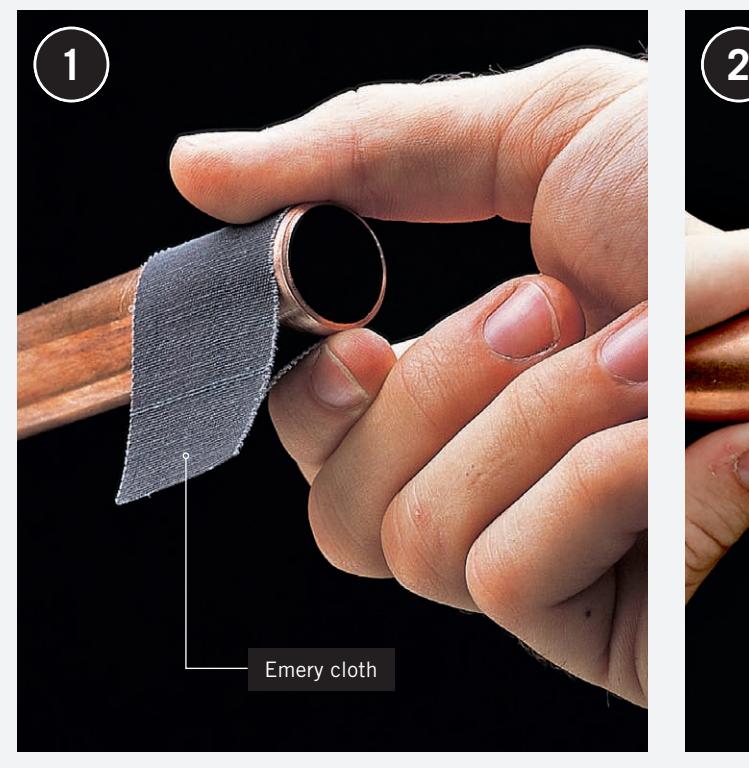
Clean the end of each pipe by sanding with an emery cloth. Ends must be free of dirt and grease to ensure that the solder forms a good seal.
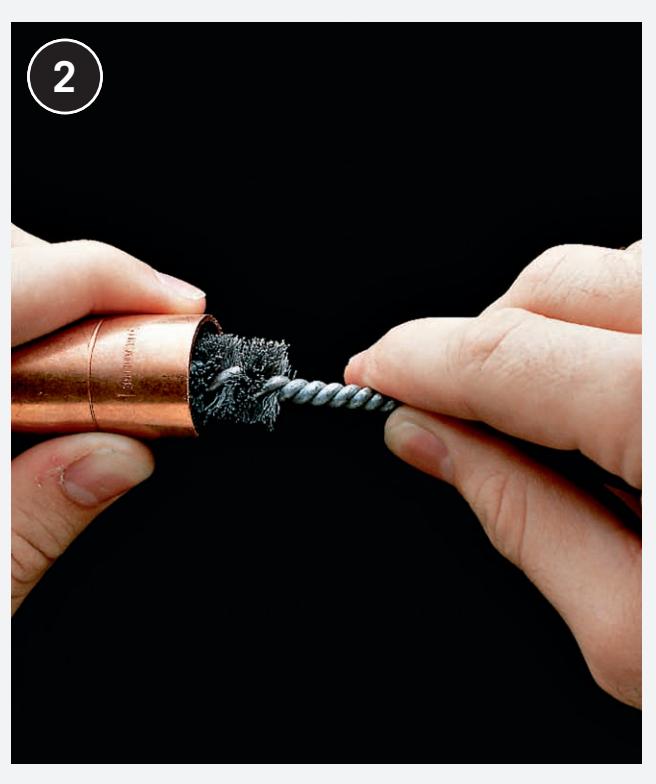
Clean the inside of each fitting by scouring with a wire brush or emery cloth.
Apply a thin layer of soldering paste (flux) to the end of each pipe using a flux brush. Soldering paste should cover about 1” of the pipe end. Don’t use too much flux. Apply a thin layer of flux to the inside of the fitting.
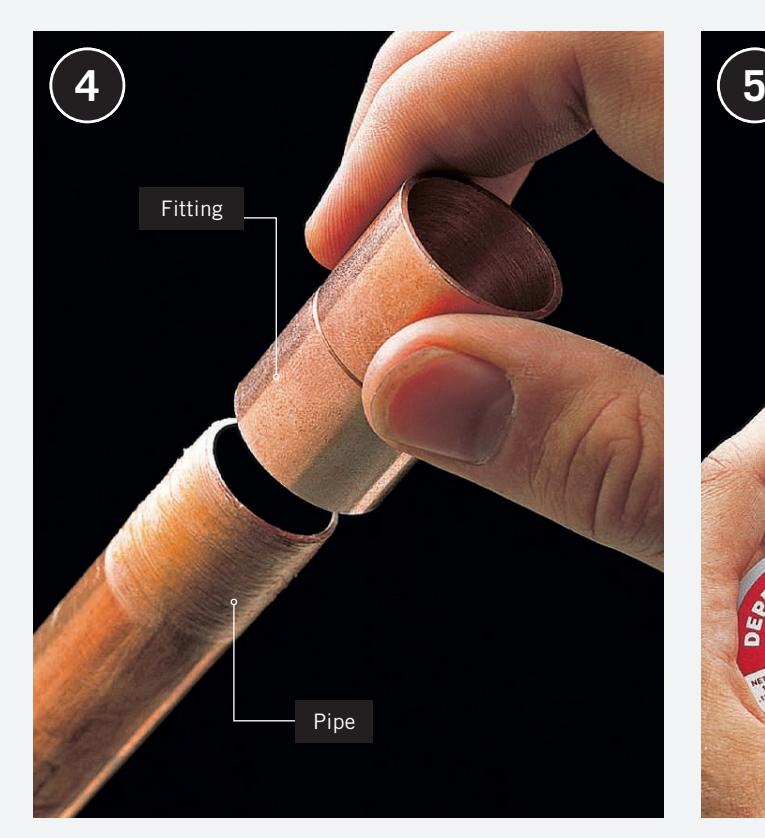
Assemble each joint by inserting the pipe into the fitting so it is tight against the internal shoulder. Twist each fitting slightly to spread the soldering paste.
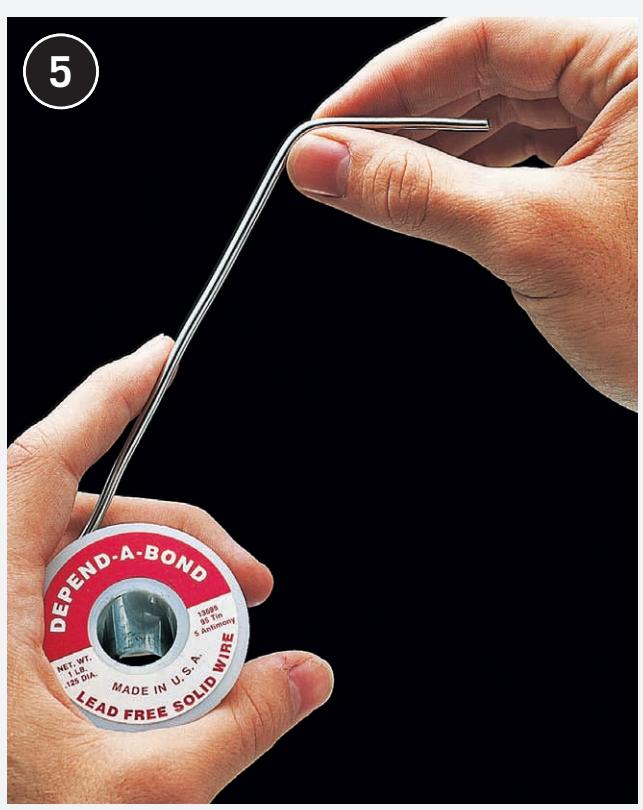
Use a clean dry cloth to remove excess flux before soldering the assembled fitting. Prepare the wire solder by unwinding 8” to 10” of wire from the spool. Bend the first 2” of the wire to a 90º angle.
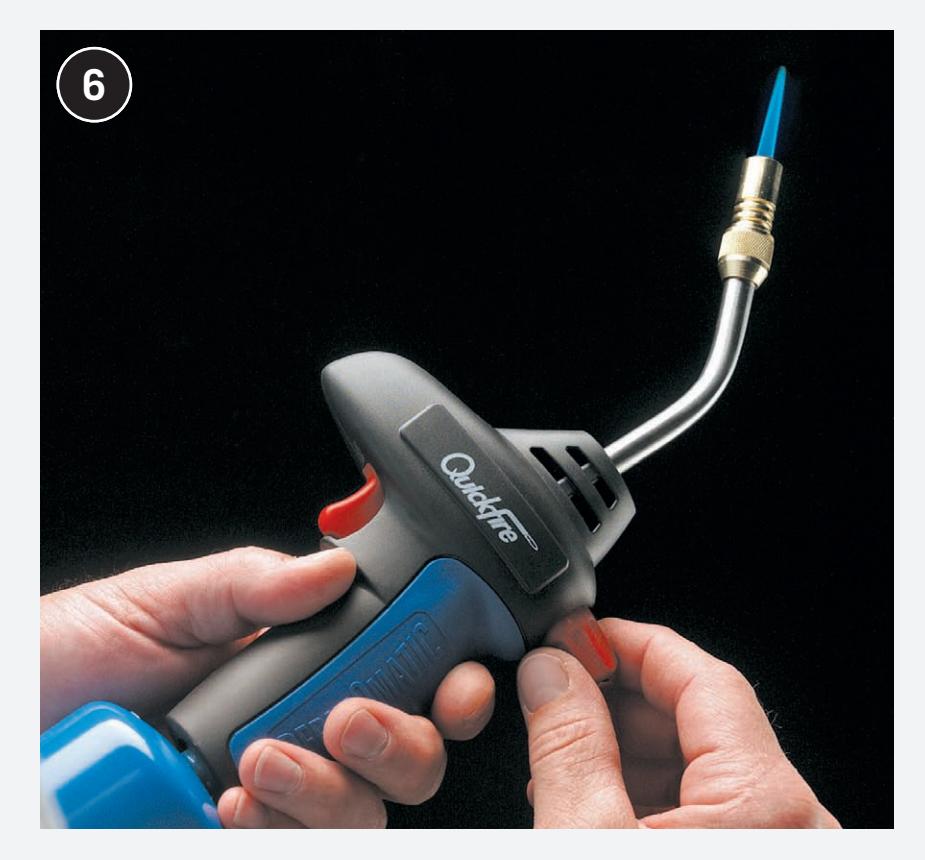
Open the gas valve and trigger the spark lighter to ignite the torch. Adjust the torch valve until the inner portion of the flame is 1” to 2” long.
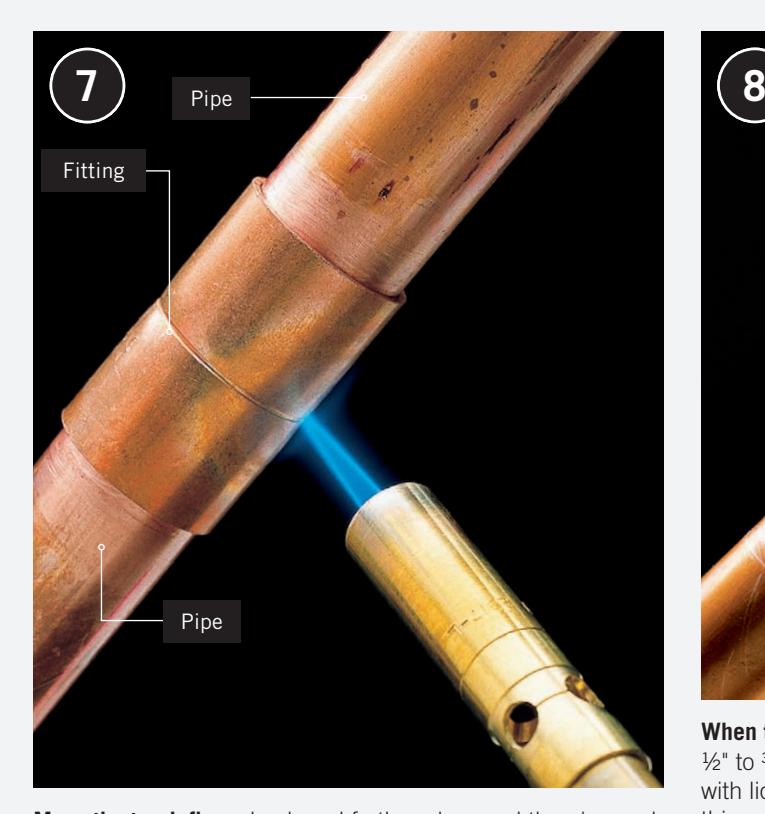
Move the torch flame back and forth and around the pipe and the fitting to heat the area evenly. Heat the other side of the copper fitting to ensure that heat is distributed evenly. Touch the solder to the pipe. The solder will melt when the pipe is at the right temperature.
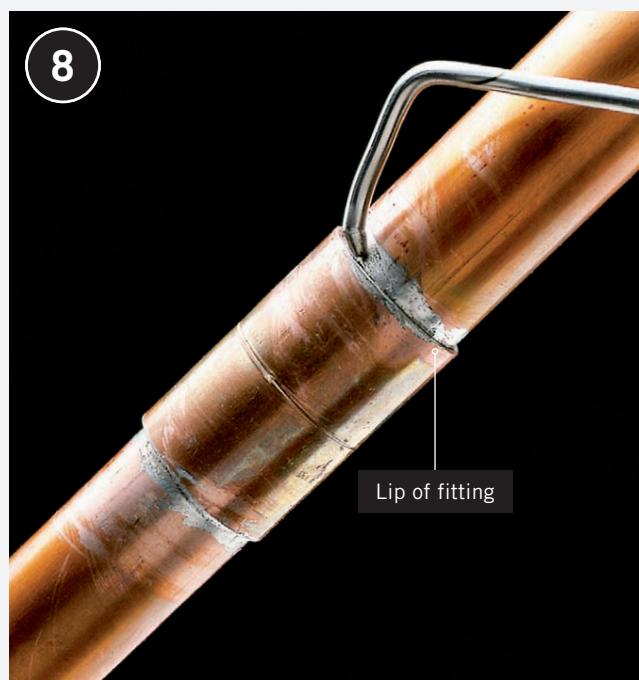
When the solder melts, remove the torch and quickly push ½” to ¾” of solder into each joint. Capillary action fills the joint with liquid solder. A correctly soldered joint should show a thin, even bead of solder around the lips of the fitting. Allow the joint to cool briefly, then wipe away excess solder with a dry rag.
CAUTION: Pipes will be hot. If joints leak after water is turned on, disassemble and resolder.
How to Take Apart Soldered Joints
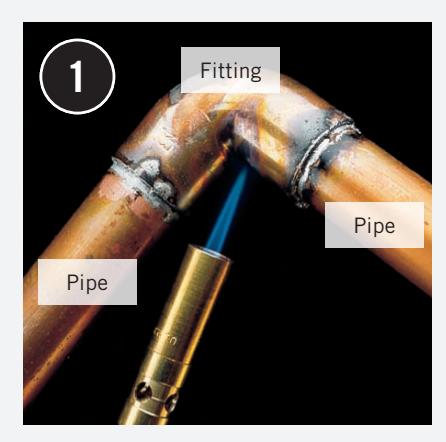
Turn off the water and drain the pipes by opening the highest and lowest faucets in the house. Light your torch. Hold the flame tip to the fitting until the solder becomes shiny and begins to melt.
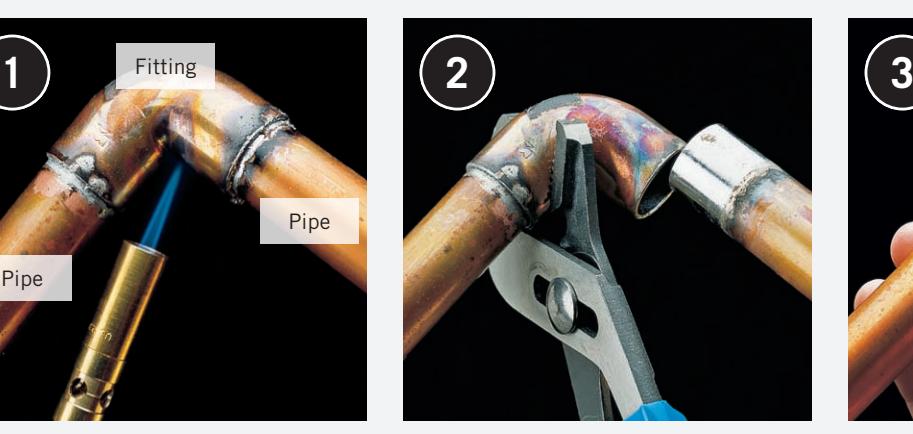
Use channel pliers to separate the pipes from the fitting.
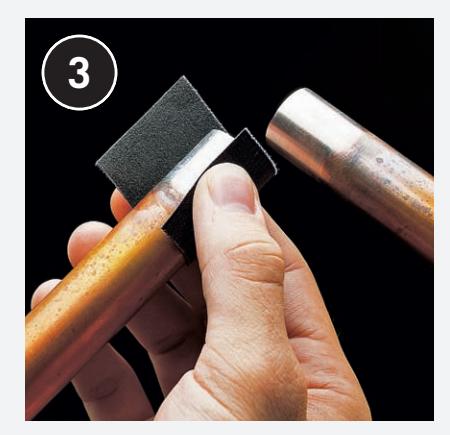
Remove old solder by heating the ends of the pipe with your torch. Use a dry rag to wipe away melted solder quickly. Use emery cloth to polish the ends of the pipe down to bare metal. Never reuse fittings.
CAUTION: Pipes will be hot.
PEX Pipe
PEX (cross-linked polyethylene) pipe is flexible plastic tubing invented in Germany in 1968. It quickly became the home water-supply plumbing of choice across Europe. In America, because of concerns about durability and potential pipe failures, PEX use was limited to radiant heating tubing from the 1980s onward. However, the use of PEX pipes in American home water supply systems has exploded over the last two decades.
The growing popularity of PEX is due to the fact that early concerns about reliability were misplaced, and the fact that PEX is much cheaper than copper, with many advantages over that traditional material. It is about the same price per linear foot as CPVC, but easier to use because there is no glue involved in the connections. Although PEX use was limited to professionals in the early years, tools, materials, and especially connection methods have advanced to the point that PEX is a completely realistic option for the home DIYer.
This type of pipe is flexible, making it possible to install it in very long, uninterrupted runs. The pipe can also be routed wherever it needs to go with fewer fittings, such as elbows. This can translate to a more stable water pressure and decrease possibility of leaks. PEX’s flexibility can completely eliminate water hammer and pipe noise. The plastic also has a degree of elasticity, which means it is less likely than copper to rupture or split if frozen.
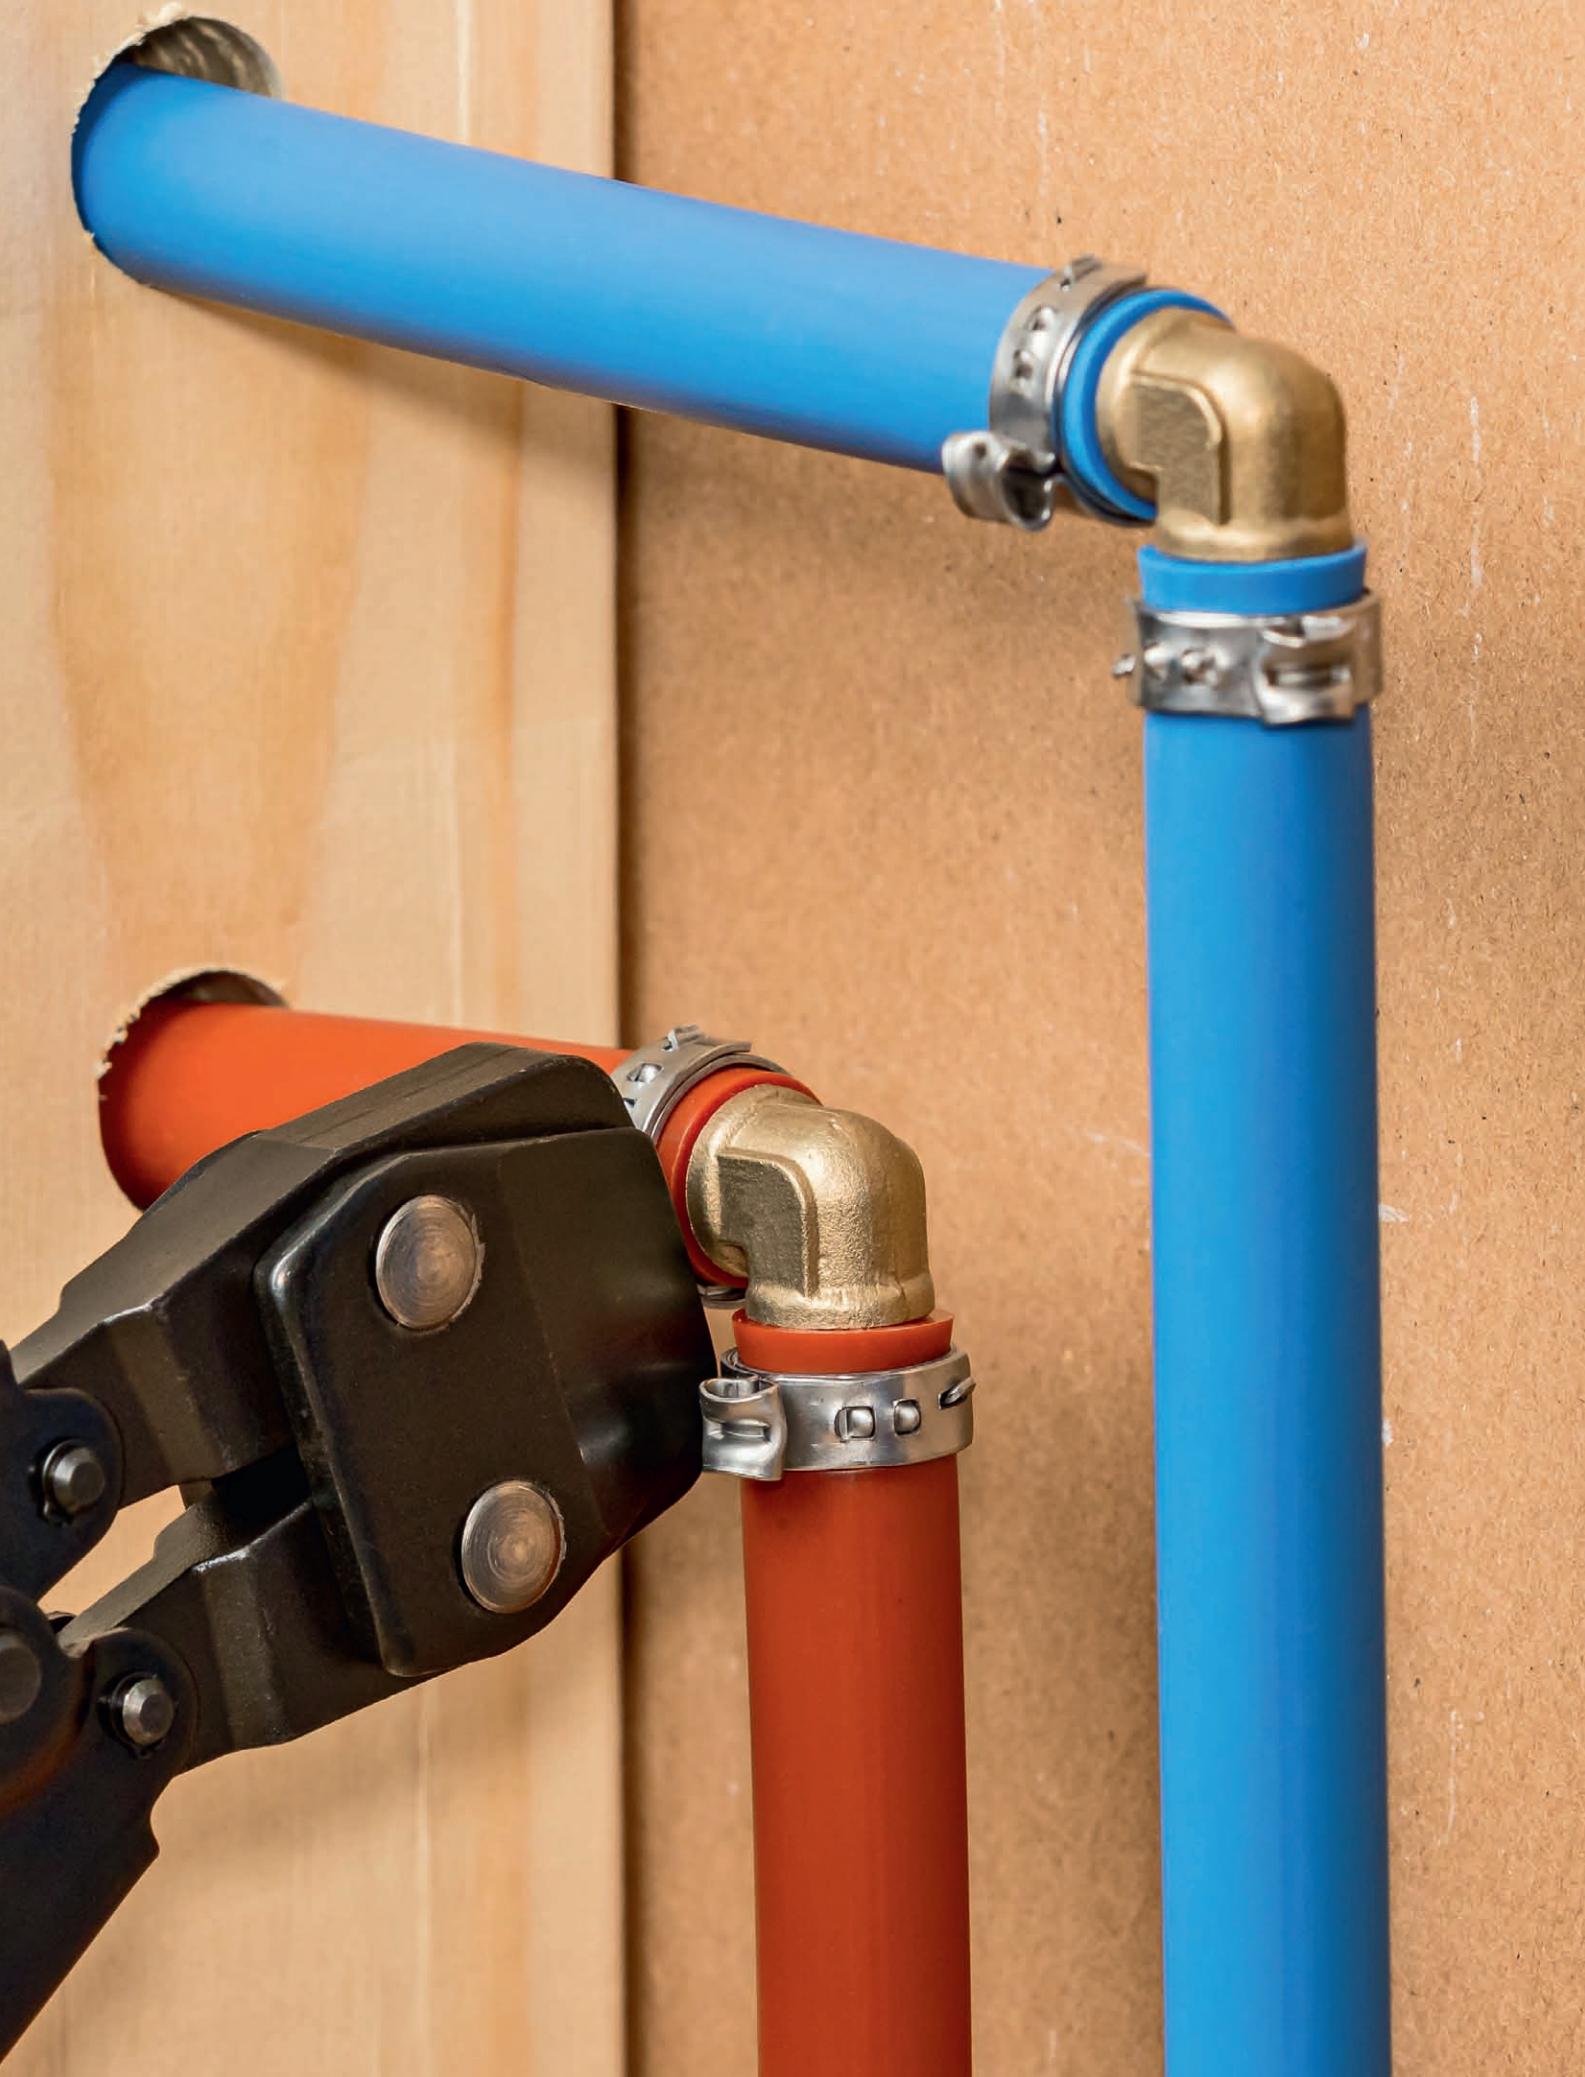
PEX comes in three colors: white, red, and blue. There is no physical difference between the three, but plumbing cold lines with blue and red lines for hot water allows you to tell at a glance what type of service any line is carrying.
There are three common types of PEX: A, B, and C. PEX-C is not used for home plumbing (it’s limited to radiant heat or other hot-water, non-potable applications). You also may come across “oxygen barrier” PEX and PEX-AL-PEX, two types that are not normally used for home water supply; they are meant for closed-loop hydronic systems, such as radiant floor heating and ice-dam melting setups.
PEX-A is the highest quality PEX pipe and the most flexible. It is most often used with expansion fittings. PEX-B is the best value, because it is cheaper than copper or PEX-A. It is most often used with crimp-style connecters. Both A and B are extremely durable and should last as long as copper piping if not damaged or exposed to excessive UV light or chlorine. A sign of the longevity of the material is that PEX manufacturers regularly warranty their products for fifteen years or longer.
PEX can be used in conjunction with other materials, including CPVC and copper. The tubing is sold in most home improvement centers in coils or lengths (sometimes called “sticks”) in diameters that include ½, ¾, and 1 inch. You’ll also find a wide selection of fittings and connection tools and materials.
NOTE: Don’t combine PEX-A with PEX-B in a single project. Use pipe, fittings, and connectors from the same manufacturer, because competing products are often not compatible.
TOOLS + MATERIALS

Tape measure
Non-permanent marker
Connection tool
Tubing cutter
PEX pipe
Manifolds
Safety plates (as needed)
PEX fittings
Utility knife
Plastic manifold hangers
PEX Materials
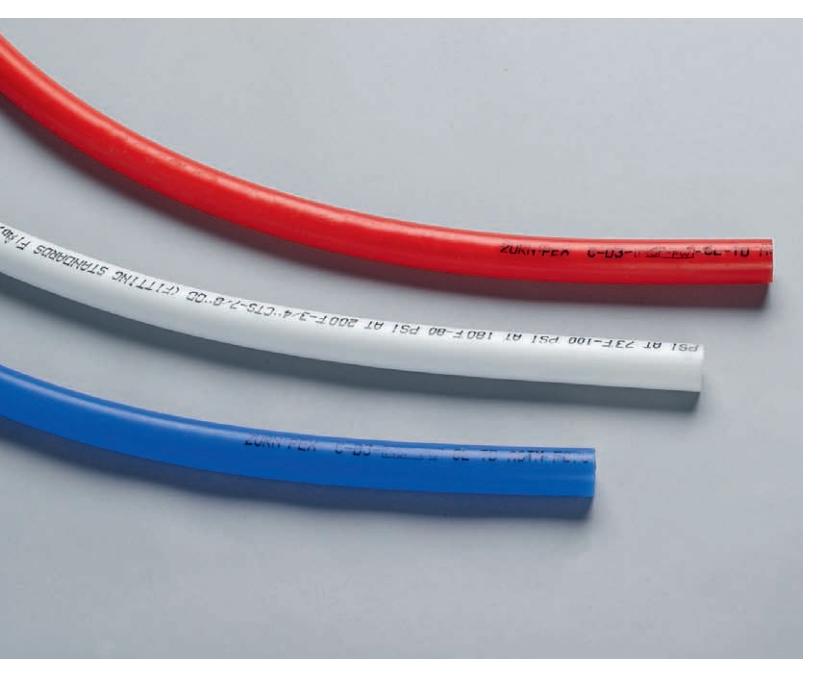
PEX pipe is manufactured in red, white, and blue. The intention is to use red for hot water lines and blue for cold water. However, the color does not affect price, and you may decide to use one color for the entire project.
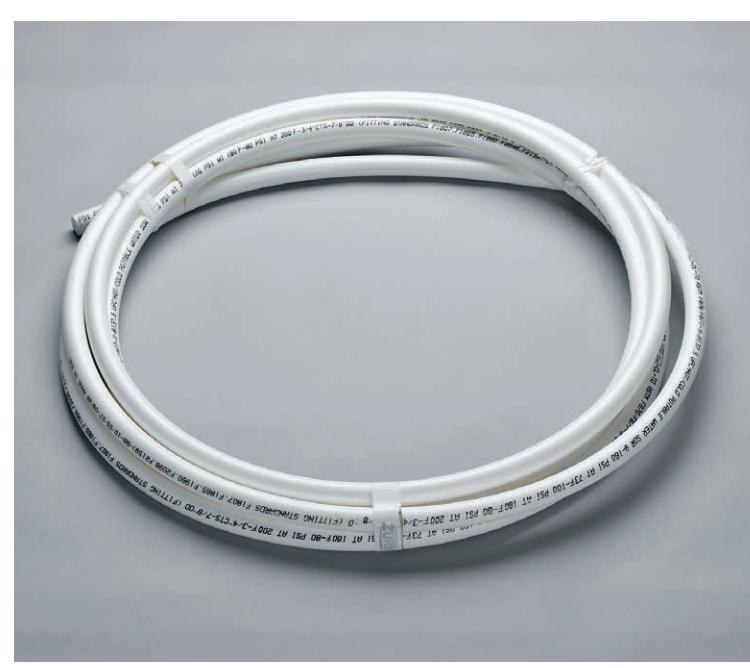
PEX combines the flexibility of plastic tubing with the durability of rigid supply pipe. It is sold in coils of common supply-pipe diameters.
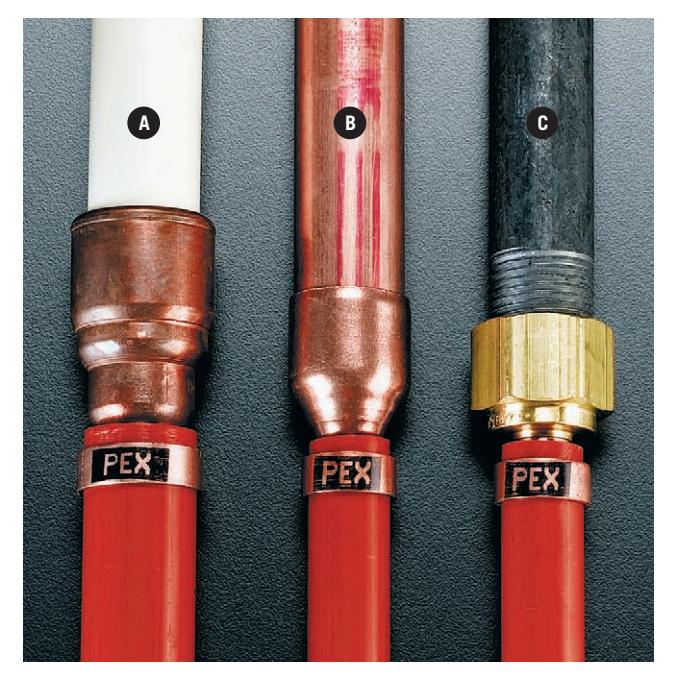
PEX is connected to other water supply materials with transition fittings, including CPVC-to-PEX (A), copper-to-PEX (B), and iron-to-PEX (C).
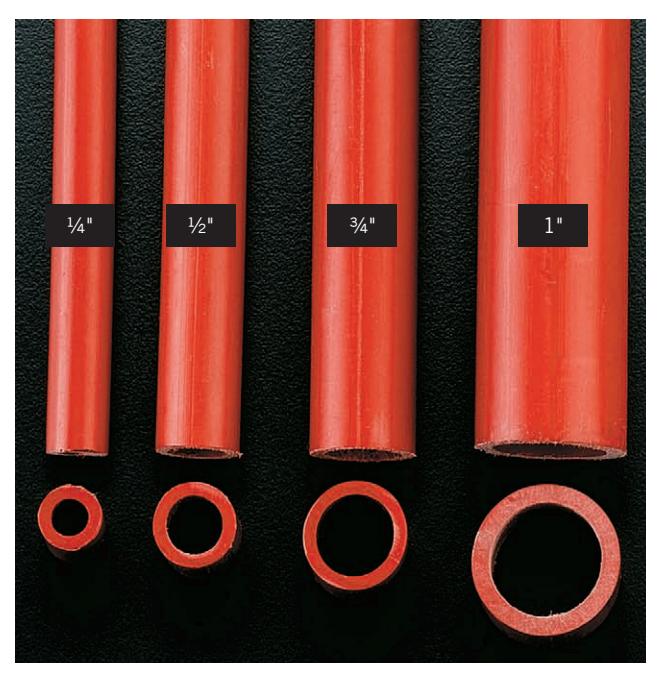
Generally, you should use the same diameter PEX as is specified for rigid supply tubing.
System Designs
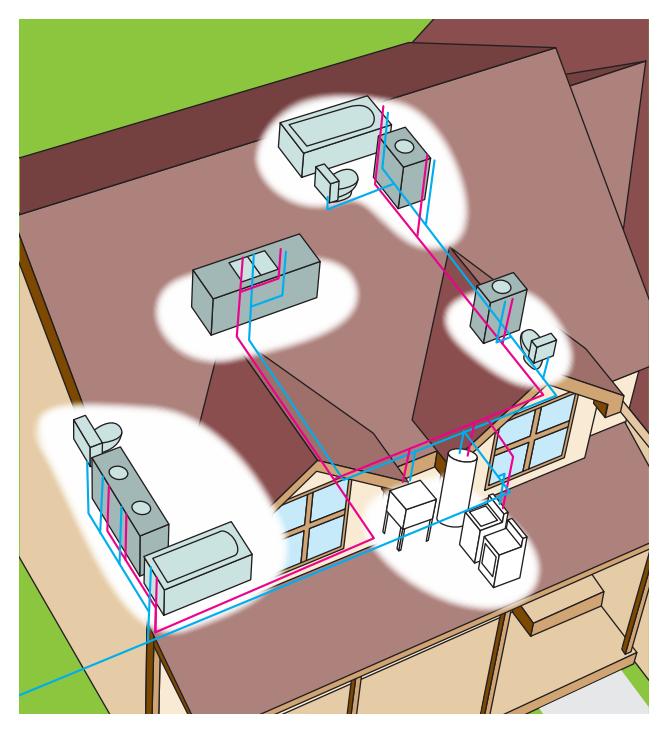
Trunk-and-branch systems are configured in much the same way as traditional rigid copper or PVC supply systems. A main supply line (the trunk line) carries water to all of the outlets via smaller branch lines that tie into the trunk and serve a few outlets in a common location.
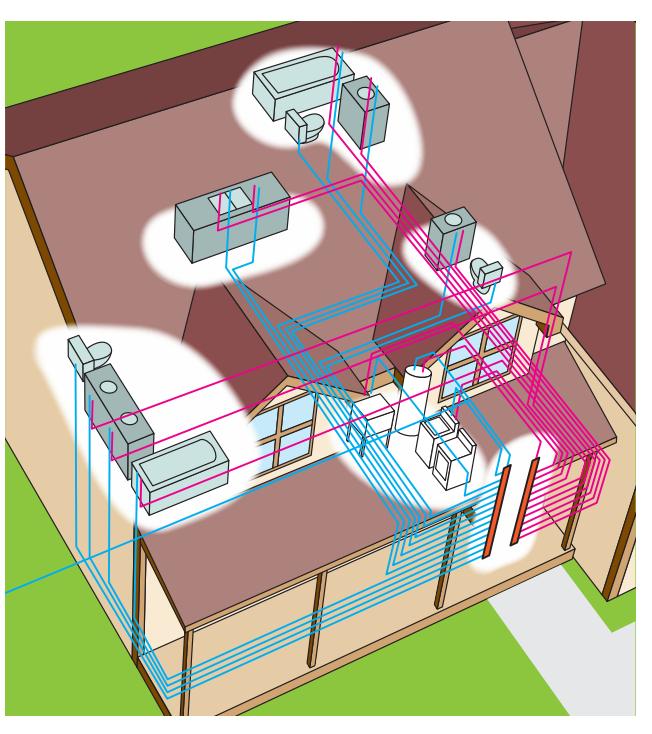
Home run systems rely on one or two central manifolds to distribute the hot and cold water very efficiently. Eliminating the branch fittings allows you to use thinner supply pipe in some situations.
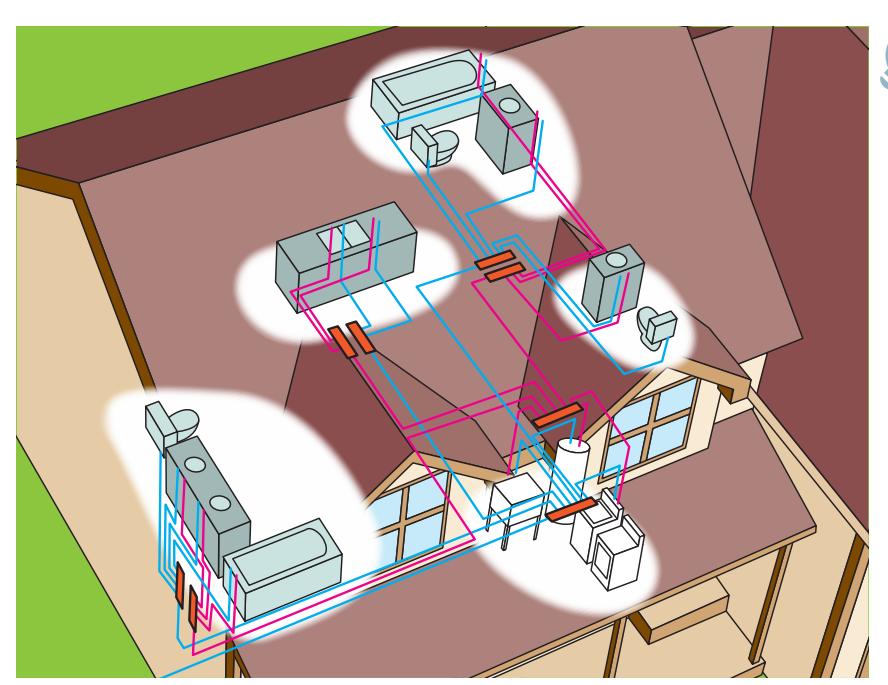
Remote manifold systems are a hybrid between traditional trunk-and-branch systems and home run systems. Instead of relying on just one or two manifolds, they employ several smaller manifolds downline from a larger manifold. Each smaller manifold services a group of fixtures, as in a bathroom or kitchen.
CHOOSING A PEX SYSTEM
- For maximum single-fixture water pressure: Trunk-and-branch
- For economy of materials: Trunk-and-branch or remote manifold
- For minimal wait times for hot water (single fixture): Home run
- For minimal wait times for hot water (multiple fixtures used at same approximate time): Trunk-and-branch or remote manifold
- For ease of shutoff control: Home run
- For lowest number of fittings and joints: Home run
PEX Installation
Most codes now allow for the use of PEX pipe and manifolds in residential plumbing, although you should always check with your local building department. Local codes may limit the use of PEX in some locations.
- Do not install PEX in aboveground exterior applications, because it degrades quickly from UV exposure.
- Do not use PEX for gas lines.
- Do not use plastic solvents or petroleum-based products with PEX (they can dissolve the plastic).
- Keep PEX at least 12” away from recessed light fixtures and other potential sources of high heat.
- Do not attach PEX directly to a water heater. Make connections at the heater with metallic tubing (either flexible water-heater connector tubing or rigid copper) at least 18” long; then join it to PEX with a transition fitting.
-
Do not install PEX in areas where there is a possibility of mechanical damage or puncture. Always fasten protective plates to wall studs that house PEX pass-throughs.
-
Always leave some slack in installed PEX lines to allow for contraction and in case you need to cut off a bad crimp. Add a loop in any run of 30’ or more.
- Use the same minimum branch and distribution supply-pipe dimensions for PEX that you’d use for copper or CPVC, according to your local plumbing codes.
- You can use push fittings to join PEX to itself or to CPVC or copper. See page 56. Some professionals avoid using push fittings inside enclosed walls.
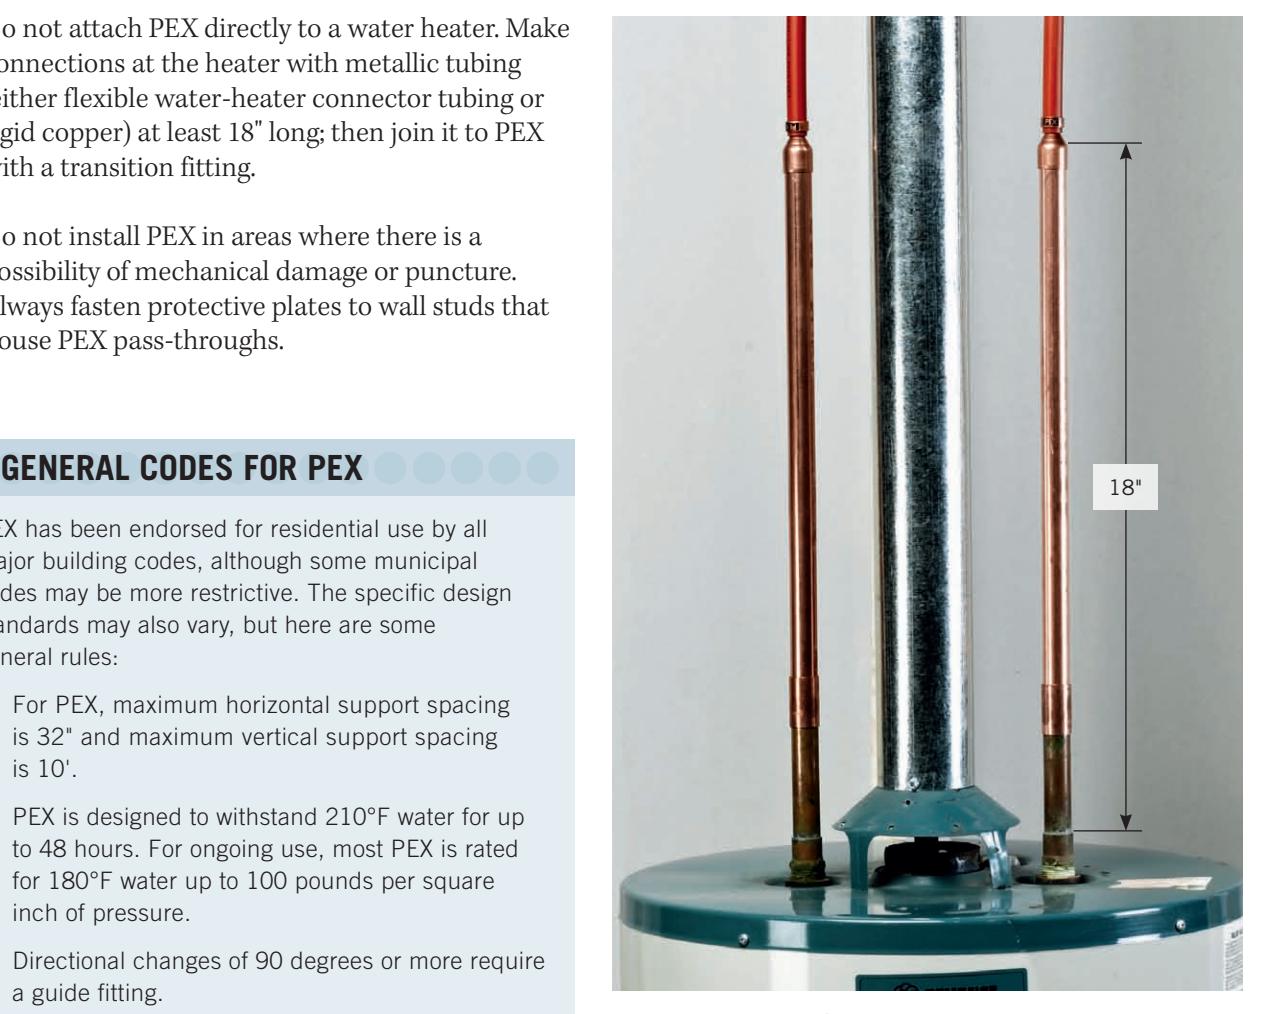
Do not connect PEX directly to a water heater. Use metal connector tubes. Solder the connector tubes to the water heater before attaching PEX. Never solder metal tubing that is already connected to PEX lines.
PEX has been endorsed for residential use by all major building codes, although some municipal codes may be more restrictive. The specific design standards may also vary, but here are some general rules:
- For PEX, maximum horizontal support spacing is 32” and maximum vertical support spacing is 10’.
- PEX is designed to withstand 210°F water for up to 48 hours. For ongoing use, most PEX is rated for 180°F water up to 100 pounds per square inch of pressure.
- Directional changes of 90 degrees or more require a guide fitting.
- A mid-story guide is required for most PEX installations in walls. The guide should prevent movement perpendicular to the pipe direction.
Connectors for PEX Systems
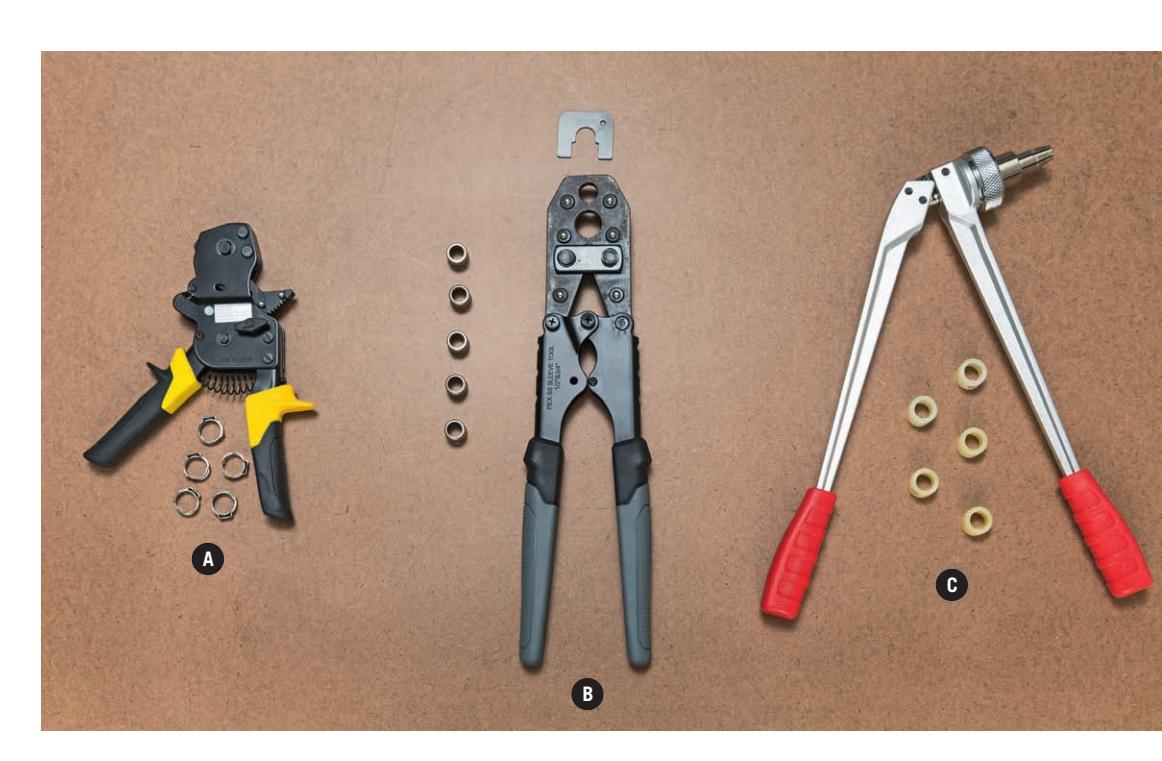
Connectors for PEX systems are not interchangeable and all require specific crimping or connecting tools. The most common types you’ll find in building centers today are: (A) clamping tool with jaws that snag a tab on a stainless-steel ring, drawing the ring tight when the tool is squeezed; (B) stainless-steel sleeve crimping tool that is similar to the full-circle crimping tool (below) but uses stainless-steel sleeves with flared ends; (C) expansion connectors with conical tips that fit into the PEX and a nylon union ring, temporarily expand it as a barbed fitting is inserted, then squeeze tight as the memory in the PEX causes it to shrink back to a nonexpanded state.
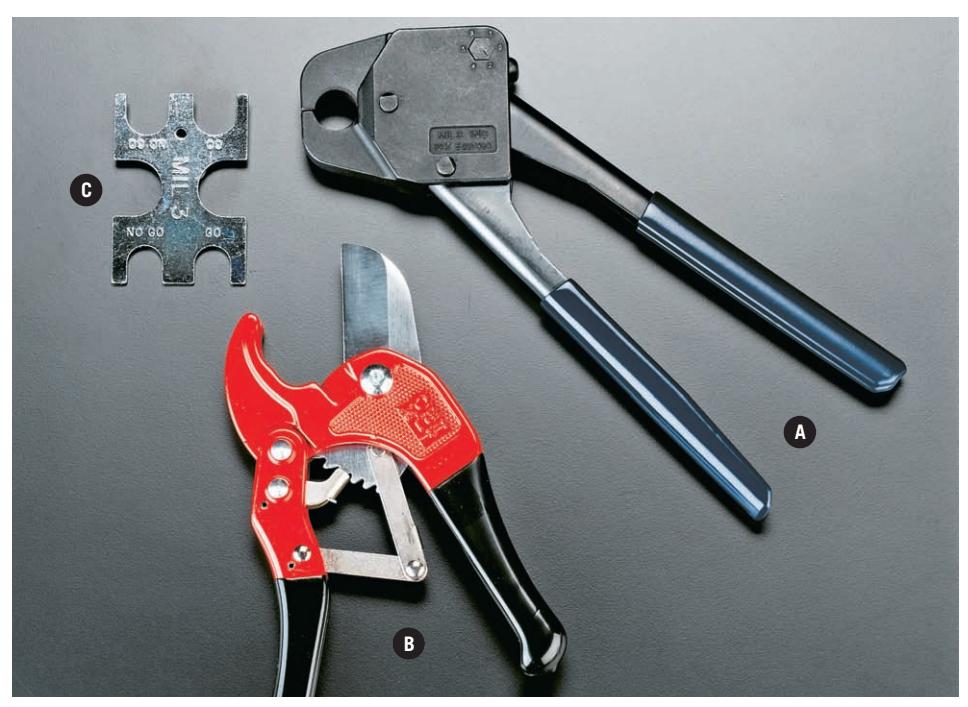
A full-circle crimping tool (A) compresses a crimping ring (usually copper) onto the PEX union to seal the joint. It was the original system used by most professionals before the PEX options expanded into more DIY-friendly systems. Crimping tools and rings are still used widely and are very reliable. With any PEX system you’ll need a PEX cutter (B) for clean, square cuts, and a go/no-go gauge (C) to test connectors to make sure they fit properly after installation.
Choosing PEX Pipe and Connectors
Deciding on a connection method for your PEX pipes can seem confusing at first, given that some connectors can only work with certain types of PEX. There are four possible connection types: push-to-connect fittings will work with any PEX pipe, compression fittings work only with PEX-AL-PEX, expansion connectors work only with PEX-A, and crimp fittings will work with any PEX pipe. The types most commonly used in home plumbing are crimp fittings and expansion fittings. Both are extremely reliable, but expansion fittings take a bit more practice and expertise. They are also marginally more expensive, but the fittings themselves feature a larger internal diameter, which translates to improved water flow.
How to Make PEX Crimp Connections

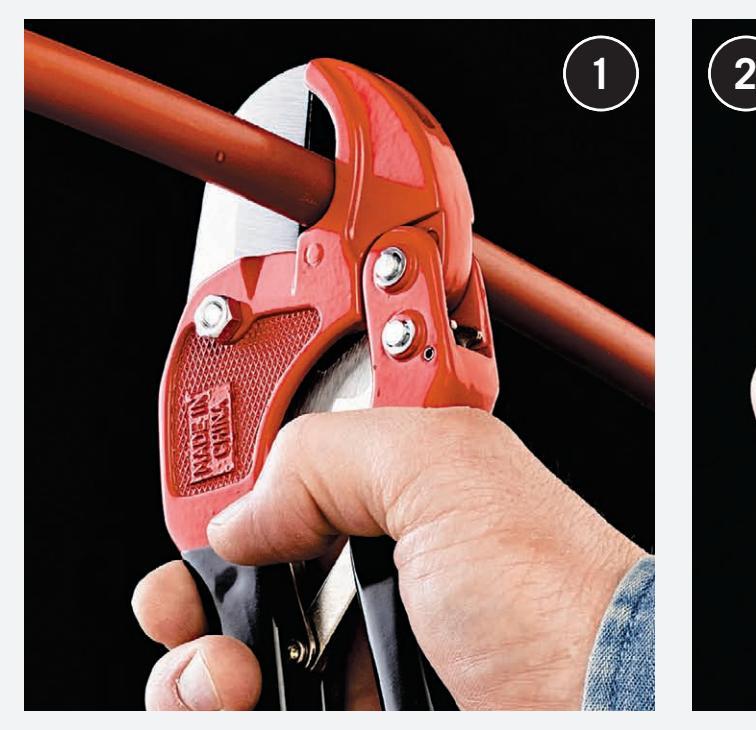
Cut the pipe to length, making sure to leave enough extra material so the line will have a small amount of slack once the connections are made. A straight, clean cut is very important. For best results, use a PEX cutter.
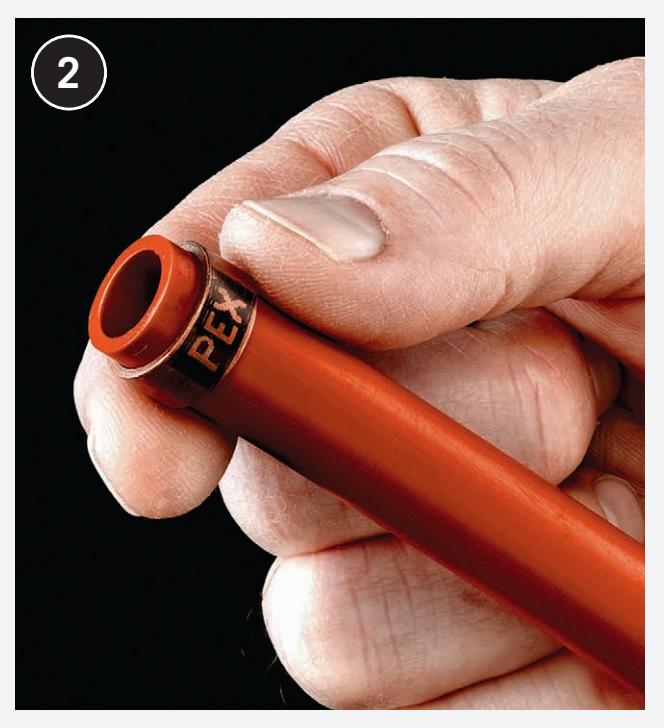
Inspect the cut end to make sure it is clean and smooth. If necessary, deburr the end of the pipe with a sharp utility knife. Slip a crimp ring over the end.
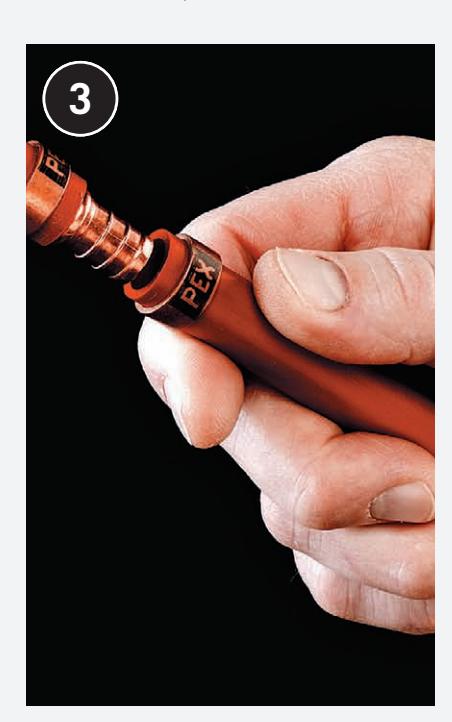
Insert the barbed end of the fitting into the pipe until it is snug against the cut edges. Position the crimp ring so it is 1⁄8” to 1⁄4” from the end of the pipe, covering the barbed end of the fitting. Pinch the fitting to hold it in place.
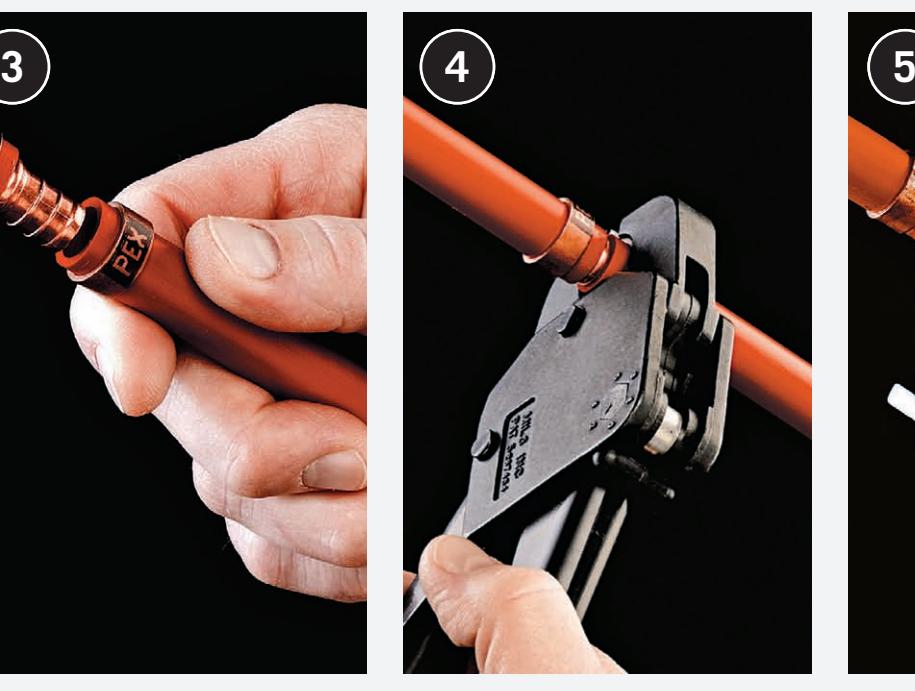
Fit the crimping tool with the appropriate head for the size pipe and fitting you’re crimping. Align the jaws of the tool over the crimp ring (the ring should be exactly perpendicular to the pipe) and squeeze the handles to apply strong, even pressure to the ring until you hear a click.
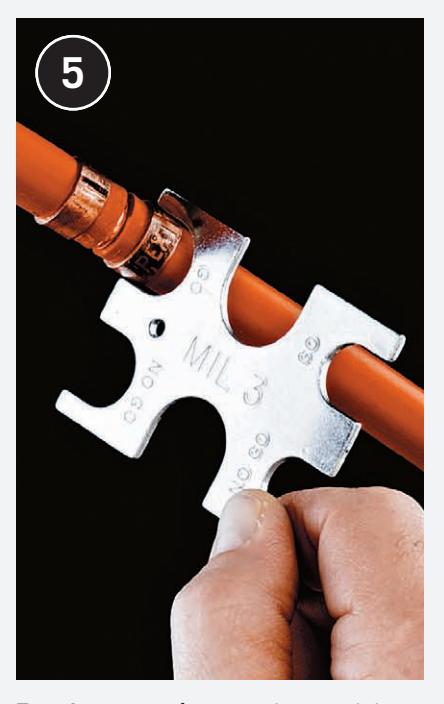
Test the connection to make sure it is mechanically acceptable using a go/no-go gauge. If the ring does not fit into the gauge properly, cut the pipe near the connection and try again.
How to Make PEX Clamp Connections

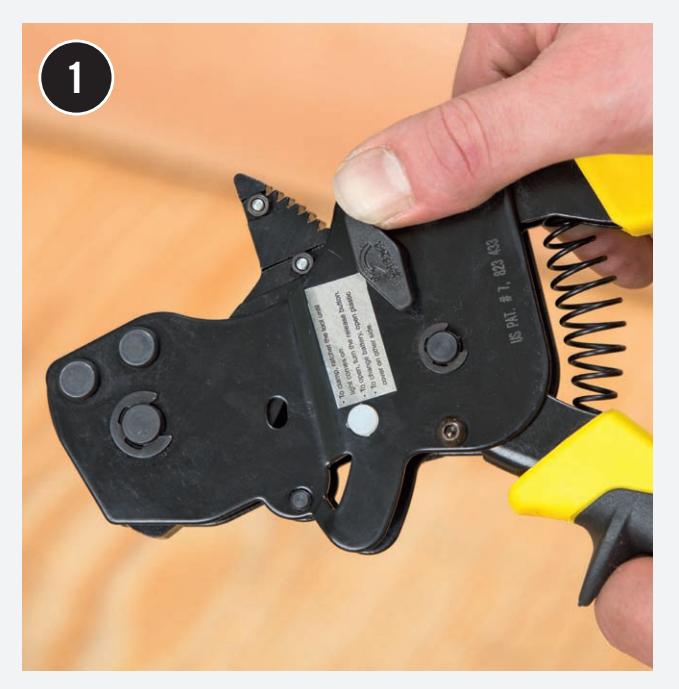
Press the release button on the clamp tool handle to unlock the tool, and test to make sure the ratcheting action occurs when you squeeze the handles together.
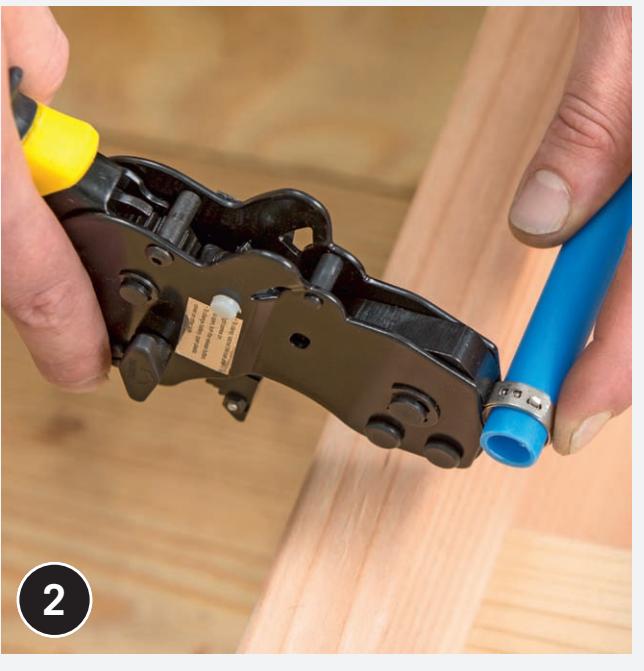
Slip a ring over the cut end of the PEX. Grasp the tab “knuckle” on the ring in the ends of the tool jaws. Partially tighten the ring to keep it from sliding, but do not fully tighten.
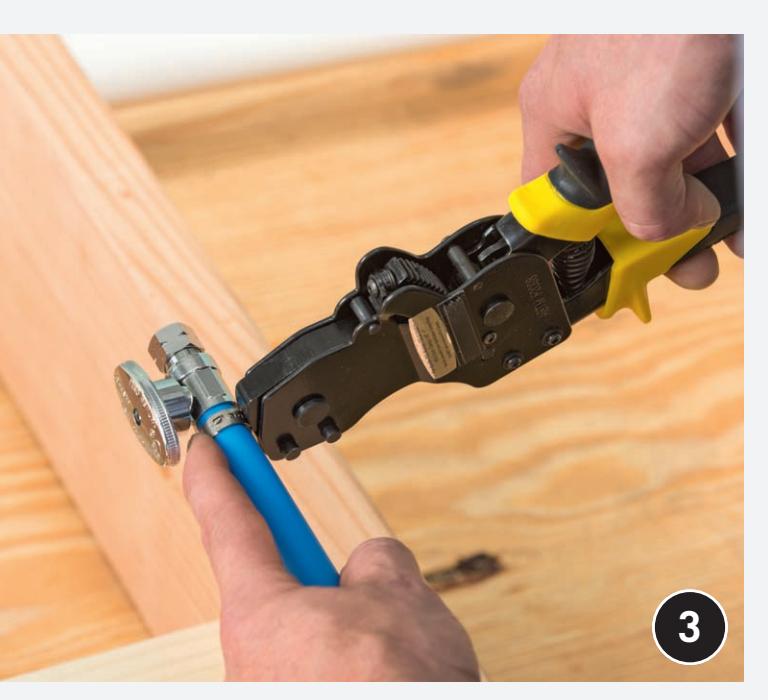
Insert the fitting or union into the PEX opening so it is fully seated. Adjust the ring so it is parallel to the cut end of the PEX and 1⁄8” back from the tube end. With the ring knuckle in the tool jaws, squeeze several times to further tighten the ring—four to six squeezes total is typical. On some tool models, an on-board alert light will glow when you have achieved the right amount of torque. Release the ring from the tool.
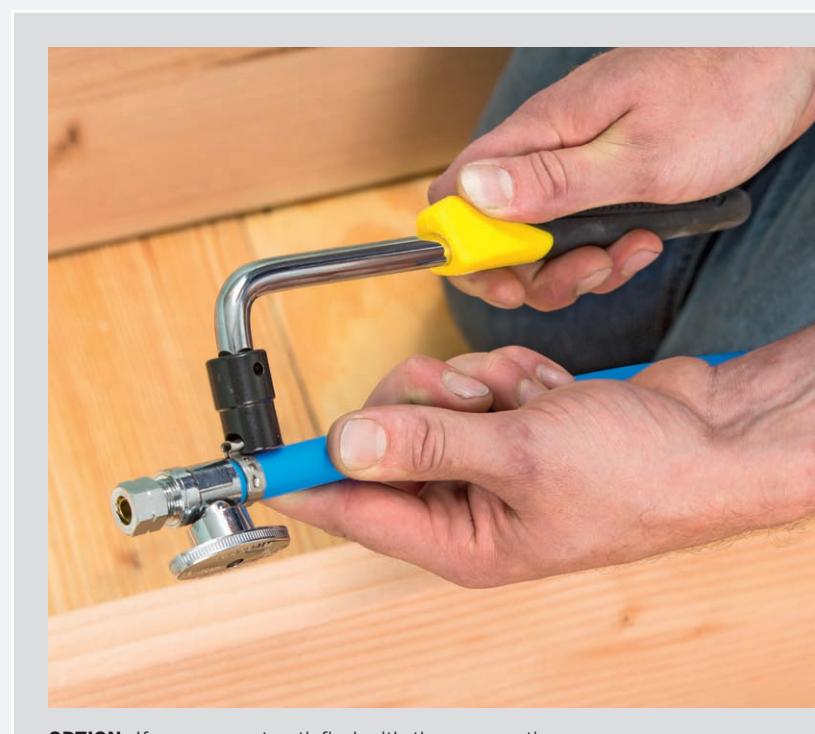
OPTION: If you are not satisfied with the connection or need to undo it for any reason, slip the ring knuckle into the slot in the end of the ring removal tool. Hold the PEX joint securely and twist the removal tool back and forth until the ring snaps and can be removed easily.
How to Make PEX Expansion Connections

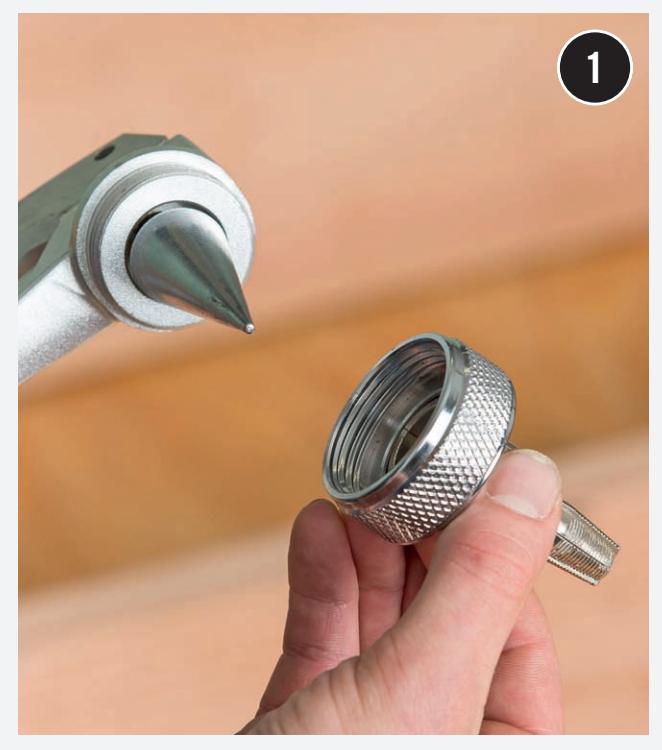
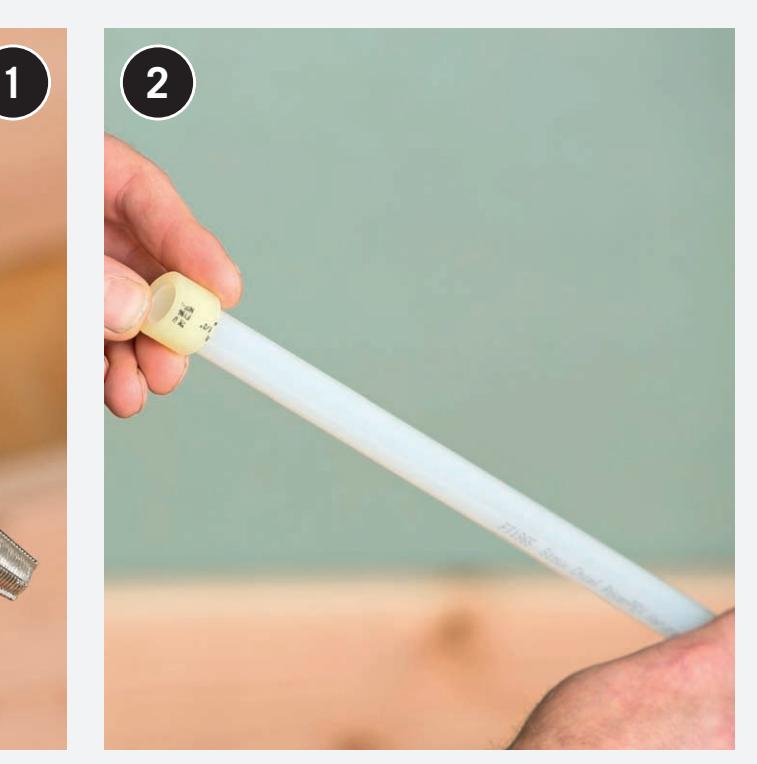
Fit the expansion connector tool with the head that corresponds to the diameter of the fitting and PEX pipe. Lightly grease the head.
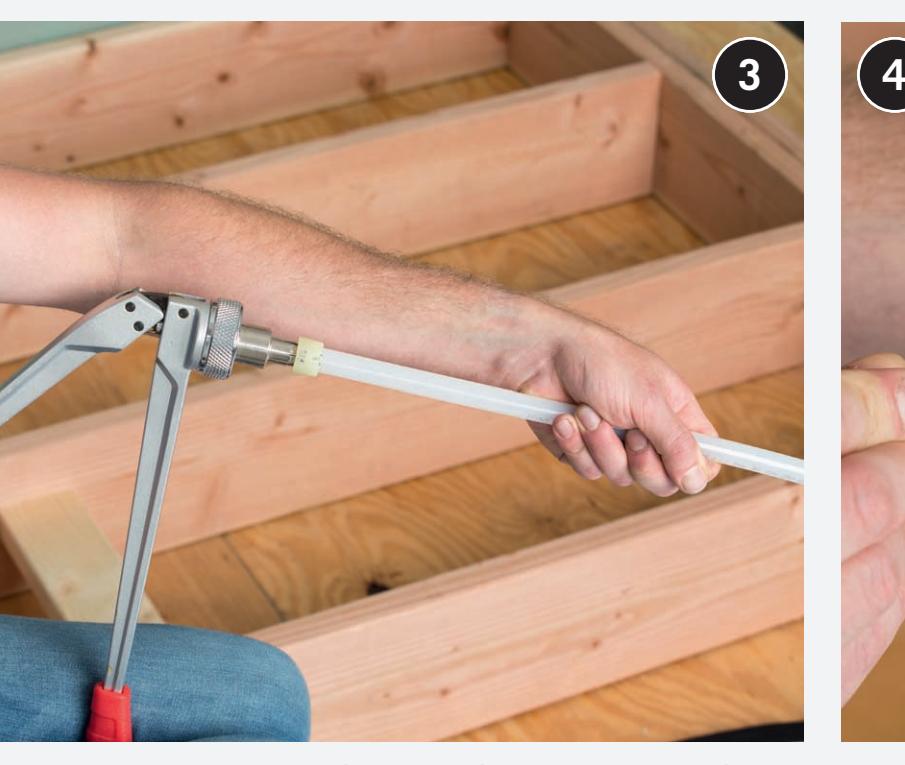
Slide the expansion ring onto the end of the PEX pipe (PEX-A only) until you reach the stop at the end of the ring. The ring should be flush against the cut end of the tubing.
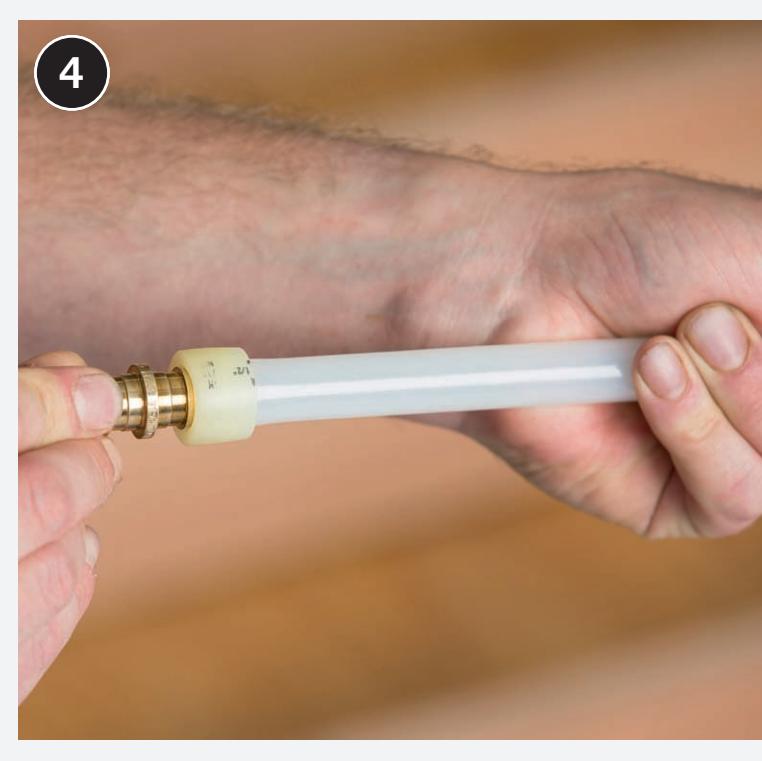
Insert the expansion tool head into the end of the PEX pipe and begin opening and closing the expansions jaws. Push the PEX pipe onto the head as it widens until the edge of the PEX pipe is flush against the base of the expansion head.
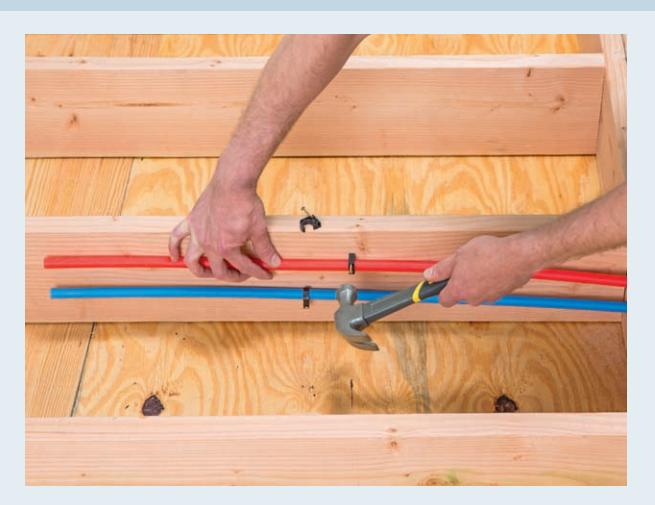
When the pipe and expansion sleeve are fully expanded, quickly remove the expansion tool head and slip the fitting into the end of the pipe. Allow the pipe to return to its original shape, firmly grabbing the fitting’s barbed end, before using.
Tips for Working with PEX

Routing PEX
In general, routing PEX supply lines is easier than routing rigid copper or PVC. That’s one of the benefits of using this innovative material. However, it’s important to follow best standards and practices when routing PEX lines to avoid leaks or other issues. Here are basic rules to follow, but you should always consult your local codes for more specific guidance.
- Planning is key. Know exactly the route your PEX lines will follow, and how you’re going to make any bends and loops in the runs. It’s always wise to plan for extra length to account for any cutting or fitting errors. Look for construction features that will allow you to route the PEX pipe with a minimum of fittings, which will save time, money, and effort.
- Provide adequate support. Horizontal PEX runs should be supported every 24 to 32 inches; vertical runs should be supported at least every 10 feet, but every 6 feet is better if possible. Keep in mind that some slack should be maintained in any PEX run.
- Loop it. On any PEX run of 30 feet or more, loop the line to allow for expansion and contraction. If you can afford the extra PEX pipe, it’s not a bad idea to loop any run over 20 feet.
- Protect underground runs. Where unavoidable, such as in an uninsulated belowground basement or crawlspace, insulate hot water supply lines to avoid heat loss.
- Follow recommendations. Use fasteners only specified by the specific manufacturer of the PEX pipe you buy.
- Support manifolds. Whether they’re home-run manifolds or smaller branch manifolds, any PEX manifold should be fully supported and mounted on a wall surface or sufficient blocking for the entire body of the manifold. Ideally, manifolds should not be enclosed in a wall. They can be mounted horizontally or vertically when properly supported.
- Avoid heat. Keep PEX pipe at least 12 inches away from any heat source. This includes less-obvious sources such as recessed lighting fixtures, gas vents, or heating fixtures such as baseboard units and radiators.
- Protect pass-throughs. Use nailing plates on stud edges for any stud through which PEX pipe passes.
- Avoid stress. Place support clamps at every fitting in a way that relieves any stress on the connection or on any bend in the PEX pipe.
PEX should be secured along runs to joists or wall studs with the correct size pipe strap or hangers specifically approved for use with PEX. It’s essential that any support not kink or crush the pipe. Keep cold and hot water lines at least 2 inches apart on runs, to avoid any heat transfer.
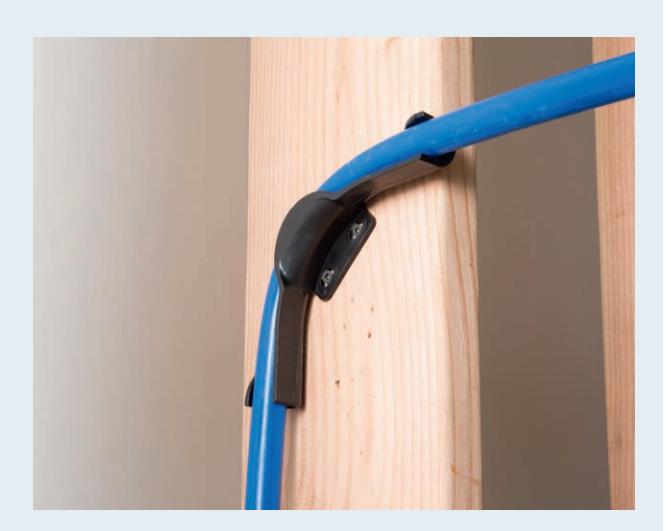
Make 90° bends in any PEX line using either a plastic snap-in guide, as shown here, or a barbed 90° elbow cut into the line. Installing guides is, however, easier and quicker where appropriate.
- Bundle carefully. Don’t tape bundled runs of PEX pipe, and don’t bundle hot and cold supply lines together. You can use plastic ties to hold bundles together, but make sure there is enough slack to allow for expansion and contraction of any pipe in the bundle.
PEX Manifolds
Although a whole-house home-run PEX system requires a large central manifold, most home DIYers are more likely to tackle installing a local or “branch” manifold (also called “remote manifold systems”), which distributes water to one room or a small area of the home. These are useful for plumbing additions or retrofitting a bathroom. Branch manifolds are simpler and easier to install than a home-run manifold. Here are considerations for choosing the right manifold.
- Material. PEX manifolds come in brass, copper, and plastic. Metal versions are more expensive and susceptible to corrosion, and often contain integral shut-off valves. Those won’t matter as much if you are enclosing the manifold in a wall or ceiling. Plastic manifolds are usually mated to a specific type of PEX.
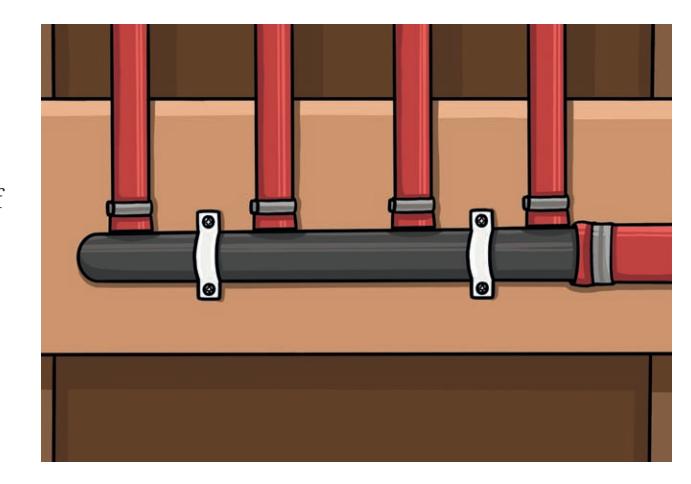
If you have already purchased the pipe for project, that may limit available choices.
- Size. Manifold size is defined by number of “branches” and inlet diameter. The most common is a ¾ inch inlet with ½ inch outlets. However, outlet size may be 3⁄8” in some circumstances (which will conserve energy and improve efficiency) or may need to be ¾”—depending on the length of the branch PEX lines. Consult the manufacturer’s recommendations and local codes for appropriate size.
- Connection method. Plain barbed inlet and outlet connections are the least expensive. However, manifolds also come with compression and push-fit connections. Push-fit, in particular, can make installation easier and quicker, but are more expensive.

Manifold Options
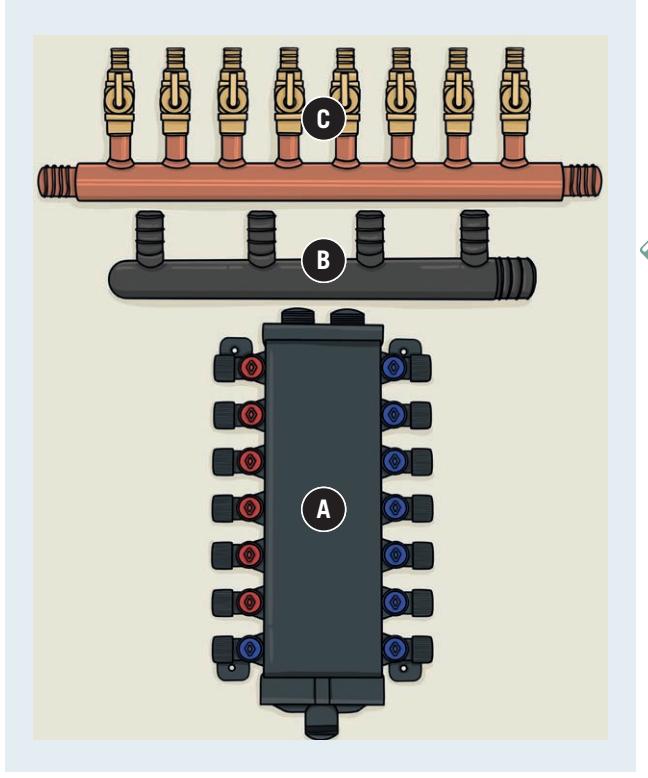
Different PEX manifolds serve different purposes. The home run manifold (A) is meant to serve all or most of a home; simple plastic remote “branch” manifolds (B) can work in with a home run manifold or alone, and are best to serve fixtures with their own shutoff valves; brass or copper branch manifolds (C) often come with integral shutoff valves.
Tools + Materials
- Level
- Carpenter’s pencil
- Drill + bits
- Screwdriver
- PEX manifold
- Mounting straps or brackets
- PEX pipe
- PEX crimps or clamps
- PEX crimping or clamping tools
- Plastic pipe straps

How to Install a PEX Branch Manifold
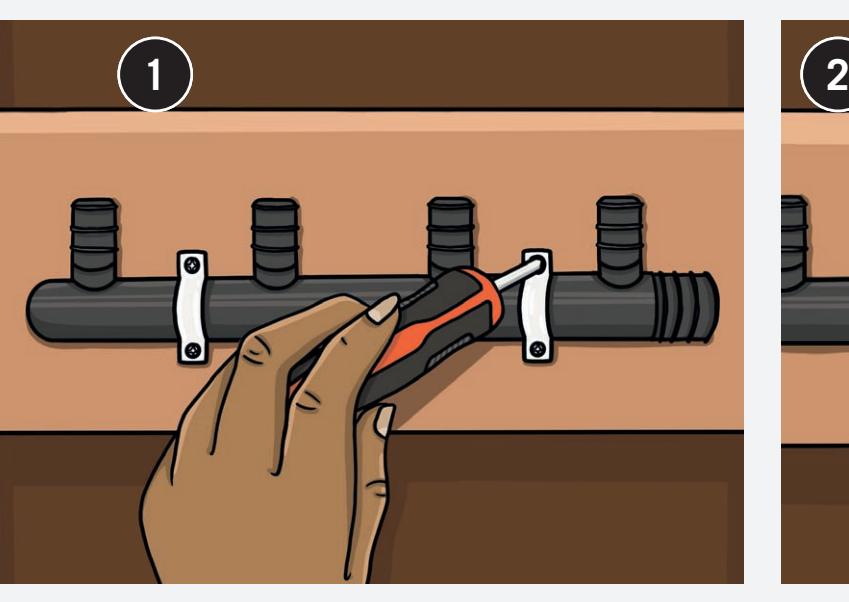
Check for level and mark the location of the manifold. Securely fasten the manifold to a wall, brace between studs, or along a joist (depending on location). Fasten the manifold with pipe straps, manifold brackets, or the manufacturer’s supplied brackets.
Note: Some manufacturers recommend attaching the PEX pipe to the manifold prior to securing the manifold in place, but this is normally a less convenient method of installation.
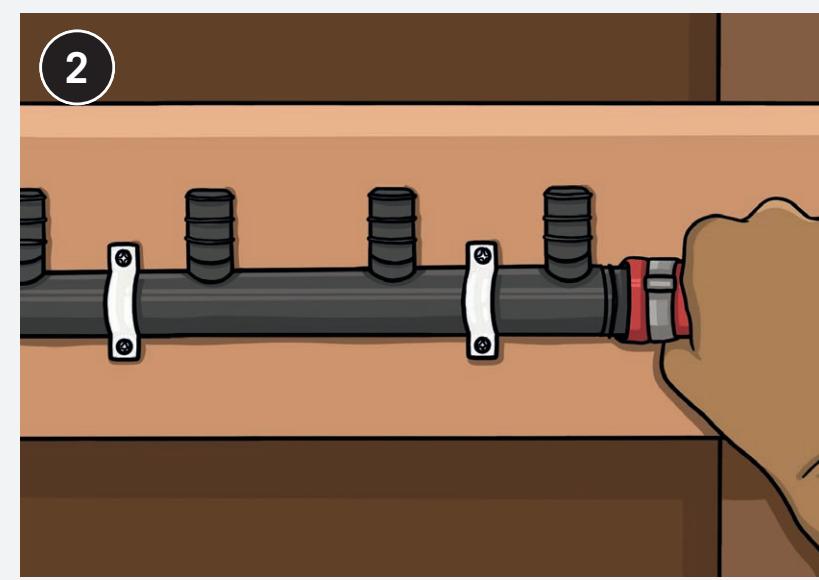
Connect the ¾” water supply to the manifold’s open-end inlet. In this case, the manifold is connected to a PEX line from the main home run manifold.
Note: If this were a home-run manifold manifold, the connections would usually be made between the manifold and copper water supply line.
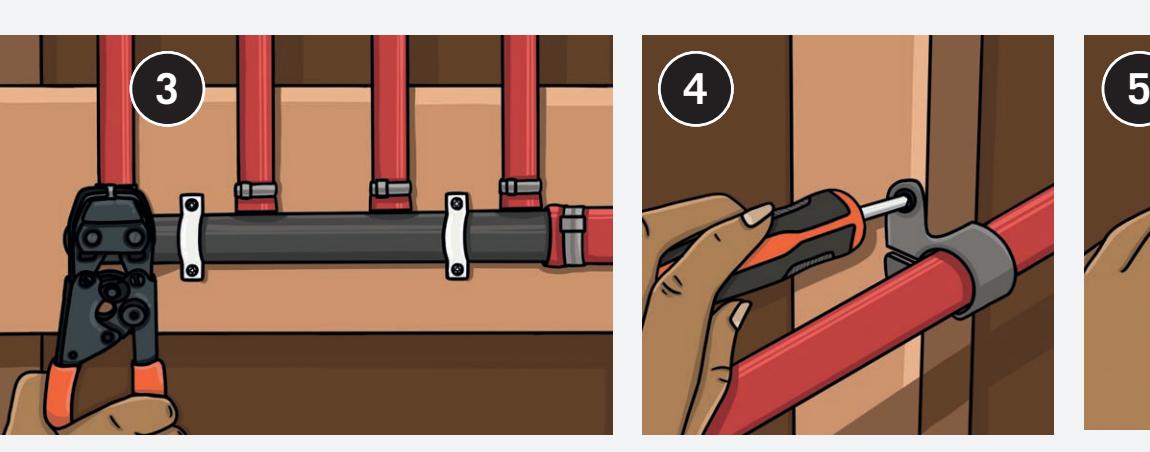
Connect the ½” individual fixture PEX supply lines to the manifold. Secure each one with a crimp ring.
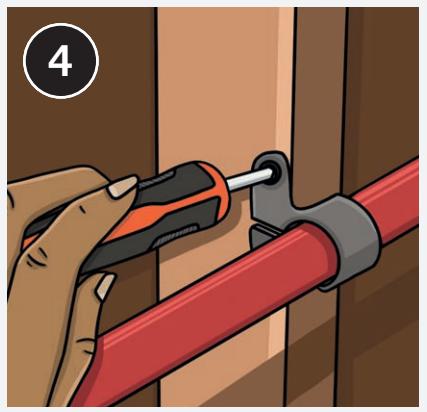
Route each line to its fixture, securing it with plastic pipe straps along the way. Plastic hangers are normally better than metal ones because they are more forgiving of PEX expansion and contraction.
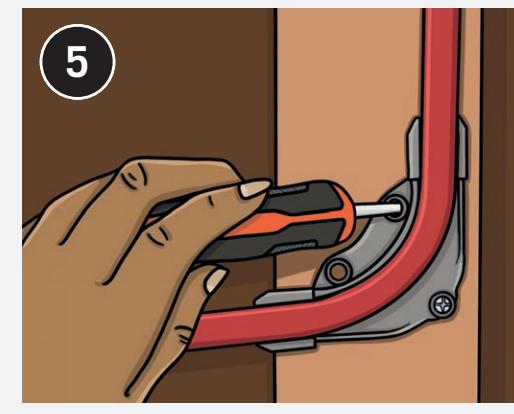
Avoid kinks in the PEX along the route to the fixture hookup. Install a 90° support channel for severe changes in direction. For long runs of more than 30 feet, loop the PEX at least once between clamps or straps to allow for some movement.